webpack- why and how
首先不要被webpack做的复杂花哨的工作所迷惑,到底webpack是个啥?一句话,webpack是一个module bundler(模块打包器)。多一句话,webpack通过将多个js文件或者其他assets整合进一个大的bundle.js文件中,允许我们在浏览器中使用javascript module功能。而所有类似翻译es6/es7为es5,或者使用css module功能仅仅为webpack提供的一些额外功能。但是我们永远不要忘记其核心功能:一个允许在浏览器中使用js模块的打包器
由于webpack有着非常强大的plugin/loader生态系统,这往往使得初学者眼花缭乱,从而对webpack是什么这个核心问题有些糊涂,因为webpack貌似无所不能,能做太多太多。虽然透过plugin机制我们获得了很多重要的功能本身是很棒的,但是我们还是应该聚焦一下:为什么webpack会存在:module bunlding.
webpack是一个命令行工具,用于生成由code和其他file组成的bunldle。webpack本身并不运行于server或者说browser,webpack命令行工具只运行于web app的构建过程。webpack从一个entry.js文件开始,将其依赖的所有js或者其他assets(通过loader)打包成一个巨大的文件。
随后这个大文件将被从server传递到客户端浏览器运行。注意:browser和server并不会关心该文件是否由webpack所生成,browser/server将该bundle文件当作其他文件一样来看待和处理。
webpack-dev-server vs webpack cli
webpack-dev-server是一个和webpack-cli不同的工具,它是一个基于node/express的dev server.当该server运行时,我们实际上从该server的一个端口下load app(bundle)并在浏览器中运行。当然该server还能提供其他一些非常棒的功能,比如Hot module reloading.
Why
传统server rendered app
传统的web app实际上是server端渲染的页面,这意味着浏览器仅仅是一个html浏览器,所有的逻辑都存在于server端。server端将一个静态的html页面传回客户端浏览器,浏览器只负责渲染静态的html/css.这也是为什么当你导航在server rendered app的不同页面时浏览器总会刷新的原因。
Spa: single page app
自从js ajax兴起后,单页应用就开始慢慢崛起,因为它的无刷新特性给与了很棒的用户体验。
Dynamic Spas mean more code in the browser
当我们说dynamic时我们是指有越来越多的以javascript形式存在的logic运行于浏览器中。而我们server side render apps仅会吐出一些并非dynamic的static page,这时所谓的dynamic仅发生在server端用于产生这个static page,而一旦该page产生并且传递到browser了,就基本上是静态的了(因为并没有很多的javascript代码)
How
如何管理越来越多的浏览器端逻辑是一个重要挑战,而webpack就是为了应对这种web开发越来越多逻辑从服务端向客户端转移的现状的。。。
那么,我们要问,为什么spa单页应用就会称为问题呢?
一个很重要的原因是:我们需要将复杂的js代码劈成更小的文件以便app更好的工作。
我们可以将所有逻辑写成一个js文件,然而,可以想象这将称为开发者的噩梦。没有人能知道应用是如何工作的,想开发新的功能难于上青天。这时,我们就需要将复杂的逻辑分到不同的chunk中,也就是根据功能划分将逻辑划分到多个js文件中去。这就是一个“模块化”的开发模式。
你可能又会想,那我们就把一个大的文件打散成多个js文件呗。。但问题是浏览器并不知道这些文件之间的依赖关系,因此我们需要一个模块管理工具,以便在浏览器端支持模块化。这就是webpack/browserfy带来的价值。
在server端node环境中,支持内置的module resolver,我们可以require一个module来使用它,然而浏览器并不具备这个require一个module的能力,也就是说browser是不懂require,import的!
https://adamisntdead.com/lets-write-a-module-bundler/
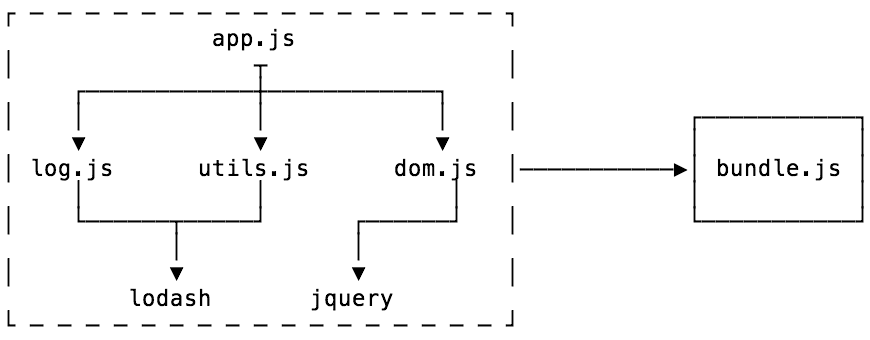
咱们直接上一个网上找的最简单的bundler代码,了解下具体工作原理
//  Hello! Welcome, welcome, it's great to have you here!
//  Today we're going to be building a really simple Javascript module
//  bundler!
//
//  Before we start, I want to give a few acknowledgements, for which this
//  source is heavily based on.
//
//  * Unbundling the JavaScript module bundler - Luciano Mammino
//    http://loige.link/bundle-dublinjs
//
//  * Minipack - Ronen Amiel
//    https://github.com/ronami/minipack
//
//  Okay, lets get started!
//


//  Let's start with what a module bundler actually is.
//
//  You may have used tools such as browserify, webpack, rollup or one of
//  many others, but a module bundler is a tool that takes pieces of
//  javascript and takes them and their dependencies and makes it into a
//  single file, usually for use in the browser.
//
//  It usually starts with an entry file, and from their bundles up all of
//  the code needed for that entry file.
//
//    + - - - - - - - - - - - - - - - - - +
//                   app.js
//    |                 +                 |
//         +------------+------------+
//    |    |            |            |    |            +-----------+
//         v            v            v                 |           |
//    | log.js      utils.js      dom.js  |----------->| bundle.js |
//         |            |             |                |           |
//    |    +------+-----+      +------+   |            +-----------+
//                |            |
//    |           v            v          |
//             lodash       jquery
//    + - - - - - - - - - - - - - - - - - +
//
//   There are 2 main stages of a bundler:
//
//   1. Dependency resolution
//   2. Packing
//
//   Starting from an entry point (above it's `main.js`), the goal of
//   dependency resolution is to look for all of the dependencies of your
//   code - that is, other pieces of code that it needs to function - and
//   construct a graph (called a dependency graph) like the above.
//
//   Once this is done, you can then pack, or convert your dependency graph
//   into a single file that you can use.


//   Let's start out our code with some imports (I will give the reasoning
//   later)

const detective = require('detective')
const resolve = require('resolve').sync
const fs = require('fs')
const path = require('path')

//   The first thing we have to do is think up how we want to represent a
//   module during the dependency resolution phase.
//   We are going to need four things:
//
//   * The name and an identifier of the file
//   * Where the file came from (in the file system)
//   * The code in the file
//   * What dependencies that file needs.
//
//   The graph structure gets built up through the recursive 'what
//   dependencies' question.
//
//   In Javascript, the easiest way to represent such a set of data would
//   be an object, so thats what's gonna happen.

let ID = 0
function createModuleObject(filepath) {
  const source = fs.readFileSync(filepath, 'utf-8')
  const requires = detective(source)
  const id = ID++

  return { id, filepath, source, requires }
}

//
//   Looking at this `createDependencyObject` function, the notable part
//   is the call to a function called `detective`.
//
//   Detective is a library that can "Find all calls to require() no
//   matter how deeply nested", and using it means we can avoid doing our
//   own AST traversal!
//
//   One thing to note (and this is the same in almost all module
//   bundlers), if you try to do something weird like
//
//   ```
//   const libName = 'lodash'
//   const lib = require(libName)
//   ```
//
//   It will not be able to find it (because that would mean executing the
//   code).


//   So what does running this function on the path of a module give?
//
//
//                                             {
//   ╭-----------------------------------╮       id: 0,
//   | ◎ ○ ○         app.js              |       filepath: '/Users/john/app.js',
//   +-----------------------------------+       requires: [ './log', './utils' ],
//   | const log = require('./logging')  |       source: `
//   | const util = require('./utils')   |         const log = require('./logging')
//   |                                   +---->    const util = require('./utils')
//   | log('hello world!')               |
//   |                                   |         log('hello world!')
//   |                                   |       `
//   +-----------------------------------+     }
//


//   Whats next?
//   Dependency resolution!!1!11!!!1!
//
//   Okay, not quite yet - I first want to talk about a thing called a
//   module map.
//
//   When you import modules in node, you can do relative imports, like
//   `require('./utils')`. So when your code calls this, how does the
//   bundler know what is the right './utils' file when everything is
//   packaged?
//
//   That is the problem the module map solves.
//
//   Our module object has a unique `id` key which will be our 'source of
//   truth'. So when we are doing our dependency resolution, for each
//   module, we will keep a list of the names of what is being required
//   along with their id, so we can get the correct module at runtime.
//
//   This also means we can store all of the modules in a non-nested
//   object, using the id as a key!
//
//
//
//            +-------------+                      +-----------+
//            | Modules Map |                      |  Modules  |
//       +----+-----------+-+---+            +-----+-----------+----+
//    +--+--->./utils     |  2 <+--+         |  2  |    { ... }     |
//    |  +----------------+-----+  |         +-----+----------------+
//    |  |    ./logger    |  3  |  |         |  3  |    { ... }     |
//    |  +----------------+-----+  |         +-----+----------------+
//    |  |     moment     |  4  |  |         |  3  |    { ... }     |
//    |  +----------------+-----+  |         +-----+----------------+
//    |  |      ...       | ... |  |         | ... |      ...       |
//    |  +----------------+-----+  |         +-----+----------------+
//    |                            |
//    |                            |
//  argument to                  module
//    require                  object's id

function getModules(entry) {
  const rootModule = createModuleObject(entry)
  const modules = [rootModule]

  // Iterate over the modules, even when new
  // ones are being added
  for (const module of modules) {
    module.map = {} // Where we will keep the module maps

    module.requires.forEach(dependency => {
      const basedir = path.dirname(module.filepath)
      const dependencyPath = resolve(dependency, { basedir })

      const dependencyObject = createModuleObject(dependencyPath)

      module.map[dependency] = dependencyObject.id
      modules.push(dependencyObject)
    })
  }

  return modules
}

//   Okay, so there is a fair amount going on in the `getModules`
//   function.
//   It's main purpose is to start at the root/entry module, and look for
//   and resolve dependencies recursively.
//
//   What do I mean by 'resolve dependencies'?
//   In node there is a thing called the `require.resolve`, and it's how
//   node figures out where the file that you are requiring is. This is
//   because we can import relatively or from a `node_modules` folder.
//
//   Lucky for us, there's an npm module named `resolve` which implements
//   this algorithm for us! We just have to pass in the argument that
//   would be for require and the base url, and it will do all the hard
//   work for us :)
//
//   So we are doing this resolution for each dependency of each module in
//   the project.
//
//   We are also creating that modules map `map` that I mentioned earlier.
//
//   At the end of the function, we are left with an array named `modules`
//   which will contain module objects for every module/dependency in our
//   project!
//
//   Now that we have that, we can move on to the final step, packing!


//   In the browser there is no such thing as modules (kind of), but that
//   means there is no require function, and no `module.exports`, so even
//   though we have all of our dependencies, we currently have no way to
//   use them as modules.
//
//   Enter the factory function.
//   A factory function is a function (that's not a constructor) which
//   returns an object.
//   It is a pattern from object oriented programming, and one of its uses
//   is to do encapsulation and dependency injection.
//
//   Sound good?
//
//   Using a factory function, we can both inject our own `require`
//   function and `module.exports` object that can be used in our bundled
//   code and give the module it's own scope.
//
//                  +-------------------------------+
//                  |       Factory Function        |
//                  +-------------------------------+
//                  |                               |
//                  |    (require, module) => {     |
//                  |        /* Module source */    |
//                  |    }                          |
//                  +-------------------------------+
//
//   I am now going to show you the `pack` function, and I will explain
//   the rest after.

function pack(modules) {
  const modulesSource = modules.map(module =>
    `${module.id}: {
      factory: (module, require) => {
        ${module.source}
      },
      map: ${JSON.stringify(module.map)}
    }`
  ).join()

  return `(modules => {
    const require = id => {
      const { factory, map } = modules[id]
      const localRequire = name => require(map[name])
      const module = { exports: {} }

      factory(module, localRequire)

      return module.exports
    }

    require(0)
  })({ ${modulesSource} })`
}

//   Most of that is just template literals of javascript, so let's
//   discuss what it's doing.
//
//   First up is `modulesSource`. Here, we are going through each of the
//   modules and transforming it into a string of source.
//   So what is the output like for a module object?
//
//  {
//    id: 0,                                  0: {
//    filepath: '/Users/john/app.js',           factory: (module, require) => {
//    requires: [ './log', './utils' ],           const log = require('./logging')
//    map: { './log': 1, './utils': 2 }           const util = require('./utils')
//    source: `                          ---->
//      const log = require('./logging')          log('hello world!')
//      const util = require('./utils')         },
//                                              map: { './log': 1, './utils': 2 }
//      log('hello world!')                   }
//    `
//  }
//
//   Now it's a little hard to read, but you can see that the source is
//   encapsulated and we are providing `modules` and `require` using the
//   factory function as I mentioned before.
//
//   We are also including the modules map that we constructed during the
//   dependency resolution.
//
//   Next in the function we join all of these up to create a big object
//   of all the dependencies.


//   The next string of code is an IIFE, which means when you run that
//   code in the browser (or anywhere else), the function will be ran
//   immediately. IIFE is another pattern for encapsulating scope, and is
//   used here to so we don't polute the global scope with our `require`
//   and `modules.


//   You can see that we are defining two require functions, `require` and
//   `localRequire`.
//
//   Require accepts the id of a module object, but of course the source
//   code isn't written using ids, we are using the other function
//   `localRequire` to take any arguments to require by the modules and
//   convert them to the correct id.
//   This is using those module maps!
//
//   After this, we are defining a `module object` that the module can
//   populate, and passing both functions into the factory, after which we
//   return `module.exports`.
//
//   Lastly, we call `require(0)` to require the module with an id of 0,
//   being our entry file.
//
//   And thats it!
//   That is our module bundler 100% complete!

module.exports = entry => pack(getModules(entry))

//   So we now have a working module bundler.
//
//   Now this probably shouldn't be used in production, because it's
//   missing loads of features (like managing circular dependency, making
//   sure each file gets only parsed once, es-modules etc...) but has
//   hopefully given you a good idea on how module bundlers actually work.
//
//   In fact, this one works in about 60 lines if you remove all of the
//   source code!
//
//   Thanks for reading and I hope you have enjoyed a look into the
//   workings of our simple module bundler!
webpack bundle.js代码解读
http://www.cnblogs.com/venoral/p/6102976.html
https://stackoverflow.com/questions/40562031/webpack-how-does-webpack-work