AOP增强实现-Spring 源码系列(5)
目录:
Ioc容器beanDefinition-Spring 源码(1)
Ioc容器BeanPostProcessor-Spring 源码(3)
AOP的核心就是个动态代理,Spring进行了大量抽象和封装形成一个方便上层使用的基础模块。
而动态代理的两种实现都在上一篇中提供了代码
直接ProxyFactoryBean入手来看Spring是如何产生这个代理对象的:
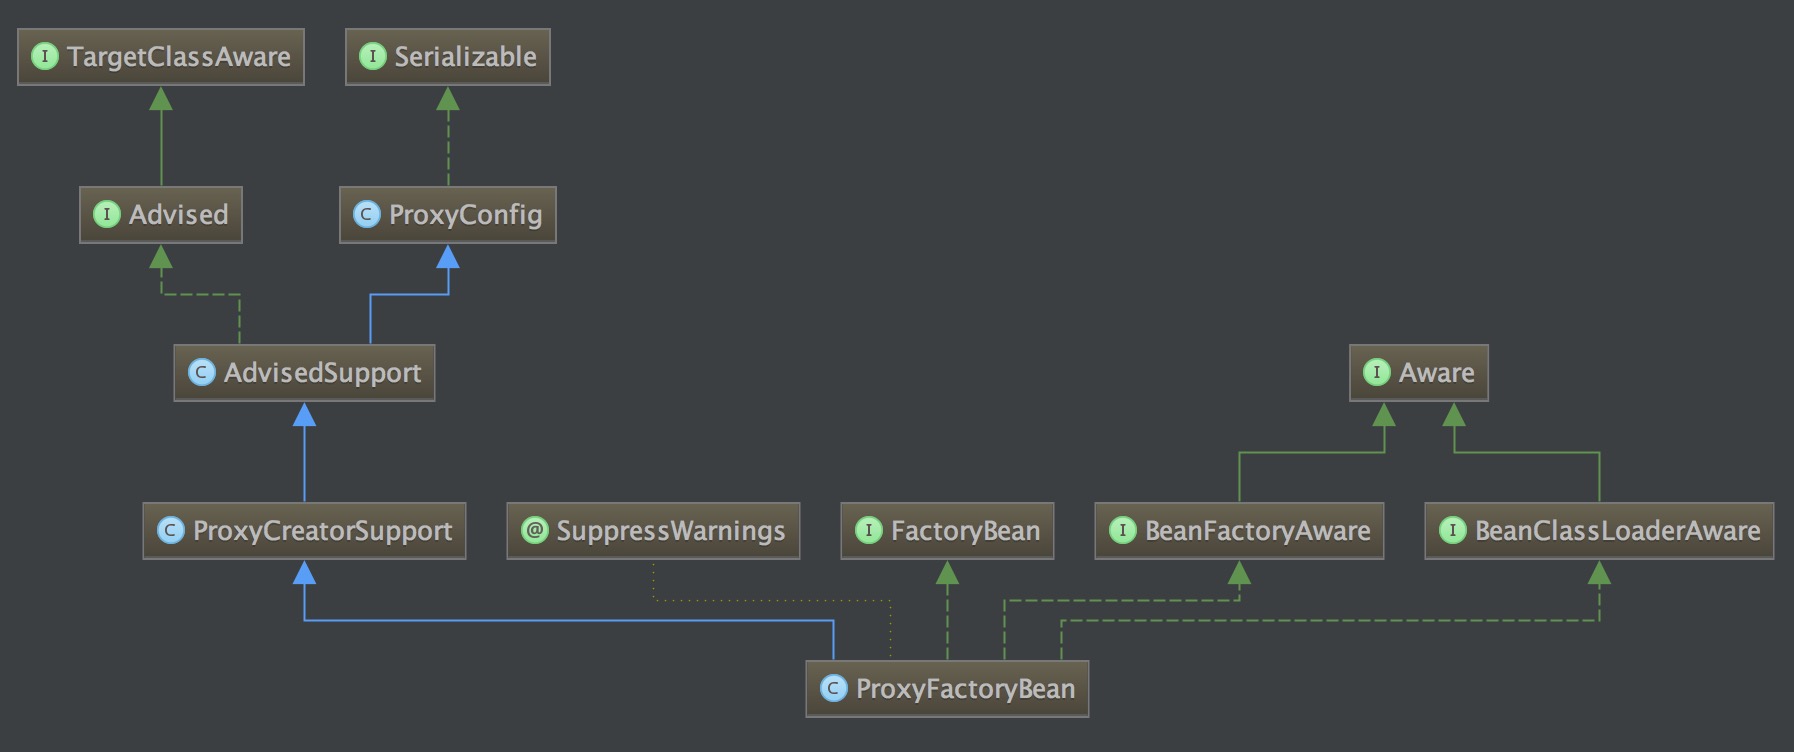
ProxyFactoryBean中getObject 作为入口:
    //获得代理
    //需要对target的增强都在这个入口里处理完成
    public Object getObject() throws BeansException {
      // 初始化通知链
        initializeAdvisorChain();
        // 默认单例
        if (isSingleton()) {
            return getSingletonInstance();
        }
        else {
            if (this.targetName == null) {
                logger.warn("Using non-singleton proxies with singleton targets is often undesirable. " +
                        "Enable prototype proxies by setting the 'targetName' property.");
            }
            return newPrototypeInstance();
        }
    }
singletonInstance缓存单例:
private synchronized Object getSingletonInstance() {
    //
        if (this.singletonInstance == null) {
            this.targetSource = freshTargetSource();
            if (this.autodetectInterfaces && getProxiedInterfaces().length == 0 && !isProxyTargetClass()) {
                // Rely on AOP infrastructure to tell us what interfaces to proxy.
                Class<?> targetClass = getTargetClass();
                if (targetClass == null) {
                    throw new FactoryBeanNotInitializedException("Cannot determine target class for proxy");
                }
                // 存住target继承的全部接口 ClassUtils api getAllInterfacesForClass
                setInterfaces(ClassUtils.getAllInterfacesForClass(targetClass, this.proxyClassLoader));
            }
            // Initialize the shared singleton instance.
            super.setFrozen(this.freezeProxy);
            // 这里createAopProxy产生一个AopProxy,在spring中的两个AopProxy实现你已经猜到了吧
            this.singletonInstance = getProxy(createAopProxy());
        }
        return this.singletonInstance;
    }
    // AopProxyFactory里去做了一个区分是用jdk的还是cglib
    protected final synchronized AopProxy createAopProxy() {
        if (!this.active) {
            activate();
        }
        // 默认DefaultAopProxyFactory
        return getAopProxyFactory().createAopProxy(this);
    }
DefaultAopProxyFactory实现,这个方法参数需要AdvisedSupport,在上面的调用代码上传的是this,因为它也继承了AdvisedSupport:
public AopProxy createAopProxy(AdvisedSupport config) throws AopConfigException {
        if (config.isOptimize() || config.isProxyTargetClass() || hasNoUserSuppliedProxyInterfaces(config)) {
            Class<?> targetClass = config.getTargetClass();
            if (targetClass == null) {
                throw new AopConfigException("TargetSource cannot determine target class: " +
                        "Either an interface or a target is required for proxy creation.");
            }
            // 有接口就用jdk方式
            if (targetClass.isInterface() || Proxy.isProxyClass(targetClass)) {
                return new JdkDynamicAopProxy(config);
            }
            return new ObjenesisCglibAopProxy(config);
        }
        else {
            return new JdkDynamicAopProxy(config);
        }
    }
再回去看getProxy方法:
public Object getProxy() {
// 调用JdkDynamicAopProxy 或 ObjenesisCglibAopProxy的getProxy方法
return createAopProxy().getProxy();
}
这里就只看一下JdkDynamicAopProxy实现,两者最终目的相同:
public Object getProxy(ClassLoader classLoader) {
   if (logger.isDebugEnabled()) {
      logger.debug("Creating JDK dynamic proxy: target source is " + this.advised.getTargetSource());
   }
   Class<?>[] proxiedInterfaces = AopProxyUtils.completeProxiedInterfaces(this.advised);
   // 筛选Equals方法和HashCode方法
   findDefinedEqualsAndHashCodeMethods(proxiedInterfaces);
   // 这个代码就熟悉了 调用newProxyInstance方法,最后传入的InvocationHandler是this,那么JdkDynamicAopProxy继承InvocationHandler,实现了invoke方法,增强都在这个方法里做文章
   return Proxy.newProxyInstance(classLoader, proxiedInterfaces, this);
}
invoke方法:
public Object invoke(Object proxy, Method method, Object[] args) throws Throwable {
   MethodInvocation invocation;
   Object oldProxy = null;
   boolean setProxyContext = false;

   TargetSource targetSource = this.advised.targetSource;
   Class<?> targetClass = null;
   Object target = null;

   try {
      if (!this.equalsDefined && AopUtils.isEqualsMethod(method)) {
         // The target does not implement the equals(Object) method itself.
         return equals(args[0]);
      }
      if (!this.hashCodeDefined && AopUtils.isHashCodeMethod(method)) {
         // The target does not implement the hashCode() method itself.
         return hashCode();
      }
      if (!this.advised.opaque && method.getDeclaringClass().isInterface() &&
            method.getDeclaringClass().isAssignableFrom(Advised.class)) {
         // Service invocations on ProxyConfig with the proxy config...
         return AopUtils.invokeJoinpointUsingReflection(this.advised, method, args);
      }

      Object retVal;

      if (this.advised.exposeProxy) {
         // Make invocation available if necessary.
         oldProxy = AopContext.setCurrentProxy(proxy);
         setProxyContext = true;
      }

      // May be null. Get as late as possible to minimize the time we "own" the target,
      // in case it comes from a pool.
      target = targetSource.getTarget();
      if (target != null) {
         targetClass = target.getClass();
      }

      // Get the interception chain for this method.
      // 拦截器链
      List<Object> chain = this.advised.getInterceptorsAndDynamicInterceptionAdvice(method, targetClass);

      // Check whether we have any advice. If we don't, we can fallback on direct
      // reflective invocation of the target, and avoid creating a MethodInvocation.
      if (chain.isEmpty()) {
         // We can skip creating a MethodInvocation: just invoke the target directly
         // Note that the final invoker must be an InvokerInterceptor so we know it does
         // nothing but a reflective operation on the target, and no hot swapping or fancy proxying.
         Object[] argsToUse = AopProxyUtils.adaptArgumentsIfNecessary(method, args);
         // 使用AopUtils直接使用反射机制调用目标方法
         retVal = AopUtils.invokeJoinpointUsingReflection(target, method, argsToUse);
      }
      else {
         // We need to create a method invocation...
         invocation = new ReflectiveMethodInvocation(proxy, target, method, args, targetClass, chain);
         // Proceed to the joinpoint through the interceptor chain.
         // 执行拦截器链
         retVal = invocation.proceed();
      }

      // Massage return value if necessary.
      Class<?> returnType = method.getReturnType();
      if (retVal != null && retVal == target && returnType.isInstance(proxy) &&
            !RawTargetAccess.class.isAssignableFrom(method.getDeclaringClass())) {
         // Special case: it returned "this" and the return type of the method
         // is type-compatible. Note that we can't help if the target sets
         // a reference to itself in another returned object.
         retVal = proxy;
      }
      else if (retVal == null && returnType != Void.TYPE && returnType.isPrimitive()) {
         throw new AopInvocationException(
               "Null return value from advice does not match primitive return type for: " + method);
      }
      return retVal;
   }
   finally {
      if (target != null && !targetSource.isStatic()) {
         // Must have come from TargetSource.
         targetSource.releaseTarget(target);
      }
      if (setProxyContext) {
         // Restore old proxy.
         AopContext.setCurrentProxy(oldProxy);
      }
   }
}
以上已经调用到增强部分的拦截器链,这些拦截器被调用由ReflectiveMethodInvocation来完成:
public Object proceed() throws Throwable {
        //    We start with an index of -1 and increment early.
        // 拦截器都被执行完成,跳出递归
        if (this.currentInterceptorIndex == this.interceptorsAndDynamicMethodMatchers.size() - 1) {
            return invokeJoinpoint();
        }

        Object interceptorOrInterceptionAdvice =
                this.interceptorsAndDynamicMethodMatchers.get(++this.currentInterceptorIndex);
        // 分两种拦截器:InterceptorAndDynamicMethodMatcher 和 MethodInterceptor
        if (interceptorOrInterceptionAdvice instanceof InterceptorAndDynamicMethodMatcher) {
            // Evaluate dynamic method matcher here: static part will already have
            // been evaluated and found to match.
            // 匹配一遍拦截器
            InterceptorAndDynamicMethodMatcher dm =
                    (InterceptorAndDynamicMethodMatcher) interceptorOrInterceptionAdvice;
            if (dm.methodMatcher.matches(this.method, this.targetClass, this.arguments)) {
              // 执行拦截器的invoke方法
                return dm.interceptor.invoke(this);
            }
            else {
                // Dynamic matching failed.
                // Skip this interceptor and invoke the next in the chain.
                // 递归调用
                return proceed();
            }
        }
        else {
            // It's an interceptor, so we just invoke it: The pointcut will have
            // been evaluated statically before this object was constructed.
            return ((MethodInterceptor) interceptorOrInterceptionAdvice).invoke(this);
        }
    }
其中调用目标方法的方式采用反射方式具体调用代码值得阅读,实际场景中可以借鉴:
protected Object invokeJoinpoint() throws Throwable {
   return AopUtils.invokeJoinpointUsingReflection(this.target, this.method, this.arguments);
}
public static Object invokeJoinpointUsingReflection(Object target, Method method, Object[] args)
      throws Throwable {

   // Use reflection to invoke the method.
   try {
      ReflectionUtils.makeAccessible(method);
      return method.invoke(target, args);
   }
   catch (InvocationTargetException ex) {
      // Invoked method threw a checked exception.
      // We must rethrow it. The client won't see the interceptor.
      throw ex.getTargetException();
   }
   catch (IllegalArgumentException ex) {
      throw new AopInvocationException("AOP configuration seems to be invalid: tried calling method [" +
            method + "] on target [" + target + "]", ex);
   }
   catch (IllegalAccessException ex) {
      throw new AopInvocationException("Could not access method [" + method + "]", ex);
   }
}
到这里,基本流通了一个代理类如何产生,实际增强执行,和目标方法最终被调用的流程,增强如何轻松配置的呢?
Object interceptorOrInterceptionAdvice =
                this.interceptorsAndDynamicMethodMatchers.get(++this.currentInterceptorIndex);
拦截器是叫interceptorsAndDynamicMethodMatchers的list在前面invoke方法中取得:
List<Object> chain = this.advised.getInterceptorsAndDynamicInterceptionAdvice(method, targetClass);
调用基类AdvisedSupport方法:
public List<Object> getInterceptorsAndDynamicInterceptionAdvice(Method method, Class<?> targetClass) {
  // 这里对缓存的key做了封装
   MethodCacheKey cacheKey = new MethodCacheKey(method);
   List<Object> cached = this.methodCache.get(cacheKey);
   if (cached == null) {
      cached = this.advisorChainFactory.getInterceptorsAndDynamicInterceptionAdvice(
            this, method, targetClass);
      this.methodCache.put(cacheKey, cached);
   }
   return cached;
}
advisorChainFactory 通知器链工厂
public List<Object> getInterceptorsAndDynamicInterceptionAdvice(
      Advised config, Method method, Class<?> targetClass) {

   // This is somewhat tricky... We have to process introductions first,
   // but we need to preserve order in the ultimate list.
   List<Object> interceptorList = new ArrayList<Object>(config.getAdvisors().length);
   Class<?> actualClass = (targetClass != null ? targetClass : method.getDeclaringClass());
   boolean hasIntroductions = hasMatchingIntroductions(config, actualClass);
   AdvisorAdapterRegistry registry = GlobalAdvisorAdapterRegistry.getInstance();
   // config.getAdvisors来自ioc容器的组装,也就是通过xml配置,注解等元数据来描述的通知器
   for (Advisor advisor : config.getAdvisors()) {
      if (advisor instanceof PointcutAdvisor) {
         // Add it conditionally.
         PointcutAdvisor pointcutAdvisor = (PointcutAdvisor) advisor;
         if (config.isPreFiltered() || pointcutAdvisor.getPointcut().getClassFilter().matches(actualClass)) {
           // 通知器转变成拦截器,拦截器才是执行链路上可以直接用于增强的
            MethodInterceptor[] interceptors = registry.getInterceptors(advisor);
            MethodMatcher mm = pointcutAdvisor.getPointcut().getMethodMatcher();
            // 匹配规则在Pointcut里
            if (MethodMatchers.matches(mm, method, actualClass, hasIntroductions)) {
               if (mm.isRuntime()) {
                  // Creating a new object instance in the getInterceptors() method
                  // isn't a problem as we normally cache created chains.
                  for (MethodInterceptor interceptor : interceptors) {
                     interceptorList.add(new InterceptorAndDynamicMethodMatcher(interceptor, mm));
                  }
               }
               else {
                  interceptorList.addAll(Arrays.asList(interceptors));
               }
            }
         }
      }
      else if (advisor instanceof IntroductionAdvisor) {
         IntroductionAdvisor ia = (IntroductionAdvisor) advisor;
         if (config.isPreFiltered() || ia.getClassFilter().matches(actualClass)) {
            Interceptor[] interceptors = registry.getInterceptors(advisor);
            interceptorList.addAll(Arrays.asList(interceptors));
         }
      }
      else {
         Interceptor[] interceptors = registry.getInterceptors(advisor);
         interceptorList.addAll(Arrays.asList(interceptors));
      }
   }

   return interceptorList;
}
将advisor转化成拦截器在DefaultAdvisorAdapterRegistry中完成:
public MethodInterceptor[] getInterceptors(Advisor advisor) throws UnknownAdviceTypeException {
   List<MethodInterceptor> interceptors = new ArrayList<MethodInterceptor>(3);
   Advice advice = advisor.getAdvice();
   if (advice instanceof MethodInterceptor) {
      interceptors.add((MethodInterceptor) advice);
   }
   // 遍历全部适配器,调用supportsAdvice方法
   for (AdvisorAdapter adapter : this.adapters) {
      if (adapter.supportsAdvice(advice)) {
         interceptors.add(adapter.getInterceptor(advisor));
      }
   }
   if (interceptors.isEmpty()) {
      throw new UnknownAdviceTypeException(advisor.getAdvice());
   }
   return interceptors.toArray(new MethodInterceptor[interceptors.size()]);
}
这里使用了适配器模式,也是spring中经常拿来做例子的代码,因为非常清晰。
MethodBeforeAdviceAdapter
AfterReturningAdviceAdapter
ThrowsAdviceAdapter
对应这三个Advice
MethodBeforeAdvice
AfterReturningAdvice
ThrowsAdvice
转变的三个拦截器:
MethodBeforeAdviceInterceptor
AfterReturningAdviceInterceptor
ThrowsAdviceInterceptor
而在前面的流程中调用到拦截器的入口在ReflectiveMethodInvocation的interceptor.invoke(this)方法,这三个拦截器的invoke方法如下:
public Object invoke(MethodInvocation mi) throws Throwable {
   this.advice.before(mi.getMethod(), mi.getArguments(), mi.getThis() );
   return mi.proceed();
}
public AfterReturningAdviceInterceptor(AfterReturningAdvice advice) {
   Assert.notNull(advice, "Advice must not be null");
   this.advice = advice;
}
public Object invoke(MethodInvocation mi) throws Throwable {
   try {
      return mi.proceed();
   }
   catch (Throwable ex) {
      Method handlerMethod = getExceptionHandler(ex);
      if (handlerMethod != null) {
         invokeHandlerMethod(mi, ex, handlerMethod);
      }
      throw ex;
   }
}
注意mi.proceed();的执行位置,这里继续递归了ReflectiveMethodInvocation的interceptor.invoke(this)方法
那么这个代码最终就可以实现一个执行链:
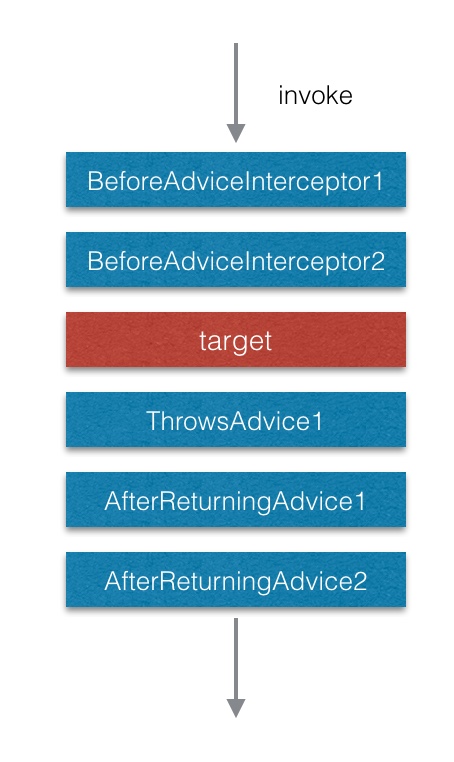
这样就明白了如何在目标方法执行后再执行配置的增强业务代码,我个人觉得这个递归的实现是整个串联执行链路的核心了,不得不说递归的写法非常简洁而高效。