即将推出的kbmMW更新不仅是一些bug修正,同时将包含一个新的主要功能:客户端存根生成器框架。
那什么是客户端存根生成器框架呢?
他是一个基于kbmMW smart services,可以生成由各种类型的客户端直接使用的代码,以访问基于kbmMW应用服务器的HTTP smart services。(什么是HTTP Smart Service呢?可参考洞主写的文章:kbmmw 的HTTP Smart Service入门)
当前,kbmMW已经实现智能客户端(smart client)功能,通过这个功能,非常容易实现客户端来访问smart services中的功能。由于智能客户端依赖于后期绑定,所以开发者无法通过IDE及编译器的帮助,来获得有关参数及其类型。因此,编译器还需要生成一些代码,为IDE及编译器,来解释服务端发布的函数及方法。
上面这个问题,正是客户端存根生成器要解决的问题,但是,本文不会讨论如何为智能服务生成Delphi客户端存根,因为尽管已经做了这方面的准备工作,但这个特定功能可能不会在即将发布的版本中完整实现。相反,我将介绍利用存根生成器框架来实现另一个更复杂的代码集,满足REST世界中的典型需求。一年多前,当我咨询大公司做Java代码时,认识到了这一点。
在Java世界中,使用当时被称为Swagger的东西来记录REST接口,这是一个事实上的标准。后来它被重命名为OpenAPI,现在得到了绝大多数支持REST的开发者的认可和支持。
OpenAPI提供了REST接口的描述,可以用于文档,也可以用于为各种开发环境自动生成(存根)代码,使这些环境可以轻松利用通过REST接口发布的功能。(Swagger 是一个规范和完整的框架,用于生成、描述、调用和可视化 RESTful 风格的 Web 服务。总体目标是使客户端和文件系统作为服务器以同样的速度来更新。文件的方法,参数和模型紧密集成到服务器端的代码,允许API来始终保持同步。)
您可以在此处阅读有关OpenAPI的更多信息:
https://blog.csdn.net/sanyaoxu_2/article/details/80555328
OpenAPI不仅成为事实上的标准,还生成了可用于生成,编辑,查看和测试REST接口描述的各种工具(通常称为Swagger文件)。
其中一个工具是Swagger-UI(用户界面),它由Javascript和HTML组成,可以由Web服务器提供,为服务器中公开的REST接口提供简单易用的用户界面。
kbmMW现在完全支持所有这些。
让我们简单地开始使用Swagger-UI展示kbmMW SimpleInvocation演示服务器的REST接口是什么样的:
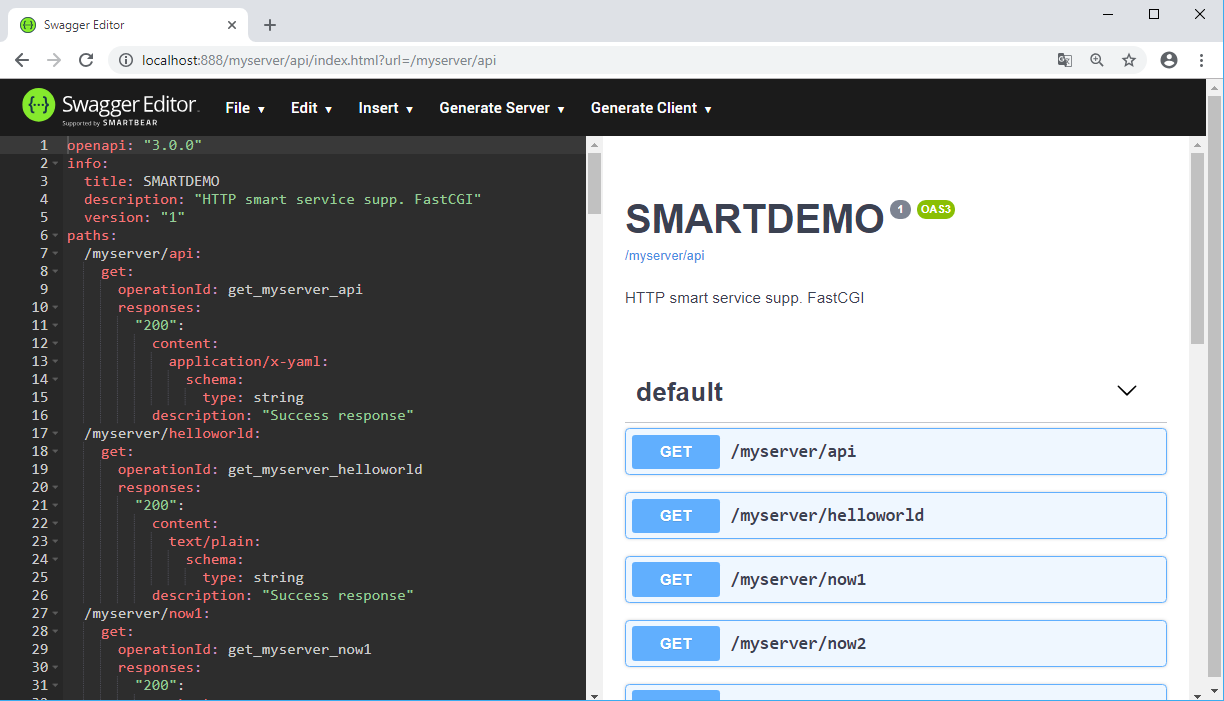
在左侧,可以看到公开的REST接口的OpenAPI声明,右侧可以看到用户友好的界面,通过简单的按钮点击可以调用这些界面。填充参数甚至REST方法也很容易。
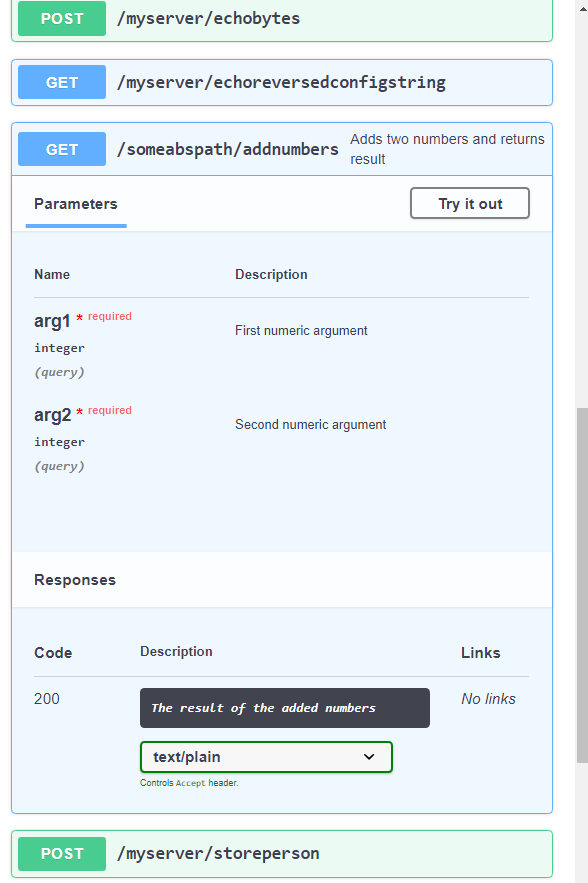
如果我向右滚动到AddNumbers方法,然后单击该栏,它会打开其他信息,以及一个让我们尝试REST调用的按钮。
这非常酷!
那么我们如何使支持REST的应用服务器启用OpenAPI呢?
这真的很容易。
要返回REST服务的OpenAPI规范,我们只需在Unit2中向服务添加另一个REST公开方法。
     [kbmMW_Rest('method:get, path: "api", responseMimeType:"application/x-yaml"')]
     function OpenAPI:string;
这可以根据您的喜好来命名方法及其REST路径,但我们应该提供正确的responseMimeType。OpenAPI描述的标准用YAML表示,幸运的是kbmMW完全支持。它也允许在JSON中生成OpenAPI描述,但它更像是一种与不支持YAML的系统兼容的方法。所以在这个例子中,我们在responseMimeType中指定响应类型为YAML。
// Return OpenAPI specification.
function TkbmMWCustomService2.OpenAPI:string;
begin
     // Return OpenAPI specification for all REST methods in this service
     // as YAML. Add the ASettings value: 'json:true' to return the specification
     // as JSON.
     // Add 'servers: [ "url1", "url2",.. "urln" ]' to ASettings if you want to
     // embed server location information in the specification.
     // Add 'inline:true' to inline object definitions instead of using $ref.
     // The example in the next line utilize the configuration framework to make
     // the setting easily configurable.
     Result:=TkbmMWSmartOpenAPIStubGenerator.GenerateOpenAPI('',self,'inline:$(OpenAPI.inline=false)');
end;
OpenAPI函数的实现代码非常简单,只调用OpenAPI存根生成器的GenerateOpenAPI方法,服务为“OpenAPI'ified”,并可选择设置字符串。设置字符串可以为空,在这个示例中,设置字符串包含值为:
inlinei:$(OpenAPI.inline=false)
原因是有两种有效的方法可以为REST接口生成OpenAPI规范,这些接口可以内联或通过引用获取或返回对象。
内联意味着每个对象都会详细解释它可以在REST调用的所有描述中使用的每个位置,而引用意味着在需要时描述和引用OpenAPI样式组件(对象)。引用是默认值。但是在示例代码中,我选择在kbmMW配置框架的帮助下对其进行配置。我们可以编写:inline:false或inline:true,但是样本会询问配置OpenAPI.inline值的当前值,该值可以是true或false。如果没有找到这样的值,kbmMW将使用默认值false(如=后面所示)。
也可以指定JSON是首选。这只需要将json:true添加到设置字符串,如下所示:
inline:$(OpenAPI.inline=false), json:true
显然,这也可以像内联一样进行配置。
但是我们保持原样,因此OpenAPI函数的输出将是对服务中REST方法的YAML格式化OpenAPI描述。
因此,如果我们使用浏览器打开URL:http://localhost:888/myserver/api,我们将获得完整的OpenAPI描述:
openapi: "3.0.0"
info:
  title: SMARTDEMO
  description: "HTTP smart service supp. FastCGI"
  version: "1"
paths:
  /myserver/api:
    get:
      operationId: get_myserver_api
      responses:
        "200":
          content:
            application/x-yaml:
              schema:
                type: string
          description: "Success response"
  /myserver/helloworld:
    get:
      operationId: get_myserver_helloworld
      responses:
        "200":
          content:
            text/plain:
              schema:
                type: string
          description: "Success response"
  /myserver/now1:
    get:
      operationId: get_myserver_now1
      responses:
        "200":
          content:
            text/plain:
              schema:
                type: string
                format: date-time
          description: "Success response"
  /myserver/now2:
    get:
      operationId: get_myserver_now2
      responses:
        "200":
          content:
            text/plain:
              schema:
                type: number
                format: double
          description: "Success response"
  /myserver/echostring/{AString}:
    get:
      operationId: get_myserver_echostring__AString_
      parameters:
        -
          in: path
          name: AString
          required: true
          schema:
            type: string
      responses:
        "200":
          content:
            text/plain:
              schema:
                type: string
          description: "Success response"
  /myserver/myechostring/{AString}:
    get:
      operationId: get_myserver_myechostring__AString_
      parameters:
        -
          in: path
          name: AString
          required: true
          schema:
            type: string
      responses:
        "200":
          content:
            text/plain:
              schema:
                type: string
          description: "Success response"
  /myserver/echourl:
    get:
      operationId: get_myserver_echourl
      responses:
        "200":
          content:
            text/plain:
              schema:
                type: string
          description: "Success response"
  /myserver/echoheader:
    get:
      operationId: get_myserver_echoheader
      parameters:
        -
          in: header
          name: Accept
          required: true
          schema:
            type: string
      responses:
        "200":
          content:
            text/plain:
              schema:
                type: string
          description: "Success response"
  /myserver/echoanyheader/{AHeaderName}:
    get:
      operationId: get_myserver_echoanyheader__AHeaderName_
      parameters:
        -
          in: path
          name: AHeaderName
          required: true
          schema:
            type: string
      responses:
        "200":
          content:
            text/plain:
              schema:
                type: string
          description: "Success response"
  /myserver/echocookie:
    get:
      operationId: get_myserver_echocookie
      parameters:
        -
          in: cookie
          name: MyCookie
          required: true
          schema:
            type: string
      responses:
        "200":
          content:
            text/plain:
              schema:
                type: string
          description: "Success response"
  /myserver/echoreversedstring:
    post:
      operationId: post_myserver_echoreversedstring
      requestBody:
        required: true
        content:
          text/plain:
            schema:
              type: string
      responses:
        "200":
          content:
            text/plain:
              schema:
                type: string
          description: "Success response"
  /myserver/echobytes:
    post:
      operationId: post_myserver_echobytes
      requestBody:
        required: true
        content:
          text/plain:
            schema:
              type: string
              format: byte
      responses:
        "200":
          content:
            text/plain:
              schema:
                type: string
                format: byte
          description: "Success response"
  /myserver/echoreversedconfigstring:
    get:
      operationId: get_myserver_echoreversedconfigstring
      responses:
        "200":
          content:
            text/plain:
              schema:
                type: string
          description: "Success response"
  /someabspath/addnumbers:
    get:
      summary: "Adds two numbers and returns result"
      operationId: add_numbers
      parameters:
        -
          in: query
          name: arg1
          required: true
          description: "First numeric argument"
          schema:
            type: integer
            format: int32
        -
          in: query
          name: arg2
          required: true
          description: "Second numeric argument"
          schema:
            type: integer
            format: int32
      responses:
        "200":
          content:
            text/plain:
              schema:
                type: integer
                format: int32
          description: "The result of the added numbers"
  /myserver/storeperson:
    post:
      operationId: post_myserver_storeperson
      requestBody:
        required: true
        content:
          text/plain:
            schema:
              "$ref": "#/components/schemas/person"
      responses:
        "200":
          content:
            text/plain:
              schema:
                type: integer
                format: int32
          description: "Success response"
  /myserver/getperson/{id}:
    get:
      operationId: get_myserver_getperson__id_
      parameters:
        -
          in: path
          name: id
          required: true
          schema:
            type: integer
            format: int32
      responses:
        "200":
          content:
            application/json:
              schema:
                "$ref": "#/components/schemas/person"
          description: "Success response"
  /myserver/getpersons:
    get:
      operationId: get_myserver_getpersons
      responses:
        "200":
          content:
            application/json:
              schema:
                type: array
                items:
                  "$ref": "#/components/schemas/person"
          description: "Success response"
components:
  schemas:
    person:
      properties:
        Name:
          type: string
        Address:
          type: string
        Age:
          type: integer
          format: int32
      type: object
      title: person
如果你愿意,可以随意学习。您可能会注意到有几个地方,有设施可以添加摘要和说明。例如,检查addnumbers调用:
  /someabspath/addnumbers:
    get:
      summary: "Adds two numbers and returns result"
      operationId: add_numbers
      parameters:
        -
          in: query
          name: arg1
          required: true
          description: "First numeric argument"
          schema:
            type: integer
            format: int32
        -
          in: query
          name: arg2
          required: true
          description: "Second numeric argument"
          schema:
            type: integer
            format: int32
      responses:
        "200":
          content:
            text/plain:
              schema:
                type: integer
                format: int32
          description: "The result of the added numbers"
摘要和描述来自哪里?
看一下Unit2.pas中AddNumbers函数的定义,很明显:
     // Add two numbers.
     // It can be called from regular clients, smart clients
     // and REST clients.
     // It can be called from a browser like this:
     // http://.../someabspath/addnumbers?arg1=10&arg2=20
     [kbmMW_Method]
     [kbmMW_Rest('method:get, path: "/someabspath/addnumbers", '+
                 'id:"add_numbers", '+
                 'summary:"Adds two numbers and returns result", '+
                 'resultDescription:"The result of the added numbers"')]
     function AddNumbers([kbmMW_Rest('value: "$arg1", required: true, description:"First numeric argument"')] const AValue1:integer;
                         [kbmMW_Rest('value: "$arg2", required: true, description:"Second numeric argument"')] const AValue2:integer;
                         [kbmMW_Arg(mwatRemoteLocation)] const ARemoteLocation:string):integer;
kbmMW_Rest属性中甚至有一个id值。OpenAPI要求每个REST路径必须具有唯一ID。kbmMW将自动尝试生成一个,但您可以通过id语法选择自己的ID名称,如上所示。id,summary,description和resultDescription都是(以kbmMW为单位)全部可选。如果OpenAPI需要描述性值且未给出任何值,则kbmMW提供默认值。
所以现在我们可以生成有效的OpenAPI描述。我们如何让我们的基于kbmMW的应用服务器使用Swagger-UI呈现它们
因为kbmMW可以充当Web服务器,所以这实际上也很容易。我们只需将TkbmMWFilePool实例添加到主窗体(Unit1)并将服务数据模块(Unit2)的FilePool属性设置为指向它。


现在,kbmMW将作为常规Web服务器工作,并在未找到要调用的REST函数时尝试提供文件。
在与SimpleInvocation服务器可执行文件相同的目录中,您应该创建一个名为MyServer的目录(以匹配服务),在其下面,我们添加一个api目录,两者都只是为了匹配Unit2中OpenAPI函数的逻辑路径。实际上,您不必使用此特定路径层次结构,但我已选择此类演示。

在api目录中,我们将放置从https://swagger.io/tools/swagger-ui/下载的文件

然后

和

您可以将dist文件夹中的所有文件逐个下载到api dist目录,也可以通过克隆或下载按钮下载所有文件。如果您执行稍后操作,则打开下载的zip文件并将包含内容的dist文件夹解压缩到api目录。
最后将一个名为index.html的文件添加到api目录中。您可以从以下位置复制/粘贴其内容:
<!DOCTYPE html>
<!-- HTML for static distribution bundle build -->
<html lang="en">
<head>
  <meta charset="UTF-8">
  <title>Swagger Editor</title>
  <style>
  * {
    box-sizing: border-box;
  }
  body {
    font-family: Roboto,sans-serif;
    font-size: 9px;
    line-height: 1.42857143;
    color: #444;
    margin: 0px;
  }

  #swagger-editor {
    font-size: 1.3em;
  }

  .container {
    height: 100%;
    max-width: 880px;
    margin-left: auto;
    margin-right: auto;
  }

  #editor-wrapper {
    height: 100%;
    border:1em solid #000;
    border:none;
  }

  .Pane2 {
    overflow-y: scroll;
  }

  </style>
  <link href="./dist/swagger-editor.css" rel="stylesheet">
  <link rel="icon" type="image/png" href="./dist/favicon-32x32.png" sizes="32x32" />
  <link rel="icon" type="image/png" href="./dist/favicon-16x16.png" sizes="16x16" />
</head>

<body>
  <div id="swagger-editor"></div>
  <script src="./dist/swagger-editor-bundle.js"> </script>
  <script src="./dist/swagger-editor-standalone-preset.js"> </script>
  <script>
  window.onload = function() {
    // Build a system
    const editor = SwaggerEditorBundle({
      dom_id: '#swagger-editor',
      layout: 'StandaloneLayout',
      presets: [
        SwaggerEditorStandalonePreset
      ]
    })

    window.editor = editor
  }
  </script>

  <svg xmlns="http://www.w3.org/2000/svg" xmlns:xlink="http://www.w3.org/1999/xlink" style="position:absolute;0;height:0">
    <defs>
      <symbol viewBox="0 0 20 20" id="unlocked">
            <path d="M15.8 8H14V5.6C14 2.703 12.665 1 10 1 7.334 1 6 2.703 6 5.6V6h2v-.801C8 3.754 8.797 3 10 3c1.203 0 2 .754 2 2.199V8H4c-.553 0-1 .646-1 1.199V17c0 .549.428 1.139.951 1.307l1.197.387C5.672 18.861 6.55 19 7.1 19h5.8c.549 0 1.428-.139 1.951-.307l1.196-.387c.524-.167.953-.757.953-1.306V9.199C17 8.646 16.352 8 15.8 8z"></path>
      </symbol>

      <symbol viewBox="0 0 20 20" id="locked">
        <path d="M15.8 8H14V5.6C14 2.703 12.665 1 10 1 7.334 1 6 2.703 6 5.6V8H4c-.553 0-1 .646-1 1.199V17c0 .549.428 1.139.951 1.307l1.197.387C5.672 18.861 6.55 19 7.1 19h5.8c.549 0 1.428-.139 1.951-.307l1.196-.387c.524-.167.953-.757.953-1.306V9.199C17 8.646 16.352 8 15.8 8zM12 8H8V5.199C8 3.754 8.797 3 10 3c1.203 0 2 .754 2 2.199V8z"/>
      </symbol>

      <symbol viewBox="0 0 20 20" id="close">
        <path d="M14.348 14.849c-.469.469-1.229.469-1.697 0L10 11.819l-2.651 3.029c-.469.469-1.229.469-1.697 0-.469-.469-.469-1.229 0-1.697l2.758-3.15-2.759-3.152c-.469-.469-.469-1.228 0-1.697.469-.469 1.228-.469 1.697 0L10 8.183l2.651-3.031c.469-.469 1.228-.469 1.697 0 .469.469.469 1.229 0 1.697l-2.758 3.152 2.758 3.15c.469.469.469 1.229 0 1.698z"/>
      </symbol>

      <symbol viewBox="0 0 20 20" id="large-arrow">
        <path d="M13.25 10L6.109 2.58c-.268-.27-.268-.707 0-.979.268-.27.701-.27.969 0l7.83 7.908c.268.271.268.709 0 .979l-7.83 7.908c-.268.271-.701.27-.969 0-.268-.269-.268-.707 0-.979L13.25 10z"/>
      </symbol>

      <symbol viewBox="0 0 20 20" id="large-arrow-down">
        <path d="M17.418 6.109c.272-.268.709-.268.979 0s.271.701 0 .969l-7.908 7.83c-.27.268-.707.268-.979 0l-7.908-7.83c-.27-.268-.27-.701 0-.969.271-.268.709-.268.979 0L10 13.25l7.418-7.141z"/>
      </symbol>


      <symbol viewBox="0 0 24 24" id="jump-to">
        <path d="M19 7v4H5.83l3.58-3.59L8 6l-6 6 6 6 1.41-1.41L5.83 13H21V7z"/>
      </symbol>

      <symbol viewBox="0 0 24 24" id="expand">
        <path d="M10 18h4v-2h-4v2zM3 6v2h18V6H3zm3 7h12v-2H6v2z"/>
      </symbol>

    </defs>
  </svg>

</body>

</html>
现在你准备摇滚了。
启动服务器。然后启动浏览器并输入:
http://localhost:888/myserver/api/index.html?url=/myserver/api
这指示kbmMW提供index.html文件,该文件反过来请求生成Swagger-UI接口所需的剩余文件。最后,我们告诉Swagger-UI从/ myserver / api URL加载OpenAPI描述(如果你记得的话,将在Unit2中调用OpenAPI函数)。
您现在应该得到类似于此博客文章开头所示的视图。
在Swagger-UI界面中,您可以为kbmMW公开的所有REST功能生成服务器骨架和客户端存根。
快乐的摇摆!!!
如果你喜欢kbmMW,请分享这个词。转发博客文章,让其他人了解该产品!
https://components4developers.blog/2018/12/31/rest-easy-with-kbmmw-20-openapi/