2017-6-5
由于工作需要 打算自己实现一个简单的 MVC框架以完成工作需求
初步定义 框架需要完成的工作
1.单入口的路由功能
2.文件的自动载入
3.流水ID的加密以及自动解密
4.MVC文件夹模式
5.通用模板的引用
单入口的路由实现
项目接口的 public 目录中存在一个index.php 文件 作为 项目的唯一入口
文件功能主要是 项目全局变量的定义
define ('ROOT_DIR', realpath(dirname(dirname(dirname(__FILE__)))));
以及配置文件和全局方法的引入的引入
require_once LIB_DIR.DS.'configs'.DS.'global.config.php';require_once LIB_DIR.DS.'configs'.DS.'function.config.php';
为了使 入口文件简单 引入 路由文件
require_once APP_DIR.DS.'router.php';
以及
require_once APP_DIR . DS .'autoload.php';
router.php 文件
路由文件主要是通过分析 $_SERVER 数组进行 路由的转发 初步定义 项目路径请求的模式 /modules/controller/action
由于路由需要兼容几种模式
1. 单路径请求 /
2.全路径请求 /index/index/index
3.带参数get请求 /index/index/index?a=1
4.带参数的POST请求
5.重写路径请求 /index/index/index/a/1
需要分布分析 $_SERVER['REQUEST_URI']
直接贴上代码
$_RequestUri = $_SERVER['REQUEST_URI'];//print_r($_SERVER);$_DocumentPath = $_SERVER['DOCUMENT_ROOT'];$_FilePath = __FILE__;$_AppPath = str_replace($_DocumentPath,'', $_FilePath);$urlPath = $_RequestUri;// 兼容 ? 号方式的参数$urlPathArr = explode('?', $urlPath);$urlPath = $urlPathArr[0];// $wParams=array();// if(isset($urlPathArr['1']))// {// $wParams=$urlPathArr['1'];// }$wParamsArr = array_merge($_GET, $_POST);$appPathArr = explode(DS, $_AppPath);for($i =0; $i < count($appPathArr); $i++){$p = $appPathArr[$i];if($p){$urlPath = preg_replace('/^/'. $p .'//','/', $urlPath,1);}}$urlPath = preg_replace('/^//','', $urlPath,1);$appPathArr = explode("/", $urlPath);$appPathArrCount = count($appPathArr);$arr_url = array('modules'=>'index','controller'=>'index','method'=>'index','parms'=> array(),);if(!empty($appPathArr[0])){$arr_url['modules']= $appPathArr[0];}if(!empty($appPathArr[1])){$arr_url['controller']= $appPathArr[1];}if(!empty($appPathArr[2])){$arr_url['method']= $appPathArr[2];}$arr_url['parms']= $wParamsArr;if($appPathArrCount >3){// 如果大于三 则说明后面是参数for($i =3; $i < $appPathArrCount; $i +=2){$arr_temp_hash = array(strtolower($appPathArr[$i])=> $appPathArr[$i +1]);$arr_url['parms']= array_merge($arr_url['parms'], $arr_temp_hash);}}//print_r($arr_url);// 转入 controller$module_name = $arr_url['modules'];//$class_name = NAME_DIR.DIRECTORY_SEPARATOR.'Controllers'.DIRECTORY_SEPARATOR.ucfirst($module_name).DIRECTORY_SEPARATOR.ucfirst($arr_url['controller']).'Controller';$class_name = NAME_DIR .'Controllers\'. ucfirst($module_name).'\'. ucfirst($arr_url['controller']).'Controller';$controller_name = $arr_url['controller'];$controller_file = CONTROLLERS_DIR . DS . ucfirst($module_name). DS . ucfirst($controller_name).'Controller.php';//print_r($class_name);$method_name = $arr_url['method'];if(file_exists($controller_file)){//print_r($controller_file);include $controller_file;//spl_autoload_register( array($class_name,$method_name) );//echo 32;die;$requestArr['path']= $arr_url['modules']. DS . $arr_url['controller']. DS . $arr_url['method'];$requestArr['server_name']= $_SERVER['SERVER_NAME'];$requestArr['method']= $_SERVER['REQUEST_METHOD'];$obj_module =new $class_name($arr_url['parms'], $requestArr);if(!method_exists($obj_module, $method_name)){die("要调用的方法不存在");}else{//print_r($arr_url['parms']);$obj_module->$method_name();}}else{die("定义的类不存在");}
当然以上的路由转入 离不开我们的 控制器的父类的支持
在父类的构造方法中,支持参数的传递
$this->params= $this->_addslashes($paramsArr);$this->autoDeCode();$this->request = $requestArr;// //判断是否登录$path ="/".strtolower($this->getPath());$this->mtoken=$this->session('mtoken');if(empty($this->mtoken)&& substr($path,0,11)!='/user/login'){$url ='/user/login';echo '<script type="text/javascript">top.window.location.href="'.$url.'";</script>';}
而我们的控制器 同样离不开文件的自动加载 不然 命名空间使用不了
autoload.php 同样 直接上代码
namespaceApplication;/*** 自动加载类* @author kinmos*/classAutoloader{// 应用的初始化目录,作为加载类文件的参考目录protectedstatic $_appInitPath ='';/*** 设置应用初始化目录* @param string $root_path* @return void*/publicstaticfunction setRootPath($root_path){self::$_appInitPath = $root_path;}/*** 根据命名空间加载文件* @param string $name* @return boolean*/publicstaticfunction loadByNamespace($name){// 相对路径$class_path = str_replace('\', DIRECTORY_SEPARATOR ,$name);// 先尝试在应用目录寻找文件if(self::$_appInitPath){$class_file =self::$_appInitPath . DIRECTORY_SEPARATOR . $class_path.'.php';}//print_r($class_file);// 文件不存在,则在上一层目录寻找if(empty($class_file)||!is_file($class_file)){$class_file = APP_DIR.DIRECTORY_SEPARATOR ."$class_path.php";}// 找到文件if(is_file($class_file)){// 加载require_once($class_file);//print_r($class_file);if(class_exists($name,false)){//echo $name;returntrue;}}returnfalse;}}// 设置类自动加载回调函数spl_autoload_register('ApplicationAutoloader::loadByNamespace');
这样一个完整的路由以及命名空间的自动加载功能都完成了。。
接下来 看下我 顶的目录结构
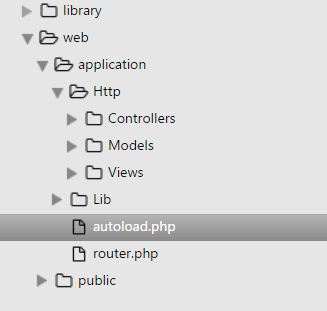
能自己写的东西 还是自己写的好~~ 目录结构 随意定的~
然后是数据层
数据层的话。嘿嘿。 这边框架没有直接连数据库 而是通过 API的方式 调用 workerman 的微服务进行数据的处理
这算是偷懒的,后面应该完善,微服务这个东西。。对于开发来说 还是稍微麻烦点的,如果以后简单的项目 就不需要 用了,直接连接数据库 简单暴力
2017-6-12 补充 数据层 链接数据库
在目录中添加一个db 的配置文件
<?php
namespace Config;
/**
 * mysql配置
 * @author
 */
class Db
{
    //
    public static $default = array(
        'host'    => '192.168.0.88',
        'port'    => 3306,
        'user'    => 'root',
        'password' => '123456',
        'dbname'  => 'kinwork',
        'charset'    => 'utf8',
    );


}
配置着本地数据库的路径,另外 这个文件是可以扩展的。便于后面的分库以及分布式的部署
另外在Lib目录中添加了三个数据库操作文件
Db 文件,DbTable DbConnection
Db 是操作数据库的表层文件,DbTable 文件是实际进行数据库操作的类 DbConnection 是进行数据库链接的类 进行数据库连接池的 管理
然后在我们的Models 文件夹中添加了 Db文件夹 对应每个数据库表的一个文件
<?php

namespace HttpModelsDb;

use LibDbTable;

/**
 *
 */
class User extends DbTable
{
    protected $_name = 'user';

    protected $_primary = 'id';

    protected $_db = 'default';

    /*
    * 构造函数
    */
    public function __construct()
    {
    }
}
其中 _name 是表名 _db 是对应的config的数据库配置 兼容数据库的分库应用
在实际使用的时候,
$DbTable_User = Db::DbTable('User');

        // 查询所有数据
        $list=$DbTable_User->getList('1=1');
        print_r($list);
        // 查询 分页数据
        $pagelist=$DbTable_User->pageList('1=1','*');
        print_r($pagelist);

        // 查询单条数据
        $row=$DbTable_User->getRow(array('id'=>1));
        print_r($row);

        // 添加数据
        $id=$DbTable_User->insert(array('name'=>'kinmos'));
        print_r($id);

        // 修改数据
        $status=$DbTable_User->update(array('name'=>'kinmos'),array('id'=>1));
        print_r($status);

        // 删除数据
        $status=$DbTable_User->delete(array('id'=>15));
        print_r($status);
至此,数据层完成。
最后是视图 层
视图的直接用的php的视图,而没有去用 类似 smarty 的模板引擎 额,个人感觉 php自己就是一个不错的 模板引擎啊。。就不多引用别的东西了~~哈哈
视图的话,在我们的Views文件夹中,然后模板就有一个问题 就是模板的数据渲染
在父类 的ActionController.php 中封装了一个 view 方法 用来实现该功能
publicfunction getViewUrl(){$this->urlPath = $this->getPath();$Path_arr = explode("/",$this->urlPath);$Module = isset($Path_arr[0])&&$Path_arr[0]!=''?$Path_arr[0]:"Index";$Controller = isset($Path_arr[1])&&$Path_arr[1]!=''?$Path_arr[1]:"Index";$Method = isset($Path_arr[2])&&$Path_arr[2]!=''?$Path_arr[2]:"index";return ucfirst($Module).'/'.ucfirst($Controller).'/'.$Method;}/** 跳到视图页面* $data = array() 数组格式 带到视图页面的参数*/publicfunction view($data = array()){$view = VIEWS_DIR . DS.$this->getViewUrl().'.php';extract($data, EXTR_OVERWRITE);ob_start();file_exists($view)?require $view :exit($view .' 不存在');$content = ob_get_contents();return $content;}
这样在我们的控制器中 当需要使用到 视图 就可以直接 $this->view($data); 就可以带出数据到视图模板中了
然后模板的通用引用 也就简单了
在我们的视图文件夹中 存在 一个Pub文件夹 存放所有的通用模板
<?php include_once(VIEWS_DIR .DS."Pub".DS."header.php");?>
至此,一个简单的 phpMVC框架就搭建好了~
然后秉承以前左大侠的教诲 系统安全性 是衡量一个系统好坏的重要因素
故而,这里简单做了些 安全性的控制
1.防注入
2.关键信息的加密
防注入 addslashes
publicfunction _addslashes($param_array){if(is_array($param_array)){foreach($param_array as $key=>$value){if(is_string($value))$param_array[$key]= addslashes(trim($value));}}else{$param_array = addslashes($param_array);}return $param_array;}
关键信息的加密的话,主要是针对 流水ID 自增字段
主要在 我们的公共方法 function.php 中封装了两个方法 用于加密和解密
这里的话,用到的对称加密方式, AES的对称加密 (关键信息被修改掉啦)
functionEncode($str){if($str ==''){return'';}$aes =newAes();return urlencode($aes->encrypt($str));}functionDecode($str){if($str ==''){return'';}$aes =newAes();if(strpos($str,'%'))return $aes->decrypt(urldecode($str));elsereturn $aes->decrypt($str);}
AES 方法类
classAes{private $_privateKey ="kinmoshelloword&*#";private $_byt = array(0x19,0x34,0x56,0x78,0x90,0xAB,0xCD,0xEF,0x12,0x34,0x56,0x78,0x90,0xAB,0xCD,0xEF);publicfunction toStr($bytes){$str ='';foreach($bytes as $ch){$str .= chr($ch);}return $str;}publicfunction encrypt($data){$vi = $this->toStr($this->_byt);$encrypted = mcrypt_encrypt(MCRYPT_RIJNDAEL_128, $this->_privateKey, $data, MCRYPT_MODE_CBC, $vi);return base64_encode($encrypted);}publicfunction decrypt($data){$vi = $this->toStr($this->_byt);$encryptedData = base64_decode($data);$decrypted = mcrypt_decrypt(MCRYPT_RIJNDAEL_128, $this->_privateKey, $encryptedData, MCRYPT_MODE_CBC, $vi);//print_r($decrypted);return rtrim($decrypted,"�");}}
对于 Encode 方法 和Decode 方法的 url_decode 和url_encode 主要是为了防止 路径的转义导致的加解密不正确~
另外 主要是针对 流水ID的 所以 在我们的基类中添加了一个自动解密的方法
protectedfunction autoDeCode(){if(isset($this->params["id"])){$id=$this->params["id"];//print_r($id);die;//print_r($_GET);if(!empty($id)&&!preg_match("/^[0-9]+$/",$id)){$this->params["id"]=Decode($id);}}//自动解密idsif(isset($this->params["ids"])){$ids=$this->params["ids"];if(!empty($ids)){$newids="";//print_r($idsarr);if(is_array($ids))foreach($ids as $key => $value){if(!preg_match("/^[0-9]+$/",$value)){if($newids!="")$newids.=','.Decode($value);else$newids=Decode($value);//$this->params["ids"]=}}else{if(!empty($ids)&&!preg_match("/^[0-9]+$/",$ids)){$newids=Decode($ids);}}$this->params["ids"]=$newids;}}}
这样的话,传到 我们的控制器中的参数 便会自动解密了~~ 方便
至此,一个简单的 MVC框架就完成了~~
后面有什么要补的再补吧