1.安装
DOS在线安装:
python -m pip install pytest
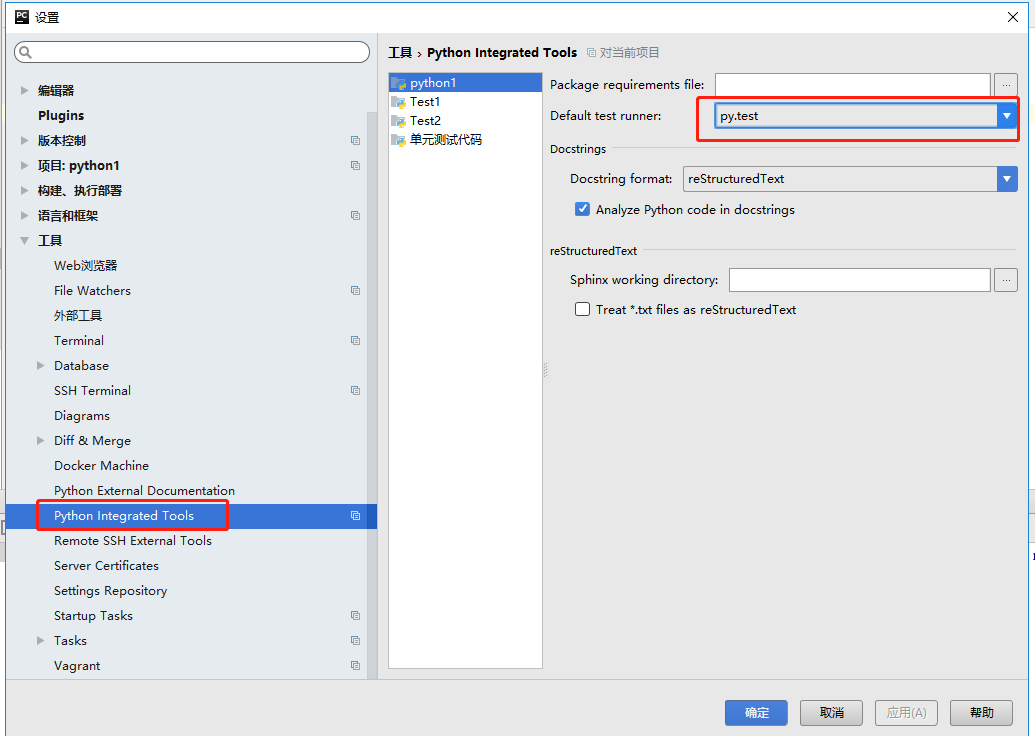
注意:在pycharm上运行pytest脚本前,需要修改pycharm配置:
文件---配置---工具---Default test runner:修改为py.test

2.Pytest断言
import pytest


# 功能:用于计算a 与 b 相加的和
def add(a, b):
    return a + b


# 功能:用于判断素数
def is_prime(n):
    if n <= 1:
        return False
    for i in range(2, n):
        if n % i == 0:
            return False
        return True


# 测试相等
def test_add_1():
    assert add(3, 4) == 7


# 测试不相等
def test_add_2():
    assert add(17, 22) != 50


# 测试大于等于
def test_add_3():
    assert add(17, 22) <= 50


# 测试小于等于
def test_add_4():
    assert add(17, 22) >= 38


# 测试包含
def test_in():
    a = 'hello'
    b = 'he'
    assert b in a


# 测试不包含
def test_not_in():
    a = 'hello'
    b = 'hi'
    assert b not in a


# 判断是否为True
def test_true_1():
    assert is_prime(13)


# 判断是否为True
def test_true_2():
    assert is_prime(7) is True


# 判断是否不为True
def test_true_3():
    assert not is_prime(4)


# 判断是否不为True
def test_true_4():
    assert is_prime(6) is not True


# 判断是否为False
def test_false_1():
    assert is_prime(8) is False

if __name__ == '__main__':
    pytest.main()
运行结果:

3.Fixture
用来对测试方法,测试函数,测试类和整个测试文件进行初始化或还原测试环境
import pytest


# 功能函数
def multiply(a, b):
    return a * b


class TestMultiply:
    # ========= Fixture ========
    @classmethod
    def setup_class(cls):  # 在当前测试类的开始执行
        print("setup_class ==========>")

    def teardown_class(cls):  # 在当前测试类的结束执行
        print("teardown_class==========>")

    def setup_method(self, method):  # 在每个测试方法开始执行
        print("setup_method------>")

    def teardown_mehod(self, method):  # 在每个测试方法结束执行
        print("teardown_method------>")

    def setup(self):  # 在每个测试方法之前执行,等效于setup_method()
        print("setup---->")

    def teardown(self):  # 在每个测试方法之后执行,等效于teardown_method(function)
        print("teardown------>")

    # ========= 测试用例 ========
    def test_multiply_3_4(self):
        print("test_number_3_4")
        assert multiply(3, 4) == 12

    def test_multiply_a_3(self):
        print("test_string_a_3")
        assert multiply('a', 3) == 'aaa'

if __name__ == '__main__':
    pytest.main()
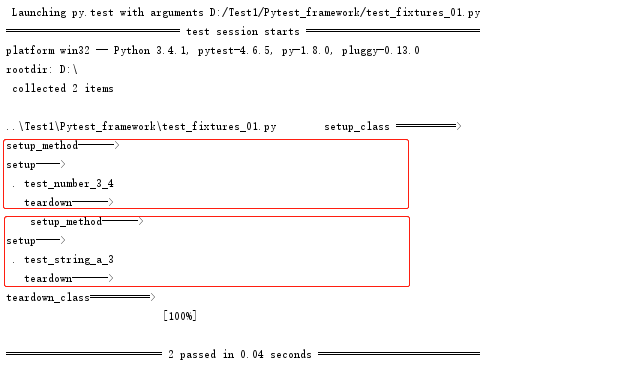
运行结果为:

4.参数化
import pytest
import math


# pytest参数化
@pytest.mark.parametrize(
    "base, exponent, expected",  # 定义参数名称
    [(2, 2, 4),
     (2, 3, 8),
     (1, 9, 1),
     (0, 9, 0)],
    ids=["case1", "case2", "case3", "case4"]  # 定义测试用例名称
    )
def test_pow(base, exponent, expected):
    assert math.pow(base, exponent) == expected


if __name__ == '__main__':
    pytest.main()
运行结果:
