前言
最近有一个idea需要去验证,比较忙,看完Mask R-CNN论文了,最近会去研究Mask R-CNN的代码,论文解析转载网上的两篇博客
技术挖掘者
remanented
文章1
论文题目:Mask R-CNN
论文链接:论文链接
论文代码:Facebook代码链接;Tensorflow版本代码链接; Keras and TensorFlow版本代码链接;MxNet版本代码链接
一、Mask R-CNN是什么,可以做哪些任务?
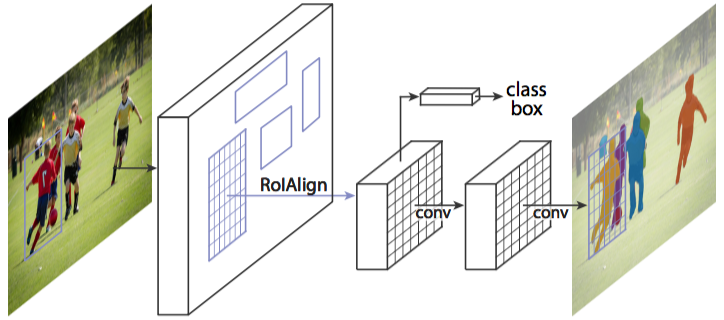
图1 Mask R-CNN整体架构
Mask R-CNN是一个实例分割(Instance segmentation)算法,可以用来做“目标检测”、“目标实例分割”、“目标关键点检测”。
1. 实例分割(Instance segmentation)和语义分割(Semantic segmentation)的区别与联系
联系:语义分割和实例分割都是目标分割中的两个小的领域,都是用来对输入的图片做分割处理;
区别:
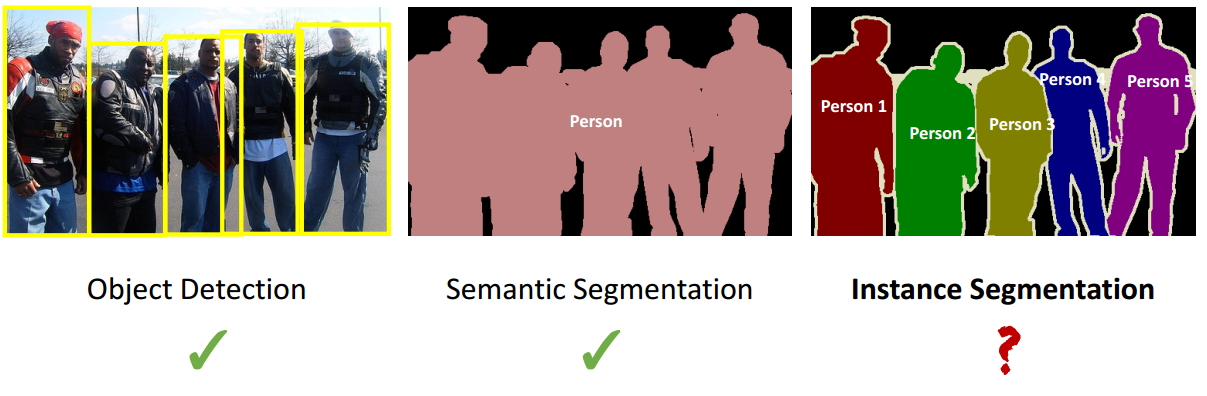
图2 实例分割与语义分割区别
1. 通常意义上的目标分割指的是语义分割,语义分割已经有很长的发展历史,已经取得了很好地进展,目前有很多的学者在做这方面的研究;然而实例分割是一个从目标分割领域独立出来的一个小领域,是最近几年才发展起来的,与前者相比,后者更加复杂,当前研究的学者也比较少,是一个有研究空间的热门领域,如图1所示,这是一个正在探索中的领域;
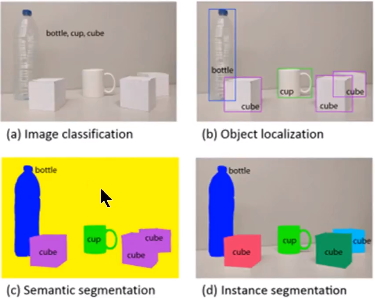
图3 实例分割与语义分割区别
2. 观察图3中的c和d图,c图是对a图进行语义分割的结果,d图是对a图进行实例分割的结果。两者最大的区别就是图中的"cube对象",在语义分割中给了它们相同的颜色,而在实例分割中却给了不同的颜色。即实例分割需要在语义分割的基础上对同类物体进行更精细的分割。
注:很多博客中都没有完全理解清楚这个问题,很多人将这个算法看做语义分割,其实它是一个实例分割算法。
2. Mask R-CNN可以完成的任务

图4 Mask R-CNN进行目标检测与实例分割
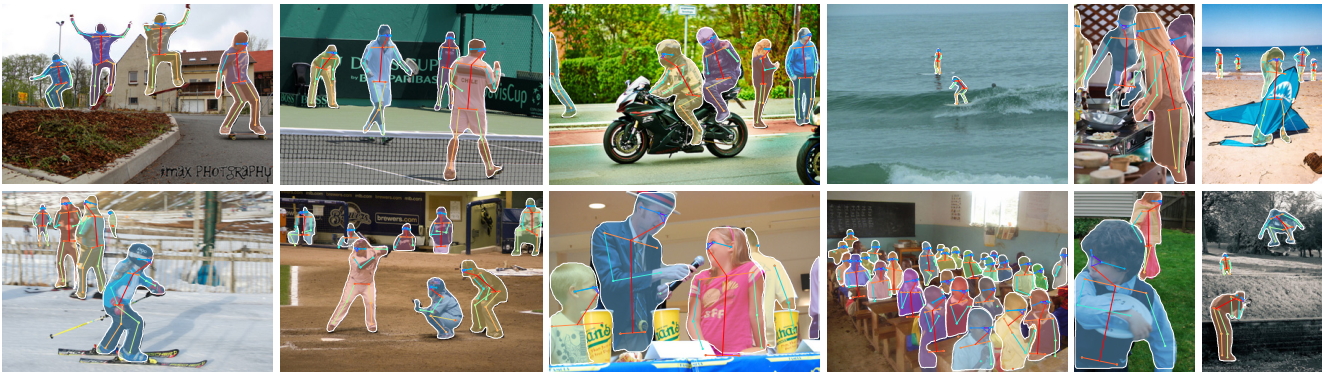
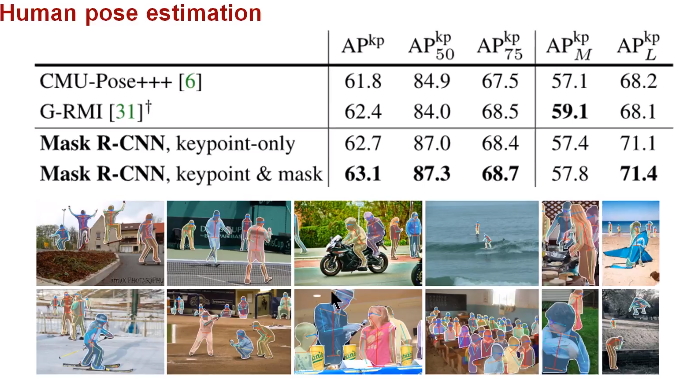
图5 Mask R-CNN进行人体姿态识别
总之,Mask R-CNN是一个非常灵活的框架,可以增加不同的分支完成不同的任务,可以完成目标分类、目标检测、语义分割、实例分割、人体姿势识别等多种任务,真不愧是一个好算法!
3. Mask R-CNN预期达到的目标
- 高速
- 高准确率(高的分类准确率、高的检测准确率、高的实例分割准确率等)
- 简单直观
- 易于使用
4. 如何实现这些目标
高速和高准确率:为了实现这个目的,作者选用了经典的目标检测算法Faster-rcnn和经典的语义分割算法FCN。Faster-rcnn可以既快又准的完成目标检测的功能;FCN可以精准的完成语义分割的功能,这两个算法都是对应领域中的经典之作。Mask R-CNN比Faster-rcnn复杂,但是最终仍然可以达到5fps的速度,这和原始的Faster-rcnn的速度相当。由于发现了ROI Pooling中所存在的像素偏差问题,提出了对应的ROIAlign策略,加上FCN精准的像素MASK,使得其可以获得高准确率。
简单直观:整个Mask R-CNN算法的思路很简单,就是在原始Faster-rcnn算法的基础上面增加了FCN来产生对应的MASK分支。即Faster-rcnn + FCN,更细致的是 RPN + ROIAlign + Fast-rcnn + FCN。
易于使用:整个Mask R-CNN算法非常的灵活,可以用来完成多种任务,包括目标分类、目标检测、语义分割、实例分割、人体姿态识别等多个任务,这将其易于使用的特点展现的淋漓尽致。我很少见到有哪个算法有这么好的扩展性和易用性,值得我们学习和借鉴。除此之外,我们可以更换不同的backbone architecture和Head Architecture来获得不同性能的结果。
二、Mask R-CNN框架解析
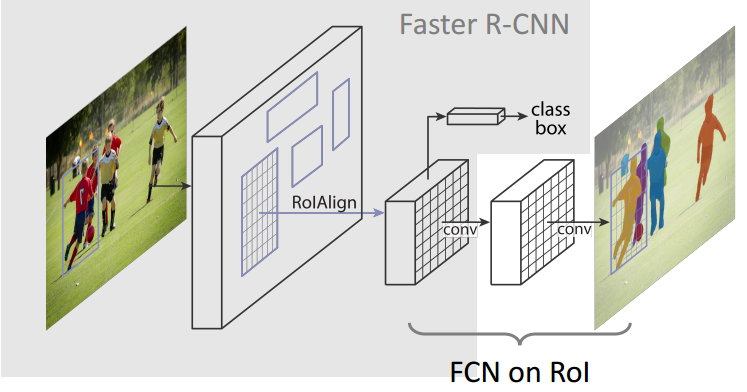
图6 Mask R-CNN算法框架
1. Mask R-CNN算法步骤
- 首先,输入一幅你想处理的图片,然后进行对应的预处理操作,或者预处理后的图片;
- 然后,将其输入到一个预训练好的神经网络中(ResNeXt等)获得对应的feature map;
- 接着,对这个feature map中的每一点设定预定个的ROI,从而获得多个候选ROI;
- 接着,将这些候选的ROI送入RPN网络进行二值分类(前景或背景)和BB回归,过滤掉一部分候选的ROI;
- 接着,对这些剩下的ROI进行ROIAlign操作(即先将原图和feature map的pixel对应起来,然后将feature map和固定的feature对应起来);
- 最后,对这些ROI进行分类(N类别分类)、BB回归和MASK生成(在每一个ROI里面进行FCN操作)。
2. Mask R-CNN架构分解
在这里,我将Mask R-CNN分解为如下的3个模块,Faster-rcnn、ROIAlign和FCN。然后分别对这3个模块进行讲解,这也是该算法的核心。
3. Faster-rcnn(该算法请参考该链接,我进行了详细的分析)
4. FCN
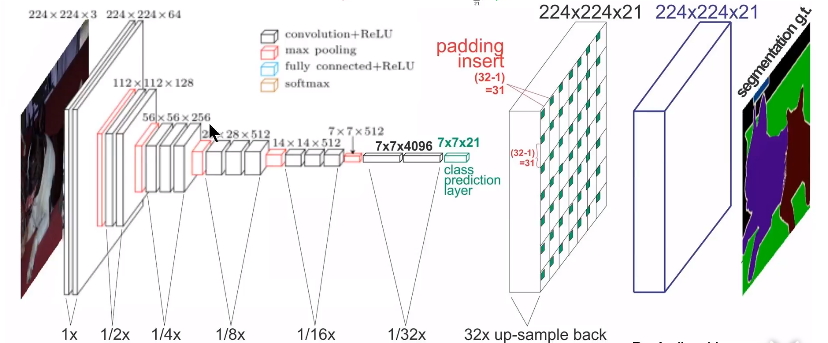
图7 FCN网络架构
FCN算法是一个经典的语义分割算法,可以对图片中的目标进行准确的分割。其总体架构如上图所示,它是一个端到端的网络,主要的模快包括卷积和去卷积,即先对图像进行卷积和池化,使其feature map的大小不断减小;然后进行反卷积操作,即进行插值操作,不断的增大其feature map,最后对每一个像素值进行分类。从而实现对输入图像的准确分割。具体的细节请参考该链接。
5. ROIPooling和ROIAlign的分析与比较
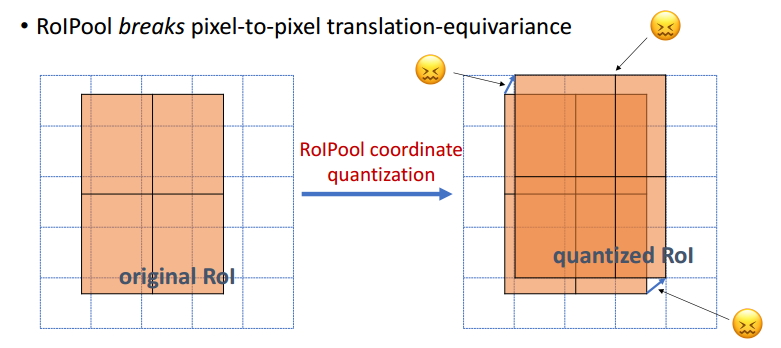

图9 ROI Pooling技术
如图9所示,为了得到固定大小(7X7)的feature map,我们需要做两次量化操作:1)图像坐标 — feature map坐标,2)feature map坐标 — ROI feature坐标。我们来说一下具体的细节,如图我们输入的是一张800x800的图像,在图像中有两个目标(猫和狗),狗的BB大小为665x665,经过VGG16网络后,我们可以获得对应的feature map,如果我们对卷积层进行Padding操作,我们的图片经过卷积层后保持原来的大小,但是由于池化层的存在,我们最终获得feature map 会比原图缩小一定的比例,这和Pooling层的个数和大小有关。在该VGG16中,我们使用了5个池化操作,每个池化操作都是2Pooling,因此我们最终获得feature map的大小为800/32 x 800/32 = 25x25(是整数),但是将狗的BB对应到feature map上面,我们得到的结果是665/32 x 665/32 = 20.78 x 20.78,结果是浮点数,含有小数,但是我们的像素值可没有小数,那么作者就对其进行了量化操作(即取整操作),即其结果变为20 x 20,在这里引入了第一次的量化误差;然而我们的feature map中有不同大小的ROI,但是我们后面的网络却要求我们有固定的输入,因此,我们需要将不同大小的ROI转化为固定的ROI feature,在这里使用的是7x7的ROI feature,那么我们需要将20 x 20的ROI映射成7 x 7的ROI feature,其结果是 20 /7 x 20/7 = 2.86 x 2.86,同样是浮点数,含有小数点,我们采取同样的操作对其进行取整吧,在这里引入了第二次量化误差。其实,这里引入的误差会导致图像中的像素和特征中的像素的偏差,即将feature空间的ROI对应到原图上面会出现很大的偏差。原因如下:比如用我们第二次引入的误差来分析,本来是2,86,我们将其量化为2,这期间引入了0.86的误差,看起来是一个很小的误差呀,但是你要记得这是在feature空间,我们的feature空间和图像空间是有比例关系的,在这里是1:32,那么对应到原图上面的差距就是0.86 x 32 = 27.52。这个差距不小吧,这还是仅仅考虑了第二次的量化误差。这会大大影响整个检测算法的性能,因此是一个严重的问题。好的,应该解释清楚了吧,好累!
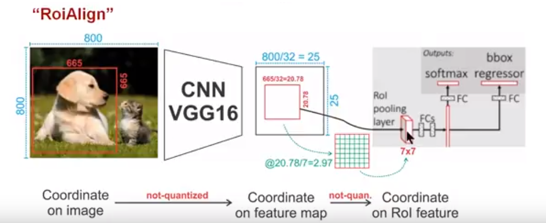
图10 ROIAlign技术
如图10所示,为了得到为了得到固定大小(7X7)的feature map,ROIAlign技术并没有使用量化操作,即我们不想引入量化误差,比如665 / 32 = 20.78,我们就用20.78,不用什么20来替代它,比如20.78 / 7 = 2.97,我们就用2.97,而不用2来代替它。这就是ROIAlign的初衷。那么我们如何处理这些浮点数呢,我们的解决思路是使用“双线性插值”算法。双线性插值是一种比较好的图像缩放算法,它充分的利用了原图中虚拟点(比如20.56这个浮点数,像素位置都是整数值,没有浮点值)四周的四个真实存在的像素值来共同决定目标图中的一个像素值,即可以将20.56这个虚拟的位置点对应的像素值估计出来。厉害哈。如图11所示,蓝色的虚线框表示卷积后获得的feature map,黑色实线框表示ROI feature,最后需要输出的大小是2x2,那么我们就利用双线性插值来估计这些蓝点(虚拟坐标点,又称双线性插值的网格点)处所对应的像素值,最后得到相应的输出。这些蓝点是2x2Cell中的随机采样的普通点,作者指出,这些采样点的个数和位置不会对性能产生很大的影响,你也可以用其它的方法获得。然后在每一个橘红色的区域里面进行max pooling或者average pooling操作,获得最终2x2的输出结果。我们的整个过程中没有用到量化操作,没有引入误差,即原图中的像素和feature map中的像素是完全对齐的,没有偏差,这不仅会提高检测的精度,同时也会有利于实例分割。这么细心,做科研就应该关注细节,细节决定成败。
we propose an RoIAlign layer that removes the harsh quantization of RoIPool, properly aligning the extracted features with the input. Our proposed change is simple: we avoid any quantization of the RoI boundaries or bins (i.e., we use x=16 instead of [x=16]). We use bilinear interpolation [22] to compute the exact values of the input features at four regularly sampled locations in each RoI bin, and aggregate the result (using max or average), see Figure 3 for details. We note that the results are not sensitive to the exact sampling locations, or how many points are sampled, as long as no quantization is performed。

图11 双线性插值
6. LOSS计算与分析
由于增加了mask分支,每个ROI的Loss函数如下所示:

其中Lcls和Lbox和Faster r-cnn中定义的相同。对于每一个ROI,mask分支有Km*m维度的输出,其对K个大小为m*m的mask进行编码,每一个mask有K个类别。我们使用了per-pixel sigmoid,并且将Lmask定义为the average binary cross-entropy loss 。对应一个属于GT中的第k类的ROI,Lmask仅仅在第k个mask上面有定义(其它的k-1个mask输出对整个Loss没有贡献)。我们定义的Lmask允许网络为每一类生成一个mask,而不用和其它类进行竞争;我们依赖于分类分支所预测的类别标签来选择输出的mask。这样将分类和mask生成分解开来。这与利用FCN进行语义分割的有所不同,它通常使用一个per-pixel sigmoid和一个multinomial cross-entropy loss ,在这种情况下mask之间存在竞争关系;而由于我们使用了一个per-pixel sigmoid 和一个binary loss ,不同的mask之间不存在竞争关系。经验表明,这可以提高实例分割的效果。
一个mask对一个目标的输入空间布局进行编码,与类别标签和BB偏置不同,它们通常需要通过FC层而导致其以短向量的形式输出。我们可以通过由卷积提供的像素和像素的对应关系来获得mask的空间结构信息。具体的来说,我们使用FCN从每一个ROI中预测出一个m*m大小的mask,这使得mask分支中的每个层能够明确的保持m×m空间布局,而不将其折叠成缺少空间维度的向量表示。和以前用fc层做mask预测的方法不同的是,我们的实验表明我们的mask表示需要更少的参数,而且更加准确。这些像素到像素的行为需要我们的ROI特征,而我们的ROI特征通常是比较小的feature map,其已经进行了对其操作,为了一致的较好的保持明确的单像素空间对应关系,我们提出了ROIAlign操作。
三、Mask R-CNN细节分析
1. Head Architecture
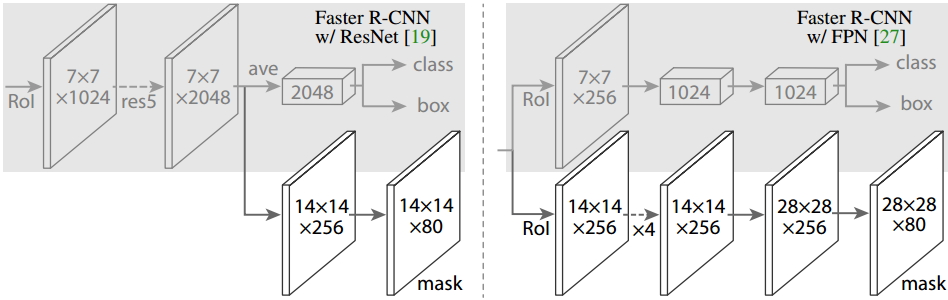
图12 Head Architecture
如上图所示,为了产生对应的Mask,文中提出了两种架构,即左边的Faster R-CNN/ResNet和右边的Faster R-CNN/FPN。对于左边的架构,我们的backbone使用的是预训练好的ResNet,使用了ResNet倒数第4层的网络。输入的ROI首先获得7x7x1024的ROI feature,然后将其升维到2048个通道(这里修改了原始的ResNet网络架构),然后有两个分支,上面的分支负责分类和回归,下面的分支负责生成对应的mask。由于前面进行了多次卷积和池化,减小了对应的分辨率,mask分支开始利用反卷积进行分辨率的提升,同时减少通道的个数,变为14x14x256,最后输出了14x14x80的mask模板。而右边使用到的backbone是FPN网络,这是一个新的网络,通过输入单一尺度的图片,最后可以对应的特征金字塔,如果想要了解它的细节,请参考该链接。得到证实的是,该网络可以在一定程度上面提高检测的精度,当前很多的方法都用到了它。由于FPN网络已经包含了res5,可以更加高效的使用特征,因此这里使用了较少的filters。该架构也分为两个分支,作用于前者相同,但是分类分支和mask分支和前者相比有很大的区别。可能是因为FPN网络可以在不同尺度的特征上面获得许多有用信息,因此分类时使用了更少的滤波器。而mask分支中进行了多次卷积操作,首先将ROI变化为14x14x256的feature,然后进行了5次相同的操作(不清楚这里的原理,期待着你的解释),然后进行反卷积操作,最后输出28x28x80的mask。即输出了更大的mask,与前者相比可以获得更细致的mask。
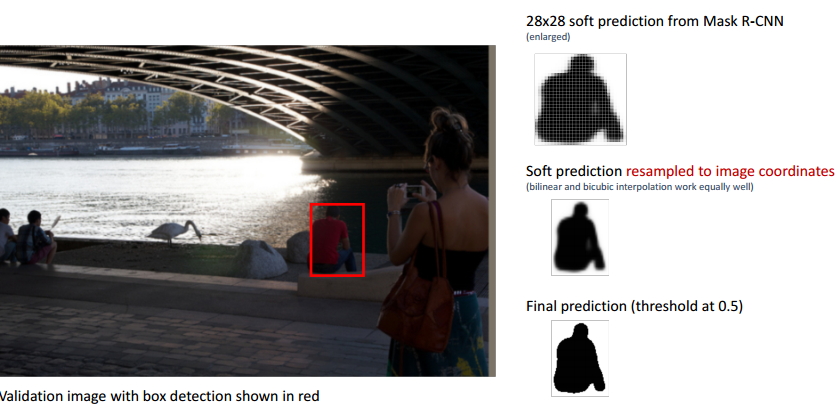
图13 BB输出的mask结果
如上图所示,图像中红色的BB表示检测到的目标,我们可以用肉眼可以观察到检测结果并不是很好,即整个BB稍微偏右,左边的一部分像素并没有包括在BB之内,但是右边显示的最终结果却很完美。
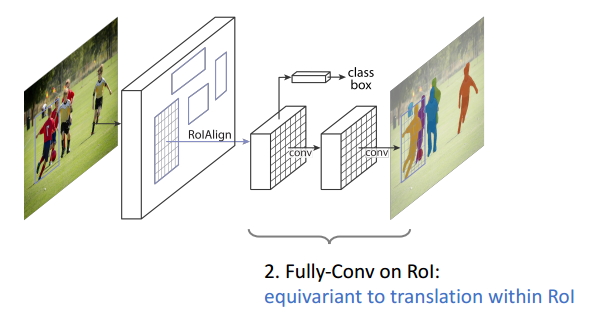
2. Equivariance in Mask R-CNN
Equivariance 指随着输入的变化输出也会发生变化。
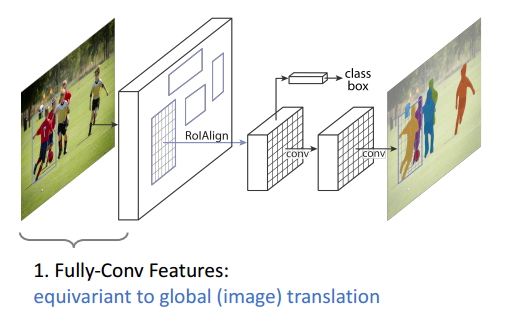
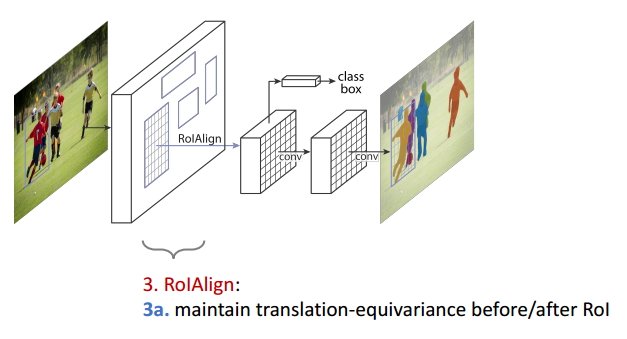
ROIAlign操作保持了ROI变换前后的同变性;
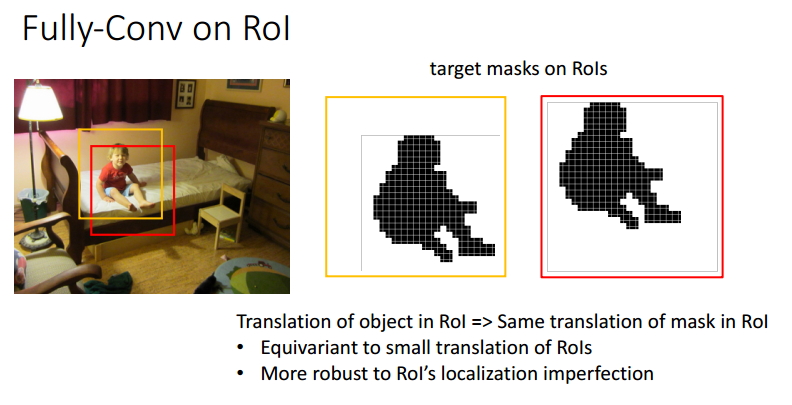
图17 ROI中的全卷积
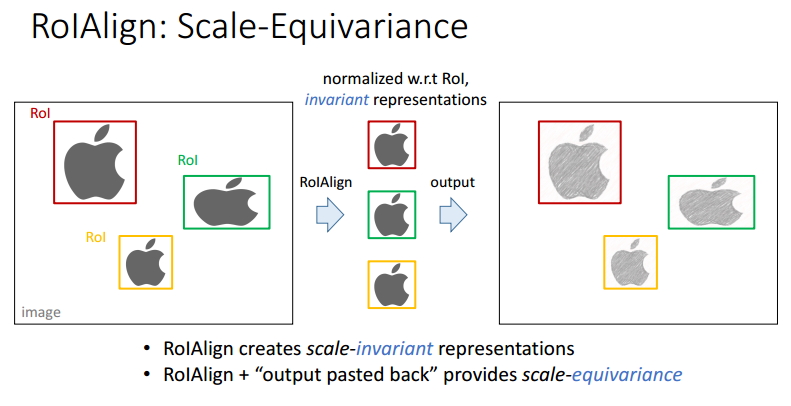
图18 ROIAlign的尺度同变性
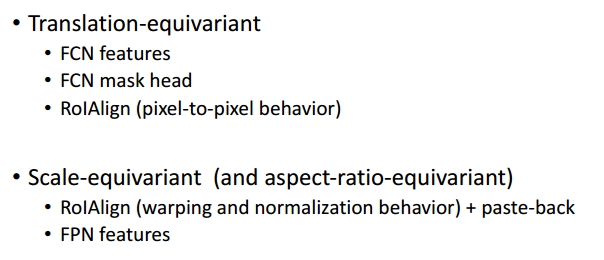
图19 Mask R-CNN中的同变性总结
3. 算法实现细节
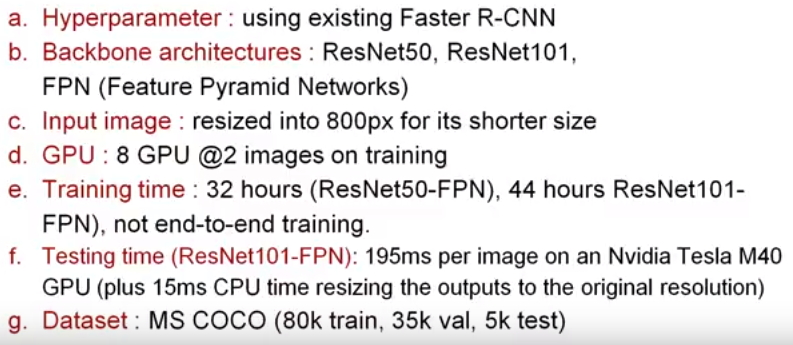
图20 算法实现细节
观察上图,我们可以得到以下的信息:
- Mask R-CNN中的超参数都是用了Faster r-cnn中的值,机智,省时省力,效果还好,别人已经替你调节过啦,哈哈哈;
- 使用到的预训练网络包括ResNet50、ResNet101、FPN,都是一些性能很好地网络,尤其是FPN,后面会有分析;
- 对于过大的图片,它会将其裁剪成800x800大小,图像太大的话会大大的增加计算量的;
- 利用8个GPU同时训练,开始的学习率是0.01,经过18k次将其衰减为0.001,ResNet50-FPN网络训练了32小时,ResNet101-FPN训练了44小时;
- 在Nvidia Tesla M40 GPU上面的测试时间是195ms/张;
- 使用了MS COCO数据集,将120k的数据集划分为80k的训练集、35k的验证集和5k的测试集;
四、性能比较
1. 定量结果分析
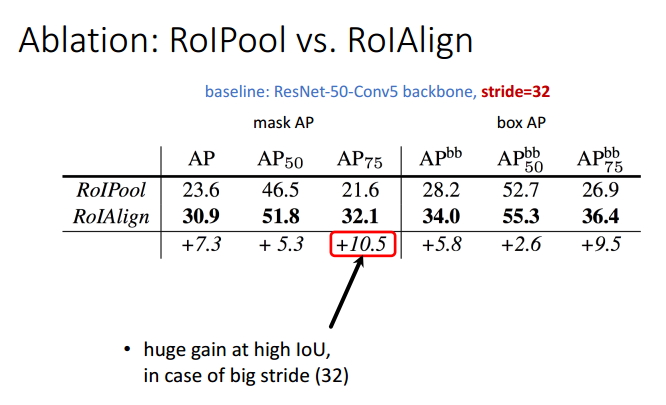
表1 ROI Pool和ROIAlign性能比较
由前面的分析,我们就可以定性的得到一个结论,ROIAlign会使得目标检测的效果有很大的性能提升。根据上表,我们进行定量的分析,结果表明,ROIAlign使得mask的AP值提升了10.5个百分点,使得box的AP值提升了9.5个百分点。

表2 Multinomial和Binary loss比较
根据上表的分析,我们知道Mask R-CNN利用两个分支将分类和mask生成解耦出来,然后利用Binary Loss代替Multinomial Loss,使得不同类别的mask之间消除了竞争。依赖于分类分支所预测的类别标签来选择输出对应的mask。使得mask分支不需要进行重新的分类工作,使得性能得到了提升。
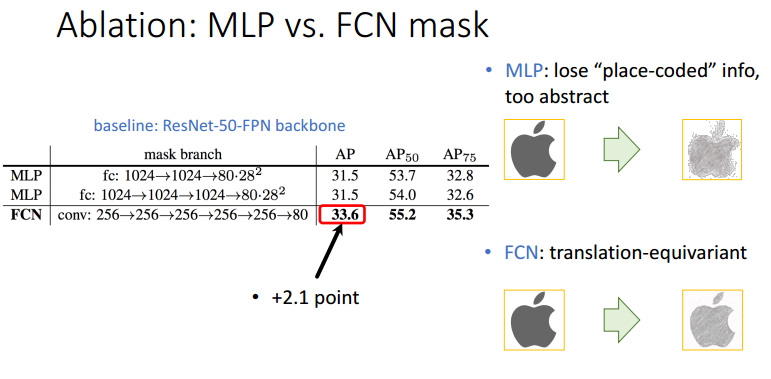
表3 MLP与FCN mask性能比较
如上表所示,MLP即利用FC来生成对应的mask,而FCN利用Conv来生成对应的mask,仅仅从参数量上来讲,后者比前者少了很多,这样不仅会节约大量的内存空间,同时会加速整个训练过程(因此需要进行推理、更新的参数更少啦)。除此之外,由于MLP获得的特征比较抽象,使得最终的mask中丢失了一部分有用信息,我们可以直观的从右边看到差别。从定性角度来讲,FCN使得mask AP值提升了2.1个百分点。
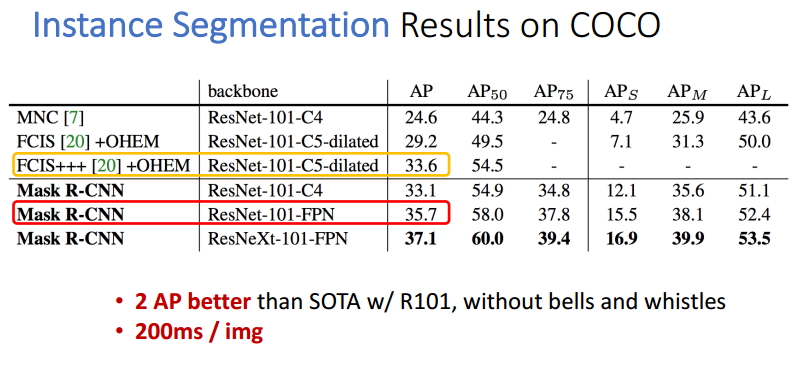
表4 实例分割的结果
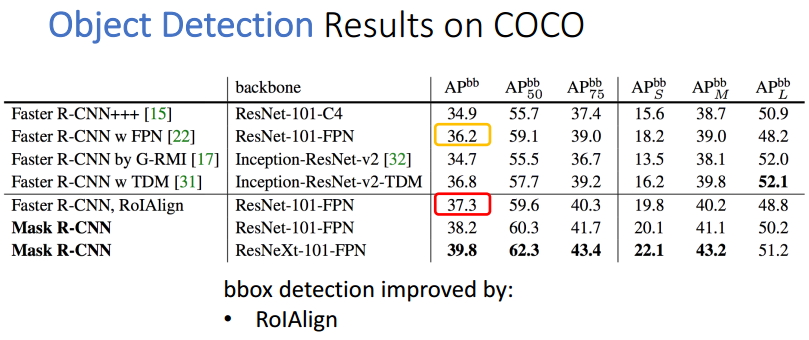
表5 目标检测的结果
观察目标检测的表格,我们可以发现使用了ROIAlign操作的Faster R-CNN算法性能得到了0.9个百分点,Mask R-CNN比最好的Faster R-CNN高出了2.6个百分点。
2. 定性结果分析


Mask R-CNN论文的主要贡献包括以下几点:
- 分析了ROI Pool的不足,提升了ROIAlign,提升了检测和实例分割的效果;
- 将实例分割分解为分类和mask生成两个分支,依赖于分类分支所预测的类别标签来选择输出对应的mask。同时利用Binary Loss代替Multinomial Loss,消除了不同类别的mask之间的竞争,生成了准确的二值mask;
- 并行进行分类和mask生成任务,对模型进行了加速。
参考文献:
[1] 何铠明大神在ICCV2017上在的Slides,视频链接
[2] Ardian Umam对Mask R-CNN的讲解,视频链接
注意事项:
[1] 该博客是本人原创博客,如果您对该博客感兴趣,想要转载该博客,请与我联系(qq邮箱:1575262785@qq.com),我会在第一时间回复大家,谢谢大家。
[2] 由于个人能力有限,该博客可能存在很多的问题,希望大家能够提出改进意见。
[3] 如果您在阅读本博客时遇到不理解的地方,希望可以联系我,我会及时的回复您,和您交流想法和意见,谢谢。
文章2
写在前面:经过了10多天对RCNN家族的目标检测算法的探究,从一个小白到了入门阶段,觉得有必要记录下这些天学习的知识,如有理解的不到位的地方,还望各位大佬指教。文章代码量比较大,详细的看可能需要一段的时间,等毕设开题答辩完了之后有时间我再修改修改,望谅解。
MASK RCNN 算法介绍:
Mask-RCNN 是何凯明大神继Faster-RCNN后的又一力作,集成了物体检测和实例分割两大功能,并且在性能上上也超过了Faster-RCNN。
整体框架:
图1. Mask-RCNN 整体架构
为了能够形成一定的对比,把Faster-RCNN的框架也展示出来,直接贴论文中的原图
是在predict中用,及其
图2.Faster-RCNN 整体架构
对比两张图可以很明显的看出,在Faster-RCNN的基础之上,Mask-RCNN加入了Mask branch(FCN)用于生成物体的掩模(object mask), 同时把RoI pooling 修改成为了RoI Align 用于处理mask与原图中物体不对齐的问题。因为在提取feature maps的主干conv layers中不好把FPN的结构绘制进去,所有在架构中就没有体现出了FPN的作用,将在后面讲述。
各大部件原理讲解
遵循自下而上的原则,依次的从backbone,FPN,RPN,anchors,RoIAlign,classification,box regression,mask这几个方面讲解。
backbone
backbone是一系列的卷积层用于提取图像的feature maps,比如可以是VGG16,VGG19,GooLeNet,ResNet50,ResNet101等,这里主要讲解的是ResNet101的结构。
ResNet(深度残差网络)实际上就是为了能够训练更加深层的网络提供了有利的思路,毕竟之前一段时间里面一直相信深度学习中网络越深得到的效果会更加的好,但是在构建了太深层之后又会使得网络退化。ResNet使用了跨层连接,使得训练更加容易。
图3.ResNet的一个block
网络试图让一个block的输出为f(x) + x,其中的f(x)为残差,当网络特别深的时候残差f(x)会趋近于0(我也没整明白为什么会趋近于0,大佬是这么说的....),从而f(x) + x就等于了x,即实现了恒等变换,不管训练多深性能起码不会变差。
在网络中只存在两种类型的block,在构建ResNet中一直是这两种block在交替或者循环的使用,所有接下来介绍一下这两种类型的block(indetity block, conv block):
图4. 跳过三个卷积的identity block
图中可以看出该block中直接把开端的x接入到第三个卷积层的输出,所以该x也被称为shortcut,相当于捷径似得。注意主路上第三个卷积层使用激活层,在相加之后才进行了ReLU的激活。
图5. 跳过三个卷积并在shortcut上存在卷积的conv block
与identity block其实是差不多的,只是在shortcut上加了一个卷积层再进行相加。注意主路上的第三个卷积层和shortcut上的卷积层都没激活,而是先相加再进行激活的。
其实在作者的代码中,主路中的第一个和第三个卷积都是1*1的卷积(改变的只有feature maps的通道大小,不改变长和宽),为了降维从而实现卷积运算的加速;注意需要保持shortcut和主路最后一个卷积层的channel要相同才能够进行相加。
下面展示一下ResNet101的整体框架:
图6.ResNet101整体架构
从图中可以得知ResNet分为了5个stage,C1-C5分别为每个Stage的输出,这些输出在后面的FPN中会使用到。你可以数数,看看是不是总共101层,数的时候除去BatchNorm层。注:stage4中是由一个conv_block和22个identity_block,如果要改成ResNet50网络的话只需要调整为5个identity_block.
ResNet101的介绍算是告一个段落了。
FPN(Feature Pyramid Network)
FPN的提出是为了实现更好的feature maps融合,一般的网络都是直接使用最后一层的feature maps,虽然最后一层的feature maps 语义强,但是位置和分辨率都比较低,容易检测不到比较小的物体。FPN的功能就是融合了底层到高层的feature maps ,从而充分的利用了提取到的各个阶段的Z征(ResNet中的C2-C5 )。
图7.FPN特征融合图
来说可能这
图8.特征融合图7中+的意义解释图
从图中可以看出+的意义为:左边的底层特征层通过1*1的卷积得到与上一层特征层相同的通道数;上层的特征层通过上采样得到与下一层特征层一样的长和宽再进行相加,从而得到了一个融合好的新的特征层。举个例子说就是:C4层经过1*1卷积得到与P5相同的通道,P5经过上采样后得到与C4相同的长和宽,最终两者进行相加,得到了融合层P4,其他的以此类推。
注:P2-P5是将来用于预测物体的bbox,box-regression,mask的,而P2-P6是用于训练RPN的,即P6只用于RPN网络中。
anchors
anchors英文翻译为锚点、锚框,是用于在feature maps的像素点上产生一系列的框,各个框的大小由scale和ratio这两个参数来确定的,比如scale =[128],ratio=[0.5,1,1.5] ,则每个像素点可以产生3个不同大小的框。这个三个框是由保持框的面积不变,来通过ratio的值来改变其长宽比,从而产生不同大小的框。
假设我们现在绘制feature maps上一个像素点的anchors,则能得到下图:
图9.一个像素点上的anchors
由于使用到了FPN,在论文中也有说到每层的feature map 的scale是保持不变的,只是改变每层的ratio,且越深scale的值就越小,因为越深的话feature map就越小。论文中提供的每层的scale为(32, 64, 128, 256, 512),ratio为(0.5, 1, 2),所有每一层的每一个像素点都会产生3个锚框,而总共会有15种不同大小的锚框。
对于图像的中心点会有15个不同大小锚框,如下图:
图10.图像中心点的锚框展示
RPN(Region Proposal Network)
RNP顾名思义:区域推荐的网络,用于帮助网络推荐感兴趣的区域,也是Faster-RCNN中重要的一部分。
图11. 论文中RPN介绍图
1. conv feature map:上文中的P2-P6
2. kk anchor boxes:在每个sliding window的点上的初始化的参考区域。每个sliding window的点上取得anchor boxes都一样。只要知道sliding window的点的坐标,就可以计算出每个anchor box的具体坐标。每个特征层的k=3k,先确定一个base anchor,如P6大小为32×3216×16,保持面积不变使其长宽比为(0.5,1,2)(0.5,1,2),得到3个anchors。
3. intermediate layer:作者代码中使用的是512d的conv中间层,再通过1×11×1的卷积获得2k2k scores和4k4k cordinates。作者在文中解释为用全卷积方式替代全连接。
4. 2k2k scores:对于每个anchor,用了softmax layer的方式,会或得两个置信度。一个置信度是前景,一个置信度是背景
5. 4k4k cordinates:每个窗口的坐标。这个坐标并不是anchor的绝对坐标,而是与ground_truth偏差的回归。
在作者代码中RPN的网络具体结构如下:
图12. RPN结构图
注:在开始看作者代码的时候也是有些蒙圈的,为什么给RPN只传入了feature map和k值就可以,而没有给出之前创建好的anchors,后来才明白作者在数据产生那一块做了修改,他在产生数据的时候就给每一个创建好的anchors标注好了是positive还是negative以及需要回归的box值,所有只需要训练RPN就好了。
RoIAlign
Mask-RCNN中提出了一个新的idea就是RoIAlign,其实RoIAlign就是在RoI pooling上稍微改动过来的,但是为什么在模型中不能使用RoI pooling呢?现在我们来直观的解释一下。
图13. RoIAlign与RoIpooling对比
可以看出来在RoI pooling中出现了两次的取整,虽然在feature maps上取整看起来只是小数级别的数,但是当把feature map还原到原图上时就会出现很大的偏差,比如第一次的取整是舍去了0.78,还原到原图时是0.78*32=25,第一次取整就存在了25个像素点的偏差,在第二次的取整后的偏差更加的大。对于分类和物体检测来说可能这不是一个很大的误差,但是对于实例分割而言,这是一个非常大的偏差,因为mask出现没对齐的话在视觉上是很明显的。而RoIAlign的提出就是为了解决这个问题,解决不对齐的问题。
RoIAlign的思想其实很简单,就是取消了取整的这种粗暴做法,而是通过双线性插值(听我师姐说好像有一篇论文用到了积分,而且性能得到了一定的提高)来得到固定四个点坐标的像素值,从而使得不连续的操作变得连续起来,返回到原图的时候误差也就更加的小。
1.划分7*7的bin(可以直接精确的映射到feature map上来划分bin,不用第一次ROI的量化)
图14. ROI分割7*7的bin
2.接着是对每一个bin中进行双线性插值,得到四个点(在论文中也说到过插值一个点的效果其实和四个点的效果是一样的,在代码中作者为了方便也就采用了插值一个点)
图15.插值示意图
3.通过插完值之后再进行max pooling得到最终的7*7的ROI,即完成了RoIAlign的过程。是不是觉得大佬提出来的高大上名字的方法还是挺简单的。
classifier
其中包括了物体检测最终的classes和bounding boxes。该部分是利用了之前检测到了ROI进行分类和回归(是分别对每一个ROI进行)。
图16. classifier的结构
论文中提到用1024个神经元的全连接网络,但是在代码中作者用卷积深度为1024的卷积层来代替这个全连接层。
mask
mask的预测也是在ROI之后的,通过FCN(Fully Convolution Network)来进行的。注意这个是实现的语义分割而不是实例分割。因为每个ROI只对应一个物体,只需对其进行语义分割就好,相当于了实例分割了,这也是Mask-RCNN与其他分割框架的不同,是先分类再分割。
图17. mask的结构
对于每一个ROI的mask都有80类,因为coco上的数据集是80个类别,并且这样做的话是为了减弱类别间的竞争,从而得到更加好的结果。
该模型的训练和预测是分开的,不是套用同一个流程。在训练的时候,classifier和mask都是同时进行的;在预测的时候,显示得到classifier的结果,然后再把此结果传入到mask预测中得到mask,有一定的先后顺序。
Mask-RCNN 代码实现
文中代码的作者是Matterport: 代码github地址,文中详细的介绍了各个部分,以及给了demo和各个实现的步骤及其可视化。
代码总体框架
先贴出我对作者代码流程的理解,及其画出的流程图。
图18.代码中training的流程图
图19.代码中predict的流程图
两张流程图其实已经把作者的代码各个关键部分都展示出来了,并写出了哪些层是在training中用,哪些层是在predict中用,及其层的输出和需要的输入。可以清晰的看出training和predict过程是存在较大的差异的,也是之前说过的,training的时候mask与classifier是并行的,predict时候是先classifier再mask,并且两个模型的输入输出差异也较大。
已经有一篇博客写的很好,对作者代码的那几个ipynb都运行了一遍,并且加上了自己的理解。非常的感谢那位博主,之前在探究Mask-RCNN的时候那边博文对我的帮助很大,有兴趣的可以看看那片博文:博文链接
我这里就主要的介绍一下作者中的几个.py文件:visualize.py,utils.py,model.py,最后再实现一下如何使用该代码处理视频
因为代码量比较大,我就挑一些本人认为重要的代码贴出来。
visualize.py
##利用不同的颜色为每个instance标注出mask,根据box的坐标在instance的周围画上矩形
##根据class_ids来寻找到对于的class_names。三个步骤中的任何一个都可以去掉,比如把mask部分
##去掉,那就只剩下box和label。同时可以筛选出class_ids从而显示制定类别的instance显示,下面
##这段就是用来显示人的,其实也就把人的id选出来,然后记录它们在输入ids中的相对位置,从而得到
##相对应的box与mask的准确顺序
def display_instances_person(image, boxes, masks, class_ids, class_names,
                      scores=None, title="",
                      figsize=(16, 16), ax=None):
    """
    the funtion perform a role for displaying the persons who locate in the image
    boxes: [num_instance, (y1, x1, y2, x2, class_id)] in image coordinates.
    masks: [height, width, num_instances]
    class_ids: [num_instances]
    class_names: list of class names of the dataset
    scores: (optional) confidence scores for each box
    figsize: (optional) the size of the image.
    """
    #compute the number of person
    temp = []
    for i, person in enumerate(class_ids):
        if person == 1:
            temp.append(i)
        else:
            pass
    person_number = len(temp)

    person_site = {}

    for i in range(person_number):
        person_site[i] = temp[i]


    NN = boxes.shape[0]
    # Number of person'instances
    #N = boxes.shape[0]
    N = person_number
    if not N:
        print("
*** No person to display ***
")
    else:
       # assert boxes.shape[0] == masks.shape[-1] == class_ids.shape[0]
        pass

    if not ax:
        _, ax = plt.subplots(1, figsize=figsize)

    # Generate random colors
    colors = random_colors(NN)

    # Show area outside image boundaries.
    height, width = image.shape[:2]
    ax.set_ylim(height + 10, -10)
    ax.set_xlim(-10, width + 10)
    ax.axis('off')
    ax.set_title(title)

    masked_image = image.astype(np.uint32).copy()
    for a in range(N):

        color = colors[a]
        i = person_site[a]


        # Bounding box
        if not np.any(boxes[i]):
            # Skip this instance. Has no bbox. Likely lost in image cropping.
            continue
        y1, x1, y2, x2 = boxes[i]
        p = patches.Rectangle((x1, y1), x2 - x1, y2 - y1, linewidth=2,
                              alpha=0.7, linestyle="dashed",
                              edgecolor=color, facecolor='none')
        ax.add_patch(p)

        # Label
        class_id = class_ids[i]
        score = scores[i] if scores is not None else None
        label = class_names[class_id]
        x = random.randint(x1, (x1 + x2) // 2)
        caption = "{} {:.3f}".format(label, score) if score else label
        ax.text(x1, y1 + 8, caption,
                color='w', size=11, backgroundcolor="none")

         # Mask
        mask = masks[:, :, i]
        masked_image = apply_mask(masked_image, mask, color)

        # Mask Polygon
        # Pad to ensure proper polygons for masks that touch image edges.
        padded_mask = np.zeros(
            (mask.shape[0] + 2, mask.shape[1] + 2), dtype=np.uint8)
        padded_mask[1:-1, 1:-1] = mask
        contours = find_contours(padded_mask, 0.5)
        for verts in contours:
            # Subtract the padding and flip (y, x) to (x, y)
            verts = np.fliplr(verts) - 1
            p = Polygon(verts, facecolor="none", edgecolor=color)
            ax.add_patch(p)

    ax.imshow(masked_image.astype(np.uint8))
    plt.show()
utils.py
##因为一个自定义层的输入的batch只能为1,所以需要把input分成batch为1的输入,
##然后通过graph_fn计算出output,最终再合在一块,即间接的实现了计算了一个batch的操作
# ## Batch Slicing
# Some custom layers support a batch size of 1 only, and require a lot of work
# to support batches greater than 1. This function slices an input tensor
# across the batch dimension and feeds batches of size 1. Effectively,
# an easy way to support batches > 1 quickly with little code modification.
# In the long run, it's more efficient to modify the code to support large
# batches and getting rid of this function. Consider this a temporary solution
def batch_slice(inputs, graph_fn, batch_size, names=None):
    """Splits inputs into slices and feeds each slice to a copy of the given
    computation graph and then combines the results. It allows you to run a
    graph on a batch of inputs even if the graph is written to support one
    instance only.

    inputs: list of tensors. All must have the same first dimension length
    graph_fn: A function that returns a TF tensor that's part of a graph.
    batch_size: number of slices to divide the data into.
    names: If provided, assigns names to the resulting tensors.
    """
    if not isinstance(inputs, list):
        inputs = [inputs]

    outputs = []
    for i in range(batch_size):
        inputs_slice = [x[i] for x in inputs]
        output_slice = graph_fn(*inputs_slice)
        if not isinstance(output_slice, (tuple, list)):
            output_slice = [output_slice]
        outputs.append(output_slice)
    # Change outputs from a list of slices where each is
    # a list of outputs to a list of outputs and each has
    # a list of slices
    outputs = list(zip(*outputs))

    if names is None:
        names = [None] * len(outputs)

    result = [tf.stack(o, axis=0, name=n)
              for o, n in zip(outputs, names)]
    if len(result) == 1:
        result = result[0]

    return result
############################################################
# Anchors
############################################################
##对特征图上的pixel产生anchors,根据anchor_stride来确定pixel产生anchors的密度
##即是每个像素点产生anchors,还是每两个产生,以此类推
def generate_anchors(scales, ratios, shape, feature_stride, anchor_stride):
"""
scales: 1D array of anchor sizes in pixels. Example: [32, 64, 128]
ratios: 1D array of anchor ratios of width/height. Example: [0.5, 1, 2]
shape: [height, width] spatial shape of the feature map over which
to generate anchors.
feature_stride: Stride of the feature map relative to the image in pixels.
anchor_stride: Stride of anchors on the feature map. For example, if the
value is 2 then generate anchors for every other feature map pixel.
"""
# Get all combinations of scales and ratios
scales, ratios = np.meshgrid(np.array(scales), np.array(ratios))
scales = scales.flatten()
ratios = ratios.flatten()
# Enumerate heights and widths from scales and ratios
heights = scales / np.sqrt(ratios)
widths = scales * np.sqrt(ratios)
# Enumerate shifts in feature space
shifts_y = np.arange(0, shape[0], anchor_stride) * feature_stride
shifts_x = np.arange(0, shape[1], anchor_stride) * feature_stride
shifts_x, shifts_y = np.meshgrid(shifts_x, shifts_y)
# Enumerate combinations of shifts, widths, and heights
box_widths, box_centers_x = np.meshgrid(widths, shifts_x)
box_heights, box_centers_y = np.meshgrid(heights, shifts_y)
# Reshape to get a list of (y, x) and a list of (h, w)
box_centers = np.stack(
[box_centers_y, box_centers_x], axis=2).reshape([-1, 2])
box_sizes = np.stack([box_heights, box_widths], axis=2).reshape([-1, 2])
# Convert to corner coordinates (y1, x1, y2, x2)
boxes = np.concatenate([box_centers - 0.5 * box_sizes,
box_centers + 0.5 * box_sizes], axis=1)
return boxes
#调用generate_anchors()为每一层的feature map都生成anchors,最终在合成在一块。自己层中的scale是相同的
def generate_pyramid_anchors(scales, ratios, feature_shapes, feature_strides,
anchor_stride):
"""Generate anchors at different levels of a feature pyramid. Each scale
is associated with a level of the pyramid, but each ratio is used in
all levels of the pyramid.
Returns:
anchors: [N, (y1, x1, y2, x2)]. All generated anchors in one array. Sorted
with the same order of the given scales. So, anchors of scale[0] come
first, then anchors of scale[1], and so on.
"""
# Anchors
# [anchor_count, (y1, x1, y2, x2)]
anchors = []
for i in range(len(scales)):
anchors.append(generate_anchors(scales[i], ratios, feature_shapes[i],
feature_strides[i], anchor_stride))
return np.concatenate(anchors, axis=0)
model.py
###建立ResNet101网络的架构,其中identity_block和conv_block就是上文中讲解。
def resnet_graph(input_image, architecture, stage5=False):
    assert architecture in ["resnet50", "resnet101"]
    # Stage 1
    x = KL.ZeroPadding2D((3, 3))(input_image)
    x = KL.Conv2D(64, (7, 7), strides=(2, 2), name='conv1', use_bias=True)(x)
    x = BatchNorm(axis=3, name='bn_conv1')(x)
    x = KL.Activation('relu')(x)
    C1 = x = KL.MaxPooling2D((3, 3), strides=(2, 2), padding="same")(x)
    # Stage 2
    x = conv_block(x, 3, [64, 64, 256], stage=2, block='a', strides=(1, 1))
    x = identity_block(x, 3, [64, 64, 256], stage=2, block='b')
    C2 = x = identity_block(x, 3, [64, 64, 256], stage=2, block='c')
    # Stage 3
    x = conv_block(x, 3, [128, 128, 512], stage=3, block='a')
    x = identity_block(x, 3, [128, 128, 512], stage=3, block='b')
    x = identity_block(x, 3, [128, 128, 512], stage=3, block='c')
    C3 = x = identity_block(x, 3, [128, 128, 512], stage=3, block='d')
    # Stage 4
    x = conv_block(x, 3, [256, 256, 1024], stage=4, block='a')
    block_count = {"resnet50": 5, "resnet101": 22}[architecture]
    for i in range(block_count):
        x = identity_block(x, 3, [256, 256, 1024], stage=4, block=chr(98 + i))
    C4 = x
    # Stage 5
    if stage5:
        x = conv_block(x, 3, [512, 512, 2048], stage=5, block='a')
        x = identity_block(x, 3, [512, 512, 2048], stage=5, block='b')
        C5 = x = identity_block(x, 3, [512, 512, 2048], stage=5, block='c')
    else:
        C5 = None
    return [C1, C2, C3, C4, C5]
Proposal Layer:
class ProposalLayer(KE.Layer):
    """
    Inputs:
        rpn_probs: [batch, anchors, (bg prob, fg prob)]
        rpn_bbox: [batch, anchors, (dy, dx, log(dh), log(dw))]

    Returns:
        Proposals in normalized coordinates [batch, rois, (y1, x1, y2, x2)]
    """

    def __init__(self, proposal_count, nms_threshold, anchors,
                 config=None, **kwargs):
        """
        anchors: [N, (y1, x1, y2, x2)] anchors defined in image coordinates
        """
        super(ProposalLayer, self).__init__(**kwargs)
        self.config = config
        self.proposal_count = proposal_count
        self.nms_threshold = nms_threshold
        self.anchors = anchors.astype(np.float32)

    def call(self, inputs):
        ###实现了将传入的anchors,及其scores、deltas进行topK的推荐和nms的推荐,最终输出
        ###数量为proposal_counts的proposals。其中的scores和deltas都是RPN网络中得到的
        # Box Scores. Use the foreground class confidence. [Batch, num_rois, 1]
        scores = inputs[0][:, :, 1]
        # Box deltas [batch, num_rois, 4]
        deltas = inputs[1]
        deltas = deltas * np.reshape(self.config.RPN_BBOX_STD_DEV, [1, 1, 4])
        # Base anchors
        anchors = self.anchors

        # Improve performance by trimming to top anchors by score
        # and doing the rest on the smaller subset.
        pre_nms_limit = min(6000, self.anchors.shape[0])
        ix = tf.nn.top_k(scores, pre_nms_limit, sorted=True,
                         name="top_anchors").indices
        scores = utils.batch_slice([scores, ix], lambda x, y: tf.gather(x, y),
                                   self.config.IMAGES_PER_GPU)
        deltas = utils.batch_slice([deltas, ix], lambda x, y: tf.gather(x, y),
                                   self.config.IMAGES_PER_GPU)
        anchors = utils.batch_slice(ix, lambda x: tf.gather(anchors, x),
                                    self.config.IMAGES_PER_GPU,
                                    names=["pre_nms_anchors"])

        # Apply deltas to anchors to get refined anchors.
        # [batch, N, (y1, x1, y2, x2)]
        ##利用deltas在anchors上,得到精化的boxs
        boxes = utils.batch_slice([anchors, deltas],
                                  lambda x, y: apply_box_deltas_graph(x, y),
                                  self.config.IMAGES_PER_GPU,
                                  names=["refined_anchors"])

        # Clip to image boundaries. [batch, N, (y1, x1, y2, x2)]
        height, width = self.config.IMAGE_SHAPE[:2]
        window = np.array([0, 0, height, width]).astype(np.float32)
        boxes = utils.batch_slice(boxes,
                                  lambda x: clip_boxes_graph(x, window),
                                  self.config.IMAGES_PER_GPU,
                                  names=["refined_anchors_clipped"])

        # Filter out small boxes
        # According to Xinlei Chen's paper, this reduces detection accuracy
        # for small objects, so we're skipping it.

        # Normalize dimensions to range of 0 to 1.
        normalized_boxes = boxes / np.array([[height, width, height, width]])

        # Non-max suppression
        def nms(normalized_boxes, scores):
            indices = tf.image.non_max_suppression(
                normalized_boxes, scores, self.proposal_count,
                self.nms_threshold, name="rpn_non_max_suppression")
            proposals = tf.gather(normalized_boxes, indices)
            # Pad if needed
            padding = tf.maximum(self.proposal_count - tf.shape(proposals)[0], 0)
            ##填充到与proposal_count的数量一样,往下填充。
            proposals = tf.pad(proposals, [(0, padding), (0, 0)])
            return proposals
        proposals = utils.batch_slice([normalized_boxes, scores], nms,
                                      self.config.IMAGES_PER_GPU)
        return proposals
RoIAlign Layer:
class PyramidROIAlign(KE.Layer):
    """Implements ROI Pooling on multiple levels of the feature pyramid.

    Params:
    - pool_shape: [height, width] of the output pooled regions. Usually [7, 7]
    - image_shape: [height, width, chanells]. Shape of input image in pixels

    Inputs:
    - boxes: [batch, num_boxes, (y1, x1, y2, x2)] in normalized
             coordinates. Possibly padded with zeros if not enough
             boxes to fill the array.
    - Feature maps: List of feature maps from different levels of the pyramid.
                    Each is [batch, height, width, channels]

    Output:
    Pooled regions in the shape: [batch, num_boxes, height, width, channels].
    The width and height are those specific in the pool_shape in the layer
    constructor.
    """

    def __init__(self, pool_shape, image_shape, **kwargs):
        super(PyramidROIAlign, self).__init__(**kwargs)
        self.pool_shape = tuple(pool_shape)
        self.image_shape = tuple(image_shape)

    def call(self, inputs):
        ##计算在不同层的ROI下的ROIalig pooling,应该是计算了每一个lever的所有channels
        # Crop boxes [batch, num_boxes, (y1, x1, y2, x2)] in normalized coords
        boxes = inputs[0]

        # Feature Maps. List of feature maps from different level of the
        # feature pyramid. Each is [batch, height, width, channels]
        feature_maps = inputs[1:]

        # Assign each ROI to a level in the pyramid based on the ROI area.
        y1, x1, y2, x2 = tf.split(boxes, 4, axis=2)
        h = y2 - y1
        w = x2 - x1
        # Equation 1 in the Feature Pyramid Networks paper. Account for
        # the fact that our coordinates are normalized here.
        # e.g. a 224x224 ROI (in pixels) maps to P4
        ###计算ROI属于FPN中的哪一个level
        image_area = tf.cast(
            self.image_shape[0] * self.image_shape[1], tf.float32)
        roi_level = log2_graph(tf.sqrt(h * w) / (224.0 / tf.sqrt(image_area)))
        roi_level = tf.minimum(5, tf.maximum(
            2, 4 + tf.cast(tf.round(roi_level), tf.int32)))
        roi_level = tf.squeeze(roi_level, 2)

        # Loop through levels and apply ROI pooling to each. P2 to P5.
        pooled = []
        box_to_level = []
        for i, level in enumerate(range(2, 6)):
            ##应该是一个二维的array,存储这哪一层的哪些box的indicies
            ix = tf.where(tf.equal(roi_level, level))
            level_boxes = tf.gather_nd(boxes, ix)

            # Box indicies for crop_and_resize.
            ##应该是只存储当前lever的box的indices
            box_indices = tf.cast(ix[:, 0], tf.int32)

            # Keep track of which box is mapped to which level
            box_to_level.append(ix)

            # Stop gradient propogation to ROI proposals
            level_boxes = tf.stop_gradient(level_boxes)
            box_indices = tf.stop_gradient(box_indices)

            # 因为插值一个点和四个点的性能影响不大故插一个点
            pooled.append(tf.image.crop_and_resize(
                feature_maps[i], level_boxes, box_indices, self.pool_shape,
                method="bilinear"))

        # Pack pooled features into one tensor
        pooled = tf.concat(pooled, axis=0)

        # Pack box_to_level mapping into one array and add another
        # column representing the order of pooled boxes
        box_to_level = tf.concat(box_to_level, axis=0)
        box_range = tf.expand_dims(tf.range(tf.shape(box_to_level)[0]), 1)
        box_to_level = tf.concat([tf.cast(box_to_level, tf.int32), box_range],
                                 axis=1)

        # Rearrange pooled features to match the order of the original boxes
        # Sort box_to_level by batch then box index
        # TF doesn't have a way to sort by two columns, so merge them and sort.
        sorting_tensor = box_to_level[:, 0] * 100000 + box_to_level[:, 1]
        ix = tf.nn.top_k(sorting_tensor, k=tf.shape(
            box_to_level)[0]).indices[::-1]
        ix = tf.gather(box_to_level[:, 2], ix)
        pooled = tf.gather(pooled, ix)

        # Re-add the batch dimension
        pooled = tf.expand_dims(pooled, 0)
        return pooled
Detection_Target_Layer的主要函数:Detection_targets_graph()
 #根据proposal和gt_box的overlap来确定正样本和负样本,并按照sample_ratio和train_anchor_per_image
    #的大小进行采样,最终得出rois(n&p),class_id,delta,masks,其中进行了padding
def detection_targets_graph(proposals, gt_class_ids, gt_boxes, gt_masks, config):
    #Subsamples 抽样
    """Generates detection targets for one image. Subsamples proposals and
    generates target class IDs, bounding box deltas, and masks for each.

    Inputs:
    proposals: [N, (y1, x1, y2, x2)] in normalized coordinates. Might
               be zero padded if there are not enough proposals.
    gt_class_ids: [MAX_GT_INSTANCES] int class IDs
    gt_boxes: [MAX_GT_INSTANCES, (y1, x1, y2, x2)] in normalized coordinates.
    gt_masks: [height, width, MAX_GT_INSTANCES] of boolean type.

    Returns: Target ROIs and corresponding class IDs, bounding box shifts,
    and masks.
    rois: [TRAIN_ROIS_PER_IMAGE, (y1, x1, y2, x2)] in normalized coordinates
    class_ids: [TRAIN_ROIS_PER_IMAGE]. Integer class IDs. Zero padded.
    deltas: [TRAIN_ROIS_PER_IMAGE, NUM_CLASSES, (dy, dx, log(dh), log(dw))]
            Class-specific bbox refinments.
    masks: [TRAIN_ROIS_PER_IMAGE, height, width). Masks cropped to bbox
           boundaries and resized to neural network output size.

    Note: Returned arrays might be zero padded if not enough target ROIs.
    """
    # Assertions
    asserts = [
        tf.Assert(tf.greater(tf.shape(proposals)[0], 0), [proposals],
                  name="roi_assertion"),
    ]
    with tf.control_dependencies(asserts):
        proposals = tf.identity(proposals)

    # Remove zero padding
    proposals, _ = trim_zeros_graph(proposals, name="trim_proposals")
    gt_boxes, non_zeros = trim_zeros_graph(gt_boxes, name="trim_gt_boxes")
    gt_class_ids = tf.boolean_mask(gt_class_ids, non_zeros,
                                   name="trim_gt_class_ids")
    gt_masks = tf.gather(gt_masks, tf.where(non_zeros)[:, 0], axis=2,
                         name="trim_gt_masks")

    # Handle COCO crowds
    # A crowd box in COCO is a bounding box around several instances. Exclude
    # them from training. A crowd box is given a negative class ID.
    crowd_ix = tf.where(gt_class_ids < 0)[:, 0]
    non_crowd_ix = tf.where(gt_class_ids > 0)[:, 0]
    crowd_boxes = tf.gather(gt_boxes, crowd_ix)
    crowd_masks = tf.gather(gt_masks, crowd_ix, axis=2)
    gt_class_ids = tf.gather(gt_class_ids, non_crowd_ix)
    gt_boxes = tf.gather(gt_boxes, non_crowd_ix)
    gt_masks = tf.gather(gt_masks, non_crowd_ix, axis=2)

    # Compute overlaps matrix [proposals, gt_boxes]
    overlaps = overlaps_graph(proposals, gt_boxes)

    # Compute overlaps with crowd boxes [anchors, crowds]
    crowd_overlaps = overlaps_graph(proposals, crowd_boxes)
    crowd_iou_max = tf.reduce_max(crowd_overlaps, axis=1)
    no_crowd_bool = (crowd_iou_max < 0.001)

    # Determine postive and negative ROIs
    roi_iou_max = tf.reduce_max(overlaps, axis=1)
    # 1. Positive ROIs are those with >= 0.5 IoU with a GT box
    positive_roi_bool = (roi_iou_max >= 0.5)
    positive_indices = tf.where(positive_roi_bool)[:, 0]
    # 2. Negative ROIs are those with < 0.5 with every GT box. Skip crowds.
    negative_indices = tf.where(tf.logical_and(roi_iou_max < 0.5, no_crowd_bool))[:, 0]

    # Subsample ROIs. Aim for 33% positive
    # Positive ROIs
    positive_count = int(config.TRAIN_ROIS_PER_IMAGE *
                         config.ROI_POSITIVE_RATIO)
    positive_indices = tf.random_shuffle(positive_indices)[:positive_count]
    positive_count = tf.shape(positive_indices)[0]
    # Negative ROIs. Add enough to maintain positive:negative ratio.
    r = 1.0 / config.ROI_POSITIVE_RATIO
    negative_count = tf.cast(r * tf.cast(positive_count, tf.float32), tf.int32) - positive_count
    negative_indices = tf.random_shuffle(negative_indices)[:negative_count]
    # Gather selected ROIs
    positive_rois = tf.gather(proposals, positive_indices)
    negative_rois = tf.gather(proposals, negative_indices)

    # Assign positive ROIs to GT boxes.
    positive_overlaps = tf.gather(overlaps, positive_indices)
    ##最终需要的indices
    roi_gt_box_assignment = tf.argmax(positive_overlaps, axis=1)
    roi_gt_boxes = tf.gather(gt_boxes, roi_gt_box_assignment)
    roi_gt_class_ids = tf.gather(gt_class_ids, roi_gt_box_assignment)

    # Compute bbox refinement for positive ROIs
    deltas = utils.box_refinement_graph(positive_rois, roi_gt_boxes)
    deltas /= config.BBOX_STD_DEV

    # Assign positive ROIs to GT masks
    # Permute masks to [N, height, width, 1]
    transposed_masks = tf.expand_dims(tf.transpose(gt_masks, [2, 0, 1]), -1)
    # Pick the right mask for each ROI
    roi_masks = tf.gather(transposed_masks, roi_gt_box_assignment)

    # Compute mask targets
    boxes = positive_rois
    if config.USE_MINI_MASK:
        # Transform ROI coordinates from normalized image space
        # to normalized mini-mask space.
        y1, x1, y2, x2 = tf.split(positive_rois, 4, axis=1)
        gt_y1, gt_x1, gt_y2, gt_x2 = tf.split(roi_gt_boxes, 4, axis=1)
        gt_h = gt_y2 - gt_y1
        gt_w = gt_x2 - gt_x1
        y1 = (y1 - gt_y1) / gt_h
        x1 = (x1 - gt_x1) / gt_w
        y2 = (y2 - gt_y1) / gt_h
        x2 = (x2 - gt_x1) / gt_w
        boxes = tf.concat([y1, x1, y2, x2], 1)
    box_ids = tf.range(0, tf.shape(roi_masks)[0])
    masks = tf.image.crop_and_resize(tf.cast(roi_masks, tf.float32), boxes,
                                     box_ids,
                                     config.MASK_SHAPE)
    # Remove the extra dimension from masks.
    masks = tf.squeeze(masks, axis=3)

    # Threshold mask pixels at 0.5 to have GT masks be 0 or 1 to use with
    # binary cross entropy loss.
    masks = tf.round(masks)
    ##进行填充
    # Append negative ROIs and pad bbox deltas and masks that
    # are not used for negative ROIs with zeros.
    rois = tf.concat([positive_rois, negative_rois], axis=0)
    N = tf.shape(negative_rois)[0]
    P = tf.maximum(config.TRAIN_ROIS_PER_IMAGE - tf.shape(rois)[0], 0)
    rois = tf.pad(rois, [(0, P), (0, 0)])
    roi_gt_boxes = tf.pad(roi_gt_boxes, [(0, N + P), (0, 0)])
    roi_gt_cliass_ids = tf.pad(roi_gt_class_ids, [(0, N + P)])
    deltas = tf.pad(deltas, [(0, N + P), (0, 0)])
    masks = tf.pad(masks, [[0, N + P], (0, 0), (0, 0)])

    return rois, roi_gt_class_ids, deltas, masks
DetectionLayer的主要函数:refine_detetions()
#根据rios和probs(每个ROI都有总类别个数的probs)和deltas进行检测的精化,得到固定数量的精化目标。
def refine_detections(rois, probs, deltas, window, config):
    """Refine classified proposals and filter overlaps and return final
    detections.
    #输入为N个rois、N个具有num_classes的probs,scores由probs得出
    Inputs:
        rois: [N, (y1, x1, y2, x2)] in normalized coordinates
        probs: [N, num_classes]. Class probabilities.
        deltas: [N, num_classes, (dy, dx, log(dh), log(dw))]. Class-specific
                bounding box deltas.
        window: (y1, x1, y2, x2) in image coordinates. The part of the image
            that contains the image excluding the padding.

    Returns detections shaped: [N, (y1, x1, y2, x2, class_id, score)]
    """
    # Class IDs per ROI
    class_ids = np.argmax(probs, axis=1)
    # Class probability of the top class of each ROI
    class_scores = probs[np.arange(class_ids.shape[0]), class_ids]
    # Class-specific bounding box deltas
    deltas_specific = deltas[np.arange(deltas.shape[0]), class_ids]
    # Apply bounding box deltas
    # Shape: [boxes, (y1, x1, y2, x2)] in normalized coordinates
    refined_rois = utils.apply_box_deltas(
        rois, deltas_specific * config.BBOX_STD_DEV)
    # Convert coordiates to image domain
    # TODO: better to keep them normalized until later
    height, width = config.IMAGE_SHAPE[:2]
    refined_rois *= np.array([height, width, height, width])
    # Clip boxes to image window
    refined_rois = clip_to_window(window, refined_rois)
    # Round and cast to int since we're deadling with pixels now
    refined_rois = np.rint(refined_rois).astype(np.int32)

    # TODO: Filter out boxes with zero area

    # Filter out background boxes
    keep = np.where(class_ids > 0)[0]
    # Filter out low confidence boxes
    if config.DETECTION_MIN_CONFIDENCE:
        keep = np.intersect1d(
            keep, np.where(class_scores >= config.DETECTION_MIN_CONFIDENCE)[0])


    #留下既满足是前景又满足scores大于MIN_CONFIDENCE的
    # Apply per-class NMS
    pre_nms_class_ids = class_ids[keep]
    pre_nms_scores = class_scores[keep]
    pre_nms_rois = refined_rois[keep]
    nms_keep = []
    #分类别的进行NMS。
    for class_id in np.unique(pre_nms_class_ids):
        # Pick detections of this class
        ixs = np.where(pre_nms_class_ids == class_id)[0]
        # Apply NMS
        class_keep = utils.non_max_suppression(
            pre_nms_rois[ixs], pre_nms_scores[ixs],
            config.DETECTION_NMS_THRESHOLD)
        # Map indicies
        class_keep = keep[ixs[class_keep]]
        nms_keep = np.union1d(nms_keep, class_keep)
    keep = np.intersect1d(keep, nms_keep).astype(np.int32)

    # Keep top detections
    roi_count = config.DETECTION_MAX_INSTANCES
    top_ids = np.argsort(class_scores[keep])[::-1][:roi_count]
    keep = keep[top_ids]

    # Arrange output as [N, (y1, x1, y2, x2, class_id, score)]
    # Coordinates are in image domain.
    result = np.hstack((refined_rois[keep],
                        class_ids[keep][..., np.newaxis],
                        class_scores[keep][..., np.newaxis]))
    return result
像RPN、fpn_classifier_graph、bulid_fpn_mask_graph等网络结构都和论文中描述的一样,这里就不贴出代码赘述了。
因为论文中添加了mask这个分支,这里就单独的把mask的loss代码贴出来,也是之前Faster-RCNN中没有的。
##根据预测的mask和真实的mask来计算binary_cross_entropy的loss,且只有positive ROIS 贡献
##loss,且每一个ROI只能对应一个类别的mask(因为防止种类竞争,每个ROIS预测了num_class个的MASK)
def mrcnn_mask_loss_graph(target_masks, target_class_ids, pred_masks):
    """Mask binary cross-entropy loss for the masks head.

    target_masks: [batch, num_rois, height, width].
        A float32 tensor of values 0 or 1. Uses zero padding to fill array.
    target_class_ids: [batch, num_rois]. Integer class IDs. Zero padded.
    pred_masks: [batch, proposals, height, width, num_classes] float32 tensor
                with values from 0 to 1.
    """
    # Reshape for simplicity. Merge first two dimensions into one.
    target_class_ids = K.reshape(target_class_ids, (-1,))
    mask_shape = tf.shape(target_masks)
    target_masks = K.reshape(target_masks, (-1, mask_shape[2], mask_shape[3]))
    pred_shape = tf.shape(pred_masks)
    #shape:[batch*proposal, height, width, number_class]
    pred_masks = K.reshape(pred_masks,
                           (-1, pred_shape[2], pred_shape[3], pred_shape[4]))
    # Permute predicted masks to [N, num_classes, height, width]
    pred_masks = tf.transpose(pred_masks, [0, 3, 1, 2])

    # Only positive ROIs contribute to the loss. And only
    # the class specific mask of each ROI.
    positive_ix = tf.where(target_class_ids > 0)[:, 0]
    positive_class_ids = tf.cast(
        tf.gather(target_class_ids, positive_ix), tf.int64)
    indices = tf.stack([positive_ix, positive_class_ids], axis=1)

    # Gather the masks (predicted and true) that contribute to loss
    y_true = tf.gather(target_masks, positive_ix)
    y_pred = tf.gather_nd(pred_masks, indices)

    # Compute binary cross entropy. If no positive ROIs, then return 0.
    # shape: [batch, roi, num_classes]
    loss = K.switch(tf.size(y_true) > 0,
                    K.binary_crossentropy(target=y_true, output=y_pred),
                    tf.constant(0.0))
    loss = K.mean(loss)
    loss = K.reshape(loss, [1, 1])
    return loss
在Date Generate 这一块中,含有三个主要的函数:
第一个是load_image_gt(dataset, config, image_id, augment=False,use_mini_mask=False) 该函数继承了utils.py中的Dataset类,主要的功能是根据image_id来读取图片的gt_masks,gt_boxes,instances,gt_class_ids。不熟悉的可以看看Dataset父类中的函数。
第二个是build_detection_target(),这个函数的作用其实和DetectionTargetLayer的作用差不多,但是他是用来帮助我们读者可视化的时候调用的,或者用来在不使用RPN的情况下来调试和训练Mask-RCNN网络的。
第三个是bulid_rpn_target(image_shape, anchors, gt_class_ids, gt_boxes, config),利用overlap的大小给anchors寻找对应的gt_boxs,对anchors再进行抽样,去除一半以上的positive anchors再计算需要留下的negative anchors,最终计算留下的positive anchors与所对应的gt_box的deltas,返回的rpn_match中-1是negative,0是neutral,1是positive,这个在data_generator()中有用处。
接下来是这块的主角data_generator(),是一个数据的生成器,用于产生数据,用于之后的训练和各层之间的调用等。可以留意一下这个生成器的返回值。
###产生一系列的数据的generator
def data_generator(dataset, config, shuffle=True, augment=True, random_rois=0,
                   batch_size=1, detection_targets=False):
    """
    - images: [batch, H, W, C]
    - image_meta: [batch, size of image meta]
    - rpn_match: [batch, N] Integer (1=positive anchor, -1=negative, 0=neutral)
    - rpn_bbox: [batch, N, (dy, dx, log(dh), log(dw))] Anchor bbox deltas.
    - gt_class_ids: [batch, MAX_GT_INSTANCES] Integer class IDs
    - gt_boxes: [batch, MAX_GT_INSTANCES, (y1, x1, y2, x2)]
    - gt_masks: [batch, height, width, MAX_GT_INSTANCES]. The height and width
                are those of the image unless use_mini_mask is True, in which
                case they are defined in MINI_MASK_SHAPE.

    outputs list: Usually empty in regular training. But if detection_targets
        is True then the outputs list contains target class_ids, bbox deltas,
        and masks.
    """
    b = 0  # batch item index
    image_index = -1
    image_ids = np.copy(dataset.image_ids)
    error_count = 0

    # Anchors
    # [anchor_count, (y1, x1, y2, x2)]
    anchors = utils.generate_pyramid_anchors(config.RPN_ANCHOR_SCALES,
                                             config.RPN_ANCHOR_RATIOS,
                                             config.BACKBONE_SHAPES,
                                             config.BACKBONE_STRIDES,
                                             config.RPN_ANCHOR_STRIDE)

    # Keras requires a generator to run indefinately.
    while True:
        try:
            ##只有在epoch的时候进行打乱
            # Increment index to pick next image. Shuffle if at the start of an epoch.
            image_index = (image_index + 1) % len(image_ids)
            if shuffle and image_index == 0:
                np.random.shuffle(image_ids)
            #利用第一个函数得到该图像所对应的所有groundtruth值
            # Get GT bounding boxes and masks for image.
            image_id = image_ids[image_index]
            image, image_meta, gt_class_ids, gt_boxes, gt_masks =
                load_image_gt(dataset, config, image_id, augment=augment,
                              use_mini_mask=config.USE_MINI_MASK)

            # Skip images that have no instances. This can happen in cases
            # where we train on a subset of classes and the image doesn't
            # have any of the classes we care about.
            if not np.any(gt_class_ids > 0):
                continue

            # RPN Targets
            ##返回锚点中positive,neutral,negative分类信息和positive的anchors与gt_boxes的delta
            rpn_match, rpn_bbox = build_rpn_targets(image.shape, anchors,
                                                    gt_class_ids, gt_boxes, config)

            # Mask R-CNN Targets
            if random_rois:
                rpn_rois = generate_random_rois(
                    image.shape, random_rois, gt_class_ids, gt_boxes)
                if detection_targets:
                    rois, mrcnn_class_ids, mrcnn_bbox, mrcnn_mask =
                        build_detection_targets(
                            rpn_rois, gt_class_ids, gt_boxes, gt_masks, config)

            # Init batch arrays
            if b == 0:
                batch_image_meta = np.zeros(
                    (batch_size,) + image_meta.shape, dtype=image_meta.dtype)
                batch_rpn_match = np.zeros(
                    [batch_size, anchors.shape[0], 1], dtype=rpn_match.dtype)
                batch_rpn_bbox = np.zeros(
                    [batch_size, config.RPN_TRAIN_ANCHORS_PER_IMAGE, 4], dtype=rpn_bbox.dtype)
                batch_images = np.zeros(
                    (batch_size,) + image.shape, dtype=np.float32)
                batch_gt_class_ids = np.zeros(
                    (batch_size, config.MAX_GT_INSTANCES), dtype=np.int32)
                batch_gt_boxes = np.zeros(
                    (batch_size, config.MAX_GT_INSTANCES, 4), dtype=np.int32)
                if config.USE_MINI_MASK:
                    batch_gt_masks = np.zeros((batch_size, config.MINI_MASK_SHAPE[0], config.MINI_MASK_SHAPE[1],
                                               config.MAX_GT_INSTANCES))
                else:
                    batch_gt_masks = np.zeros(
                        (batch_size, image.shape[0], image.shape[1], config.MAX_GT_INSTANCES))
                if random_rois:
                    batch_rpn_rois = np.zeros(
                        (batch_size, rpn_rois.shape[0], 4), dtype=rpn_rois.dtype)
                    if detection_targets:
                        batch_rois = np.zeros(
                            (batch_size,) + rois.shape, dtype=rois.dtype)
                        batch_mrcnn_class_ids = np.zeros(
                            (batch_size,) + mrcnn_class_ids.shape, dtype=mrcnn_class_ids.dtype)
                        batch_mrcnn_bbox = np.zeros(
                            (batch_size,) + mrcnn_bbox.shape, dtype=mrcnn_bbox.dtype)
                        batch_mrcnn_mask = np.zeros(
                            (batch_size,) + mrcnn_mask.shape, dtype=mrcnn_mask.dtype)
            #超过了config中instance的最大数量则进行删减。
            # If more instances than fits in the array, sub-sample from them.
            if gt_boxes.shape[0] > config.MAX_GT_INSTANCES:
                ids = np.random.choice(
                    np.arange(gt_boxes.shape[0]), config.MAX_GT_INSTANCES, replace=False)
                gt_class_ids = gt_class_ids[ids]
                gt_boxes = gt_boxes[ids]
                gt_masks = gt_masks[:, :, ids]
            ##把每张图片的信息添加到一个batch中,直到满为止
            # Add to batch
            batch_image_meta[b] = image_meta
            batch_rpn_match[b] = rpn_match[:, np.newaxis]
            batch_rpn_bbox[b] = rpn_bbox
            batch_images[b] = mold_image(image.astype(np.float32), config)
            batch_gt_class_ids[b, :gt_class_ids.shape[0]] = gt_class_ids
            batch_gt_boxes[b, :gt_boxes.shape[0]] = gt_boxes
            batch_gt_masks[b, :, :, :gt_masks.shape[-1]] = gt_masks
            if random_rois:
                batch_rpn_rois[b] = rpn_rois
                if detection_targets:
                    batch_rois[b] = rois
                    batch_mrcnn_class_ids[b] = mrcnn_class_ids
                    batch_mrcnn_bbox[b] = mrcnn_bbox
                    batch_mrcnn_mask[b] = mrcnn_mask
            b += 1

            # Batch full?
            if b >= batch_size:
                inputs = [batch_images, batch_image_meta, batch_rpn_match, batch_rpn_bbox,
                          batch_gt_class_ids, batch_gt_boxes, batch_gt_masks]
                outputs = []

                if random_rois:
                    inputs.extend([batch_rpn_rois])
                    if detection_targets:
                        inputs.extend([batch_rois])
                        # Keras requires that output and targets have the same number of dimensions
                        batch_mrcnn_class_ids = np.expand_dims(
                            batch_mrcnn_class_ids, -1)
                        outputs.extend(
                            [batch_mrcnn_class_ids, batch_mrcnn_bbox, batch_mrcnn_mask])

                yield inputs, outputs

                # start a new batch
                b = 0
        except (GeneratorExit, KeyboardInterrupt):
            raise
        except:
            # Log it and skip the image
            logging.exception("Error processing image {}".format(
                dataset.image_info[image_id]))
            error_count += 1
            if error_count > 5:
                raise
接下里最重要的一个步骤就是构建Mask-RCNN的模型,又论文我们也知道,训练和预测需要分开的构建,因为两者存在差异的。这一段可以对着那几个流程图看看。
    def build(self, mode, config):
        """Build Mask R-CNN architecture.
            input_shape: The shape of the input image.
            mode: Either "training" or "inference". The inputs and
                outputs of the model differ accordingly.
        """
        assert mode in ['training', 'inference']

        # Image size must be dividable by 2 multiple times
        h, w = config.IMAGE_SHAPE[:2]
        if h / 2**6 != int(h / 2**6) or w / 2**6 != int(w / 2**6):
            raise Exception("Image size must be dividable by 2 at least 6 times "
                            "to avoid fractions when downscaling and upscaling."
                            "For example, use 256, 320, 384, 448, 512, ... etc. ")
        ##构建所有需要的输入,并且都为神经网络的输入,可用KL.INPUT来转化
        # Inputs
        input_image = KL.Input(
            shape=config.IMAGE_SHAPE.tolist(), name="input_image")
        input_image_meta = KL.Input(shape=[None], name="input_image_meta")
        if mode == "training":
            # RPN GT
            input_rpn_match = KL.Input(
                shape=[None, 1], name="input_rpn_match", dtype=tf.int32)
            input_rpn_bbox = KL.Input(
                shape=[None, 4], name="input_rpn_bbox", dtype=tf.float32)

            # Detection GT (class IDs, bounding boxes, and masks)
            # 1. GT Class IDs (zero padded)
            input_gt_class_ids = KL.Input(
                shape=[None], name="input_gt_class_ids", dtype=tf.int32)
            # 2. GT Boxes in pixels (zero padded)
            # [batch, MAX_GT_INSTANCES, (y1, x1, y2, x2)] in image coordinates
            input_gt_boxes = KL.Input(
                shape=[None, 4], name="input_gt_boxes", dtype=tf.float32)
            # Normalize coordinates
            h, w = K.shape(input_image)[1], K.shape(input_image)[2]
            image_scale = K.cast(K.stack([h, w, h, w], axis=0), tf.float32)
            gt_boxes = KL.Lambda(lambda x: x / image_scale)(input_gt_boxes)
            # 3. GT Masks (zero padded)
            # [batch, height, width, MAX_GT_INSTANCES]
            if config.USE_MINI_MASK:
                input_gt_masks = KL.Input(
                    shape=[config.MINI_MASK_SHAPE[0],
                           config.MINI_MASK_SHAPE[1], None],
                    name="input_gt_masks", dtype=bool)
            else:
                input_gt_masks = KL.Input(
                    shape=[config.IMAGE_SHAPE[0], config.IMAGE_SHAPE[1], None],
                    name="input_gt_masks", dtype=bool)
        ##实现FPN的多层特征融合
        # Build the shared convolutional layers.
        # Bottom-up Layers
        # Returns a list of the last layers of each stage, 5 in total.
        # Don't create the thead (stage 5), so we pick the 4th item in the list.
        _, C2, C3, C4, C5 = resnet_graph(input_image, "resnet101", stage5=True)
        # Top-down Layers
        # TODO: add assert to varify feature map sizes match what's in config
        P5 = KL.Conv2D(256, (1, 1), name='fpn_c5p5')(C5)
        P4 = KL.Add(name="fpn_p4add")([
            KL.UpSampling2D(size=(2, 2), name="fpn_p5upsampled")(P5),
            KL.Conv2D(256, (1, 1), name='fpn_c4p4')(C4)])
        P3 = KL.Add(name="fpn_p3add")([
            KL.UpSampling2D(size=(2, 2), name="fpn_p4upsampled")(P4),
            KL.Conv2D(256, (1, 1), name='fpn_c3p3')(C3)])
        P2 = KL.Add(name="fpn_p2add")([
            KL.UpSampling2D(size=(2, 2), name="fpn_p3upsampled")(P3),
            KL.Conv2D(256, (1, 1), name='fpn_c2p2')(C2)])
        # Attach 3x3 conv to all P layers to get the final feature maps.
        P2 = KL.Conv2D(256, (3, 3), padding="SAME", name="fpn_p2")(P2)
        P3 = KL.Conv2D(256, (3, 3), padding="SAME", name="fpn_p3")(P3)
        P4 = KL.Conv2D(256, (3, 3), padding="SAME", name="fpn_p4")(P4)
        P5 = KL.Conv2D(256, (3, 3), padding="SAME", name="fpn_p5")(P5)
        # P6 is used for the 5th anchor scale in RPN. Generated by
        # subsampling from P5 with stride of 2.
        P6 = KL.MaxPooling2D(pool_size=(1, 1), strides=2, name="fpn_p6")(P5)

        # Note that P6 is used in RPN, but not in the classifier heads.
        rpn_feature_maps = [P2, P3, P4, P5, P6]
        mrcnn_feature_maps = [P2, P3, P4, P5]

        # Generate Anchors
        self.anchors = utils.generate_pyramid_anchors(config.RPN_ANCHOR_SCALES,
                                                      config.RPN_ANCHOR_RATIOS,
                                                      config.BACKBONE_SHAPES,
                                                      config.BACKBONE_STRIDES,
                                                      config.RPN_ANCHOR_STRIDE)
        #构建RPN 网络,用来接受上一级的feature maps
        #BACKBONE_SHAPES:[N,2]
        # RPN Model :RPN_ANCHOR_STRIDE为产生anchors的pixels,len(config.RPN_ANCHOR_RATIOS)为每个pixels产生anchors的数量
        #256为接受feature maps的channel
        rpn = build_rpn_model(config.RPN_ANCHOR_STRIDE,
                              len(config.RPN_ANCHOR_RATIOS), 256)
        # Loop through pyramid layers
        layer_outputs = []  # list of lists
        for p in rpn_feature_maps:
            layer_outputs.append(rpn([p]))
        # Concatenate layer outputs
        # Convert from list of lists of level outputs to list of lists
        # of outputs across levels.
        # e.g. [[a1, b1, c1], [a2, b2, c2]] => [[a1, a2], [b1, b2], [c1, c2]]
        output_names = ["rpn_class_logits", "rpn_class", "rpn_bbox"]
        outputs = list(zip(*layer_outputs))
        outputs = [KL.Concatenate(axis=1, name=n)(list(o))
                   for o, n in zip(outputs, output_names)]
        ##
        rpn_class_logits, rpn_class, rpn_bbox = outputs
        ##利用proposal_layer来产生一系列的ROIS,输入为RPN网络中得到的输出:rpn_class, rpn_bbox
        # Generate proposals
        # Proposals are [batch, N, (y1, x1, y2, x2)] in normalized coordinates
        # and zero padded.
        proposal_count = config.POST_NMS_ROIS_TRAINING if mode == "training"
            else config.POST_NMS_ROIS_INFERENCE
        rpn_rois = ProposalLayer(proposal_count=proposal_count,
                                 nms_threshold=config.RPN_NMS_THRESHOLD,
                                 name="ROI",
                                 anchors=self.anchors,
                                 config=config)([rpn_class, rpn_bbox])

        if mode == "training":
            # Class ID mask to mark class IDs supported by the dataset the image
            # came from.
            #active_class_ids表示的是当前数据集下含有的class类别
            _, _, _, active_class_ids = KL.Lambda(lambda x: parse_image_meta_graph(x),
                                                  mask=[None, None, None, None])(input_image_meta)

            if not config.USE_RPN_ROIS:
                # Ignore predicted ROIs and use ROIs provided as an input.
                input_rois = KL.Input(shape=[config.POST_NMS_ROIS_TRAINING, 4],
                                      name="input_roi", dtype=np.int32)
                # Normalize coordinates to 0-1 range.
                target_rois = KL.Lambda(lambda x: K.cast(
                    x, tf.float32) / image_scale[:4])(input_rois)
            else:
                target_rois = rpn_rois

            # Generate detection targets
            # Subsamples proposals and generates target outputs for training
            # Note that proposal class IDs, gt_boxes, and gt_masks are zero
            # padded. Equally, returned rois and targets are zero padded.
            rois, target_class_ids, target_bbox, target_mask =
                DetectionTargetLayer(config, name="proposal_targets")([
                    target_rois, input_gt_class_ids, gt_boxes, input_gt_masks])

            # Network Heads
            # TODO: verify that this handles zero padded ROIs
            mrcnn_class_logits, mrcnn_class, mrcnn_bbox =
                fpn_classifier_graph(rois, mrcnn_feature_maps, config.IMAGE_SHAPE,
                                     config.POOL_SIZE, config.NUM_CLASSES)

            mrcnn_mask = build_fpn_mask_graph(rois, mrcnn_feature_maps,
                                              config.IMAGE_SHAPE,
                                              config.MASK_POOL_SIZE,
                                              config.NUM_CLASSES)

            # TODO: clean up (use tf.identify if necessary)
            output_rois = KL.Lambda(lambda x: x * 1, name="output_rois")(rois)

            # Losses
            rpn_class_loss = KL.Lambda(lambda x: rpn_class_loss_graph(*x), name="rpn_class_loss")(
                [input_rpn_match, rpn_class_logits])
            rpn_bbox_loss = KL.Lambda(lambda x: rpn_bbox_loss_graph(config, *x), name="rpn_bbox_loss")(
                [input_rpn_bbox, input_rpn_match, rpn_bbox])
            class_loss = KL.Lambda(lambda x: mrcnn_class_loss_graph(*x), name="mrcnn_class_loss")(
                [target_class_ids, mrcnn_class_logits, active_class_ids])
            bbox_loss = KL.Lambda(lambda x: mrcnn_bbox_loss_graph(*x), name="mrcnn_bbox_loss")(
                [target_bbox, target_class_ids, mrcnn_bbox])
            mask_loss = KL.Lambda(lambda x: mrcnn_mask_loss_graph(*x), name="mrcnn_mask_loss")(
                [target_mask, target_class_ids, mrcnn_mask])

            # Model
            inputs = [input_image, input_image_meta,
                      input_rpn_match, input_rpn_bbox, input_gt_class_ids, input_gt_boxes, input_gt_masks]
            if not config.USE_RPN_ROIS:
                inputs.append(input_rois)
            outputs = [rpn_class_logits, rpn_class, rpn_bbox,
                       mrcnn_class_logits, mrcnn_class, mrcnn_bbox, mrcnn_mask,
                       rpn_rois, output_rois,
                       rpn_class_loss, rpn_bbox_loss, class_loss, bbox_loss, mask_loss]
            model = KM.Model(inputs, outputs, name='mask_rcnn')
        else:
            # Network Heads
            # Proposal classifier and BBox regressor heads
            mrcnn_class_logits, mrcnn_class, mrcnn_bbox =
                fpn_classifier_graph(rpn_rois, mrcnn_feature_maps, config.IMAGE_SHAPE,
                                     config.POOL_SIZE, config.NUM_CLASSES)

            # Detections
            # output is [batch, num_detections, (y1, x1, y2, x2, class_id, score)] in image coordinates
            detections = DetectionLayer(config, name="mrcnn_detection")(
                [rpn_rois, mrcnn_class, mrcnn_bbox, input_image_meta])

            # Convert boxes to normalized coordinates
            # TODO: let DetectionLayer return normalized coordinates to avoid
            #       unnecessary conversions
            h, w = config.IMAGE_SHAPE[:2]
            detection_boxes = KL.Lambda(
                lambda x: x[..., :4] / np.array([h, w, h, w]))(detections)

            # Create masks for detections
            mrcnn_mask = build_fpn_mask_graph(detection_boxes, mrcnn_feature_maps,
                                              config.IMAGE_SHAPE,
                                              config.MASK_POOL_SIZE,
                                              config.NUM_CLASSES)

            model = KM.Model([input_image, input_image_meta],
                             [detections, mrcnn_class, mrcnn_bbox,
                                 mrcnn_mask, rpn_rois, rpn_class, rpn_bbox],
                             name='mask_rcnn')

        # Add multi-GPU support.
        if config.GPU_COUNT > 1:
            from parallel_model import ParallelModel
            model = ParallelModel(model, config.GPU_COUNT)
构建完了之后,其他的编译和训练函数的编写就比较简单而且好理解了,就不贴上来了。
其实看到这里我觉得代码mask-RCNN的框架和一些具体的细节应该是了解了挺多了,但就我个人而言的话,这些代码我是看了2到3遍才看懂的,只能应了一句话,好事多磨.....
最后我把我处理视频的代码贴上来,其实处理视频就是把视频切割成帧,然后用模型处理,再合成为视频,但这样确实很耗时间。
import os
import sys
import random
import math
import numpy as np
import skimage.io
import matplotlib
import matplotlib.pyplot as plt
import cv2
import coco
import utils
import model as modellib
import video_visualize

%matplotlib inline

# Root directory of the project
ROOT_DIR = os.getcwd()

# Directory to save logs and trained model
MODEL_DIR = os.path.join(ROOT_DIR, "logs")

# Local path to trained weights file
COCO_MODEL_PATH = os.path.join(ROOT_DIR, "mask_rcnn_coco.h5")
# Download COCO trained weights from Releases if needed
if not os.path.exists(COCO_MODEL_PATH):
    utils.download_trained_weights(COCO_MODEL_PATH)

# Directory of images to run detection on
IMAGE_DIR = os.path.join(ROOT_DIR, "images")


class InferenceConfig(coco.CocoConfig):
    # Set batch size to 1 since we'll be running inference on
    # one image at a time. Batch size = GPU_COUNT * IMAGES_PER_GPU
    GPU_COUNT = 1
    IMAGES_PER_GPU = 1

config = InferenceConfig()
config.display()


# Create model object in inference mode.
model = modellib.MaskRCNN(mode="inference", model_dir=MODEL_DIR, config=config)

# Load weights trained on MS-COCO
model.load_weights(COCO_MODEL_PATH, by_name=True)


# COCO Class names
# Index of the class in the list is its ID. For example, to get ID of
# the teddy bear class, use: class_names.index('teddy bear')
class_names = ['BG', 'person', 'bicycle', 'car', 'motorcycle', 'airplane',
               'bus', 'train', 'truck', 'boat', 'traffic light',
               'fire hydrant', 'stop sign', 'parking meter', 'bench', 'bird',
               'cat', 'dog', 'horse', 'sheep', 'cow', 'elephant', 'bear',
               'zebra', 'giraffe', 'backpack', 'umbrella', 'handbag', 'tie',
               'suitcase', 'frisbee', 'skis', 'snowboard', 'sports ball',
               'kite', 'baseball bat', 'baseball glove', 'skateboard',
               'surfboard', 'tennis racket', 'bottle', 'wine glass', 'cup',
               'fork', 'knife', 'spoon', 'bowl', 'banana', 'apple',
               'sandwich', 'orange', 'broccoli', 'carrot', 'hot dog', 'pizza',
               'donut', 'cake', 'chair', 'couch', 'potted plant', 'bed',
               'dining table', 'toilet', 'tv', 'laptop', 'mouse', 'remote',
               'keyboard', 'cell phone', 'microwave', 'oven', 'toaster',
               'sink', 'refrigerator', 'book', 'clock', 'vase', 'scissors',
               'teddy bear', 'hair drier', 'toothbrush']


#处理视频需要用到的文件及其文件夹
input_path = os.path.join(ROOT_DIR, "luozx")

frame_interval = 1
##列出所有的视频文件名字
filenames = os.listdir(input_path)
##得到文件夹的名字
video_prefix = input_path.split(os.sep)[-1]
frame_path = "{}_frame".format(input_path)

if not os.path.exists(frame_path):
    os.mkdir(frame_path)

#读取图片并且保存其每一帧
cap = cv2.VideoCapture()
# for filename in filenames:
for filename in filenames:
# if 1 == 1:
#     filename = 'huan.mp4'
    filepath = os.sep.join([input_path, filename])
    flag = cap.open(filepath)
    assert flag == True
    ##获取视频帧
    n_frames = int(cap.get(cv2.CAP_PROP_FRAME_COUNT))
    #或者直接用n_frames = cap.
    print(n_frames)
    if n_frames > 800:
        n_frames = 800

#     for i in range(42):
#         cap.read()
    for i in range(n_frames):
        ret, frame = cap.read()
        #assert ret == True
        if i % frame_interval == 0:
            #存储图片的路径及其名字
            imagename = '{}_{}_{:0>6d}.jpg'.format(video_prefix, filename.split('.')[0], i)
            imagepath = os.sep.join([frame_path, imagename])
            print("export{}!".format(imagepath))
            cv2.imwrite(imagepath, frame)

fps = cap.get(5)

cap.release()

##处理视频中的每一帧图片并且进行保留
 for i in range(n_frames):
    #find the direction of the images
    imagename = '{}_{}_{:0>6d}.jpg'.format(video_prefix, filename.split('.')[0], i)
    imagepath = os.sep.join([frame_path, imagename])
    print(imagepath)
    #load the image
    image = skimage.io.imread(imagepath)

    # Run detection
    results = model.detect([image], verbose=1)
    r = results[0]

    # save the dealed image

    video_visualize.save_dealed_image(filename, video_prefix, i, image, r['rois'], r['masks'], r['class_ids'],
                      class_names, r['scores'], title="",
                      figsize=(16, 16), ax=None)
##其中video_visaulize.save_dealed_imag函数就是把display_instance()函数小小的改动了一下,存储了一下处理完后的相片。

##把处理完的图像进行视频合成
#把处理好的每一帧再合成视频
import os
import cv2
import skimage.io
fps = 22
n_frames = 200
ROOT = os.getcwd()
save_path = os.path.join(ROOT,"save_images")
fourcc = cv2.VideoWriter_fourcc(*'MJPG')
#get the width and height of processed image
imagepath = "/home/xiongliang/python/python_project/Mask_RCNN/save_images/luozx_promise_000001.jpg"
image = skimage.io.imread(imagepath)
width, height, _ = image.shape
videoWriter = cv2.VideoWriter("save_video.mp4", fourcc, fps, (width, height))

video_prefix = "luozx"
filename = "promise.mp4"
for i in range(int(n_frames)):
    imagename = '{}_{}_{:0>6d}.jpg'.format(video_prefix, filename.split('.')[0], i)
    imagepath = os.sep.join([save_path, imagename])
    frame = cv2.imread(imagepath)
    videoWriter.write(frame)
videoWriter.release()

###对视频进行播放
ROOT = os.getcwd()
path = os.path.join(ROOT, "save_video.mp4")
cap = cv2.VideoCapture(path)
assert cap.isOpened() == True
while(cap.isOpened()):
    ret, frame = cap.read()
    cv2.imshow('frame',frame)
    if cv2.waitKey(1) & 0xFF == ord('q'):  # 适当调整等待时间
        break
结语
这些基本上就是这十多天学习到的所有的东西了,这条漫长的路还有很远要走,加油了。第一次发博客,文中肯定有很多不对的地方,望大佬们指正 。溜了溜了, 后天还得毕设开题答辩,开题报告还没写
