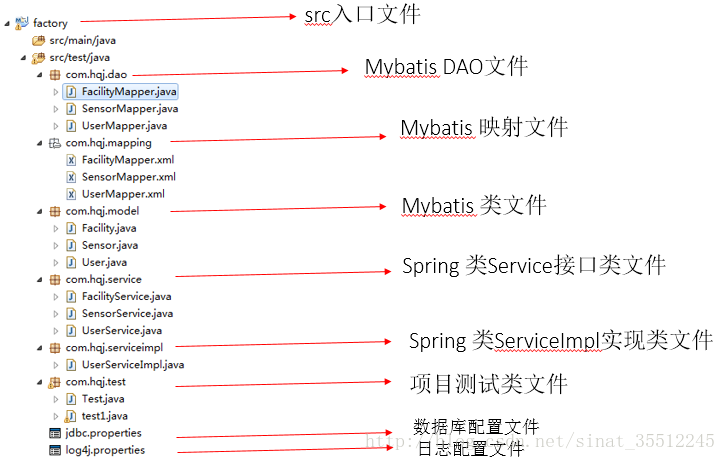
首先看一下项目结构图:
具体步骤如下:
1、建立JDBC属性文件
jdbc.properties (文件编码修改为 utf-8 )
driver=com.mysql.jdbc.Driver
url=jdbc:mysql://localhost:3306/projectview
username=root
password=729821- 1
- 2
- 3
- 4
辅助:数据库脚本:
INSERT INTO `test_user` VALUES (1, 'liuzhonghao', '6329869', '384037404@qq.com');
INSERT INTO `test_user` VALUES (2, 'xiahe', '6329869', '12345@qq.com');
INSERT INTO `test_user` VALUES (3, NULL, NULL, NULL);
INSERT INTO `test_user` VALUES (4, '123', '123', '123');
INSERT INTO `test_user` VALUES (5, '321', '321', '321');- 1
- 2
- 3
- 4
- 5
2、log4j的配置
#u5B9Au4E49LOGu8F93u51FAu7EA7u522B
log4j.rootLogger=INFO,Console,File
#u5B9Au4E49u65E5u5FD7u8F93u51FAu76EEu7684u5730u4E3Au63A7u5236u53F0
log4j.appender.Console=org.apache.log4j.ConsoleAppender
log4j.appender.Console.Target=System.out
#u53EFu4EE5u7075u6D3Bu5730u6307u5B9Au65E5u5FD7u8F93u51FAu683Cu5F0FuFF0Cu4E0Bu9762u4E00u884Cu662Fu6307u5B9Au5177u4F53u7684u683Cu5F0F
log4j.appender.Console.layout = org.apache.log4j.PatternLayout
log4j.appender.Console.layout.ConversionPattern=[%c] - %m%n

#u6587u4EF6u5927u5C0Fu5230u8FBEu6307u5B9Au5C3Au5BF8u7684u65F6u5019u4EA7u751Fu4E00u4E2Au65B0u7684u6587u4EF6
log4j.appender.File =org.apache.log4j.RollingFileAppender
#u6307u5B9Au8F93u51FAu76EEu5F55
log4j.appender.File.File = logs/ssm.log
#u5B9Au4E49u6587u4EF6u6700u5927u5927u5C0F
log4j.appender.File.MaxFileSize = 10MB
# u8F93u51FAu6240u4EE5u65E5u5FD7uFF0Cu5982u679Cu6362u6210DEBUGu8868u793Au8F93u51FADEBUGu4EE5u4E0Au7EA7u522Bu65E5u5FD7
log4j.appender.File.Threshold = ALL
log4j.appender.File.layout =org.apache.log4j.PatternLayout
log4j.appender.File.layout.ConversionPattern =[%p] [%d{yyyy-MM-ddHH:mm:ss}][%c]%m%n- 1
- 2
- 3
- 4
- 5
- 6
- 7
- 8
- 9
- 10
- 11
- 12
- 13
- 14
- 15
- 16
- 17
- 18
- 19
3、建立工程
(1)User类
package com.hqj.model;

public class User {
    private Integer id;

    private String username;

    private String password;

    private String email;

    public Integer getId() {
        return id;
    }

    public void setId(Integer id) {
        this.id = id;
    }

    public String getUsername() {
        return username;
    }

    public void setUsername(String username) {
        this.username = username == null ? null : username.trim();
    }

    public String getPassword() {
        return password;
    }

    public void setPassword(String password) {
        this.password = password == null ? null : password.trim();
    }

    public String getEmail() {
        return email;
    }

    public void setEmail(String email) {
        this.email = email == null ? null : email.trim();
    }

    public User() {
        super();
        // TODO Auto-generated constructor stub
    }

    public User(Integer id, String username, String password, String email) {
        super();
        this.id = id;
        this.username = username;
        this.password = password;
        this.email = email;
    }

    @Override
    public String toString() {
        return "User [id=" + id + ", username=" + username + ", password="
                + password + ", email=" + email + "]";
    }
}- 1
- 2
- 3
- 4
- 5
- 6
- 7
- 8
- 9
- 10
- 11
- 12
- 13
- 14
- 15
- 16
- 17
- 18
- 19
- 20
- 21
- 22
- 23
- 24
- 25
- 26
- 27
- 28
- 29
- 30
- 31
- 32
- 33
- 34
- 35
- 36
- 37
- 38
- 39
- 40
- 41
- 42
- 43
- 44
- 45
- 46
- 47
- 48
- 49
- 50
- 51
- 52
- 53
- 54
- 55
- 56
- 57
- 58
- 59
- 60
- 61
- 62
(2)UserMapper类(Mybatis中的DAO类)
package com.hqj.dao;

import com.hqj.model.User;

public interface UserMapper {
    int deleteByPrimaryKey(Integer id);

    int insert(User record);

    int insertSelective(User record);

    User selectByPrimaryKey(Integer id);

    int updateByPrimaryKeySelective(User record);

    int updateByPrimaryKey(User record);
}- 1
- 2
- 3
- 4
- 5
- 6
- 7
- 8
- 9
- 10
- 11
- 12
- 13
- 14
- 15
- 16
- 17
(3)UserMapper类(Mybatis映射文件)
<?xml version="1.0" encoding="UTF-8" ?>
<!DOCTYPE mapper PUBLIC "-//mybatis.org//DTD Mapper 3.0//EN" "http://mybatis.org/dtd/mybatis-3-mapper.dtd" >
<mapper namespace="com.hqj.dao.UserMapper" >
  <resultMap id="BaseResultMap" type="com.hqj.model.User" >
    <id column="id" property="id" jdbcType="INTEGER" />
    <result column="username" property="username" jdbcType="VARCHAR" />
    <result column="password" property="password" jdbcType="VARCHAR" />
    <result column="email" property="email" jdbcType="VARCHAR" />
  </resultMap>
  <sql id="Base_Column_List" >
    id, username, password, email
  </sql>
  <select id="selectByPrimaryKey" resultMap="BaseResultMap" parameterType="java.lang.Integer" >
    select
    <include refid="Base_Column_List" />
    from test_user
    where id = #{id,jdbcType=INTEGER}
  </select>
  <delete id="deleteByPrimaryKey" parameterType="java.lang.Integer" >
    delete from test_user
    where id = #{id,jdbcType=INTEGER}
  </delete>
  <insert id="insert" parameterType="com.hqj.model.User" >
    insert into test_user (id, username, password,
      email)
    values (#{id,jdbcType=INTEGER}, #{username,jdbcType=VARCHAR}, #{password,jdbcType=VARCHAR},
      #{email,jdbcType=VARCHAR})
  </insert>
  <insert id="insertSelective" parameterType="com.hqj.model.User" >
    insert into test_user
    <trim prefix="(" suffix=")" suffixOverrides="," >
      <if test="id != null" >
        id,
      </if>
      <if test="username != null" >
        username,
      </if>
      <if test="password != null" >
        password,
      </if>
      <if test="email != null" >
        email,
      </if>
    </trim>
    <trim prefix="values (" suffix=")" suffixOverrides="," >
      <if test="id != null" >
        #{id,jdbcType=INTEGER},
      </if>
      <if test="username != null" >
        #{username,jdbcType=VARCHAR},
      </if>
      <if test="password != null" >
        #{password,jdbcType=VARCHAR},
      </if>
      <if test="email != null" >
        #{email,jdbcType=VARCHAR},
      </if>
    </trim>
  </insert>
  <update id="updateByPrimaryKeySelective" parameterType="com.hqj.model.User" >
    update test_user
    <set >
      <if test="username != null" >
        username = #{username,jdbcType=VARCHAR},
      </if>
      <if test="password != null" >
        password = #{password,jdbcType=VARCHAR},
      </if>
      <if test="email != null" >
        email = #{email,jdbcType=VARCHAR},
      </if>
    </set>
    where id = #{id,jdbcType=INTEGER}
  </update>
  <update id="updateByPrimaryKey" parameterType="com.hqj.model.User" >
    update test_user
    set username = #{username,jdbcType=VARCHAR},
      password = #{password,jdbcType=VARCHAR},
      email = #{email,jdbcType=VARCHAR}
    where id = #{id,jdbcType=INTEGER}
  </update>
</mapper>- 1
- 2
- 3
- 4
- 5
- 6
- 7
- 8
- 9
- 10
- 11
- 12
- 13
- 14
- 15
- 16
- 17
- 18
- 19
- 20
- 21
- 22
- 23
- 24
- 25
- 26
- 27
- 28
- 29
- 30
- 31
- 32
- 33
- 34
- 35
- 36
- 37
- 38
- 39
- 40
- 41
- 42
- 43
- 44
- 45
- 46
- 47
- 48
- 49
- 50
- 51
- 52
- 53
- 54
- 55
- 56
- 57
- 58
- 59
- 60
- 61
- 62
- 63
- 64
- 65
- 66
- 67
- 68
- 69
- 70
- 71
- 72
- 73
- 74
- 75
- 76
- 77
- 78
- 79
- 80
- 81
- 82
(4)UserService类(Spring中对应的类接口)
package com.hqj.service;

import com.hqj.model.User;

public interface UserService {
    public User getUserById(Integer id);
}
- 1
- 2
- 3
- 4
- 5
- 6
- 7
- 8
(5)UserServiceImpl类(Spring中对应的类接口的实现)
务必先看图片中的红字!易错点!!!
务必先看图片中的红字!易错点!!!
务必先看图片中的红字!易错点!!!
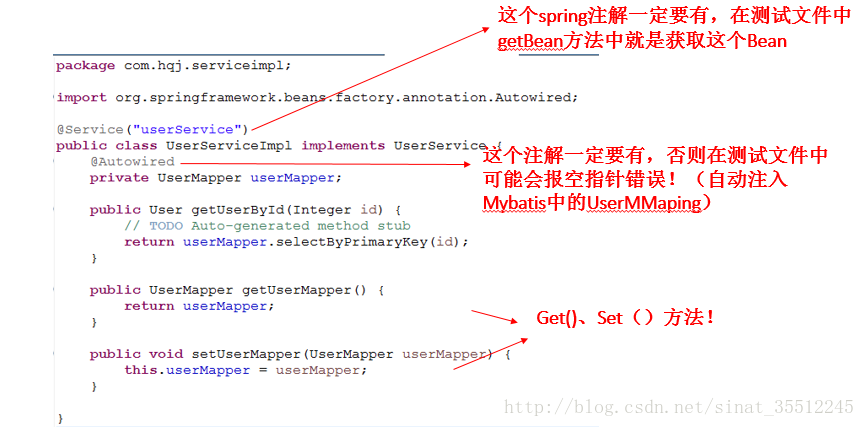
package com.hqj.serviceimpl;

import org.springframework.beans.factory.annotation.Autowired;
import org.springframework.stereotype.Service;

import com.hqj.dao.UserMapper;
import com.hqj.model.User;
import com.hqj.service.UserService;

@Service("userService")
public class UserServiceImpl implements UserService {
    @Autowired
    private UserMapper userMapper;

    public User getUserById(Integer id) {
        // TODO Auto-generated method stub
        return userMapper.selectByPrimaryKey(id);
    }

    public UserMapper getUserMapper() {
        return userMapper;
    }

    public void setUserMapper(UserMapper userMapper) {
        this.userMapper = userMapper;
    }

}
- 1
- 2
- 3
- 4
- 5
- 6
- 7
- 8
- 9
- 10
- 11
- 12
- 13
- 14
- 15
- 16
- 17
- 18
- 19
- 20
- 21
- 22
- 23
- 24
- 25
- 26
- 27
- 28
- 29
(6)测试类
务必先看图片中的红字!易错点!!!
务必先看图片中的红字!易错点!!!
务必先看图片中的红字!易错点!!!
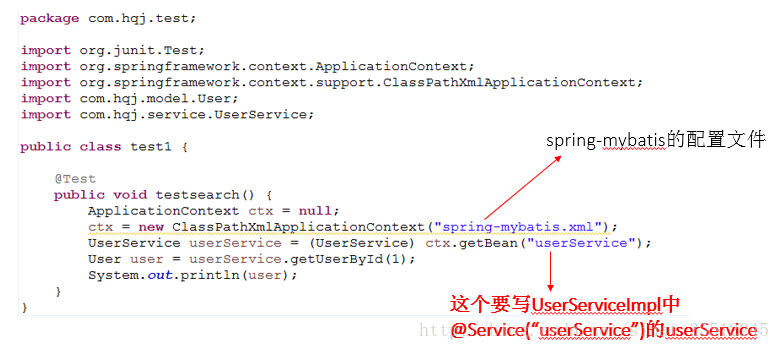
package com.hqj.test;

import org.junit.Test;
import org.springframework.context.ApplicationContext;
import org.springframework.context.support.ClassPathXmlApplicationContext;
import com.hqj.model.User;
import com.hqj.service.UserService;

public class test1 {

    @Test
    public void testsearch() {
        ApplicationContext ctx = null;
        ctx = new ClassPathXmlApplicationContext("spring-mybatis.xml");
        UserService userService = (UserService) ctx.getBean("userService");
        User user = userService.getUserById(1);
        System.out.println(user);
    }
}
- 1
- 2
- 3
- 4
- 5
- 6
- 7
- 8
- 9
- 10
- 11
- 12
- 13
- 14
- 15
- 16
- 17
- 18
- 19
- 20
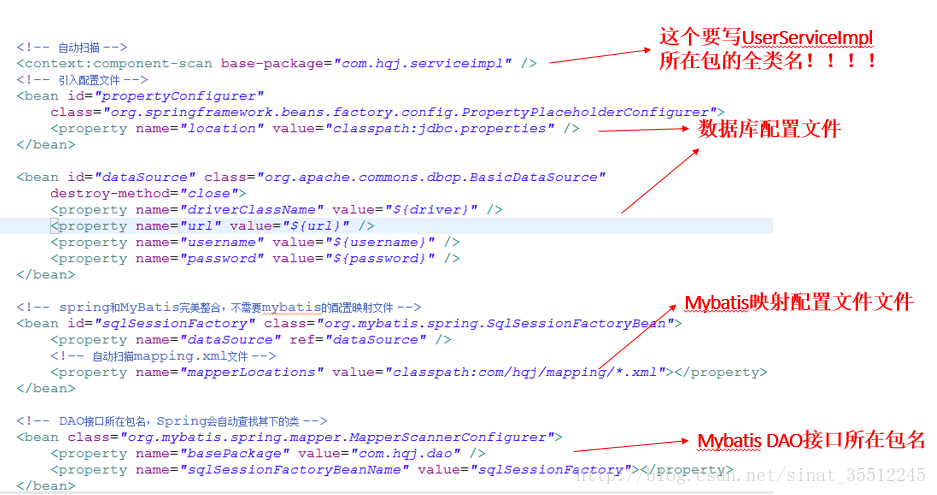
(7)spring-mybatis.xml配置文件(最重要的配置)
务必先看图片中的红字!易错点!!!
务必先看图片中的红字!易错点!!!
务必先看图片中的红字!易错点!!!
<?xml version="1.0" encoding="UTF-8"?>
<beans xmlns="http://www.springframework.org/schema/beans"
    xmlns:xsi="http://www.w3.org/2001/XMLSchema-instance" xmlns:p="http://www.springframework.org/schema/p"
    xmlns:context="http://www.springframework.org/schema/context"
    xmlns:mvc="http://www.springframework.org/schema/mvc"
    xsi:schemaLocation="http://www.springframework.org/schema/beans
 http://www.springframework.org/schema/beans/spring-beans-3.1.xsd
 http://www.springframework.org/schema/context
 http://www.springframework.org/schema/context/spring-context-3.1.xsd
 http://www.springframework.org/schema/mvc
 http://www.springframework.org/schema/mvc/spring-mvc-4.0.xsd">
    <!-- 自动扫描 -->
    <context:component-scan base-package="com.hqj.serviceimpl" />
    <!-- 引入配置文件 -->
    <bean id="propertyConfigurer"
        class="org.springframework.beans.factory.config.PropertyPlaceholderConfigurer">
        <property name="location" value="classpath:jdbc.properties" />
    </bean>

    <bean id="dataSource" class="org.apache.commons.dbcp.BasicDataSource"
        destroy-method="close">
        <property name="driverClassName" value="${driver}" />
        <property name="url" value="${url}" />
        <property name="username" value="${username}" />
        <property name="password" value="${password}" />
    </bean>

    <!-- spring和MyBatis完美整合,不需要mybatis的配置映射文件 -->
    <bean id="sqlSessionFactory" class="org.mybatis.spring.SqlSessionFactoryBean">
        <property name="dataSource" ref="dataSource" />
        <!-- 自动扫描mapping.xml文件 -->
        <property name="mapperLocations" value="classpath:com/hqj/mapping/*.xml"></property>
    </bean>

    <!-- DAO接口所在包名,Spring会自动查找其下的类 -->
    <bean class="org.mybatis.spring.mapper.MapperScannerConfigurer">
        <property name="basePackage" value="com.hqj.dao" />
        <property name="sqlSessionFactoryBeanName" value="sqlSessionFactory"></property>
    </bean>

    <!-- (事务管理)transaction manager, use JtaTransactionManager for global tx -->
    <bean id="transactionManager"
        class="org.springframework.jdbc.datasource.DataSourceTransactionManager">
        <property name="dataSource" ref="dataSource" />
    </bean>

</beans>- 1
- 2
- 3
- 4
- 5
- 6
- 7
- 8
- 9
- 10
- 11
- 12
- 13
- 14
- 15
- 16
- 17
- 18
- 19
- 20
- 21
- 22
- 23
- 24
- 25
- 26
- 27
- 28
- 29
- 30
- 31
- 32
- 33
- 34
- 35
- 36
- 37
- 38
- 39
- 40
- 41
- 42
- 43
- 44
- 45
- 46
- 47
测试成功的结果如下:
