Table of Contents
1.2 Environmental Pre-Requisites 6
2.3 Active Directory Prerequisite Configurations 9
2.4 Mobile Hydration Toolkit Host 12
2.5 Hyper-V Host and Guest Installation 33
2.6 SQL Server 2008 SP1 CU10 Deployment 50
2.7 System Center Virtual Machine Manager 2008 R2 66
2.8 System Center Operations Manager 2007 R2 88
2.9 System Center Virtual Machine Manager Self-Service Portal 2.0 (SSP v2) 117
3 Management Agent Deployment, VMM Pro and VMM Reporting Setup 138
3.2 Pro Tips and VMM Reporting 142
Appendix A: Active Directory Worksheet 151
Appendix B: Network Services Worksheets 152
Appendix C: User Account Worksheet 153
Appendix D: Groups Worksheet 154
Appendix E: Computer Account Worksheet 155
Appendix F: SQL Instance Worksheet 156
Appendix G: HVC Hydration Troubleshooting 157
- Overview
The steps to perform the installation or restoration for the Hyper-V Cloud Accelerate Pilot environment are outlined in this document. The installation process is optimized for a prescriptive and targeted installation of the System Center products contained within the solution. It is not envisioned that the installation would utilize existing customer implementations of System Center products; it will rather utilize customized implementations to provide various areas of functionality to the overall solution. The following assumptions, permissions and prerequisites are provided.
The Hyper-V Cloud Accelerate Environment includes the following hosts and virtual machines:
Pilot Item | Required for |
Hyper-V Host #1 | Management VMs for the Pilot |
Hyper-V Host #2 | Pilot with required second host |
Hyper-V Host #3 | Pilot with optional third host |
Hyper-V Host #4 | Pilot with optional fourth host |
Hyper-V Host #5 | Pilot with optional fifth host |
Hyper-V Host #6 | Pilot with optional sixth host |
Hyper-V Host #7 | Pilot with optional seventh host |
Hyper-V Host #8 | Pilot with optional eighth host |
SQL Server VM | SQL Server 2008 to support System Center product DB requirements |
SCVMM VM | SCVMM installation |
OpsMgr VM | OpsMgr installation and SQL reporting services installation |
SSP VM | SSP v2, Windows SharePoint Services, and the SSP v2 Dashboard. |
- Required Permissions
Permissions required for performing installation:
Permissions needed | Required for |
Local Administrator | Configuration of each component |
Domain Administrator | Creation of required Active Directory objects (OU structure, users, groups, delegation) |
SQL Server SysAdmin on all instances | Creating and connecting to databases |
- Environmental Pre-Requisites
As mentioned above, the solution utilizes custom installations of several System Center products. In order to perform these installations, the automation provided in the solution and the steps to be performed in this document assume several prerequisites are performed within the customer's environment.
- Operating System and Component Software Requirements
All systems are built and configured using a customized installation of the Windows Server 2008 R2 operating system (operating system) known as the Mobile Hydration Toolkit. Once the Mobile Hydration Toolkit operating system is built, the actual component product installations are automated using a custom hydration wizard based on MDT. The HVC_Source repository is located at <insert partner download location>. Partners must use their own volume or enterprise agreement (EA) media to build the Mobile Hydration Toolkit and it is assumed that customers will require using their own media for many of the products. The media for the following products is required for the installation:
- Windows Server 2008 R2 Hyper-V
- Microsoft SQL Server 2008 SP1 with CU10
- System Center Virtual Machine Manager 2008 R2
- System Center Operations Manager 2007 R2 CU2
- System Center Virtual Machine Manager Self Service Portal v2.0
- Microsoft Windows SharePoint Services 3.0 SP2 x64
- System Center Virtual Machine Manager Self Service Portal v2.0 Dashboard
The table below shows who is responsible for each piece of software and license:
Product |
Media Type | Responsible Entity for License and Software |
Windows Server 2008 R2 | DVD | Partner and Customer |
Microsoft SQL Server 2008 SP1 with Cumulative Update 10 | DVD | Partner and Customer |
System Center Operations Manager 2007 R2 with Cumulative Update 2 | DVD | Customer |
System Center Virtual Machine Manager 2008 R2 | DVD | Customer |
System Center Virtual Machine Manager Self Service Portal v2 | Customer | |
System Center Virtual Machine Manager Self Service Portal v2 Dashboard | Customer | |
Microsoft Windows SharePoint Services 3.0 SP2 x64 | Customer |
Table 1
- Mobile Hydration Toolkit Hardware Requirements
In order to provide a reusable accelerator for hydration, a mobile component called the Mobile Hydration Toolkit is required to run on a single system. This system serves as a temporary repository within the customer environment to build and deploy the solution. As outlined in the Architecture guide, a Hyper-V Enabled Private Cloud requires a considerable amount of resources to run the System Center management products. Conversely, the Hydration Mobile Toolkit system is reusable and mobile in nature and should be run on a small workstation class system, laptop, or portable virtual machine that meets the minimum requirements listed below. The following hardware requirements are provided for the Mobile Hydration Toolkit host:
Hardware Component | Minimum Specifications |
Processor | Dual-Core or dual processor system |
RAM | 4 GB |
Hard Drive | 80 GB Free Space |
Network | 1 GbE |
- Network Requirements
1 GbE network speeds are required. To support Windows Deployment Services installations using a Microsoft Deployment Toolkit (MDT), an existing Dynamic Host Configuration Protocol (DHCP) server is assumed to be available within the customer environment and is also assumed to not have the Windows Deployment Services role installed. The Hydration Mobile Toolkit server may not function as intended if the previous assumptions are not met. Additional DHCP scope options may be required to support Windows Deployment Services installations required for the hydration process. Additional information on Windows Deployment Services can be found on TechNet: http://technet.microsoft.com/en-us/library/cc771670(WS.10).aspx.
- Installation
The installation and customization of the solution is mostly automated via MDT and scripting. The entire process needs to be completed at least once prior to any customer engagements. This is necessary in order to allow the consultant to become familiar with the process. The process is outlined as follows:
- Initial Deployment
- Partner environmental prerequisites are validated and remediated
- Infrastructure is provisioned (servers, storage, and network)
- Consultant Performs Active Directory Prerequisite Configurations of partners evaluation or demonstration environment
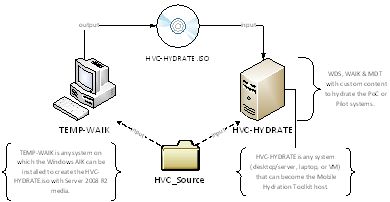
- TEMP-WAIK computer is setup and used to create Mobile Hydration Toolkit ISO
- Mobile Hydration Toolkit host (desktop, laptop, or VM) is built and configured using the HVC-HYDRATE ISO and light touch installation (LTI)
- Mobile Hydration Toolkit host is joined to and configured for the environment (evaluation or demonstration)
- Hydration of the Mobile Hydration Toolkit is completed
- Management host is deployed using the Mobile Hydration Toolkit
- Second host (optional) is deployed using the Mobile Hydration Toolkit
- Management virtual machines are deployed using the Mobile Hydration Toolkit
- Mobile Hydration Toolkit host is removed from test or evaluation environment and readied for reuse at next engagement (data wiped and ISO based LTI process repeated or snapshot rolled back if a portable VM is used)
- Customer Deployment
- Customer environmental prerequisites are validated and remediated
- Infrastructure is provisioned (storage, network)
- Consultant Performs Active Directory Prerequisite Configurations of customers Pilot environment
- Mobile Hydration Toolkit host (desktop, laptop, or VM) is built and configured using the HVC-HYDRATE ISO and light touch installation (LTI) or restored from a saved VHD or Hyper-V snapshot.
- Mobile Hydration Toolkit host is joined to and configured for the customer's Pilot environment
- Hydration of the Mobile Hydration Toolkit is completed
- Management host is deployed using the Mobile Hydration Toolkit
- Second host (optional) is deployed using the Mobile Hydration Toolkit
- Management virtual machines are deployed using the Mobile Hydration Toolkit
- Mobile Hydration Toolkit host is removed from the customers Pilot environment and readied for reuse at next engagement (data wiped and ISO based LTI process repeated or snapshot rolled back if a portable VM is used)
- Active Directory Prerequisite Configurations
- Creating The Required Active Directory Objects
Within the HVC_Source <insert partner download location here>, several files are provided to create the required service accounts, security groups, OU structure, and associated delegation to house the HVC solution. Depending on the scenario, this script may have to be run on a DC in the customer's environment. These files include:
- HVCADPreReq.PS1 – PowerShell script to create all required objects in the target Active Directory instance
- groups_domainlocal.csv, groups_global.csv and groups_universal.csv – Comma delimited files used to specify the names of the required security groups
- Users.csv - Comma delimited file used to specify the names of the required service accounts
In order to run this script, the following steps must be followed:
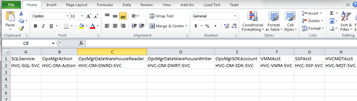
From a tool such as Excel, edit the Users.csv groups_domainlocal.csv, groups_global.csv and groups_universal.csv files to contain the user and group object names determined in the design workshop. Default object names are included in the files and are referenced throughout this document. These files are located in the HVC_Source\HVC_Solution_Pack\DIST\HVCHydration\Applications\HVC AD Prereq Script\ folder. If no modifications to the defaults are required, the CSV files can be used as-is. |
|
Identify the distinguished name (DN) of the OU or container in the target Active Directory environment where the OU structure will reside. For example, if the organization has an OU structure for similar installations called "Projects", the resulting DN would be "ou=Projects,dc=domain,dc=domain" and if the customer would like the HVC OU at the top of the domain, then "dc=domain,dc=domain" would be sufficient. | |
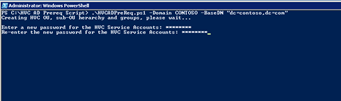
Login with a user that has Domain Admins membership or delegated rights to the OU that will host the new OU structure. Copy the HVC AD Prereq Folder to a local folder on the server where you are running the command. In this example, the folder has been copied to the root of C:\. From an elevated PowerShell command prompt, run the HVCADPreReq.PS1 script with the following arguments: -Domain – The NetBIoperating system domain name of the target Active Directory domain -BaseDN – The full DN of the source container or OU where the OU structure and associated objects will be placed Enter the password that will be used for ALL service accounts when prompted. Note: If the error below is received, your Execution Policy needs to be changed. "File ...HVCADPreReq.ps1 cannot be loaded because the execution of scripts is disabled on this system. Please see "get-help about_signing" for more details." |
.\HVCADPreReq.ps1 –Domain CONTOSO –BaseDN "dc=contoso,dc=com"
|
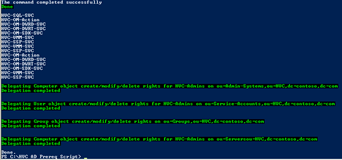
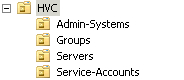
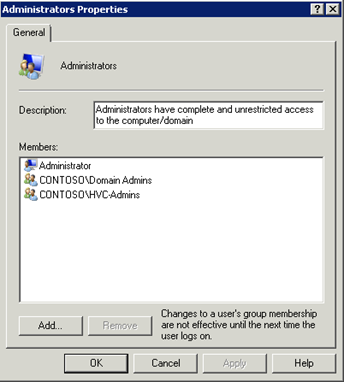
The script will create all required objects and delegate the resulting OU structure to a group called HVC-Admins. |
|
- Mobile Hydration Toolkit Host
- Creating the Reference Image and Mobile Hydration Toolkit Installation Media
The solution uses a custom unattended installation of Windows Server 2008 R2 utilizing custom media to support its automated processes. The goal of this build is to provide a starting point (reference image and Mobile Hydration Toolkit) for the solution and assist with initial setup of the envisioned Hyper-V Enabled Private Cloud host and virtual machine components. The build utilizes an unattended installation process to create the Mobile Hydration Toolkit server (HVC-HYDRATE) which can be used to develop subsequent MDT or Windows Deployment Services captured builds using the customer's media – which is a requirement in some customers. MDT and Hydration (the "toolkit") provide the necessary post-setup configuration installation files in order to instantiate the environment; this automation simply assists with the development of an MDT reference image.
The initial automation is built upon several design assumptions, including:
- Windows Server 2008 R2 will be utilized for all components
- The customer will either provide Windows Server media or utilize Volume Licensing media available at the Microsoft Volume Licensing (MLVS) download site
- All required Premier Support Hyper-V hotfixes are to be installed as part of the base operating system
- All Prerequisite configurations will be made to the operating system to prepare for an MDT or Windows Deployment Services capture
- Creating the HVC Mobile Hydration Toolkit Operating System Media
The build utilizes a base Windows Server 2008 R2 Full Installation configuration. To create the image, the following elements are required:
- Windows Server 2008 R2 source files
- HVC_Source files, which includes
- Post-setup configuration scripts
- Unattended installation file
- Windows Server 2008 R2 Automated Installation Kit (AIK)
To create an unattended build, the following steps must be followed:
On TEMP-WAIK (the system where the build will be created) copy the folder HVC_Source\HVC_Solution_Pack\BIN\WAIK2.0\ to C:\WAIK2.0. Install the Windows AIK by running the appropriate Windows Installer file, e.g., C:\WAIK2.0\waikamd64.msi. Select the default options during the installation wizard. | |
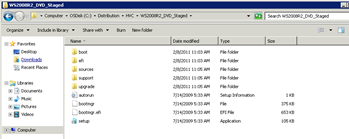
On TEMP-WAIK, create a folder called "Distribution" at the root of the drive and a sub-folder called "HVC". Expand the contents of the Windows Server 2008 R2 DVD to a local directory called "WS2008R2_DVD_Staged". The full path should be: C:\Distribution\HVC\WS2008R2_DVD_Staged |
|
Copy the WS2008R2_DVD_Staged\$OEM$ folder and its contents from the HVC_Source folder to the root of the expanded Windows Server 2008 R2 DVD folder (e.g., C:\Distribution\HVC\WS2008R2_DVD_Staged\$OEM$). | |
Copy the autounattend.xml file from the WS2008R2_DVD_Staged folder in the HVC_Source folder to the root of the C:\Distribution\HVC\WS2008R2_DVD_Staged folder. |
|
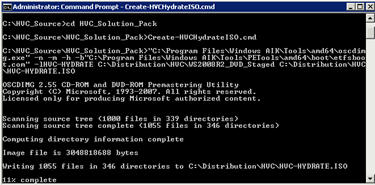
From the system where the WAIK was installed, elevate a Command Prompt and run the following command to create a bootable Windows Server 2008 DVD: C:\HVC_Source\HVC_Solution_Pack\Create-HVCHydrateISO.cmd Once finished, the HVC-HYDRATE.ISO can be found in C:\Distribution\HVC. |
|

From this point, the HVC Mobile Hydration Toolkit system (HVC-HYDRATE) can be installed. From this system, other portions of the HVC solution, including the HVC management products, can be deployed. Additional customer-specific customizations can be made in the resulting installation and captured in MDT and/or Windows Deployment Services.
- Installing the HVC Mobile Hydration Toolkit (HVC-HYDRATE)
The Hyper-V Enabled Private Cloud environment runs all core services on Windows Server 2008 R2. An ISO of Windows Server 2008 R2 was created in the previous step. This image contains a customized build of Windows Server 2008 R2 and additional required configuration changes. The HVC_Source contains all required system provisioning automation, publically available source files, and pre-service pack patches for Hyper-V.
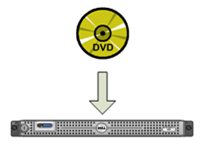
Insert the newly created HVC-HYDRATE DVD (or the ISO in virtual machine-based installs) in the server provided for the Mobile Hydration Toolkit (HVC-HYDRATE). Note: This is a destructive action and should only be performed if a system requires initial build or recovery. |
|
After initial POST, when prompted, press any key to boot from DVD and enter in the Windows Setup interface. |
|
| |
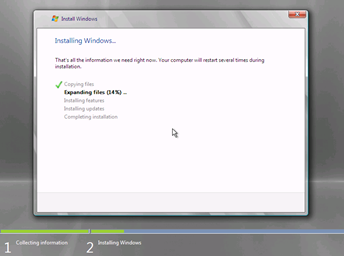
The Install Windows dialog appears. At this point the Windows Server 2008 R2 installation will perform in an unattended fashion. No interaction on the part of the administrator is required to complete the base installation of the operating system. Allow the installation of the customized Windows Server 2008 R2 build to complete without interruption. |
|
Once completed, the CTRL + ALT + DELETE dialog is displayed.
|
|
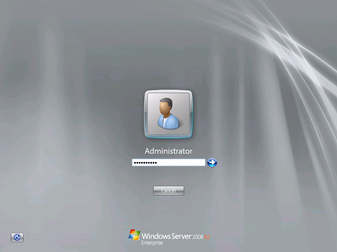
At the logon dialog, confirm that the local Administrator account is identified.
Click the Arrow, or click Enter to continue. |
|
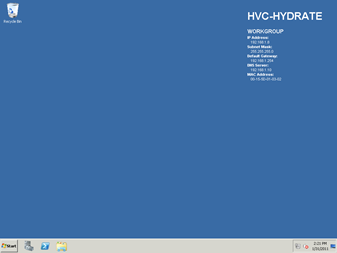
The system desktop appears. Wait for system startup to complete. Once completed, it is recommended that system naming is set properly (though this system will always be referred to as HVC-HYDRATE) on the system and that the default local admin password is changed in accordance to your policy. This may need to be updated each time the Mobile Hydration Toolkit is created and integrated into a new customer's Pilot production environment. |
|
This process and the configuration steps to follow must be repeated for each engagement. In order to reduce the time needed for this process, you can maintain the ISO file created earlier and skip the TEMP-WAIK section for future build. If you chose to create HVC-HYDRATE as a VM, you can also utilize a snapshot or read-only differencing VHD to preserve this base installation state. |


The following components and configurations are automatically added to the Mobile Hydration Toolkit:
- Windows Deployment Services role
- Microsoft .NET Framework feature
- Windows Firewall configuration
- BGInfo
- PowerShell configuration
Once built, the resulting operating system will be utilized as a starting point for the HVC Hydration process.
- Configuring the Mobile Hydration Toolkit
Now that the Mobile Hydration Toolkit is installed with the necessary components, it must be configured to support the HVC Hydration and operating system Provisioning processes.
Join HVC-HYDRATE to the existing Active Directory domain. (If this is for a customer engagement, then join the customer's AD domain). The computer account should be placed in the HVC\Servers OU created during the AD prerequisites steps. Logon to HVC-HYDRATE as a member of the Domain Admins group (to ensure local administrator access as well as the necessary rights to configure Windows Deployment Services as an authorized DHCP server in the domain). | |
Copy the contents of the WS2008R2_DVD_Staged folder to the C: drive of HVC-HYDRATE, e.g., C:\ WS2008R2_DVD_Staged. | |
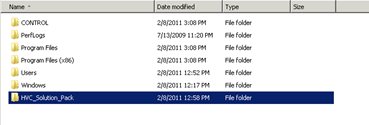
Copy the contents of the HVC_Solution_Pack folder to the C: drive of HVC-HYDRATE, e.g., C:\HVC_Solution_Pack. |
|
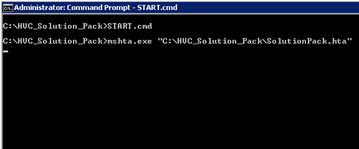
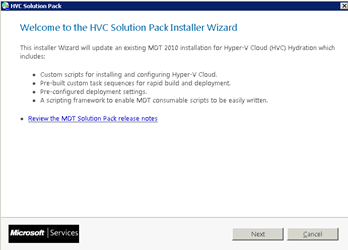
Open an elevated Command Prompt, change directory to C:\HVC_Solution_Pack, and run start.cmd. |
|
Click Next on the welcome screen. |
|
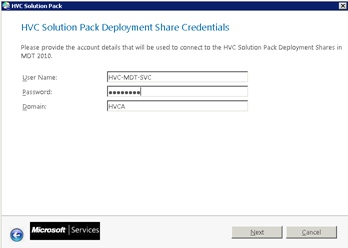
Enter the credentials of a domain service account that will be used to authenticate to the Hydration and Provisioning file shares (e.g., HVC-MDT-SVC). Click Next. |
|
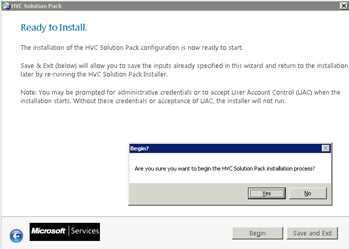
Click Begin to start the installation of the HVC Solution Pack. Click Yes to confirm. |
|
The HVC Solution Pack will automatically install the Windows Automated Installation Kit (WAIK), Microsoft Deployment Toolkit (MDT), configure Windows Deployment Services, and configure MDT by adding the HVC Hydration and HVC Provision deployment shares. Note: The configuration is tied to the profile of the account you are logged on with when the process is implemented. |
|
Click OK to the setup is complete message box. |
|
Add the customer provided Windows Server 2008 R2 installation source files by copying them from the customer provided media to the HVC-HYDRATE location C:\ HVCProvision\Operating Systems\Windows Server 2008 R2 x64\ (this folder will already exist). The installation source files consist of all files and folders within the customer-provided Windows Server 2008 R2 media. |
|
Add the customer provided application installation sources for SCVMM 2008 R2, and OpsMan 2007 R2 by copying them from the customer provided media to the HVC-HYDRATE location C:\ HVCHydration\Applications\INSTALL - <AppName>\Source (this folder will already exist for each application). |
|
While all of the components are compatible and supported with Microsoft SQL Server 2008 R2, the SQL Server Hydration installation is based upon the SQL Server 2008 SP1 Cumulative Update 10. In order to create these integrated source files, the following steps must be followed: | |
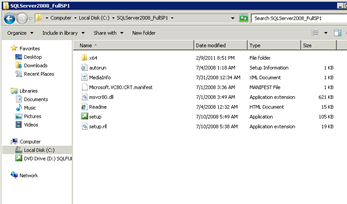
Create the folder C:\SQLServer2008_FullSP1 on HVC-HYDRATE. Copy the original SQL Server 2008 x64 source media to C:\SQLServer2008_FullSP1 (you can exclude the x86 and IA64 folders). |
|
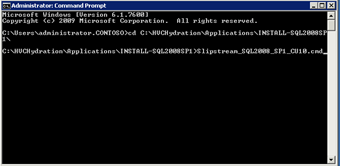
Open an elevated Command Prompt and change directories to C:\HVCHydration\Applications\INSTALL-SQL2008SP1\ Run Slipstream_SQL2010_SP1_CU10.cmd
|
|
Click OK. |
|
Click OK again. |
|
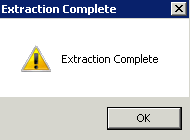
Close the Command Prompt when copying completes. | |
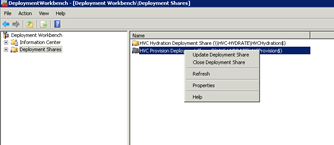
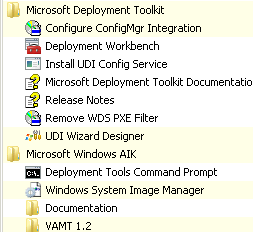
Open the MDT Deployment Workbench (Start – All Programs – Microsoft Deployment Toolkit). | |
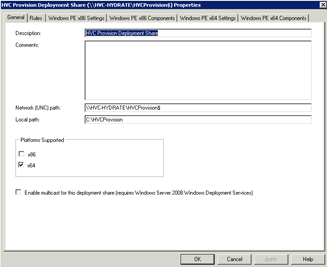
Select the Deployment Shares folder and then right-click the HVC Provision Deployment Share and select Properties. |
|
On the General tab, in the Platforms Supported section, uncheck x86 and click OK. |
|
In the next few steps, you may need to integrate customer required drivers, updates, and hotfixes into the deployment source. For more details on obtaining the required files please refer to http://support.microsoft.com/kb/323166. For more information on Windows Deployment Services please refer to http://technet.microsoft.com/en-us/library/cc772106(WS.10).aspx. For more information on Microsoft Deployment Toolkit please refer to http://technet.microsoft.com/en-us/solutionaccelerators/dd407791.aspx. For more information on Windows Automated Installation Kit please refer to http://technet.microsoft.com/en-us/library/dd349343(WS.10).aspx. |
|
Add any hardware drivers to the Drivers node that may be required for the HVC Management host systems (primarily mass storage and network 64-bit drivers for either Windows PE or Windows Server 2008 R2). |
|
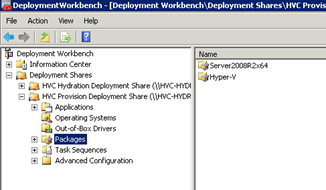
Add any required Windows Server 2008 R2 updates (patches) to the Packages node, Server2008R2x64 folder. Updates can be integrated here, applied later using Windows Update, or integrated using the customer's existing patch management solution if one exists. No additional updates are required to complete hydration but a fully patched host should be the end result of whatever process is used with the customer. |
|
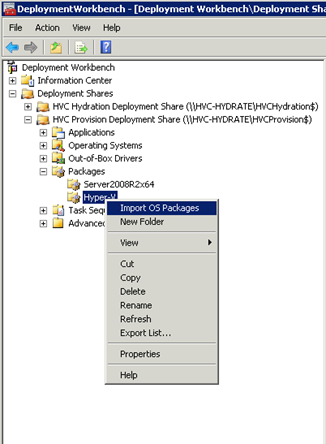
Import the necessary Hyper-V updates from the HVC_ Source folder: Expand the HVC Provision Deployment Share and expand the Packages folder. Select and then right-click on the Hyper-V folder and select Import OS Packages. |
|
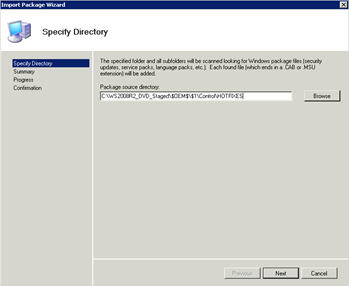
Input or browse to C:\WS2008R2_DVD_Staged\$OEM$\$1\Control\HOTFIXES in the Package Source directory field and click Next. |
|
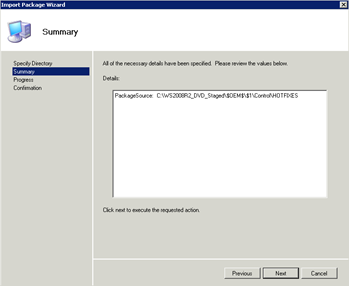
Click Next. |
|
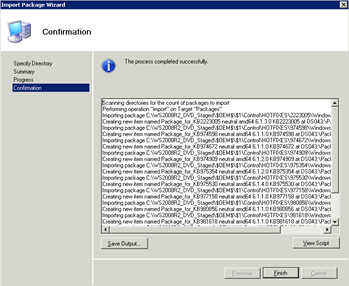
Click Finish. |
|
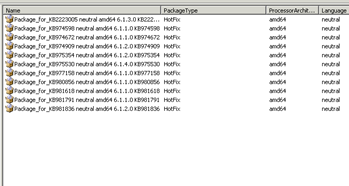
The Hyper-V folder should now contain the required hotfixes. |
|
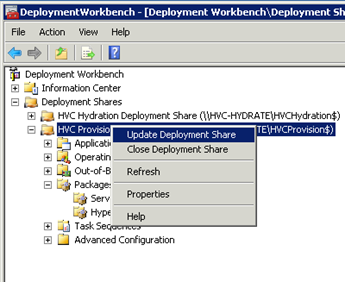
Right-click the HVC Provision Deployment Share and select Update Deployment Share. |
|
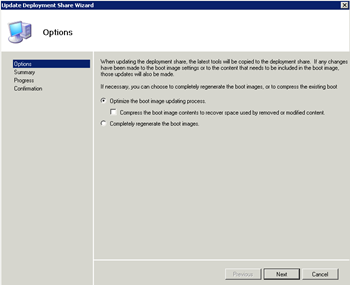
Click Next to select the default options. |
|
Click Next to begin. |
|
Click Finish when complete. |
|
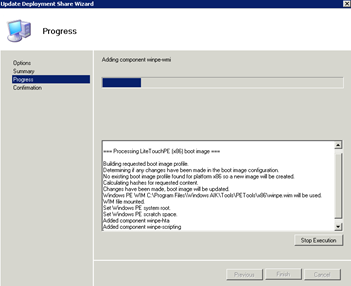
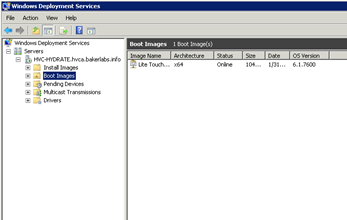
The deployment share will update, generating the Lite Touch Windows PE image (C:\HVCProvision\Boot\LiteTouchPE_x64.wim). Note: Once completed, this image needs to be set to be the default boot image in Windows Deployment Services This process is covered in the next steps. | |
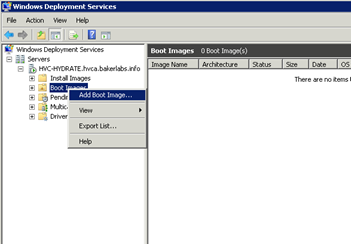
Open the Windows Deployment Services administrative console (Start – Administrative Tools – Windows Deployment Services). | |
Expand the server, right-click Boot Images and select Add Boot Image. |
|
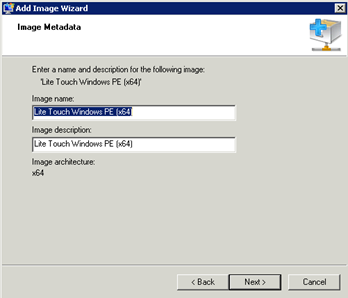
Enter C:\HVCProvision\Boot\LiteTouchPE_x64.wim and click Next. |
|
Accept the default name and description values and click Next. |
|
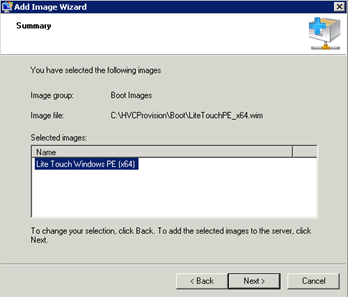
Click Next. |
|
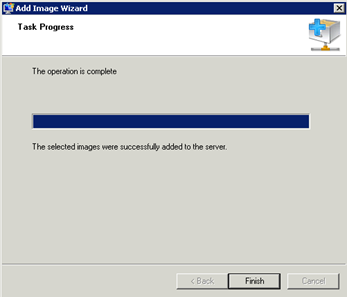
Click Finish when complete. Note that the default boot image is now listed pointing to the WIM created in the previous steps. |
|
Add the domain group HVC-Admins to the local administrators group on HVC-Hydrate. |
|


The Mobile Hydration Toolkit is now ready to provision and hydrate host and guest systems.
Note: An existing DHCP server is assumed to be available on the network. This DHCP server is also assumed to not have the Windows Deployment Services role installed. The HVC-HYDRATE Windows Deployment Services server may not function as intended if the previous assumptions are not met.
- Hyper-V Host and Guest Installation
- Provisioning Hyper-V Hosts
The next step is to provision the physical hardware that will support the Hyper-V hosts. Assuming the physical servers are prepared, the following steps will install Windows Server 2008 R2 using a lite-touch installation from the Mobile Hydration Toolkit server, including the necessary configurations for the management host.
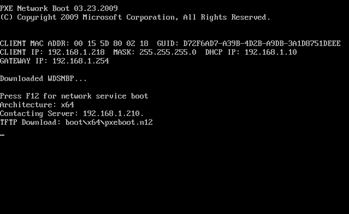
Turn on the first physical server and, if needed, select the appropriate option to PXE boot to the network. The server should get an IP address from the DHCP server and then locate the Windows Deployment Services PXE service on HVC-HYDRATE. Press F12 for network services boot. |
|
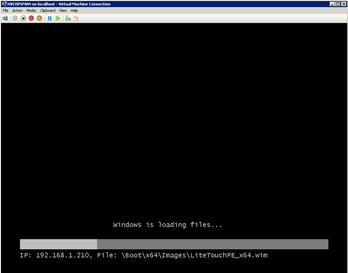
The system will download and boot to the Windows PE image. | |
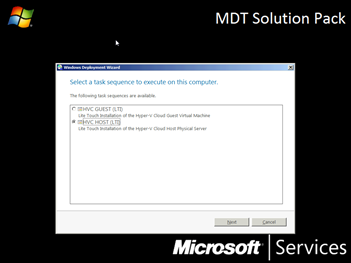
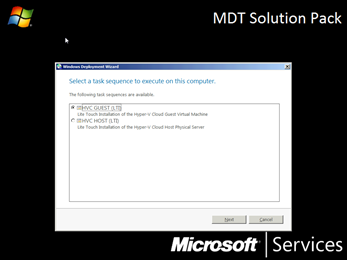
Select the task sequence HVC HOST (LTI) and click Next. |
|
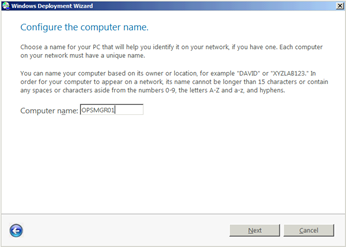
Enter the computer name of this HVC Host (e.g., HVCHost1) and click Next. |
|
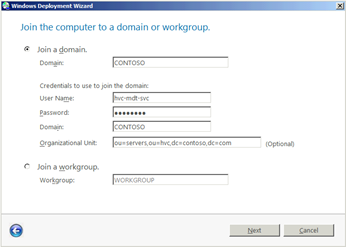
Enter the existing Active Directory domain name and credentials to create the computer account. You may also enter the DN of OU in which you would like it created in (e.g., ou=server,ou=hvc,dc=contso,dc=com) Click Next. |
|
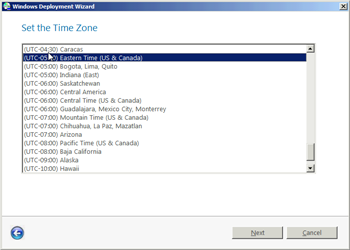
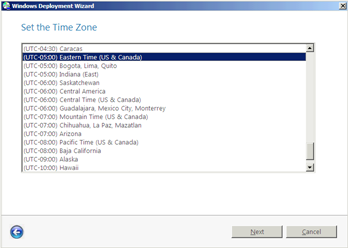
Specify the appropriate time zone, and click Next. |
|
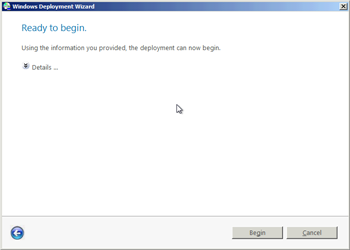
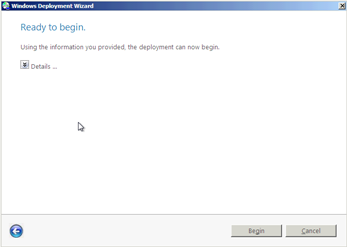
Click Begin to start the unattended installation of Windows Server 2008 R2. |
|
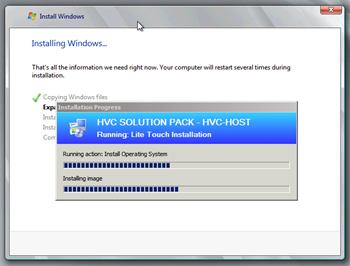
The installation process will run through a series of actions as the host operating system is installed and configured for Hyper-V. |
|
After the operating system installation completes, the HVC Solution Pack process will continue to configure the Hyper-V host and will reboot several times as additional actions are completed. |
|
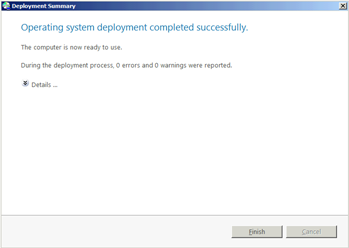
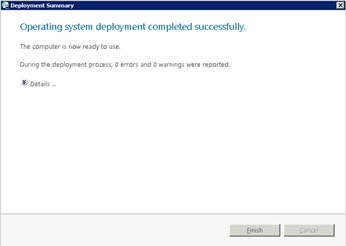
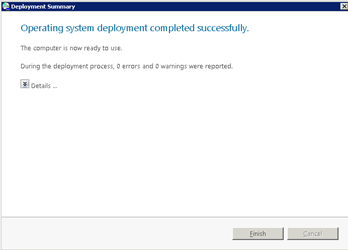
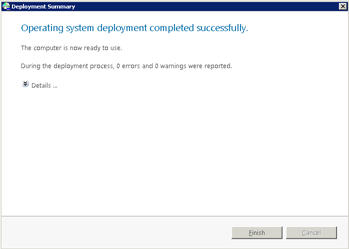
Review the Deployment Summary upon completion and click Finish to close the deployment wizard. The server will now reboot. |
|
Hyper-V Networking Information As part of the deployment process, a default virtual network is created on each host. This virtual network is bound to the first available physical network adapter in the host server, is assigned the name "public" and is configured as an external network. At least one network must be created in order for the solution to function. It will likely be necessary to create additional networks, modify or delete the default "public" network, and generally investigate the needs of the customer's specific network implementation. For details on how to configure these networks and for additional guidance, please refer to http://technet.microsoft.com/en-us/library/cc816585(WS.10).aspx
|
|


The following components and configuration are automatically added to the Hyper-V host:
- Hyper-V role
- Default Virtual Network "Public"
- Microsoft .NET Framework feature
- Windows Firewall configuration
- BGInfo
- PowerShell configuration
- Create Management Virtual Guests
From a tool such as Excel or Notepad, edit the HVCcreateMGMTVMs.csv file (found in C:\HVCHydration\Applications\HVC Create MGMT VMs\) to contain the following information:
|
|
Copy the folder C:\HVCHydration\Applications\HVC Create MGMT VMs\ and all contents to the root of the C:\ drive on the Hyper-V host server that will host all management VMs. |
|
Logon on, using HVC-INSTALL-SVC credentials, to the Hyper-V server that will host the HVC management servers. From an elevated PowerShell command prompt, change directories to C:\HVC Create MGMT VMs\ and run the script HVCCreateMGMTVMs.ps1. Type in the credentials for HVC-INSTALL-SVC. The script will run and create all the servers listed in the CSV file. You can safely ignore the warning related to starting each VM. The VM will be started by the time you open the Hyper-V MMC in the next step. |
|
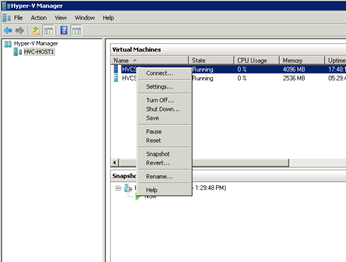
Open the Hyper-V Manager and validate each of the newly created VMS. |
|
- Provisioning Management Virtual Machines
The following steps will install Windows Server 2008 R2 on the newly created virtual machines using a lite-touch installation from the Mobile Hydration Toolkit server, including the necessary configurations for the Management virtual machines.
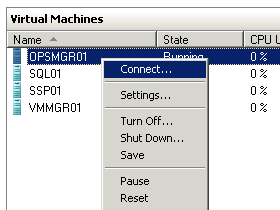
In Hyper-V Manager, right-click one of the newly created VMs that will host the System Center management products and select Connect…. |
|
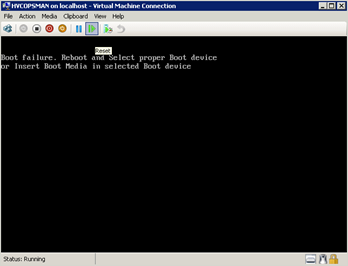
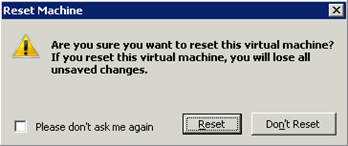
Click the green Reset button to restart the VM. Click Reset again on the alert pop-up. |
|
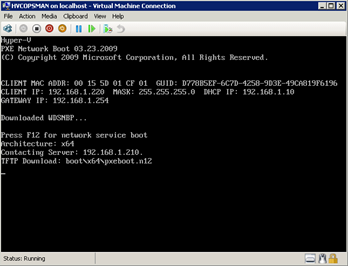
Press F12 to PXE boot to the network. The VM will locate the Windows Deployment Services PXE service on HVC-HYDRATE and download the necessary boot files. |
|
Next the VM will load the LiteTouch WIM. |
|
Select the task sequence HVC FM GUEST (LTI) and click Next. |
|
Enter the computer name of this HVC management virtual machine and click Next. |
|
Enter the existing Active Directory domain name and credentials to create the computer account. You may also enter the DN of OU where you would like it created (e.g., ou=server,ou=hvc,dc=contso,dc=com) and click Next. |
|
Specify the appropriate time zone and click Next. |
|
Click Begin to start the unattended installation of Windows Server 2008 R2. |
|
The installation process will run through a series of actions as the guest operating system is installed and configured. |
|
After the operating system installation completes, the HVC Solution Pack process will continue to configure the VM and will reboot several times as additional actions are completed. |
|
Review the Deployment Summary upon completion and click Finish to close the deployment wizard. The server will now reboot. |
|
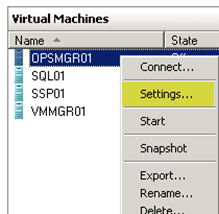
Shutdown the server and open Hyper-V Manager on the host. | |
Select the VM in Hyper-V manager and select Settings. |
|
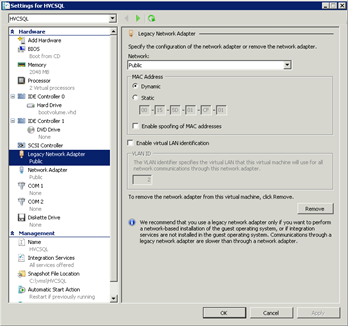
Select the Legacy Network Adapter, click remove, and then click OK. This adapter was only needed for network-based deployment. It is removed in favor of the synthetic network adaptor that is optimized for Hyper-V. |
|
Power on the VM. | |
Repeat the above process to provision the three other remaining Management virtual machines (multiple installations can occur simultaneously). | |
Add the OpsMgr computer account to the OpsMgr Admins group (i.e., HVC-OM-Admins) and to the SQL Admins group (i.e., HVC-SQL-Admins) | |
The Management virtual machines are now ready to be hydrated. |


The following components and configuration are automatically added to each virtual machine:
- Microsoft .NET Framework feature
- Windows Firewall configuration
- BGInfo
- PowerShell configuration
- SQL Server 2008 SP1 CU10 Deployment
- Overview
This section provides a high-level walkthrough on how to setup and implement the task sequence and scripts for deploying SQL Server 2008 SP1 with CU10 on the Management SQL VM in an automated manner.
- Prerequisites
The following environment prerequisites must be met before proceeding.
Accounts
Verify that the following accounts have been created by the HVC Active Directory Object creation script:
User Name | Purpose |
HVC-SQL-SVC | SQL Service Account |
HVC-INSTALL-SVC | Install Account |
Groups
Verify that the following security groups have been created by the HVC Active Directory Object creation script (Note: Members and member-of is automatically set by the provisioning or hydration processes):
Security Group Name | Group Scope | Members | Member-of |
HVC-Admins | Universal | HVC-INSTALL-SVC and customers Administrators for the HVC solution | Buildin\Administrators Sysadmin role on all SQL instances |
HVC-SQL-Admins | Universal | All HVC service accounts and customers SQL Administrators for the HVC solution | Buildin\Administrators |
HVC-OM-Admins | Domain Local | OpsMgr service account and customers OpsMgr Administrators for the HVC solution | Sysadmin role on HVCSCOM instance |
HVC-VMM-Admins | Global | Sysadmin role on MICROSOFT$VMM$ instance | |
HVC-SSP-Admins | Domain Local | SSP service account | Sysadmin role on HVCSSP instance Sysadmin role on HVCWSPS instance |
Hydration Wizard Variables
The SQL Server hydration wizard will prompt you for the following values:
- SQL Service Account Name
- SQL Service Account Password
- SQL Instance DATA Directory
- SQL Instance LOG Directory
- Application admin group name for each of the HVC management components (these groups, along with HVC-INSTALL-SVC are assigned to the sysadmin roles on the appropriate instance in SQL)
- VMM admin group name
- OpsMgr admin group name
- SSP admin group name
- SQL admin group name
Note: The SQL service account (e.g., HVC-SQL-SVC) is only used to start the SQL service for each instance. Later in this guide the "SQL Service Account" refers to the account used to connect to the SQL instance or database for each application. This will always be the service account for that specific application (e.g., HVC-VMM-SVC, HVC-OM-SDK-SVC, and HVC-SSP-SVC).
- Creating the SQL Data and Log Drives
Logon to the Hyper-V host that is hosting the SQL VM as HVC-INSTALL-SVC and open the Hyper-V Manager console. | |
Select the SQL VM and open the VM Settings… |
|
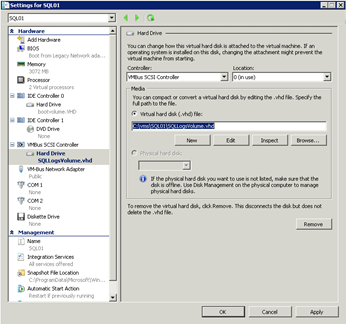
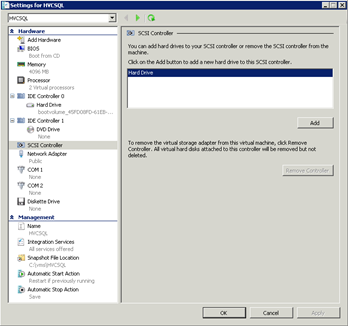
Select the SCSI Controller, select Hard Drive and click Add. |
|
Click New. |
|
Select Do not show this page again and then click Next. |
|
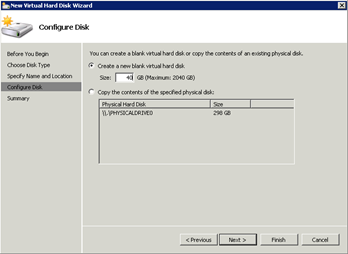
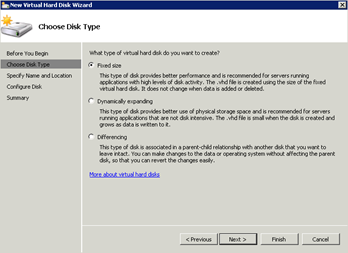
Select Fixed size and click Next. |
|
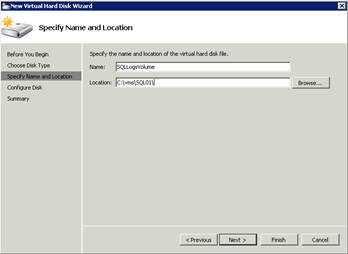
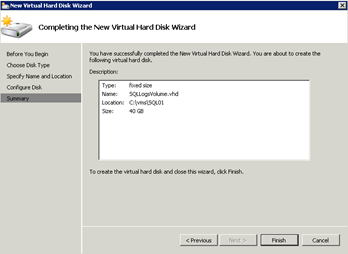
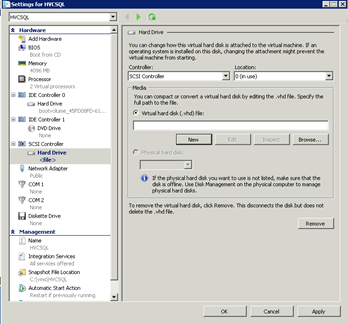
Enter a name and location for the new disk and click Next. This VHD will be the location for SQL log files. Be sure to place it on a physical volume with sufficient performance to handle the expected I/O of the SQL VM. |
|
Specify a size for the new VHD of at least 40 GB and click Next. |
|
Click Finish. |
|
Click Apply. |
|
Repeat the previous steps to create a second VHD that will be the location for SQL database files. Close the VM Settings. | |
Logon to the SQL server as HVC-INSTALL-SVC. | |
Open Disk Management. |
|
Right-click on Disk 1 and select Online. Right-click on Disk 2 and select Online. |
|
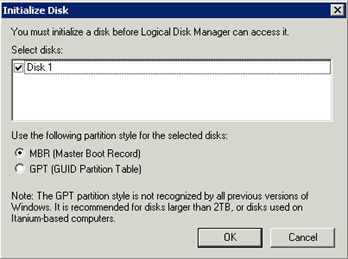
Right-click on Disk 1 and select Initialize Disk. |
|
Leave both Disk 1 and Disk 2 selected, and click OK. |
|
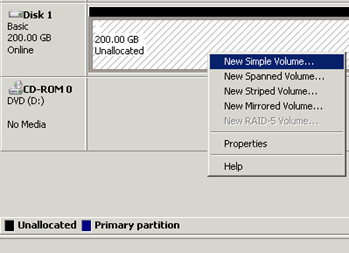
Right-click on the Unallocated space of Disk 1, and select New Simple Volume…. |
|
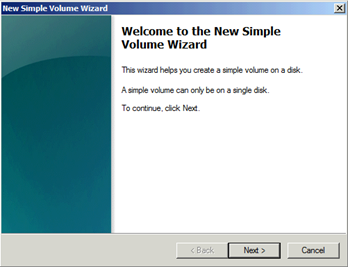
Select Next. |
|
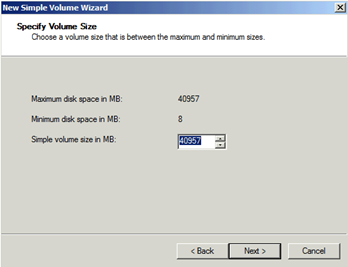
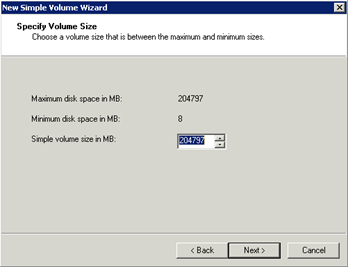
Accept the default volume size, and click Next. |
|
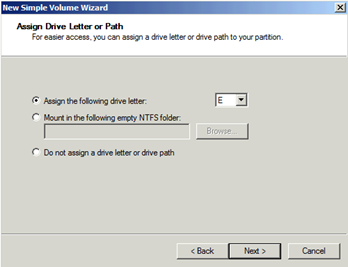
Accept the default drive letter, and click Next. This drive letter will be provided for the path of the SQL Log files when running through the SQL Hydration wizard. |
|
Adjust the volume label if desired, and click Next. |
|
Click Finish. | |
Repeat the previous few steps on Disk 2 for the SQL Data volume. |
|
Close Disk Management. |


- Installing the SQL Named Instances
The SQL Hydration process will perform the following:
Refer to the Troubleshooting Appendix for complete details. | |
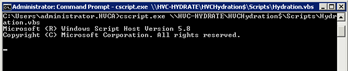
From an elevated Command Prompt, implement the hydration from the Mobile Hydration Toolkit server HVC-HYDRATE by running the following command: cscript.exe \\HVC-HYDRATE\HVCHydration$\Scripts\Hydration.vbs |
|
The Hydration Wizard will appear. Click Next to continue. |
|
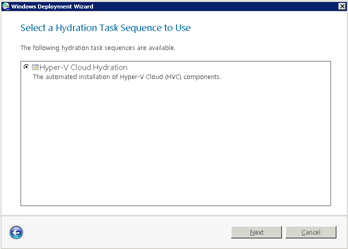
Select the HVC Hydration task and click Next to continue. |
|
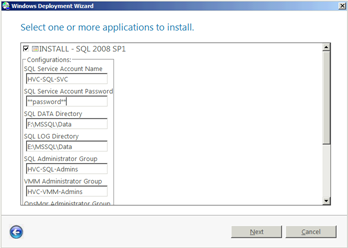
From the available choices, select the checkbox for INSTALL-SQL 2008 SP1. |
|
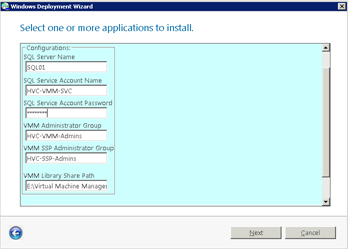
The dialog will expand to show the available options for SQL 2008 SP1 installation. Provide the following values, and click Next:
|
|
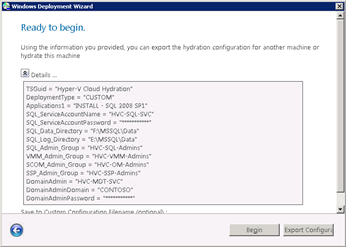
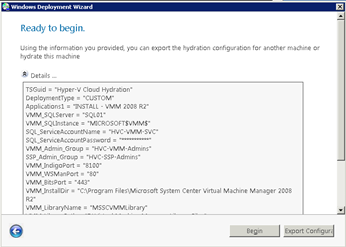
Review the settings specified in the wizard and click Begin to start the installation. |
|
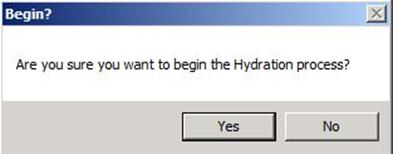
When prompted, click Yes to begin the installation. |
|
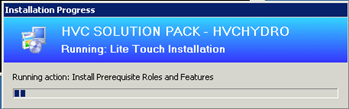
The installation will continue until all 4 SQL instances complete installation on the SQL server. Note: The process may take quite some time to complete. Do not interrupt the installation process even if you see no indication of progress.
|
|
Click Finish to close the deployment wizard. |
|
Because the SQL service is running as a domain user it will not be able to dynamically create SPNs for each SQL instance. The next few steps will show the process of setting the SPN using the setspn.exe tool. |
|
While still logged in as HVC-INSTALL-SVC, from an elevated Command Prompt, run the following command once for each of the four SQL instances: setspn –A MSSQLSvc/<FQDN>:<instancename> <accountname> Where:
e.g., setspn –A MSSQLSvc/SQL01.contoso.com:MICROSOFT$VMM$ contoso\hvc-sql-svc Instance Names:
| |
SQL hydration is now complete. Reboot the SQL server. |


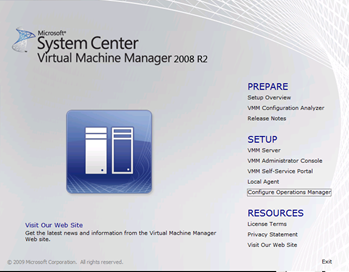
- System Center Virtual Machine Manager 2008 R2
- Overview
This section provides a high-level walkthrough on how to setup and implement the task sequence and scripts for deploying SCVMM 2008 R2 in a highly automated manner.
- Pre-requisites
The following environment prerequisites must be met before proceeding:
Accounts
Verify that the following accounts have been created by the HVC Active Directory Objects creation script as outlined in the section above:
User Name | Purpose |
HVC-VMM-SVC | Virtual Machine Manager Service Account |
Groups
Verify that the following security groups have been created by the HVC Active Directory Objects creation script as outlined in the section above.
(Note: members and member-of is automatically set by the provisioning or hydration processes):
Security Group Name | Group Scope | Members | Member-of |
HVC-VMM-Admins | Global | HVC-VMM-SVC HVC-SSP-SVC | Builtin\Administrators |
HVC-Admins | Universal | HVC-INSTALL-SVC | Builtin\Administrators |
SQL Configuration
Verify that the SQL server instance MICROSOFT$VMM$ exists and that HVC-VMM-Admins, HVC-Admins, and HVC-INSTALL-SVC have been assigned the Sysadmin role to the instance.
- Creating the VMM Library Share Drive
Logon to the Hyper-V host that is hosting the VMM VM as HVC-INSTALL-SVC and open the Hyper-V Manager console. | |
Select the VMM VM and choose the VM Settings…. |
|
Select the SCSI Controller, select Hard Drive and click Add. |
|
Click New. |
|
Select Fixed size and click Next. |
|
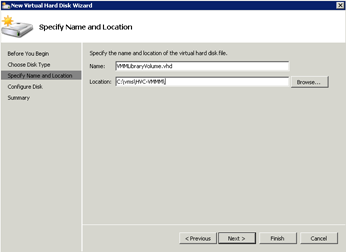
Provide a name and location for the new disk, and click Next. |
|
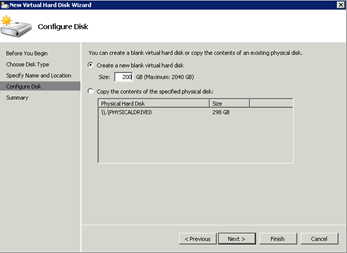
Specify a size for the new VHD of at least |
|
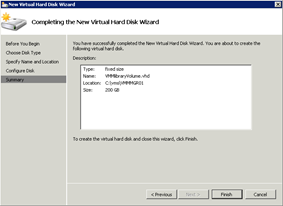
Click Finish. |
|
Click Apply. |
|
Close the VM Settings. | |
Logon to the VMM server as HVC-INSTALL-SVC. | |
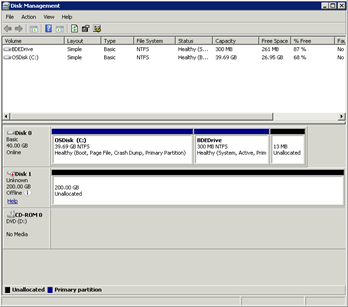
Open Disk Management. |
|
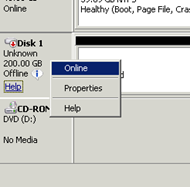
Right-click on Disk 1 and select Online. |
|
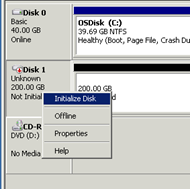
Right-click on Disk 1 and select Initialize Disk. |
|
Leave Disk 1 selected, and click OK. |
|
Right-click on the Unallocated space of Disk 1 and select New Simple Volume…. |
|
Select Next. |
|
Accept the default volume size, and click Next. |
|
Accept the default drive letter, and click Next. This drive letter will be provided for the path of the VMM Library share when running through the VMM setup wizard. |
|
Adjust the volume label if desired, and click Next. |
|
Click Finish. | |
Close Disk Management. |


- Installing SCVMM
The SCVMM Hydration process will perform the following:
Refer to the Troubleshooting Appendix for complete details. | |
Logon to the HVC VMM server as HVC-INSTALL-SVC. From an elevated Command Prompt, implement the hydration from the Mobile Hydration Toolkit server HVC-HYDRATE by running the following command: cscript.exe \\HVC-HYDRATE\HVCHydration$\Scripts\Hydration.vbs |
|
The Hydration Wizard will appear. Click Next to continue. |
|
Select the HVC Hydration task and click Next to continue. |
|
From the available selections, select the checkbox for INSTALL- VMM 2008 R2. |
|
The dialog will expand to show the available options for VMM 2008 R2 installation. Provide the following values and click Next:
|
|
Review the settings specified in the wizard and click Begin to start the installation. |
|
When prompted, click Yes to begin the installation. |
|
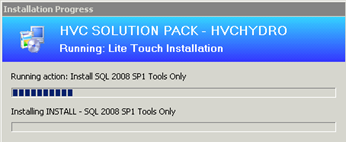
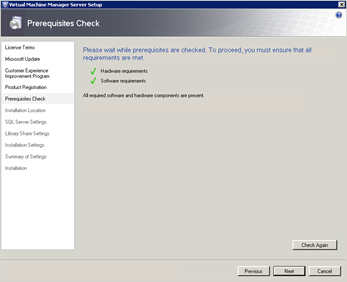
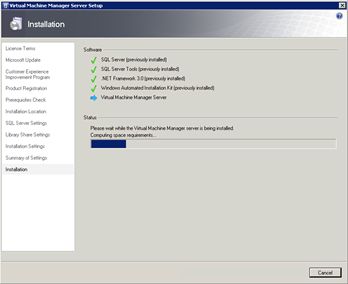
The installation will continue until SCVMM installation is complete. The process may take quite some time to complete. Do not interrupt the installation process even if you see no indication of progress. |
|
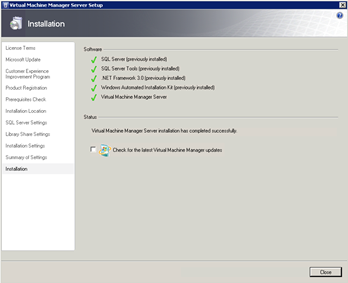
Once the hydration wizard completes it will have installed SQL Server 2008 SP1 Tools, the VMM 2008 R2 Admin Console, and the OpsMgr 2007 R2 Operations Console. Click Finish. |
|
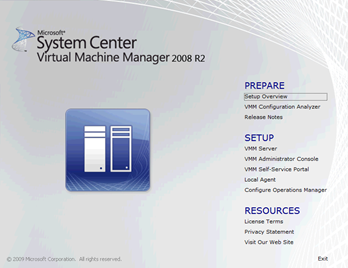
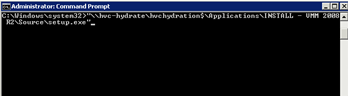
From the same elevated Command Prompt, start the install of the SCVMM Server Component by running the following command: "\\hvc-hydrate\hvchydration$\Applications\INSTALL - VMM 2008 R2\Source\Setup.exe" Click SETUP -> VMM Server. |
|
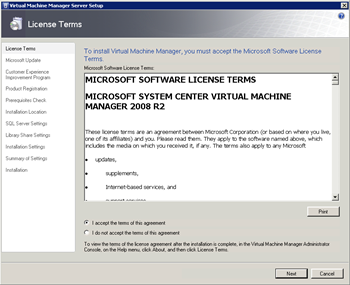
Accept the license agreement and click Next. |
|
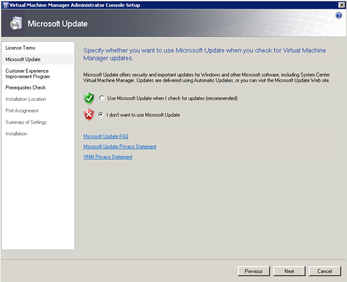
Select I don't want to use Microsoft Update and click Next. |
|
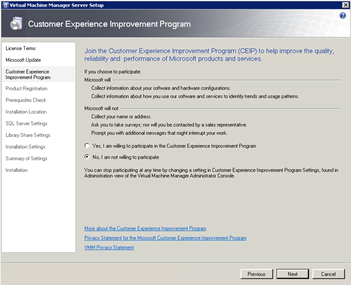
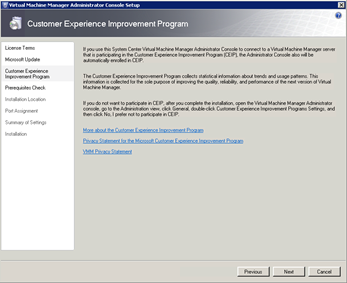
Select No, I am not willing to participate and click Next. |
|
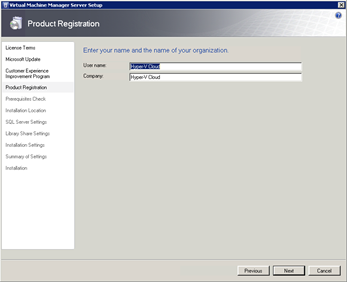
Supply an appropriate User name and Company value, and click Next. |
|
Click Next. |
|
Click Next. |
|
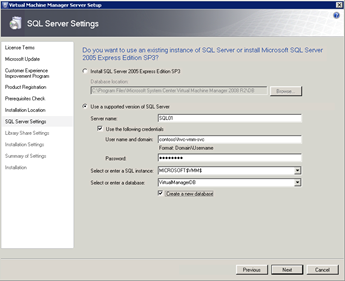
Select User a Supported Version of SQL Server, select Use the following credentials, select Create a new database, and input the values for these fields:
Select Create a new database. Click Next. |
|
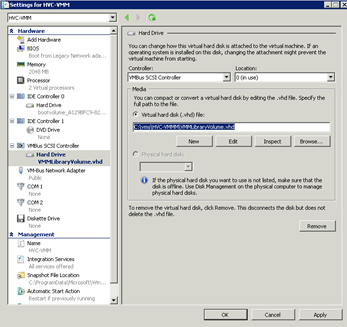
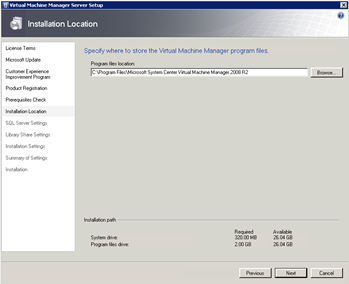
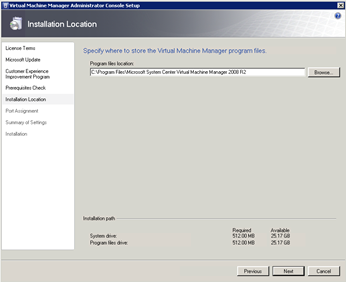
Change the path for the VMM Library Share to point to the volume you created in the previous section. Click Change. Select the Library volume you created. Select Make New Folder and name the folder VMMLibrary. Click Ok. Click Next. |
|
Click Next. |
|
Click Install. |
|
Install process will take several minutes. |
|
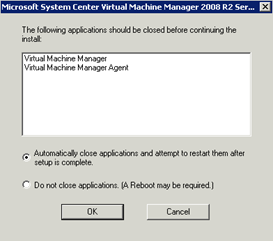
Deselect the Check for latest Virtual Machine Manager updates, and click Close. |
|
Click Exit to close the VMM setup splash screen. | |
From the same elevated Command Prompt, start the install of the SCVMM Server Component by running the following command: msiexec /update "\\hvc-hydrate\hvchydration$\Applications\INSTALL - VMM 2008 R2\Update\vmmServer64Update-OEM.msp" BOOTSTRAPPED=1 | |
Click OK. |
|
The application will install and close automatically when finished. You can confirm installation was successful by checking for MsInstaller Event ID 1035 in the Application Event Log. |
|
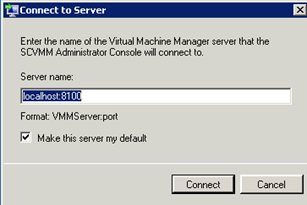
Launch the SCVMM Admin Console. Click Connect. |
|
Validate that the SCVMM Admin Console opens and connects to the server service without issue. Close the console. |
|


- System Center Operations Manager 2007 R2
- Overview
This section provides a high-level walkthrough on how to setup and implement the task sequence and scripts for deploying OpsMgr 2007 R2 in a highly automated manner. OpsMgr is deployed with SQL Reporting Services installed locally but all databases on the remote SQL server.
- Prerequisites
The following environment prerequisites must be met before proceeding:
Accounts
Verify that the following security groups have been created by the HVC Active Directory Object creation script as outlined in the section above:
User Name | Purpose |
HVC-OM-Action | OpsMgr Action Account |
HVC-OM-DWRD-SVC | OpsMgr Data Reader Account |
HVC-OM-DWRT-SVC | OpsMgr DW Write Account |
HVC-OM-SDK-SVC | OpsMgr SDK Account |
Groups
Verify that the following security groups have been created by the HVC Active Directory Object creation script as outlined in the section above (Note: members and member-of is automatically set by the provisioning or hydration processes):
| Group Scope |
|
|
HVC-OM-ADMINS | Global | HVC-OM-Action HVC-OM-DWRD-SVC HVC-OM-DWRT-SVC HVC-OM-SDK-SVC SCOM Administrators' privileged admin accounts SCOMSERVER$ computer account | Builtin\Administrators Sysadmin role on the OpsMgr SQL instance |
HVC-OM-OPS | Global | SCOM Operators' privileged admin accounts |
SQL Instance Configuration
Verify that the SQL server instance HVCSCOM exists and that HVC-OM-Admins, HVC-Admins, and HVC-INSTALL-SVC have been assigned the Sysadmin role to the instance.
- Installation – Operations Manager Prerequisites and Reporting Server
The following steps must be completed in order to install the required prerequisites for Operations Manager 2007:
The Operations Manager Prerequisites and Reporting Server Hydration process will perform the following:
Refer to the Troubleshooting Appendix for complete details. | |
Log on to the OpsMgr VM as HVC-INSTALL-SVC. From an elevated Command Prompt, implement the hydration from the HVC Mobile Hydration Toolkit server: cscript.exe \\HVC-HYDRATE\HVCHydration$\Scripts\Hydration.vbs |
|
The Hydration Wizard will appear. Click Next to continue. |
|
Click Next. |
|
From the available choices, select the checkbox for INSTALL- OpsMgr 2007 R2. |
|
Select Install Prerequisites on OpsMgr server, and click Next. There is no need fill out or change any of the other configuration variables at this point. |
|
Review the settings specified in the wizard, and click Begin to start the installation. |
|
When prompted, click Yes to begin the installation. |
|
The installation will continue silently until the OpsMgr prerequisites complete its installation on the OpsMgr Server. |
|
After the OpsMgr prerequisites complete, please complete the following SQL Server Reporting Services configuration: | |
Launch the Reporting Services Configuration Manager (Start->All Programs->Microsoft SQL Server 2008->Configuration Tools). Click Yes on the UAC alert. |
|
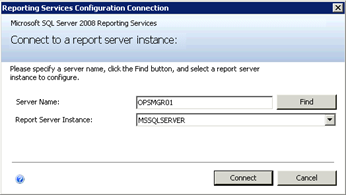
In the Reporting Services Configuration Connection dialog box, accept the default entries and click Connect. |
|
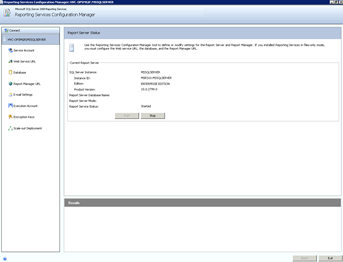
In the Reporting Services Configuration Manager, maximize the window. |
|
Click the Database menu item on the left. In the details pane, click Change Database. The Report Server Database Configuration Wizard will then launch. |
|
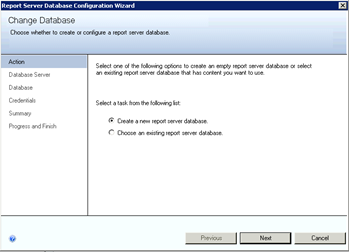
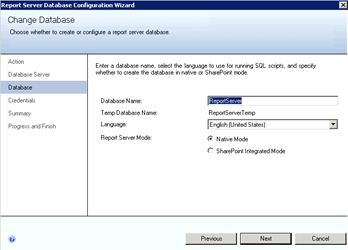
Select the Create a new report server database option. Click Next. |
|
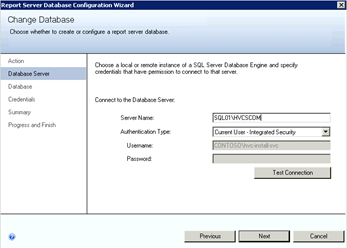
On the Database Server page, enter the SQL Server name and SQL instance name for OpsMgr (e.g., SQL01\HVCSCOM). Click Test Connection. When the Test Connection dialog states "Test Connection Succeeded", click OK. Click Next. |
|
On the Database page, accept the default selections, and click Next. |
|
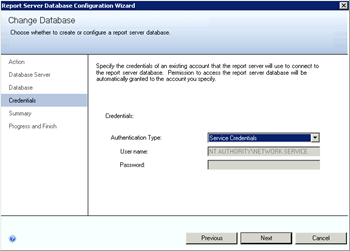
On the Credentials page, accept the default selection of NT AUTHORITY\NETWORK SERVICE for the Service Credential, and then click Next. |
|
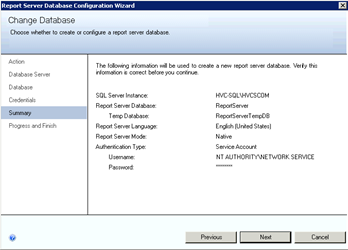
On the Summary page, review the settings, and then click Next. |
|
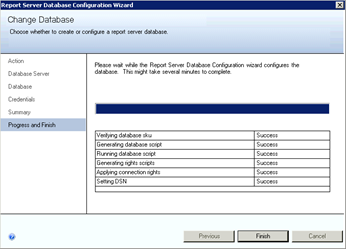
On the Progress and Finish page, review the results, and then click Finish. |
|
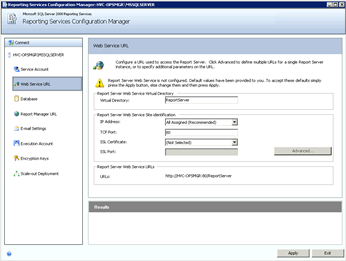
In the Reporting Services Configuration Manager, click the Web Service URL menu item on the left. In the details pane, click Apply. |
|
Click the Report Manager URL menu item on the left. In the details pane, click Apply. |
|
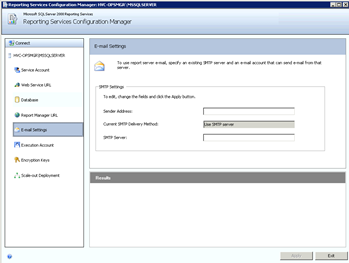
Optional: Click the Email Settings menu item on the left. In the details pane, enter an email address in the Sender Address field and the FQDN of an outbound SMTP server in the SMTP Server field. Click Apply. |
|
Click Exit to close the Reporting Services Configuration Manager. | |
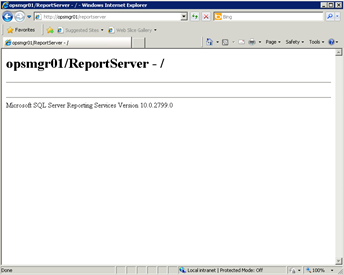
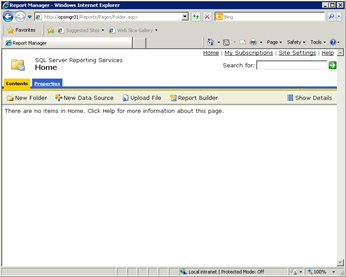
Ensure that the OpsMgr server computer account has already been added to the Operations Managers Administrators security group (i.e., HVC-OM-Admins) and the SQL Admins security group (i.e. HVC-SQL-Admins), and then reboot the server. | |
Verify that the reboot of the OpsMgr server has completed. From another computer, open Internet Explorer and inspect the health of the Report Server and Report Manager by browsing to the following sites respectively: http://<OpsMgrServerName>/reportserver And |
|
Close IE. |


- Installation – Operations Manager Databases
The following steps must be completed in order to install and configure the Operations Manager 2007 databases.
The Operations Manager Databases Hydration process will perform the following:
Refer to the Troubleshooting Appendix for complete details. | |
Logon to the SQL Server as HVC-INSTALL-SVC. From an elevated Command Prompt, implement the hydration from the HVC Mobile Hydration Toolkit server: cscript.exe \\HVC-HYDRATE\HVCHydration$\Scripts\Hydration.vbs |
|
The Hydration Wizard will appear. Click Next to continue. |
|
Click Next. |
|
From the available choices, INSTALL – OpsMgr 2007 R2. |
|
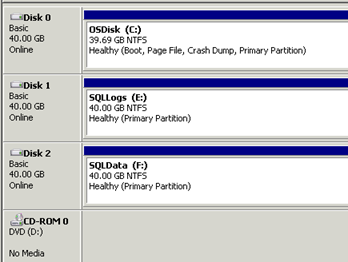
Type in the SQL server name and the SQL instance. Select Install OpsMgr Databases on SQL Server. Fill in the SQL Server and SQL Instance fields with the appropriate values for your environment (e.g., SQL01 and HVCSCOM). Fill in the Administrators Security Group field with the appropriate value for your environment (e.g., HVC-OM-Admins). Fill in the Management Group name with the appropriate value for you environment (e.g., HVC). Fill in the SQL Data Directory and SQL Log Directory with the appropriate values for your environment (e.g., F:\MSSQL\Data and E:\MSSQL\Data). Click Next. |
|
Review the settings specified in the wizard and click Begin. |
|
Click Yes. |
|
The installation will continue silently until the OpsMgr DBs are created on the SQL Server. Click Finish. Log off the SQL server. |
|


- Installation – Operations Manager Roles
The following steps must be completed in order to install and configure the Operations Manager 2007 server roles.
The Operations Manager Roles Hydration process will perform the following:
Refer to the Troubleshooting Appendix for complete details. | |
Logon on to the OpsMgr server as HVC-INSTALL-SVC. From an elevated Command Prompt, implement the hydration from the HVC Mobile Hydration Toolkit server: cscript.exe \\HVC-HYDRATE\HVCHydration$\Scripts\Hydration.vbs |
|
Click Next. |
|
Click Next. |
|
From the available choices, select INSTALL – OpsMgr 2007 R2. |
|
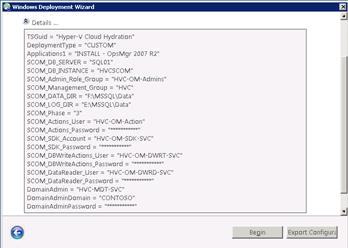
Select Install and configure roles on OpsMgr. Provide the following values, and click Next:
Click Next. |
|
Review the settings specified in the wizard and click Begin. |
|
When prompted, click Yes to begin the installation. |
|
The installation will continue silently until the OpsMgr roles are installed on the OpsMgr Server. |
|
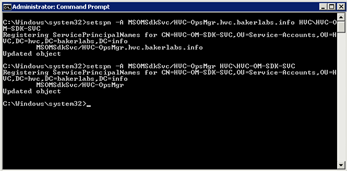
Create Service Principle Names for OpsMgr. Open an elevated Command Prompt and type : setspn –A MSOMSdkSvc/<OpsMgrServerName.domainname> <DOMAIN>\<OpsMgrSDKServiceAccount> (e.g., setspn -A MSOMSdkSvc/OpsMgr01.contoso.com Contoso\HVC-OM-SDK-SVC) And setspn -A MSOMSdkSvc/<OpsMgrServerName> <DOMAIN>\<OpsMgrSDKServiceAccount> (e.g., setspn -A MSOMSdkSvc/OpsMgr01 Contoso\HVC-OM-SDK-SVC) |
|


- Installation – Configure Operations Manager VMM Integration
The following steps must be completed in order to configure Operations Manager 2007 integration with SCVMM.
From an elevated Command Prompt, run the following command: "\\hvc-hydrate\hvchydration$\Applications\ INSTALL - VMM 2008 R2\Source\Setup.exe" |
|
Click Configure Operations Manager. |
|
Select I accept the terms of this agreement, and click Next. |
|
Select I don't want to use Microsoft Update and click Next. |
|
At the Customer Experience Improvement Program, click Next. |
|
After the prerequisites have been checked and passed, click Next. |
|
Select the default file location, and click Next. |
|
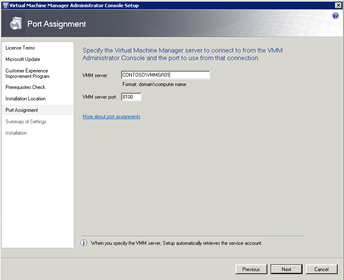
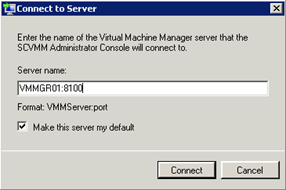
Type in the VMM server name (e.g., Contoso\VMMGR01), and click Next. |
|
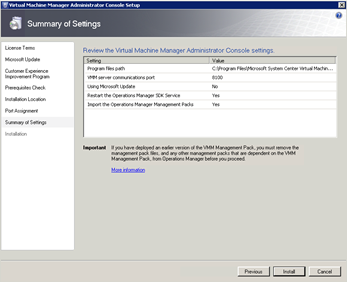
Review the installation settings and click Install. |
|
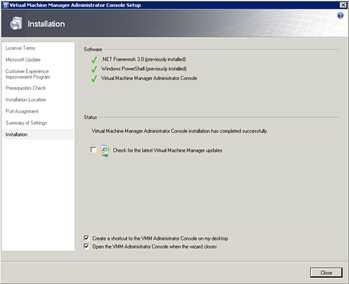
When the installation is complete, clear the checkbox in Check for the latest Virtual Machine Manager Updates. Select the checkbox Open the VMM Administrator Console when the wizard closes. Click Close. |
|
Type in the VMM server name, and click Connect. |
|
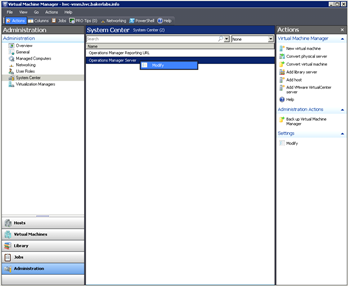
Select Administration. Choose System Center. Right-click on Operations Manager Server, and select Modify. |
|
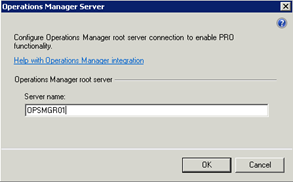
Type in the OpsMgr server name, and click OK. |
|
When complete, close the VMM Administration console. |

The OpsMgr installation, and the integration with VMM, is now complete. However, it is imperative for the delivery consultant(s) working with the customer to configure and tune the management packs in OpsMgr once the HVC management environment has been fully implemented. While the MPs that accompany the HVC solution have already been tuned, more configurations and tuning will need to be accomplished in the customer environment.
The OpsMgr 2007 R2 MP guide is especially important and its guidance should be implemented as soon as possible upon initial deployment. A typical example of an important configuration task would be configuring Run As accounts with privileged accounts that are unique to the customer's domain environment.
It is highly recommended that the delivery consultant first review the MP guides that are located in the same directory as its corresponding MP: <MDTDeploymentShare>\Applications\INSTALL - OpsMgr 2007 R2\MPs\. Custom MPs for overrides have also been imported and associated with each sealed or custom MP in a 1:1 manner and are annotated with a "- CUSTOM" suffix in the Operations Console.
- System Center Virtual Machine Manager Self-Service Portal 2.0 (SSP v2)
- Overview
This section provides high-level walkthrough on how to deploy SSP v2.
- Pre-requisites
The following environment prerequisites must be met before proceeding:
Accounts
Verify that the following security groups have been created by the HVC Active Directory Object creation script as outlined in the section above:
User Name | Purpose |
<DOMAIN>\ HVC-SSP-SVC | SSP v2 Account |
Hydration Wizard Variables
The SSP Server hydration wizard will prompt you for the following values:
- SSP Administrators Group name
- Installation – SSP v2 Server and Portal
SSP provides user/tenant self-service functionality. The following steps need to be completed in order to install the SSP Server and Portal components.
The SSP Portal and Server Hydration process will perform the following:
Refer to the Troubleshooting Appendix for complete details. | |
Logon to the SSP server as HVC-INSTALL-SVC. From an elevated Command Prompt, implement the hydration from the HVC Mobile Hydration Toolkit server HVC-HYDRATE by running the following command: cscript.exe \\HVC-HYDRATE\HVCHydration$\Scripts\Hydration.vbs |
|
The Hydration Wizard will appear. Click Next. |
|
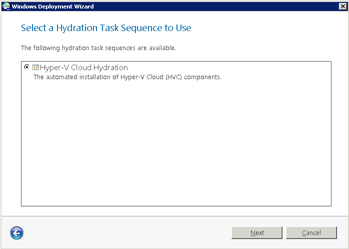
Select the HVC Hydration task, and click Next. |
|
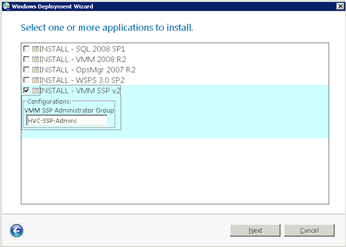
From the available choices, select INSTALL-VMM SSP v2, and click Next. |
|
Provide the VMM SSP Administrators Group name (e.g., HVC-SSP-Admins). Click Next. |
|
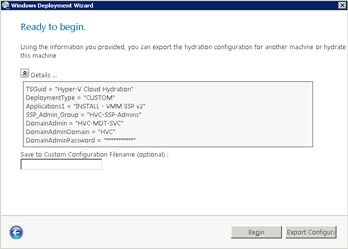
Review the details and click Begin. |
|
Click Yes. |
|
Click Finish. |
|


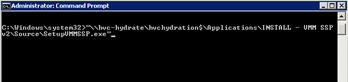
From an elevated Command Prompt, implement SSP Setup from the HVC Mobile Hydration Toolkit server HVC-HYDRATE by running the following command: "\\hvc-hydrate\hvchydration$\Applications\INSTALL - VMM SSP v2\Source\SetupVMMSSP.exe" |
|
Click Run on the Security Warning. |
|
Click Install. |
|
Accept the license and click Next. |
|
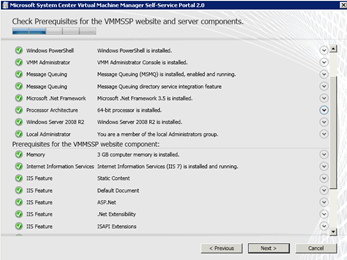
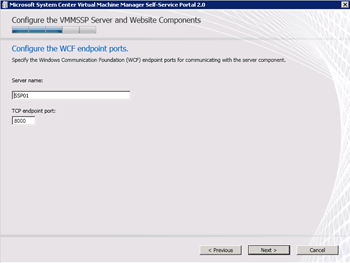
Select VMMSSP server component and VMMSSP website component, and click Next. |
|
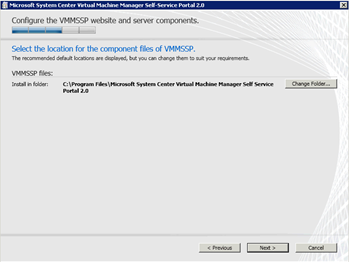
Click Next. |
|
Click Next. |
|
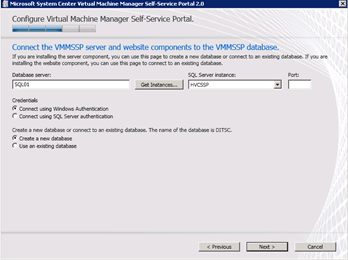
Input the SQL Server name (e.g., SQL01). Click Get Instances…. Select HVCSSP from the SQL Server instance drop-down list, clear the SQL port (1433), and click Next. |
|
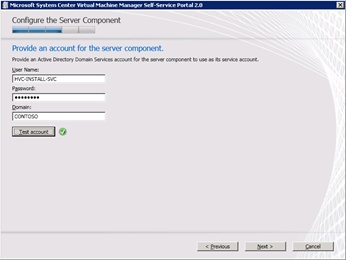
Input the SSP service account name and password values (e.g., HVC-SSP-SVC). Click Test account. Verify the accounts tests with a green check mark Click Next. |
|
Click Next. |
|
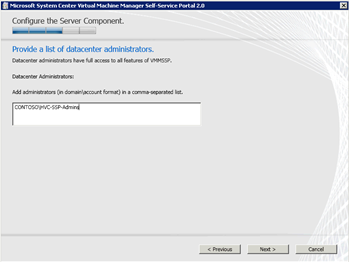
Add the SSP Admins security group (e.g., CONTOSO\HVC-SSP-Admins) and click Next. |
|
Use the SSP service account for the application pool's identity, and click Next. |
|
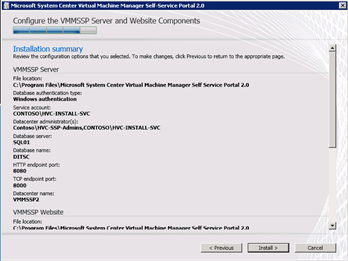
Review the installation settings, and click Install. |
|
Click Yes. |
|
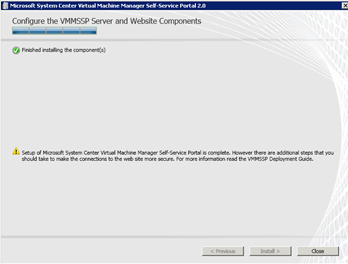
The installation finishes. Click Close. |
|
Open IE and go to http://localhost. Verify the default SSP start page loads without error. Close IE. |
|


- Installation – SSP Dashboard
The SSP DashBoard extends the functionality of SSP by providing advanced dashboarding capabilities in conjunction with Windows SharePoint Services 3.0 SP2. The following steps need to be completed in order to install the SSP Dashboard component:
The SSP Dashboard Hydration process will perform the following:
Refer to the Troubleshooting Appendix for complete details. | |
From an elevated Command Prompt, implement the hydration from the HVC Mobile Hydration Toolkit server HVC-HYDRATE by running the following command: cscript.exe \\HVC-HYDRATE\HVCHydration$\Scripts\Hydration.vbs |
|
The Hydration Wizard will appear. Click Next. |
|
Select the HVC Hydration task, and click Next. |
|
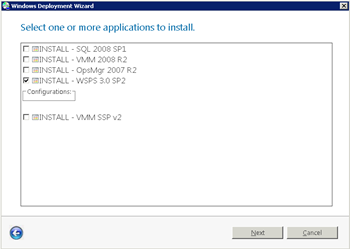
From the available choices, select INSTALL - WSPS 3.0 SP2. |
|
Click Next. |
|
Review the details, and click Begin. |
|
Click Yes. |
|
Click Finish. |
|
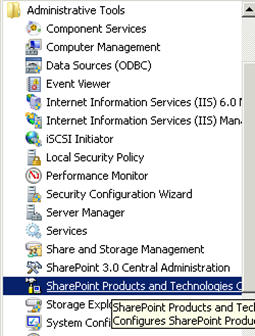
Complete SharePoint Configuration. Click Start-> Administrative Tools-> SharePoint Products and Technologies Configuration Wizard |
|
Click Yes. |
|
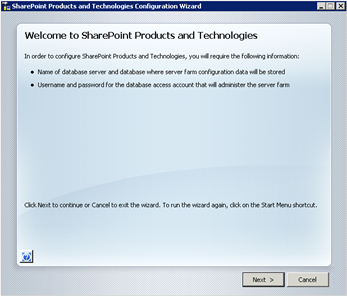
Click Next. |
|
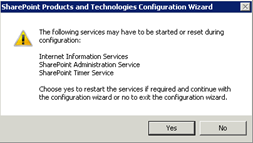
Click Yes. |
|
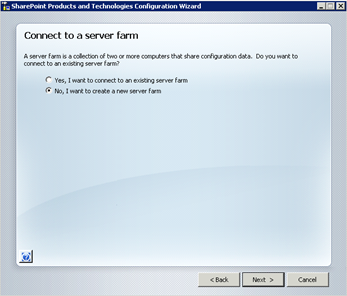
Select No, I want to create a new server farm. Click Next. |
|
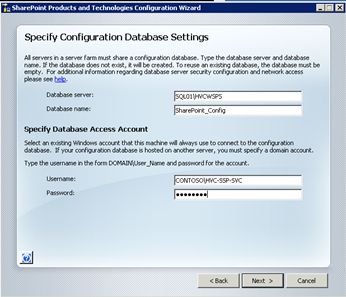
Input the SQL Server name and WSPS instance name (e.g., SQL01\HVCWSPS). Input the name and password for the SSP Service account (e.g., CONTOSO\HVC-SSP-SVC). Click Next. |
|
Click Next. |
|
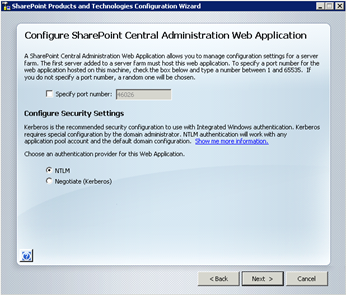
Note the Central Administration URL with port number, and click Next. |
|
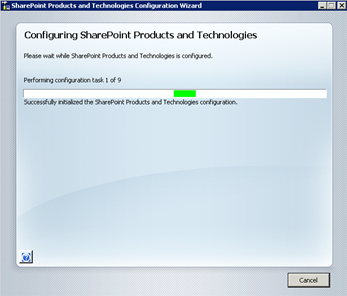
SharePoint Configuration will process 9 tasks and then complete. |
|
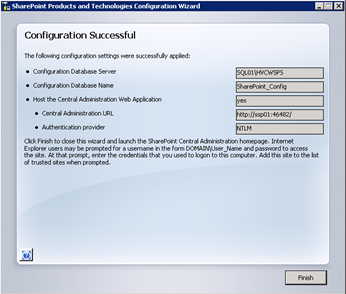
Click Finish. |
|
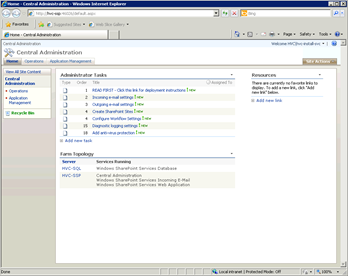
Verify that the Central Administration site loads without errors. Close IE. |
|
Log off of the SSP server and then log back on as the SSP service account (e.g., HVC-SSP-SVC). | |
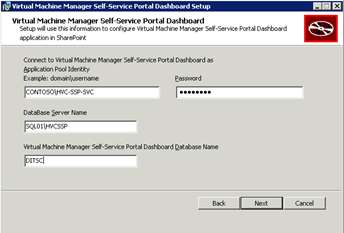
From an elevated Command Prompt, implement the SSP Dashboard Setup from the HVC Mobile Hydration Toolkit server HVC-HYDRATE by running the following command: msiexec /i "\\hvc-hydrate\hvchydration$\Applications\INSTALL - VMM SSP v2\Source\SetupVMMSSPDashboard.msi" /L*V setup.log |
|
Click Next. |
|
Accept the license and click Next. |
|
Enter the SSP service account for the application pool identity (e.g., Contoso\HVC-SSP-SVC). Enter the SQL server name and the SSP SQL instance for the server name (e.g., HVCSQL\HVCSSP). Enter DITSC for the database name, and click Next. |
|
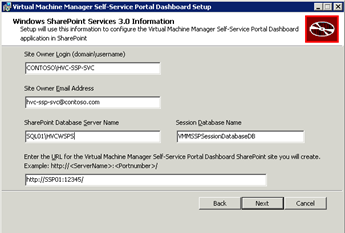
Enter the SSP service account for the Site Owner Login (e.g., Contoso\HVC-SSP-SVC). Enter the email address value (e.g., hvc-ssp-svc@contoso.com). Enter the SharePoint database server name\instance name (e.g., HVCSQL\HVCWSPS). Adjust the port number (e.g., 12345 changed to 18888) for the Dashboard URL if needed, and click Next. |
|
Click Install. |
|
Click Finish. | |
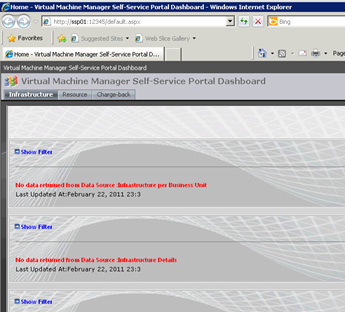
Launch an elevated IE session (run as Administrator) and go to Error! Hyperlink reference not valid. |
|
SSP v2 and SSP v2 Dashboard Hydration are now complete. |


- Management Agent Deployment, VMM Pro and VMM Reporting Setup
- SCVMM Agents
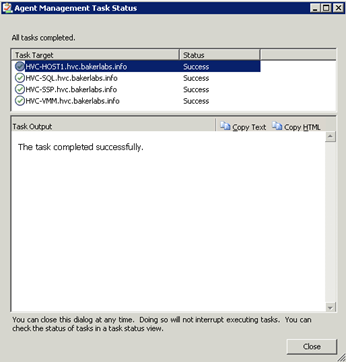
Once all of the systems required for management of the solution have been deployed, the VMM agent must be deployed to each host system. The following steps show the process of deploying the VMM agent to all hosts.
Logon to the VMM server as HVC-INSTALL-SVC. | |
Open the SCVMM Admin Console. |
|
Select Add Host from the Actions list. Provide the password for HVC-INSTALL-SVC Click Next. |
|
Input the name of the first host you want to add and click Add.
Add any additional host server (i.e., HVCHost2, HVCHost3), and click Next. |
|
Click Yes. |
|
Click Next. |
|
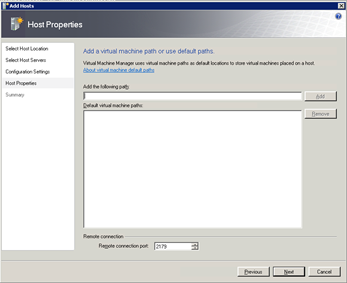
Input any additional locations where you will store virtual machine files (e.g., E:\VirtualMachines), and click Next. |
|
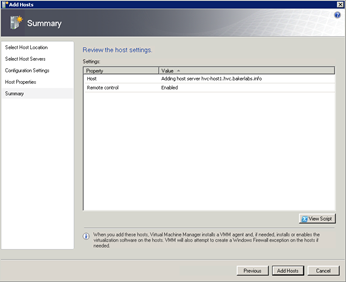
Click Add Hosts. |
|
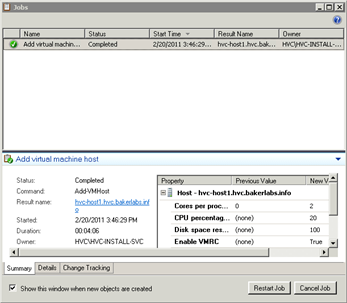
The Jobs window will open and display the progress of the Add virtual machine host job. When the jobs completes, you can close the window. |
|
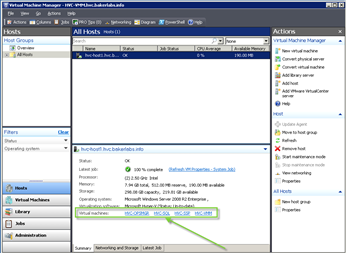
You will now see the host listed in the All Hosts view and any virtual machines on the host in the Summary tab. |
|
Continue on to configure Pro Tips and Enable VMM Reporting. |

- Pro Tips and VMM Reporting
With OpsMgr integration complete, Pro Tips and VMM reporting can be enabled and configured. The following steps show the process of completing these tasks.
In the SCVMM Admin Console, select Administration and then System Center. |
|
Right-click Operations Manager Reporting URL, and select Modify. |
|
Select the box Enable reporting and input the Reporting server URL (e.g., http://OPSMGR01/ReportServer) Click OK. |
|
Once reporting is enabled successfully, the SCVMM Admin Console will have a section entitled Reporting just below Administration. |
|
Select Administration and then General. |
|
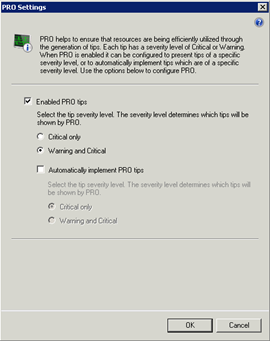
Right-click on PRO Settings, and click Modify. |
|
Select Enable PRO tips. Click OK. This enables PRO tips at the "global" level. PRO tips still needs to be enabled and configured on a Host Group and possible Host and Guest level. This process is out of scope for this document but more information can be found in the Operations Guide and on TechNet at: |
|


- OpsMgr Agents
Once all of the systems required for management of the solution have been deployed, the OpsMgr agent must be deployed to each system. The following steps show the process of deploying the OpsMgr agent to all HVC hosts and guests.
Add the OpsMgr action account to the local admin group of all HVC hosts and virtual machines. This can be accomplished by adding the account to the HVC Administrators group in AD (i.e. HVC-Admins). | |
Logon to the OpsMgr server as HVC-INSTALL-SVC. | |
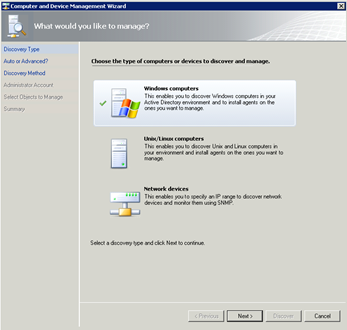
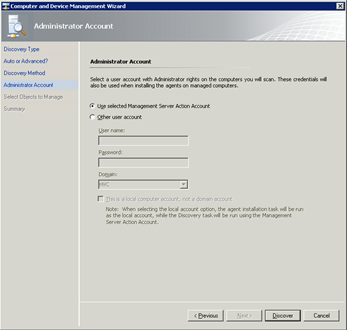
Open the OpsMgr Operations Console. Select the Action Configure Computers and Devices to Manage. |
|
Select Windows Computers, and click Next. |
|
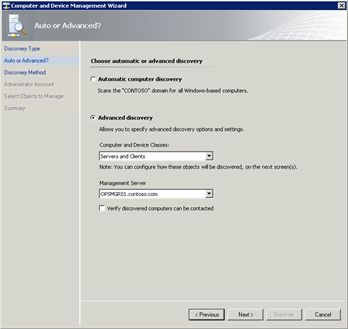
Leave Advanced discovery selected, and click Next. |
|
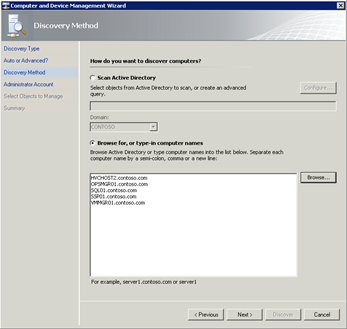
Select Browse for, or type-in computer names and click Browse. Select all HVC hosts and virtual machines. Click Next. |
|
Click Discover. |
|
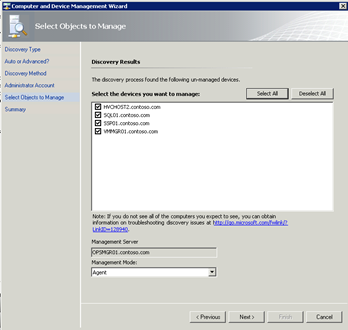
Click Select All, and then click Next. |
|
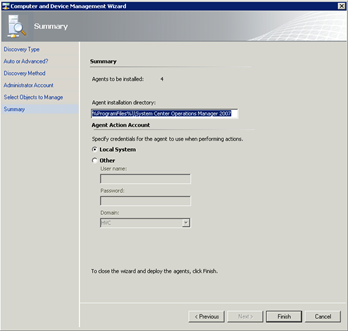
Click Finish. |
|
When the tasks complete, click Close. Close the Operations Console. |
|
Congratulations! Your deployment is complete. Please refer to the Operations Guide for details on using the Hyper-V Enabled Private Cloud solution. |
|

Appendix A: Active Directory Worksheet
Component | Value |
Active Directory FQDN | |
Active Directory NetBIoperating system Name | |
Domain Admin Account Name for Setup |
Appendix B: Network Services Worksheets
Component | Value |
Network (e.g., 192.168.1.0/24) | |
DHCP Server IP Address | |
DHCP Scope |
Appendix C: User Account Worksheet
Component | Default Value | Selected Value |
Install Account (cannot be changed) | HVC-INSTALL-SVC | HVC-INSTALL-SVC |
MDT Service Account | HVC-MDT-SVC | |
SQL Service Account | HVC-SQL-SVC | |
SCVMM Service Account | HVC-VMM-SVC | |
OpsMgr Service (SDK) Account | HVC-OM-SDK-SVC | |
OpsMgr Action Account | HVC-OM-Action | |
OpsMgr Data Warehouse Reader | HVC-OM-DWRD-SVC | |
OpsMgr Data Warehouse Writer | HVC-OM-DWRT-SVC | |
SSP v2 Service Account | HVC-SSP-SVC |
Appendix D: Groups Worksheet
Component | Default Value | Selected Value | Group Scope |
SSP v2 Admins | HVC-SSP-Admins | Domain Local | |
OpsMgr Admins | HVC-OM-Admins | Domain Local | |
OpsMgr Operators | HVC-OM-Ops | Global | |
SQL Admins | HVC-SQL-Admins | Universal | |
SCVMM Admins | HVC-VMM-Admins | Global | |
HVC Admin | HVC-Admins | Universal | |
Appendix E: Computer Account Worksheet
Component | Default Value | Selected Value |
Hyper-V Host 1 | HVCHost1 | |
Hyper-V Host 2 | HVCHost2 | |
Hyper-V Host 3 | HVCHost3 | |
Hyper-V Host 4 | HVCHost4 | |
Hyper-V Host 5 | HVCHost5 | |
Hyper-V Host 6 | HVCHost6 | |
Hyper-V Host 7 | HVCHost7 | |
Hyper-V Host 8 | HVCHost8 | |
SQL Virtual Machine | HVCSQL | |
SCVMM Virtual Machine | HVCVMM | |
OpsMgr Virtual Machine | HVCOPSMGR | |
SSP v2 Virtual Machine | HVCSSP | |
Appendix F: SQL Instance Worksheet
Fill out the following table prior to deploying the solution and reference these values when reqiured.
Component | SCVMM | OpsMgr | SSP v2 | WSPS |
SQL Instance Name | ||||
SQL Instance DATA Directory | ||||
SQL Instance LOG Directory |
Appendix G: HVC Hydration Troubleshooting
Hydration is a Microsoft Consulting Services automation solution built upon the Microsoft Deployment Toolkit (MDT) 2010 Update 1 framework. It allows variables to be specified by the user before implementing an MDT task sequence to automate a product installation. The task sequence references WSF scripts that utilize the MDT ZTIUtility.vbs scripting library. Advanced knowledge of and experience with MDT and VBScript scripting will enhance the understanding of hydration and the ability to troubleshoot problems if they occur.
- Hydration Execution
- Logon to the target server as a user with administrative rights.
- Elevate a Command Prompt.
- Run the following command to start the Hydration Wizard
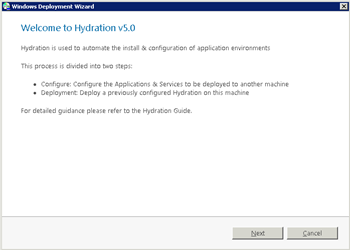
cscript \\HVC-HYDRATE\HVCHydration$\Scripts\Hydration.vbs.- On the Welcome screen, click Next.
- The single Hydration task sequence should be automatically selected; click Next.
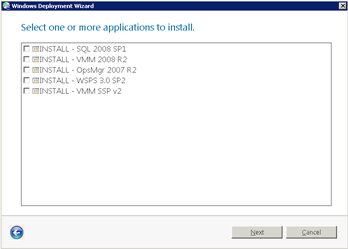
- Select the component to install, and enter the values as necessary; click Next.
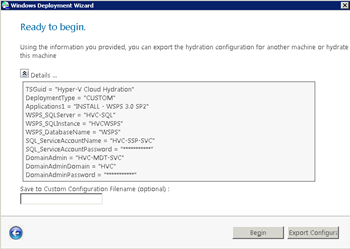
- Click Details to see the variables specified; click Begin to continue.
- Optionally, specify a custom configuration file name and click Export Configuration to write the values to the specified file for future use.
- The task sequence should implement running the tasks for the selected component.
- There's a known 60-second delay at the end of the process before the final summary window is displayed (the task sequence engine is attempting to cleanup runtime files). The process is complete when you see the final summary window.
- The final summary window will change color depending upon the overall outcome:
- White: success
- Yellow: warning(s) during execution
- Red: errors during execution
- Debugging Parameters
Append /debug:true to the command line to enable script debugging, which will write more verbose information into the hydration log files.
cscript \\HVC-HYDRATE\HVCHydration$\Scripts\Hydration.vbs /debug:true
The parameter /whatif:0 can also be appended to the command line not to implement anything but instead to run the process and dump logs with details of what it would have done. The zero parameter is used as the return code for anything it doesn't implement, so this will test everything working. Any integer (1, -1, 3010, etc.) can be used instead to test different return codes.
cscript \\HVC-HYDRATE\HVCHydration$\Scripts\Hydration.vbs /debug:true /whatif:0
- Hydration Logs
- C:\MININT\SMSOSD\OSDLOGS – runtime MDT log location, only there during hydration script execution
- C:\Windows\Temp\DeploymentLogs – MDT copies from above after successful operation
- %TEMP%\smsts.log – the task sequence engine log
Included with the solution is a simple PowerShell script (C:\HVCHydration\Scripts\Destroy-MDTLogs.ps1) that will delete all files in the above directories. MDT will append log files if they exist but it is best to start from scratch when retesting/rerunning the process. It also caches variables in the OSDLOGS directory (variables.dat) so it is best to clear those out so no remnants exist between runs. Some of the scripts will write unattended answer files to the OSDLOGS directory, so be careful about cleaning things up too soon when testing.
- Application and Event Logs
Each application will log its installation process separate from the hydration logs.
- SQL Server 2008
- C:\Program Files\Microsoft SQL Server\100\Setup Bootstrap\Log\YYYYMMDD_hhmmss
- Detail.txt
- Summary_<ComputerName>_YYYYMMDD_hhmmss.txt
- Etc.
- C:\MININT\SMSOSD\OSDLOGS\SQLSUPP.TXT (SQL Support Tools)
- Event Viewer, Windows Logs: Application, e.g.,
Log Name: Application Source: MsiInstaller Date: 1/15/2011 4:08:14 PM Event ID: 11707 Task Category: None Level: Information Keywords: Classic User: HVC-Install-SVC Computer: hvcsql.contoso.com Description: Product: Microsoft SQL Server 2008 Database Engine Services -- Installation completed successfully. |
- System Center Virtual Machine Manager 2008 R2
- C:\ProgramData\VMMLogs\ServerSetup.log
- C:\ProgramData\VMMLogs\ClientSetup.log
- Event Viewer, Windows Logs: Application, e.g.,
Log Name: Application Source: MsiInstaller Date: 1/21/2011 9:14:57 AM Event ID: 11707 Task Category: None Level: Information Keywords: Classic User: HVC-Install-SVC Computer: hvcvmm.contoso.com Description: Product: System Center Virtual Machine Manager Agent (x64) -- Installation operation completed successfully. |
- System Center Operations Manager 2007 R2
- C:\MININT\SMSOSD\OSDLOGS
- INSTALL-AJAX Extensions-App.log
- INSTALL-OpsMgr2007-UI-MSI.log
- INSTALL-OpsMgr2007-DB-MSI.log
- INSTALL-OpsMgr2007-DW-MSI.log
- INSTALL-OpsMgr2007-RPT-MSI.log
- INSTALL-OpsMgr2007-SVR-MSI.log
- %Temp%\KB979257-x64.log (CU2)
- Event Viewer, Windows Logs: Application, e.g.,
Log Name: Application Source: MsiInstaller Date: 2/1/2011 1:42:17 PM Event ID: 11707 Task Category: None Level: Information Keywords: Classic User: HVC-Install-SVC Computer: hvcscom.contoso.com Description: Product: System Center Operations Manager 2007 R2 -- Installation operation completed successfully. |
- Windows SharePoint Services
- %Temp%\Microsoft Windows SharePoint Services 3.0 Setup(*).log
- Event Viewer, Windows Logs: Application, e.g.,
Log Name: Application Source: MsiInstaller Date: 2/3/2011 10:04:11 PM Event ID: 11707 Task Category: None Level: Information Keywords: Classic User: HVC-Install-SVC Computer: hvcwsps.contoso.com Description: Product: Microsoft Windows SharePoint Services 3.0 -- Installation operation completed successfully. |
- Windows Installer Verbose Logging
Most products utilize the Windows Installer service which can be configured to enable verbose logging by one of the two following methods:
- Enable the Windows Installer Logging policy.
- Run the Local Group Policy Editor console (gpedit.msc)
- Navigate to Local Computer Policy, Computer Configuration, Administrative Templates, Windows Components, Windows Installer.
- Enable the Logging setting and configure the Logging option with the values "voicewarmup" (without the quotation marks).
- Reference Microsoft Support Article KB314852 for instructions to directly modify the Windows Registry to enable Windows Installer verbose logging.
- Advanced Execution
Individual scripts can be run outside of the Hydration/MDT framework. That works similar to the above, e.g.,
cscript "\\HVC-HYDRATE\HVCHydration$\Applications\INSTALL-SQL2008SP1\INSTALL-SQL2008SP1.wsf"
The same parameters hold true here (debug, whatif) but the catch is that the other environment variables populated by hydration do not exist in this context. However, you can explicitly present them to the script, e.g.,
cscript "\\HVC-HYDRATE\HVCHydration$\Applications\INSTALL-SQL2008SP1\INSTALL-SQL2008SP1.wsf" /debug:true /whatif:0 /SQL_ServiceAccountName:HVC-SQL-SVC /SQL_ServiceAccountPassword:Password1 /SQL_Data_Directory:D:\Data /SQL_Data_Directory:D:\Logs
Note: The required variables can be found primarily in the AppDescriptor.xml file for the application.
This will get complicated for a script with a lot of variables (like Operations Manager or Virtual Machine Manager) but it does allow for very fine-tuned testing of different scenarios without actually implementing the payload of the script with the whatif parameter.
Note: The scripts all check for the necessary source files (e.g., Source\setup.exe) and will fail if not there. They do not validate the size, version, or hash of the file, though, so a 0 KB file of the appropriate name will suffice for testing purposes.
- AppDescriptor Variables
The following variables are defined in the AppDescriptor.xml for each of the specified applications:
- SQL Server 2008 SP1
Name | Label | Type | Default Value |
SQL_ServiceAccountName | SQL Service Account Name | Text | HVC-SQL-SVC |
SQL_ServiceAccountPassword | SQL Service Account Password | Text | |
SQL_Data_Directory | SQL Instance DATA Directory | Text | F:\MSSQL\Data |
SQL_Log_Directory | SQL Instance LOG Directory | Text | E:\MSSQL\Data |
SQL_Admin_Group | SQL Administrator Group | Text | HVC-SQL-Admins |
VMM_Admin_Group | VMM Administrator Group | Text | HVC-VMM-Admins |
SCOM_Admin_Group | OpsMgr Administrator Group | Text | HVC-OM-Admins |
SSP_Admin_Group | VMM SSP Administrator Group | Text | HVC-SSP-Admins |
- System Center Virtual Machine Manager 2008 R2
Name | Label | Type | Default Value |
VMM_SQLServer | SQL Server Name | Hidden | HVCSQL |
VMM_SQLInstance | SQL Instance | Hidden | MICROSOFT$VMM$ |
SQL_ServiceAccountName | SQL Service Account Name | Hidden | HVC-SQL-SVC |
SQL_ServiceAccountPassword | SQL Service Account Password | Hidden | |
VMM_IndigoPort | VMM Indigo TCP Port | Hidden | 8100 |
VMM_WSManPort | VMM WSMan TCP Port | Hidden | 80 |
VMM_BitsPort | VMM BITS TCP Port | Hidden | 443 |
VMM_InstallDir | Installation Directory | Hidden | C:\Program Files\Microsoft System Center Virtual Machine Manager 2008 R2 |
VMM_LibraryName | VMM Library Share Name | Hidden | MSSCVMMLibrary |
VMM_LibraryPath | VMM Library Share Path | Hidden | C:\Virtual Machine Manager Library Files |
VMM_LibraryDesc | VMM Library Share Description | Hidden | Virtual Machine Manager Library Files |
VMM_Admin_Group | VMM Administrator Group | Text | HVC-VMM-Admins |
SSP_Admin_Group | VMM SSP Administrator Group | Text | HVC-SSP-Admins |
Note: The hidden values are for Virtual Machine Manager server installation that is currently not used. This functionality may be added in a future version.
- System Center Operations Manager 2007 R2
Name | Label | Type | Default Value |
SCOM_DB_SERVER | SQL Server | Text | HVCSQL |
SCOM_DB_INSTANCE | SQL Instance | Text | SCOM |
SCOM_Admin_Role_Group | Administrators security group | Text | HVC-OM-Admins |
SCOM_Management_Group | Management Group | Text | HVC-FM1 |
SCOM_Phase | Install Prerequisites on OpsMgr server Install OpsMgr Databases on SQL cluster Install and configure roles on OpsMgr server | Radio | 1 |
SCOM_DATA_DIR | SQL Data Directory | Text | E:\MSSQL\Data |
SCOM_LOG_DIR | SQL Log Directory | Text | D:\MSSQL\Data |
SCOM_Actions_User | Action Service Account Name | Text | HVC-OM-Action |
SCOM_Actions_Password | Action Service Account Password | Text | |
SCOM_SDK_Account | SDK Service Account Name | Text | HVC-OM-SDK-SVC |
SCOM_SDK_Password | SDK Service Account Password | Text | |
SCOM_DBWriteActions_User | DB Write Actions Service Account Name | Text | HVC-OM-DWRT-SVC |
SCOM_DBWriteActions_Password | DB Write Actions Service Account Password | Text | |
SCOM_DataReader_User | Data Warehouse Read Service Account Name | Text | HVC-OM-DWRD-SVC |
SCOM_DataReader_Password | Data Warehouse Read Service Account Password | Text |
- System Center Virtual Machine Manager Self-Service Portal v2
Name | Label | Type | Default Value |
SSP_Admin_Group | VMM SSP Administrator Group | Text | HVC-SSP-Admins |
- Windows SharePoint Services
Name | Label | Type | Default Value |
WSPS_SQLServer | SQL Server Name | Hidden | HVCSQL |
WSPS_SQLInstance | SQL Instance | Hidden | HVCWSPS |
WSPS_DatabaseName | SQL Database Name | Hidden | WSPS |
SQL_ServiceAccountName | SQL Service Account Name | Hidden | HVC-SQL-SVC |
SQL_ServiceAccountPassword | SQL Service Account Password | Hidden |
Note: The hidden values are required for Windows SharePoint Services configuration that is currently not used. This functionality may be added in a future version.
- Hydration Process
- Hydration.vbs launches the Hydration Wizard.
- Any saved values are loaded from Control\CustomSettings.ini.
- When an application is selected it reads from the AppDescriptor.xml in the application source folder and loads any configuration items. If they are set to type Text they are displayed for user input. Configuration items of type Hidden are not displayed for user input but loaded into the environment for access by the task sequence and scripts.
- The AppDescriptor.xml Component tag has attributes that are used elsewhere:
- The Name attribute populates the Install<Name> environment variable with value YES that is used as conditional logic in the task sequence and can be utilized in scripts as well, e.g., <Component Name="VMM2008R2" …> translates to the variable InstallVMM2008R2. In the Hyper-V Hydration task sequence the Virtual Machine Manager 2008 R2 group has the following condition on the Options tab: "If all conditions are true: Task sequence variable InstallVMM2008R2 equals YES." Therefore, when VMM is selected in the Hydration wizard only this section of the task sequence is implemented.
- The GUID attribute is set to be the same as the GUID of the associated MDT Application, e.g., <Component Name="VMM2008R2" Label="Virtual Machine Manager 2008 R2" GUID="{66cf661e-2f14-4082-a5d7-5bdafe2aac6b}"> has the same GUID as the "INSTALL – VMM 2008 R2" application in the Hydration Deployment Share of MDT.
- At the end of the wizard the variables are written to Control\CustomSettings.ini.
- Next the task sequence (defined by Control\HVCHYDRO\ts.xml) runs. See the section below on the specifics of what occurs for each component during the task sequence.
- The task sequence engine reads in variables from Control\CustomSettings.ini so that they are available to the common environment.
- Each of the task sequence groups associate with an application component in the Hydration wizard and the task sequence only implements the appropriate group by conditional logic based upon the specific environment variable Install<Name>=YES (as described above).
- The task sequence includes one of two types of tasks:
- Install Roles and Features: an MDT task to install Windows Server 2008 R2 roles and/or features using the ServerManagerCmd.exe command line.
- Install Application: an MDT task to call a single "application" which in this instance references a WSF script in one of the Application source folders, e.g., command line "cscript INSTALL-SQL2008SP1.wsf" with working directory "Applications\INSTALL-SQL2008SP1."
- The WSF scripts perform the bulk of the action including writing to script-specific log files at C:\MININT\SMSOSD\OSDLOGS\<ScriptID>.log. The <ScriptID> is defined in the first line of the script, e.g., <job id="Install-SQL2008"> yields Install-SQL2008.log.
- The task sequence engine logs information to %Temp%\smsts.log (user's temporary directory)
- After clicking Finish on the final summary window the OSDLOGS are moved to %WinDir%\Temp\DeploymentLogs.
- Hydration Task Sequence Details
- SQL Server 2008 SP1
- Install Prerequisite Roles and Features
- Roles
- Application Server
- Web Server (IIS) Support
- Distributed Transactions
- Incoming Remote Transactions
- Outgoing Remote Transactions
- Web Server (IIS)
- Web Server
- Application Development
- ASP.NET
- Install SQL 208 SP1 Support Tools (INSTALL-SQL2008SP1SupTools.wsf)
- Install SQL Support Tools (Source\PCU\x64\setup\1033\sqlsupport.msi)
- Install SQL Server 2008 SP1 (INSTALL-SQL2008SP1.wsf)
- Add SQL Administrator domain group to local Administrators group
- Disable program compatibility script for SQL 2008
- Disable firewall domain profile
- Install SQL instances (Source\setup.exe…)
- General settings for all instances
- SQLSYSADMINACCOUNTS=BUILTIN\Administrators
- Using service account for SQL & SQL Agent
- Using custom Data and Log directories
- Virtual Machine Manager instance
- Instance name: Microsoft$VMM$
- Features: SQLEngine, all tools, client connection components, and documentation
- Sysadmins: VMM Administrators group, VMM SSP Administrators group
- OpsMgr instance
- Instance name: HVCSCOM
- Features: SQLEngine
- Sysadmins: OpsMgr Administrators group
- VMM SSP instance
- Instance name: HVCSSP
- Features: SQLEngine
- Sysadmins: VMM SSP Administrators group
- Windows SharePoint instance
- Instance name: HVCWSPS
- Features: SQLEngine
- Sysadmins: VMM SSP Administrators group
- SQL Collation: Latin1_General_CI_AS_KS_WS
- Enable Named Pipes
- Virtual Machine Manager 2008 R2
- Install SQL 2008 SP1 Tools Only (INSTALL-SQL2008SP1ToolsOnly.wsf)
- Install SQL Tools feature (Source\setup.exe /INSTANCENAME=MSSQLSERVER /FEATURES=Tools)
- Install VMM 2008 R2 Client (INSTALL-VMM2008R2Client.wsf)
- Add VMM Administrators and VMM SSP Administrators domain groups to local Administrators group
- Create unattended answer file (OSDLOGS\VMMClient.ini)
- Install VMM client (Source\setup.exe /client…)
- Stop vmmagent service
- Install VMM 2008 R2 Admin Console hotfix rollup package KB982523 (Update\vmmClient64Update.msp)
- Install OpsMgr 2007 R2 Operations Console (INSTALL-OpsMgr2007-UI.wsf)
- Install OpsMgr Console (Source\server\AMD64\MOM.msi ADDLOCAL=MOMUI,MOMMonadShell…)
- Install Cumulative Update (CU2\SetupUpdateOM.exe /amd64msp:KB979257-x64.msp…)
- Operations Manager 2007 R2
- OpsMgr Prerequisites
- Install IIS7 and .NET
- Roles
- Web Server (IIS)
- Web Server
- Common HTTP Features
- Static Content
- Default Document
- Directory Browsing
- HTTP Error
- HTTP Redirection
- Application Development
- ASP.NET
- .NET Extensibility
- ASP
- ISAPI Extensions
- ISAPI Filters
- Health and Diagnostics
- HTTP Logging
- Request Monitor
- Security
- Windows Authentication
- Request Filtering
- Performance
- Static Content Compression
- Management Tools
- IIS Management Console
- IIS 6 Management Compatibility
- IIS 6 Metabase Compatibility
- IIS 6 WMI Compatibility
- IIS 6 Scripting Tools
- IIS 6 Management Console
- Features
- .NET Framework 3.x Features
- .NET Framework 3.x
- Install AJAX Extension (INSTALL-AJAXExtensions.wsf)
- Install AJAX (Source\ASPAJAXExtSetup.msi)
- Install SQL Server Reporting Services (INSTALL-SQL2008-RS.wsf)
- Disable program compatibility script for SQL 2008
- Install SQL Server Reporting Services (Source\setup.exe /configurationfile= ConfigurationFile-SSRS-x64.ini…)
- OpsMgr Databases
- Install OpsMgr Database (INSTALL-OpsMgr2007-DB.wsf)
- Add OpsMgr Administrators domain group to local Administrators group
- Install OpsMgr database (Source\server\AMD64\MOM.msi ADDLOCAL=MOMDB)
- Install OpsMgr Data Warehouse (INSTALL-OpsMgr2007-DW.wsf)
- Install OpsMgr Data Warehouse (Source\Reporting\AMD64\Reporting2007.msi ADDLOCAL=MOMREPORTINGDB MOMREPORTINGDBNAME=OperationsManagerDW…)
- OpsMgr Server
- Install OpsMgr Server Roles (INSTALL-OpsMgr2007-SVR.wsf)
- Add OpsMgr Administrators domain group to local Administrators group
- Install OpsMgr (Source\server\AMD64\MOM.msi ADDLOCAL=MOMServer,MOMUI,MOMMonadShell,MOMWebConsole…)
- Reset IIS
- Update RSReportServer.Config file rights on SQL 2008 RS
- Install OpsMgr Reporting (INSTALL-OpsMgr2007-RPT.wsf)
- Install OpsMgr Reporting (Source\Reporting\AMD64\Reporting2007.msi ADDLOCAL=MOMREPORTING…)
- Install OpsMgr Cumulative Update 2 (INSTALL-OpsMgr2007-CU2.wsf)
- Install Cumulative Update (CU2\SetupUpdateOM.exe /amd64msp:KB979257-x64.msp…)
- Apply CU2 on the OpsMgr database (sqlcmd DiscoveryEntitySprocs.sql)
- Configure OpsMgr (CONFIG-OpsMgr2007.wsf, CONFIG-OpsMgr2007.ps1), i.e., import OpsMgr management packs
- OpsMgr 2007 R2 + CU2
- MPs\OpsMgr\Microsoft.SystemCenter.OperationsManager.2007.mp
- MPs\OpsMgr\Microsoft.SystemCenter.OperationsManager.AM.DR.2007.mp
- MPs\OpsMgr\Microsoft.SystemCenter.OperationsManager.Reports.2007.mp
- CU2\ManagementPacks\Microsoft.SystemCenter.DataWarehouse.Report.Library.mp
- MPs\OpsMgr\ODR.mp
- MPs\OpsMgr\Operations.Manager.CUSTOM.xml
- Windows Server
- MPs\WindowsServer\Microsoft.Windows.Server.Library.mp
- MPs\WindowsServer\Microsoft.Windows.Server.2003.mp
- MPs\WindowsServer\Microsoft.Windows.Server.2008.Discovery.mp
- MPs\WindowsServer\Microsoft.Windows.Server.2008.Monitoring.mp
- MPs\WindowsServer\Microsoft.Windows.Server.CUSTOM.xml
- Hyper-V
- MPs\Hyper-V\Microsoft.Windows.HyperV.Library.mp
- MPs\Hyper-V\Microsoft.Windows.HyperV.2008.Discovery.mp
- MPs\Hyper-V\Microsoft.Windows.HyperV.2008.Monitoring.mp
- MPs\Hyper-V\Microsoft.Windows.HyperV.CUSTOM.xml
- SQL 2008
- MPs\SQL\Microsoft.SQLServer.Library.mp
- MPs\SQL\Microsoft.SQLServer.2008.Discovery.mp
- MPs\SQL\Microsoft.SQLServer.2008.Monitoring.mp
- MPs\SQL\Microsoft.SQL.Server.CUSTOM.xml
- IIS 7
- MPs\IIS\Microsoft.Windows.InternetInformationServices.CommonLibrary.MP
- MPs\IIS\Microsoft.Windows.InternetInformationServices.2008.MP
- MPs\IIS\Microsoft.Windows.InternetInformationServices.2003.MP
- MPs\IIS\Microsoft.Windows.Internet.Information.Services.CUSTOM.xml
- Windows SharePoint Services 3.0 SP2
- Install WSPS 3.0 SP2 (INSTALL-WSPS3SP2.wsf)
- Install WSPS web front end (Source\setup.exe /config config.xml…)
- VMM Self-Service Portal v2
- Install Roles and Features
- Roles
- Web Server (IIS)
- Web Server
- Common HTTP Features
- Static Content
- Default Document
- Application Development
- ASP.NET
- .NET Extensibility
- ISAPI Extensions
- ISAPI Filters
- Security
- Windows Authentication
- Request Filtering
- Management Tools
- IIS 6 Management Compatibility
- IIS 6 Metabase Compatibility
- Features
- Message Queuing
- Message Queuing Services
- Message Queuing Server
- Directory Service Integration
- Install VMM SSP v2 (INSTALL-VMMSSPv2.wsf)
- Configure IIS authentication (appcmd)
- enable windowsAuthentication
- disable AnonymousAuthentication
- Add VMM SSP Administrators domain group to local Administrators group
- Install VMM 2008 R2 Client (INSTALL-VMM2008R2Client.wsf)
- Create unattended answer file (OSDLOGS\VMMClient.ini)
- Install VMM client (Source\setup.exe /client…)
- Stop vmmagent service
- Install VMM 2008 R2 Admin Console hotfix rollup package KB982523 (Update\vmmClient64Update.msp)