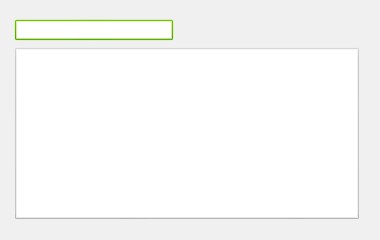
距上篇C#制作高仿360安全卫士窗体(二)也将近一个多月了,这个月事情还是像往常一样的多。不多我也乐在其中,毕竟我做的是我喜欢做的东西。今天特地抽空把怎么制作文本框写一下。同时也希望有爱好这些玩意的同仁和我进行交流... 文本框的开发比起按钮开发还是有一点不同,因为我这里主要是给文本框做美化,所以不需要完完全全的进行自己开发。只是重写它的某些事件,然后展现不同的效果。下面是运行后的效果。

这个文本框实现了多行以及鼠标进入移出等事件的效果,那么开发这个素材只有一个也是从之前360皮肤包里面提取出来进行修改的:

一、嵌入资源
将以上素材另存为,在解决方案中Images目录里面建立一个TextBoxImages文件夹,将图片素材拷贝进去,并设置图片属性中生成操作选择为“嵌入的资源”。
二、添加控件
资源嵌入之后再在ControlEx目录中建立一个TextBoxEx文件夹,在该文件夹下创建一个名为TextBoxEx的用户控件。该用户控件是用来实现皮肤变化,而真正的TextBox需要再从工具栏中拖一个到用户控件中。调整用户控件的宽高为为160*22,TextBox的宽高为154*16,TextBox的Margin属性为3,3,3,3,TextBox的BorderStyle属性值为None,将属性都调整完毕之后就可以开始进行代码的处理了。

三、编码
该控件的主要处理方法都比较简单,主要思路是重写TextBox的状态,然后再在用户控件上根据状态绘制不同的样式。
1、变量声明
 1 #region 声明
 2 private Bitmap _TextBoxBackImg = ImageObject.GetResBitmap("FANGSI.UI.Images.TextBoxImages.Textbox.png");
 3 private State state = State.Normal;
 4 private bool _Isico = false;
 5 private Bitmap _Ico;
 6 private Padding _IcoPadding = new Padding(3, 3, 0, 0);
 7 //枚鼠标状态
 8 private enum State
 9 {
10     Normal = 1,
11     MouseOver = 2,
12     MouseDown = 3,
13     Disable = 4,
14     Default = 5
15 }
16 #endregion
2、构造参数处理,初始化控件的属性
 1 #region 构造
 2 public TextBoxEx()
 3 {
 4     InitializeComponent();
 5     this.SetStyle(ControlStyles.UserPaint, true);
 6     this.SetStyle(ControlStyles.DoubleBuffer, true);
 7     this.SetStyle(ControlStyles.AllPaintingInWmPaint, true);
 8     this.SetStyle(ControlStyles.SupportsTransparentBackColor, true);
 9     this.SetStyle(ControlStyles.StandardDoubleClick, false);
10     this.SetStyle(ControlStyles.Selectable, true);
11     this.BackColor = Color.Transparent;
12 }
13 #endregion
3、属性定义,其中可以加入自己想要功能的特殊字段再根据自己的需要进行处理
  1 #region 属性
  2
  3 [Category("放肆雷特扩展属性"), Description("输入最大字符数")]
  4 public int MaxLength
  5 {
  6     get { return BaseText.MaxLength; }
  7     set { BaseText.MaxLength = value; }
  8
  9 }
 10
 11 [Category("放肆雷特扩展属性"), Description("与控件关联的文本")]
 12 public new string Text
 13 {
 14     get
 15     {
 16         return BaseText.Text;
 17     }
 18     set
 19     {
 20         BaseText.Text = value;
 21     }
 22 }
 23
 24 [Category("放肆雷特扩展属性"), Description("将控件设为密码显示")]
 25 public bool IsPass
 26 {
 27     get
 28     {
 29         return BaseText.UseSystemPasswordChar;
 30     }
 31     set
 32     {
 33         BaseText.UseSystemPasswordChar = value;
 34     }
 35 }
 36
 37 [Category("放肆雷特扩展属性"), Description("密码显示字符")]
 38 public char PassChar
 39 {
 40     get
 41     {
 42         return BaseText.PasswordChar;
 43     }
 44     set
 45     {
 46         BaseText.PasswordChar = value;
 47     }
 48 }
 49
 50 [Category("放肆雷特扩展属性"), Description("将控件设为多行文本显示")]
 51 public bool Multiline
 52 {
 53     get
 54     {
 55         return BaseText.Multiline;
 56     }
 57     set
 58     {
 59         BaseText.Multiline = value;
 60         if (value)
 61         {
 62             BaseText.Height = this.Height - 6;
 63         }
 64         else
 65         {
 66             base.Height = 22;
 67             BaseText.Height = 16;
 68             this.Invalidate();
 69         }
 70
 71     }
 72 }
 73
 74 [Category("放肆雷特扩展属性"), Description("设置控件中文本字体")]
 75 public Font font
 76 {
 77     get
 78     {
 79         return BaseText.Font;
 80     }
 81     set
 82     {
 83         BaseText.Font = value;
 84     }
 85 }
 86
 87 [Category("放肆雷特扩展属性"), Description("将控件设为只读")]
 88 public bool ReadOnly
 89 {
 90     get
 91     {
 92         return BaseText.ReadOnly;
 93     }
 94     set
 95     {
 96         BaseText.ReadOnly = value;
 97     }
 98 }
 99
100 [Category("放肆雷特扩展属性"), Description("多行文本的编辑行")]
101 public String[] lines
102 {
103     get
104     {
105         return BaseText.Lines;
106     }
107     set
108     {
109         BaseText.Lines = value;
110     }
111 }
112
113 [Category("放肆雷特扩展属性"), Description("是否显示图标")]
114 public bool Isico
115 {
116     get
117     {
118         return _Isico;
119     }
120     set
121     {
122         _Isico = value;
123         if (value)
124         {
125             if (_Ico != null)
126             {
127                 BaseText.Location = new Point(_IcoPadding.Left + _Ico.Width, 3);
128                 BaseText.Width = BaseText.Width - _IcoPadding.Left - _Ico.Width;
129             }
130             else
131             {
132                 BaseText.Location = new Point(25, 3);
133                 BaseText.Width = BaseText.Width - 25;
134             }
135         }
136         this.Invalidate();
137     }
138 }
139
140 [Category("放肆雷特扩展属性"), Description("图标文件")]
141 public Bitmap Ico
142 {
143     get
144     {
145         return _Ico;
146     }
147     set
148     {
149         _Ico = value;
150     }
151 }
152
153 [Category("放肆雷特扩展属性"), Description("控件内部间距,图标文件")]
154 public Padding IcoPadding
155 {
156     get { return _IcoPadding; }
157     set
158     {
159         _IcoPadding = value;
160         this.Invalidate();
161     }
162 }
163 #endregion
4、委托,委托图标点击事件
1 #region 委托
2 public event EventHandler IcoOnclick;
3 #endregion
5、方法处理
 1 #region 方法
 2 protected override void OnPaint(PaintEventArgs e)
 3 {
 4     Rectangle rc = this.ClientRectangle;
 5     Graphics g = e.Graphics;
 6     ImageDrawRect.DrawRect(g, _TextBoxBackImg, rc, Rectangle.FromLTRB(10, 10, 10, 10), (int)state, 5);
 7     if (_Isico)
 8     {
 9         if (_Ico != null)
10         {
11             g.DrawImage(_Ico, new Point(_IcoPadding.Left, _IcoPadding.Top));
12         }
13     }
14     base.OnPaint(e);
15 }
16
17 private void TextBoxEx_Resize(object sender, EventArgs e)
18 {
19     if (this.Height > 22)
20     {
21         Multiline = true;
22     }
23     else
24     {
25         this.Height = 22;
26         Multiline = false;
27     }
28 }
29
30 private void NotifyIcoOnclick()
31 {
32     if (IcoOnclick != null)
33     {
34         IcoOnclick(this, EventArgs.Empty);
35     }
36 }
37
38 public void AppendText(string ss)
39 {
40     BaseText.AppendText(ss);
41 }
42
43 private void BaseText_MouseEnter(object sender, EventArgs e)
44 {
45     state = State.MouseOver;
46     this.Invalidate();
47 }
48
49 private void BaseText_MouseLeave(object sender, EventArgs e)
50 {
51     state = State.Normal;
52     this.Invalidate();
53 }
54
55 private void TextBoxEx_MouseUp(object sender, MouseEventArgs e)
56 {
57     if (_Ico != null)
58     {
59         if (new Rectangle(_IcoPadding.Left, _IcoPadding.Top, _Ico.Width, _Ico.Height).Contains(e.X, e.Y))
60         {
61             NotifyIcoOnclick();
62         }
63     }
64 }
65
66 private void TextBoxEx_MouseEnter(object sender, EventArgs e)
67 {
68     state = State.MouseOver;
69     this.Invalidate();
70 }
71
72 private void TextBoxEx_MouseLeave(object sender, EventArgs e)
73 {
74     state = State.Normal;
75     this.Invalidate();
76 }
77 #endregion
OK,写完收工…这个控件功力强大,使用简单很符合中国程序猿的使用习惯直接从工具栏拖放即可..如果还有不懂的欢迎进行留言。下一篇就开始讲360安全卫士最上面一排的水晶按钮的制作敬请期待喔。。
本文来自 放肆雷特 | 胖子的技术博客