为什么需要日志备份
KubeSphere 日志系统使用 Fluent Bit + ElasticSearch 的日志采集存储方案,并通过 Curator 实现对 Index 的生命周期管理,定期清理久远日志。对于有日志审计和灾备需求的场景来说,KubeSphere 默认的 7 天日志保留策略远远不够,仅备份 ElasticSearch 数据盘并不能保证数据可恢复性和完整性。
ElasticSearch 开源社区提供了 SnapShot API 帮助我们实现长期的存储快照和恢复。本文介绍如何针对 KubeSphere(版本 2.1.0)内置 ElasticSearch (版本 6.7.0)组件进行改造,实践日志备份,以满足审计和灾备的需求。
注:如果是数据量较小、带查询条件的日志导出场景,可以使用 KubeSphere 一键导出功能,或尝试使用 elasticsearch-dump 工具。外接商业版 ElasticSearch 的 KubeSphere 用户也可以直接开启 ElasticSearch X-Pack 中提供的 SnapShot Lifecycle Management 功能。
前提条件
执行存储快照前,我们需要在 ElasticSearch 集群中注册存放快照文件的仓库。快照仓库可以使用共享文件系统,比如 NFS。其他存储类型,如 AWS S3,需要单独安装 repository 插件 支持。
我们以 NFS 为例。共享快照仓库需要挂载到 ElasticSearch 的所有主节点和数据节点,并在 elasticsearch.yaml 中配置 path.repo 参数。NFS 支持 ReadWriteMany 访问模式,所以使用 NFS 非常合适。
第一步,我们首先准备一个 NFS 服务端,例如本教程中使用的 QingCloud vNAS 服务,共享目录路径为 /mnt/shared_dir。

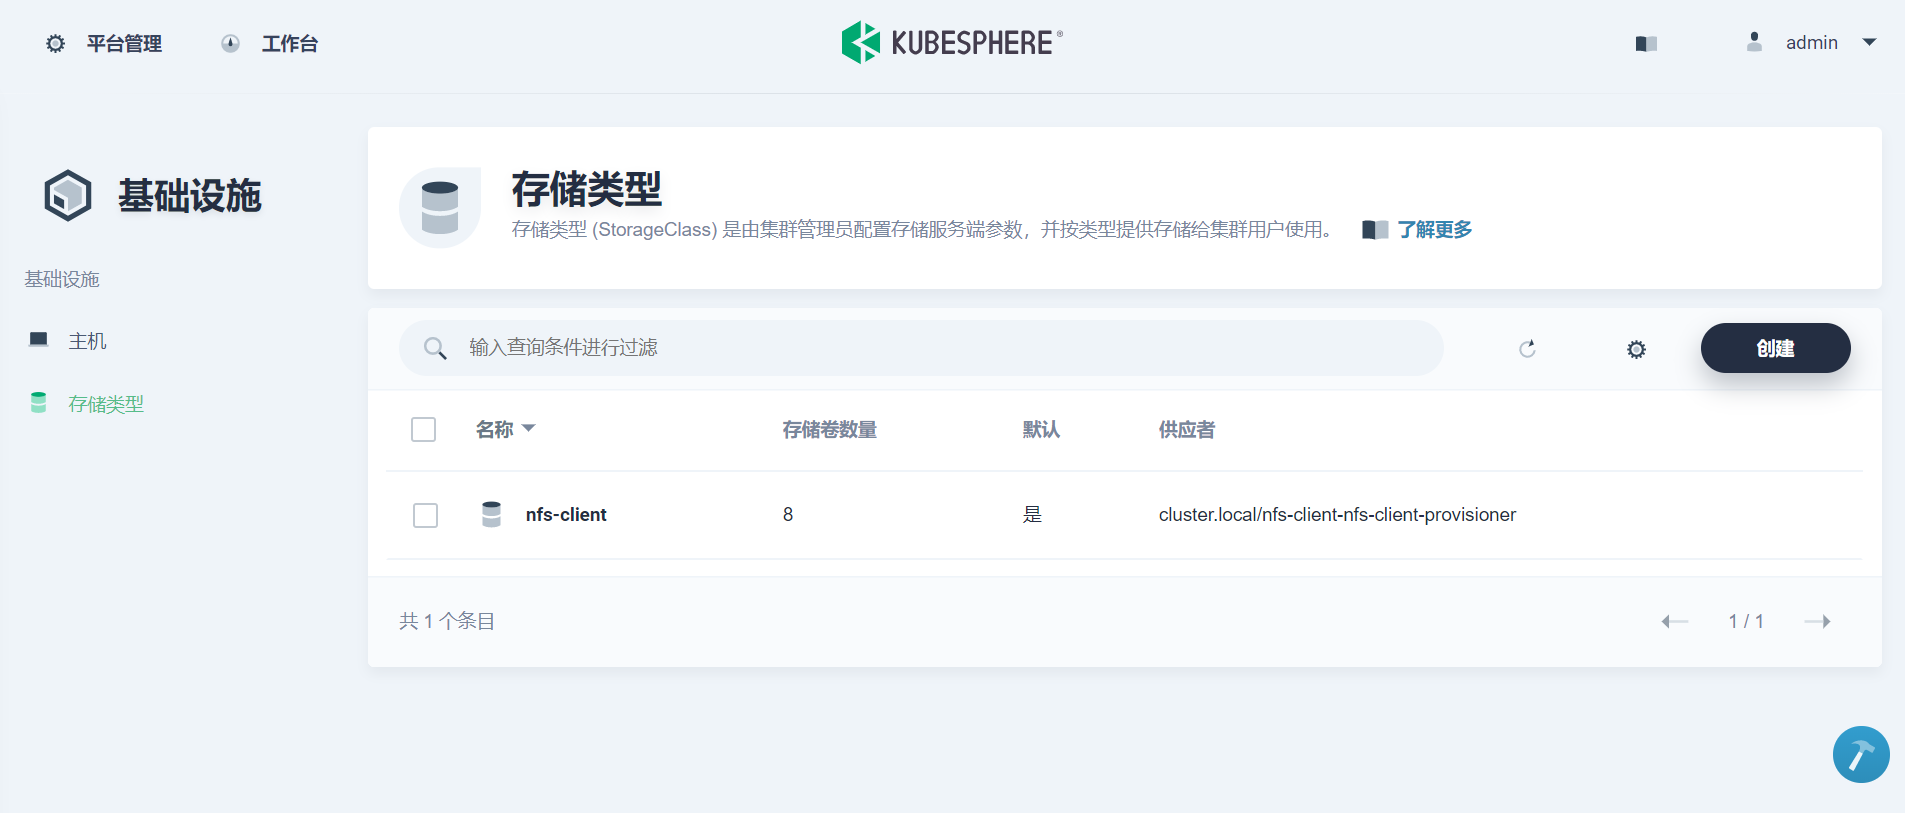
然后在 KubeSphere 环境上准备 NFS 类型的 StorageClass,后面我们为快照仓库申请 Persistent Volume 的时候会用到。本文环境已经在安装时配置了 NFS 存储,所以无需额外操作。有安装需要的读者请参考 KubeSphere 官方文档,修改 conf/common.yaml 并重新执行 install.sh 脚本。
1. ElasticSearch Setup
在 KubeSphere 中,ElasticSearch 主节点为有状态副本集 elasticsearch-logging-discovery,数据节点为 elasticsearch-logging-data,本教程环境为一主两从:
$ kubectl get sts -n kubesphere-logging-system
NAME                              READY   AGE
elasticsearch-logging-data        2/2     18h
elasticsearch-logging-discovery   1/1     18h
第一步,我们为 ElasticSearch 集群 snapshot repository 准备持久化卷:
cat <<EOF | kubectl create -f -
---
apiVersion: v1
kind: PersistentVolumeClaim
metadata:
  name: elasticsearch-logging-backup
  namespace: kubesphere-logging-system
spec:
  accessModes:
    - ReadWriteMany
  volumeMode: Filesystem
  resources:
    requests:
      storage: 100Gi
  # 根据你的环境填充 storageClassName 字段
  storageClassName: nfs-client
EOF
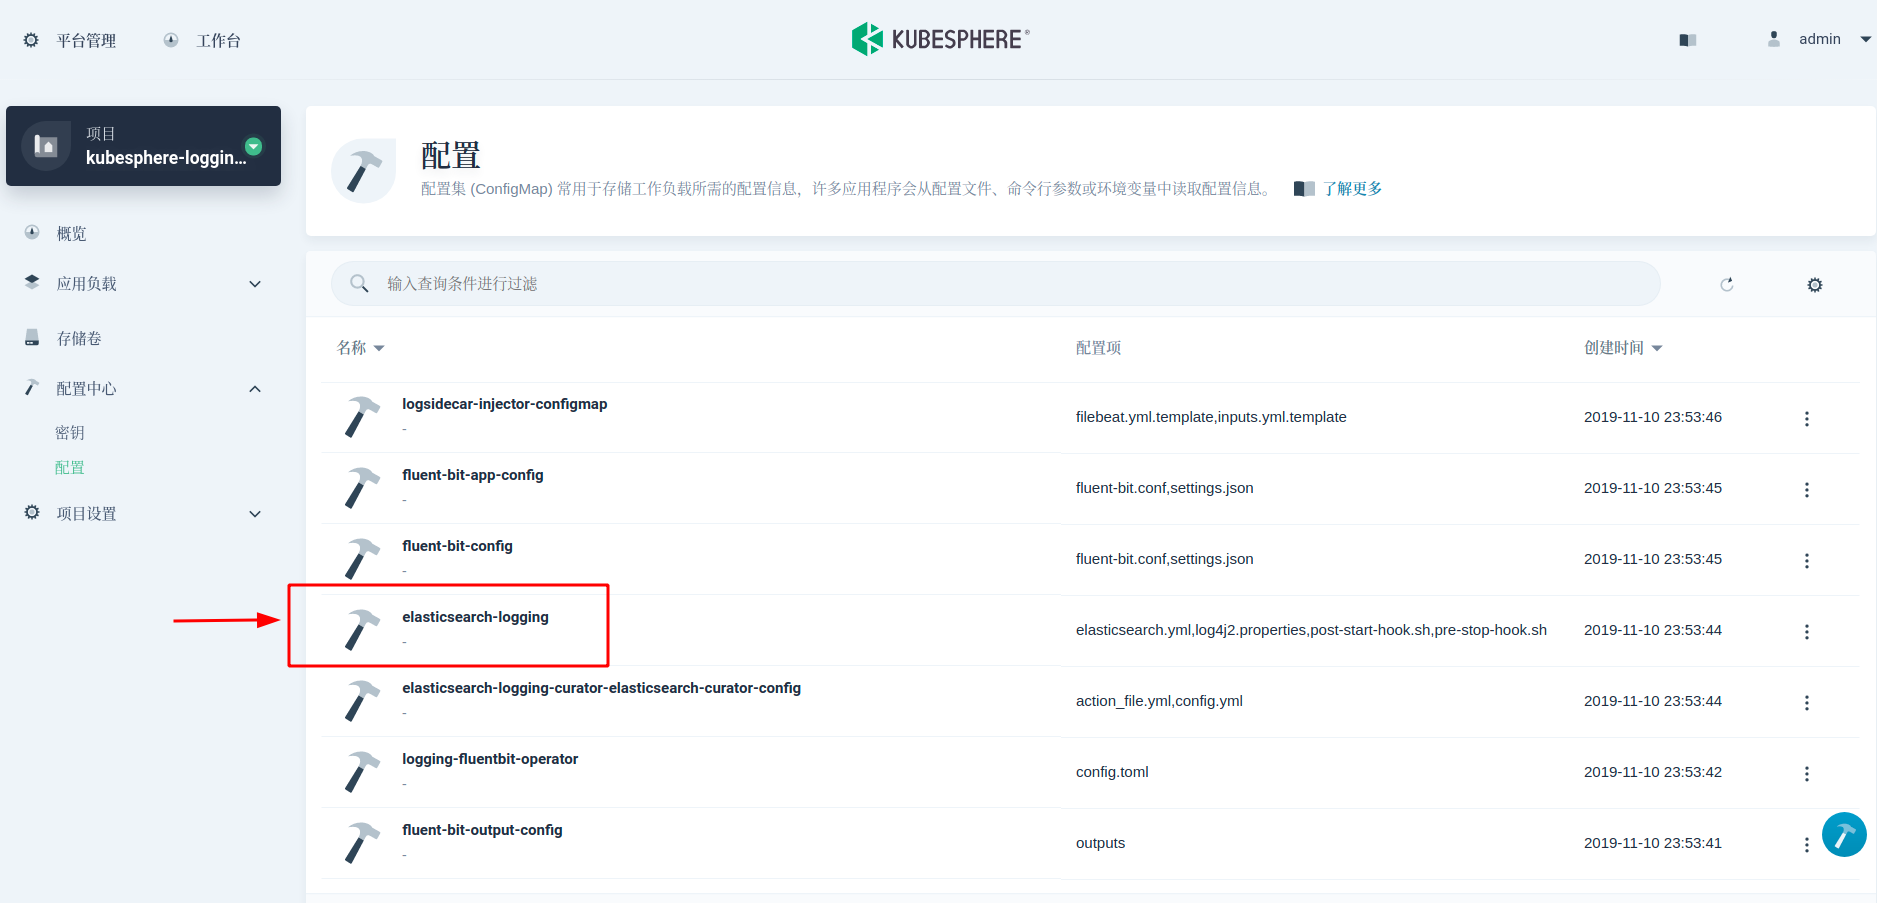
第二步,修改 elasticsearch.yml 配置文件,将 NFS 目录路径注册到各个主从节点。在 KubeSphere 中,elasticsearch.yml 配置在 ConfigMap elasticsearch-logging 里可以找到。在最后一行,添加 path.repo: ["/usr/share/elasticsearch/backup"]

第三步,修改 StatefulSet YAML,将存储卷挂载到 ElasticSearch 各节点,并通过 chown 命令,在 initContainer
启动时,初始化快照仓库文件夹的所有者用户和用户组为 elasticsearch。
在这一步特别需要注意的是,我们无法直接 kubectl edit 修改 Stateful,需要先把 yaml 内容备份下来,修改完后再 kubectl apply 重新应用。
kubectl get sts -n kubesphere-logging-system elasticsearch-logging-data -oyaml > elasticsearch-logging-data.yml
kubectl get sts -n kubesphere-logging-system elasticsearch-logging-discovery -oyaml > elasticsearch-logging-discovery.yml
修改 yaml 文件,以修改上面生成的 elasticsearch-logging-data.yml 为例,主节点的 yaml 文件一样修改。
apiVersion: apps/v1
kind: StatefulSet
metadata:
  labels:
    # 由于篇幅原因,此处省略
    # ...
  name: elasticsearch-logging-data
  namespace: kubesphere-logging-system
  # -------------------------------------------------
  #   注释或删除非 labels、name、namespace 的元信息字段
  # -------------------------------------------------
  # resourceVersion: "109019"
  # selfLink: /apis/apps/v1/namespaces/kubesphere-logging-system/statefulsets/elasticsearch-logging-data
  # uid: 423adffe-271f-4657-9078-1a75c387eedc
spec:
  # ...
  template:
    # ...
    spec:
      # ...
      containers:
      - name: elasticsearch
        # ...
        volumeMounts:
        - mountPath: /usr/share/elasticsearch/data
          name: data
        # --------------------------
        #   添加 backup Volume 挂载
        # --------------------------
        - mountPath: /usr/share/elasticsearch/backup
          name: backup
        - mountPath: /usr/share/elasticsearch/config/elasticsearch.yml
          name: config
          subPath: elasticsearch.yml
        # ...
      initContainers:
      - name: sysctl
        # ...
      - name: chown
        # --------------------------------------
        #   修改 command,调整快照仓库文件夹拥有者
        # --------------------------------------
        command:
        - /bin/bash
        - -c
        - |
          set -e; set -x; chown elasticsearch:elasticsearch /usr/share/elasticsearch/data; for datadir in $(find /usr/share/elasticsearch/data -mindepth 1 -maxdepth 1 -not -name ".snapshot"); do
            chown -R elasticsearch:elasticsearch $datadir;
          done; chown elasticsearch:elasticsearch /usr/share/elasticsearch/logs; for logfile in $(find /usr/share/elasticsearch/logs -mindepth 1 -maxdepth 1 -not -name ".snapshot"); do
            chown -R elasticsearch:elasticsearch $logfile;
          done; chown elasticsearch:elasticsearch /usr/share/elasticsearch/backup; for backupdir in $(find /usr/share/elasticsearch/backup -mindepth 1 -maxdepth 1 -not -name ".snapshot"); do
            chown -R elasticsearch:elasticsearch $backupdir;
          done
        # ...
        volumeMounts:
        - mountPath: /usr/share/elasticsearch/data
          name: data
        # --------------------------
        #   添加 backup Volume 挂载
        # --------------------------
        - mountPath: /usr/share/elasticsearch/backup
          name: backup
      # ...
      tolerations:
      - key: CriticalAddonsOnly
        operator: Exists
      - effect: NoSchedule
        key: dedicated
        value: log
      volumes:
      - configMap:
          defaultMode: 420
          name: elasticsearch-logging
        name: config
      # -----------------------
      #   指定第一步中创建的 PVC
      # -----------------------
      - name: backup
        persistentVolumeClaim:
          claimName: elasticsearch-logging-backup
  volumeClaimTemplates:
  - metadata:
      name: data
    spec:
      accessModes:
      - ReadWriteOnce
      resources:
        requests:
          storage: 20Gi
      storageClassName: nfs-client
      volumeMode: Filesystem
# --------------------------------------
#   注释或删除 status 字段
# --------------------------------------
#     status:
#       phase: Pending
# status:
#   ...
修改完后,可以删除 ElasticSearch StatefulSet,并重新应用新 yaml:
kubectl delete sts -n kubesphere-logging-system elasticsearch-logging-data
kubectl delete sts -n kubesphere-logging-system elasticsearch-logging-discovery

kubectl apply -f elasticsearch-logging-data.yml
kubectl apply -f elasticsearch-logging-discovery.yml
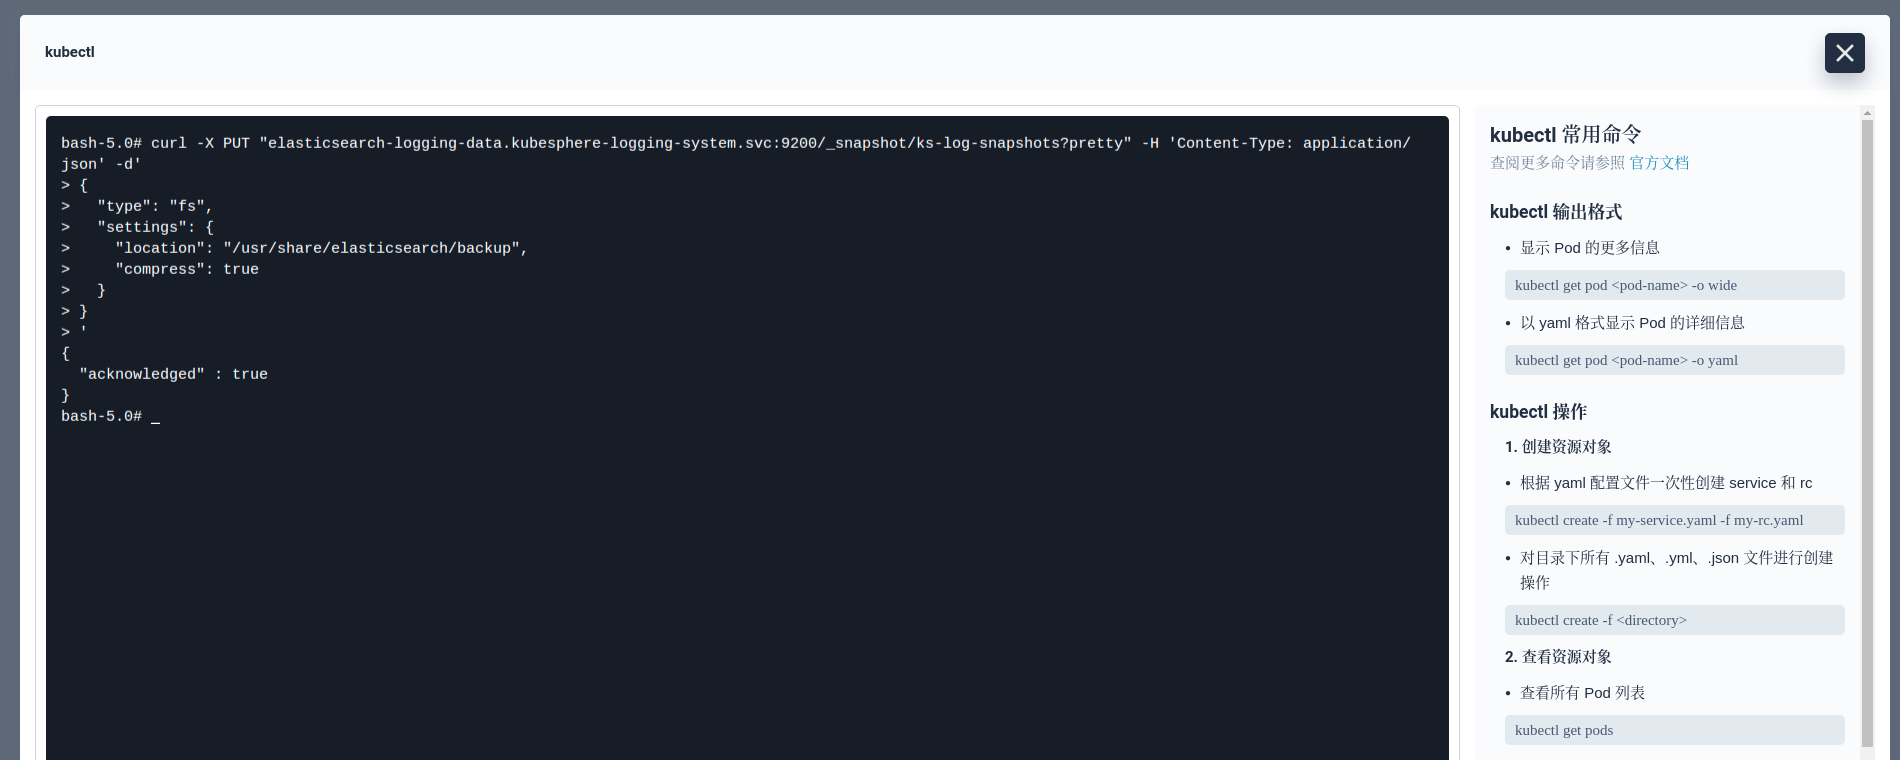
最后一步,等待 ElasticSearch 全部节点启动后,调用 Snapshot API 创建出一个名为 ks-log-snapshots 的 repository,并开启压缩功能:
curl -X PUT "elasticsearch-logging-data.kubesphere-logging-system.svc:9200/_snapshot/ks-log-snapshots?pretty" -H 'Content-Type: application/json' -d'
{
  "type": "fs",
  "settings": {
    "location": "/usr/share/elasticsearch/backup",
    "compress": true
  }
}
'
返回 "acknowledged": true 表示成功。至此,ElasticSearch 集群快照功能的准备工作已经就绪。后面只需要定时的调用 Snapshot API 实现增量备份即可。ElasticSearch 自动化增量备份可以借助 Curator 来完成。
2. 使用 Curator 定时快照
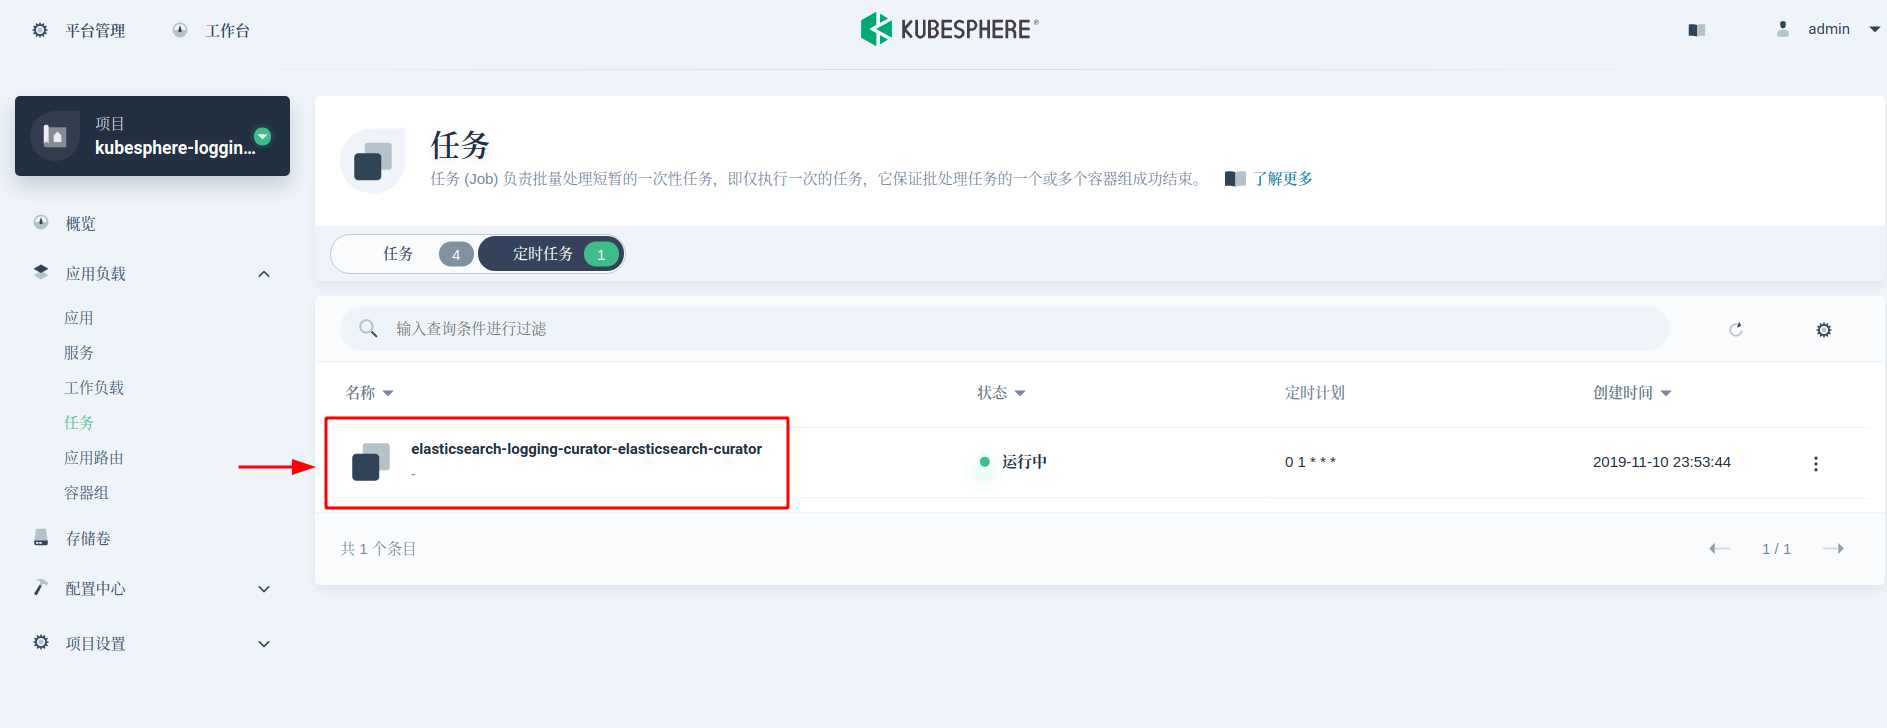
ElasticSearch Curator 能帮助管理 ElasticSearch 索引和快照。接下来,我们使用 Curator 来实现自动化定时日志备份。KubeSphere 日志组件默认包含了 Curator(被部署为一个 CronJob,每天凌晨 1 点执行)来管理索引,我们可以借助同一个 Curator。Curator 的执行规则在 ConfigMap 中可以找到。
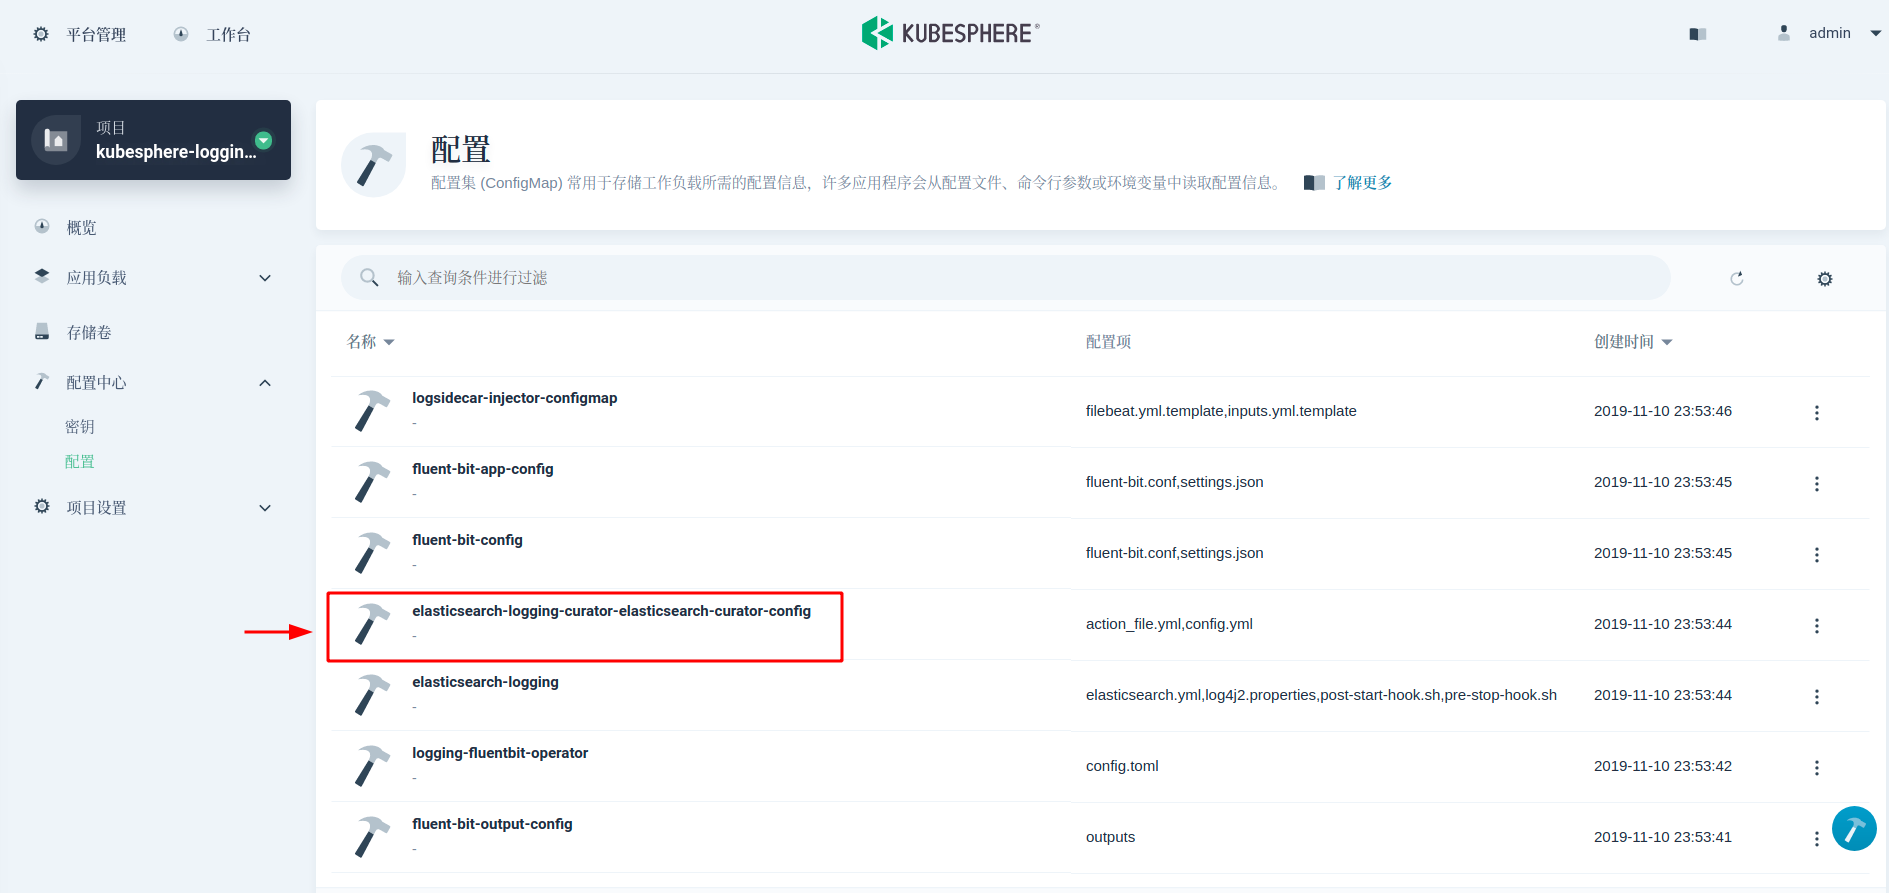
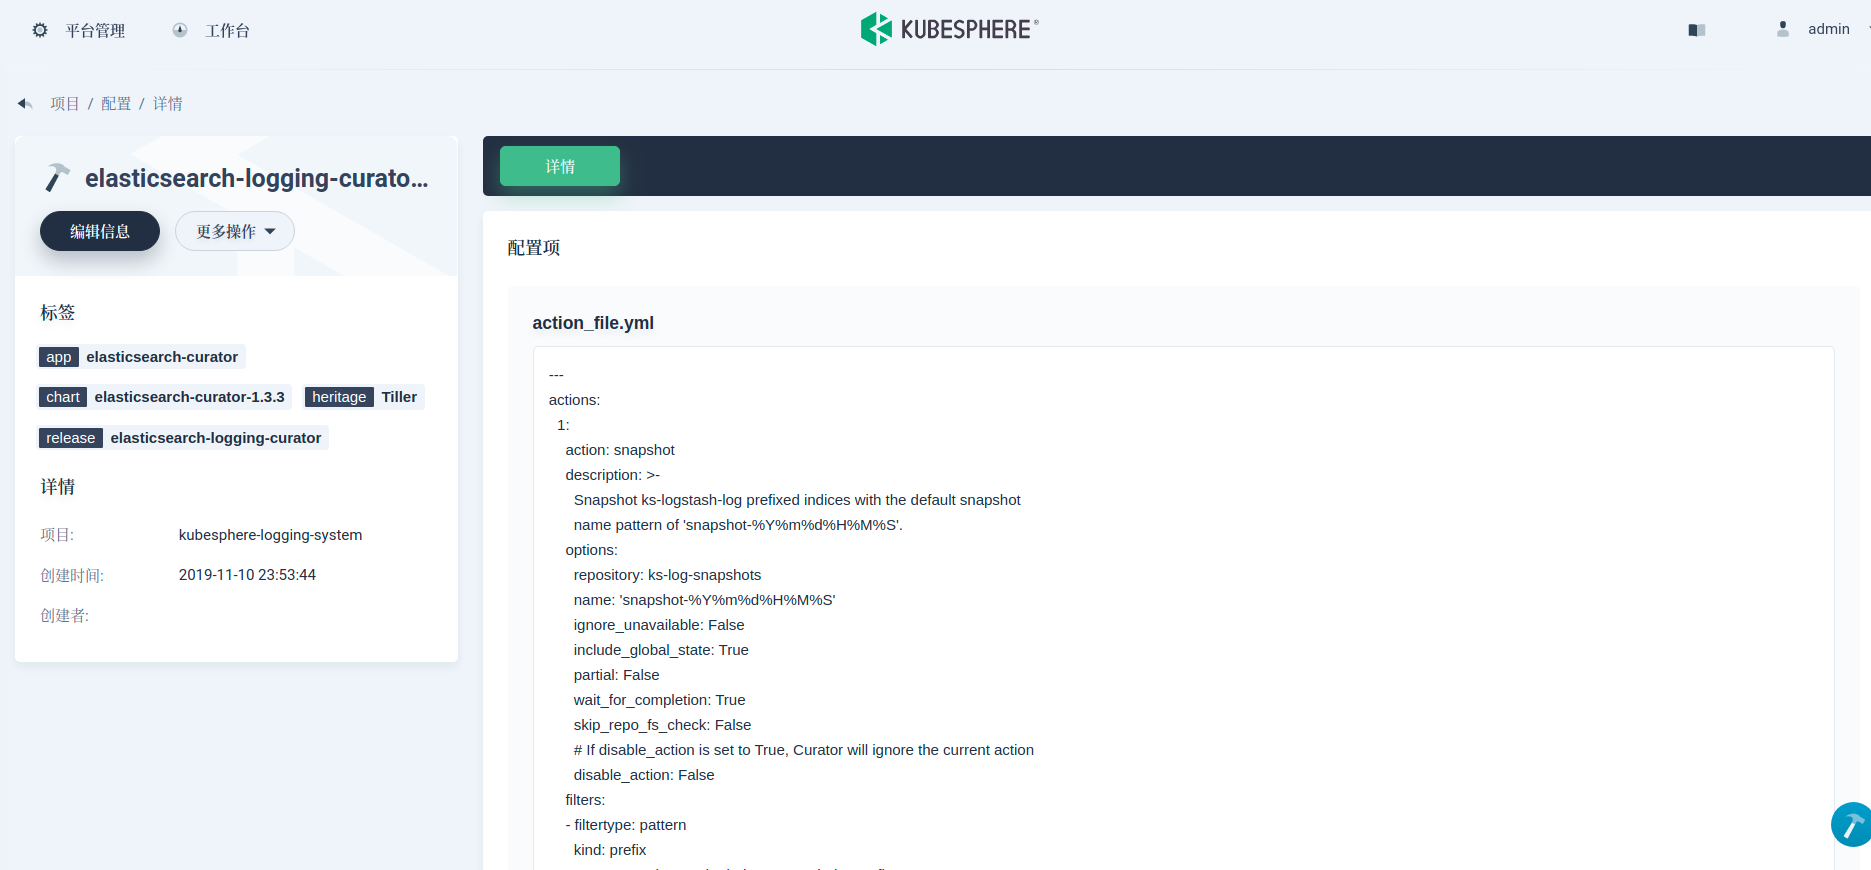
这里我们需要在 action_file.yml 字段值中增加两个 action:snapshot 和 delete_snapshots。并把这个规则优先级提高到 delete_indices 前。该配置规定了 snapshot 创建命名方式为 snapshot-%Y%m%d%H%M%S,保留 45 天的 snapshots。具体参数含义可参考 Curator Reference。
actions:
  1:
    action: snapshot
    description: >-
      Snapshot ks-logstash-log prefixed indices with the default snapshot
      name pattern of 'snapshot-%Y%m%d%H%M%S'.
    options:
      repository: ks-log-snapshots
      name: 'snapshot-%Y%m%d%H%M%S'
      ignore_unavailable: False
      include_global_state: True
      partial: False
      wait_for_completion: True
      skip_repo_fs_check: False
      # If disable_action is set to True, Curator will ignore the current action
      disable_action: False
    filters:
    - filtertype: pattern
      kind: prefix
      # You may change the index pattern below to fit your case
      value: ks-logstash-log-
  2:
    action: delete_snapshots
    description: >-
      Delete snapshots from the selected repository older than 45 days
      (based on creation_date), for 'snapshot' prefixed snapshots.
    options:
      repository: ks-log-snapshots
      ignore_empty_list: True
      # If disable_action is set to True, Curator will ignore the current action
      disable_action: False
    filters:
    - filtertype: pattern
      kind: prefix
      value: snapshot-
      exclude:
    - filtertype: age
      source: name
      direction: older
      timestring: '%Y%m%d%H%M%S'
      unit: days
      unit_count: 45
  3:
    action: delete_indices
    # 原有内容不变
    # ...
3. 日志恢复与查看
当我们需要回顾某几天前的日志时,我们可以通过快照恢复,比如 11 月 12 日的日志。首先我们需要检查最新的 Snapshot:
curl -X GET "elasticsearch-logging-data.kubesphere-logging-system.svc:9200/_snapshot/ks-log-snapshots/_all?pretty"
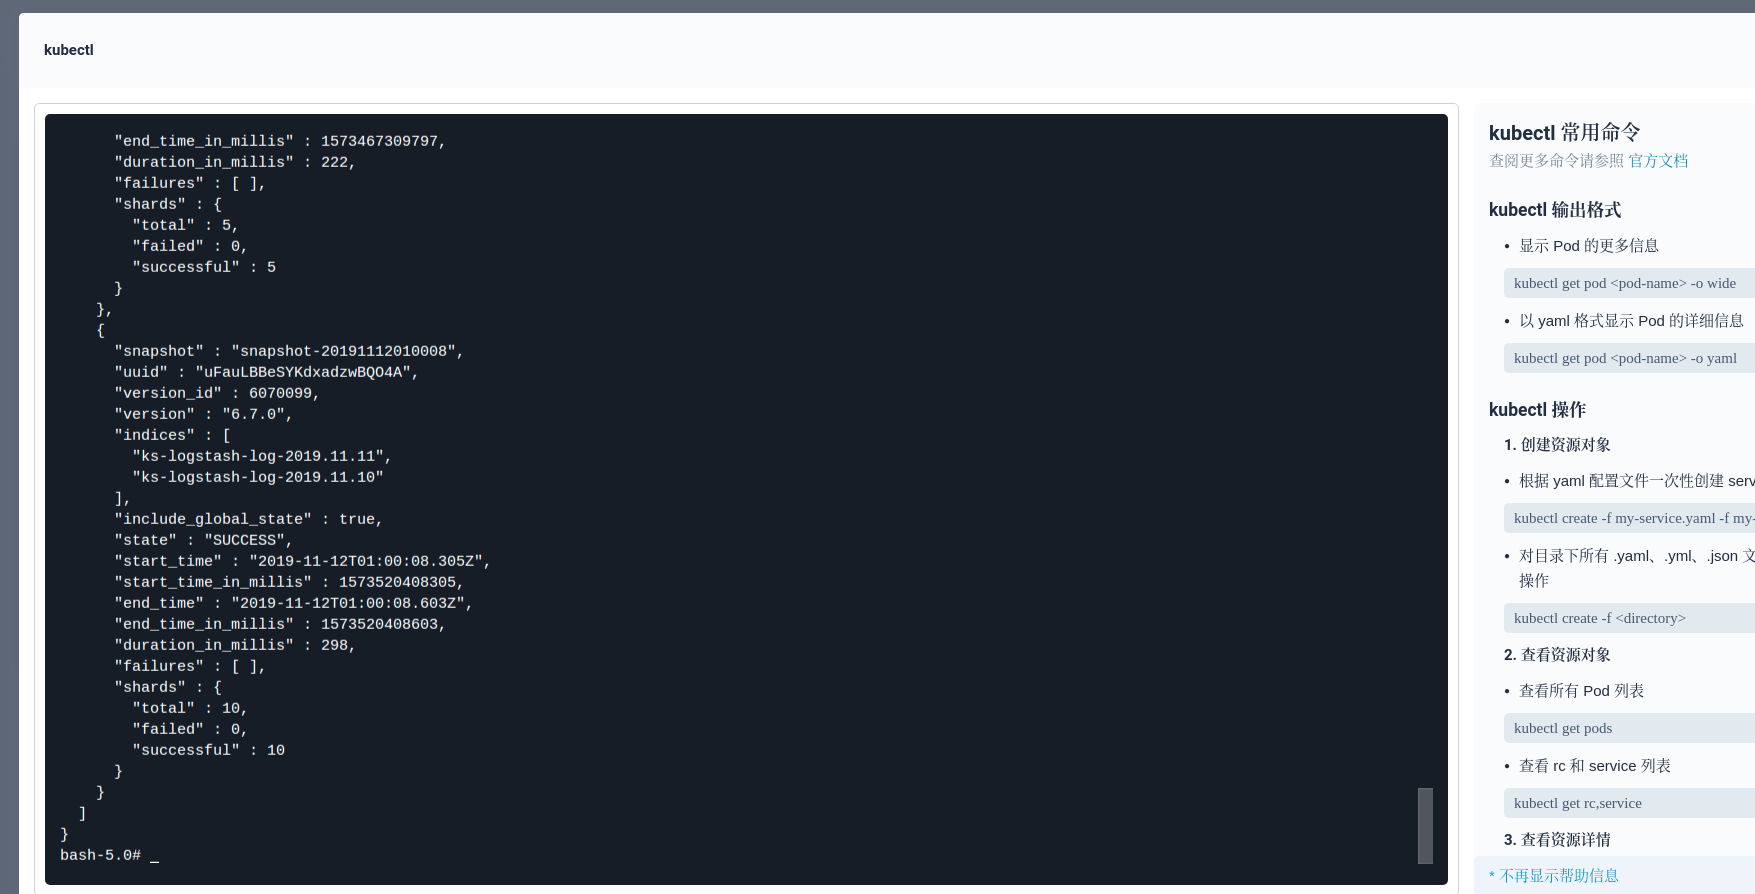
然后通过最新的 Snapshot 恢复指定日期的索引(也可以选择恢复全部)。这个 API 会恢复日志索引到数据盘,所以请确保数据盘的存储空间足够充足。另外,你也可以直接备份对应的 PV(Snapshot 仓库对应的存储卷是可以直接被用来备份的),挂载到其他 ElasticSearch 集群,将日志恢复到其他 ElasticSearch 集群中使用。
curl -X POST "elasticsearch-logging-data.kubesphere-logging-system.svc:9200/_snapshot/ks-log-snapshots/snapshot-20191112010008/_restore?pretty" -H 'Content-Type: application/json' -d'
{
  "indices": "ks-logstash-log-2019.11.12",
  "ignore_unavailable": true,
  "include_global_state": true,
}
'
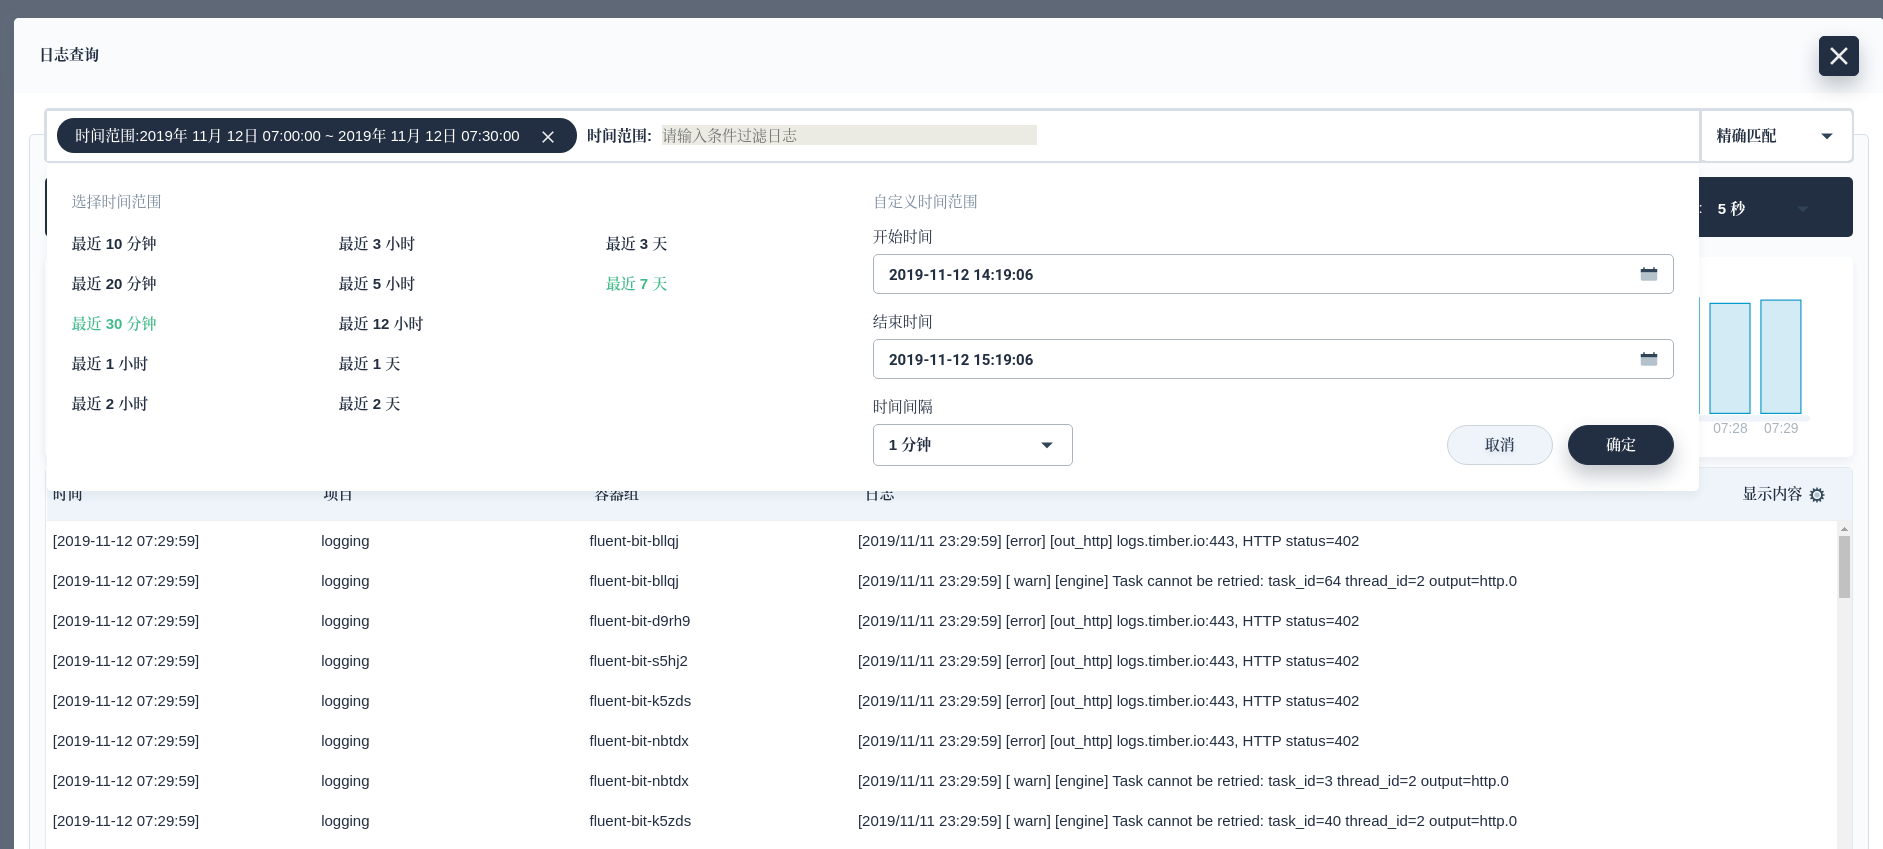
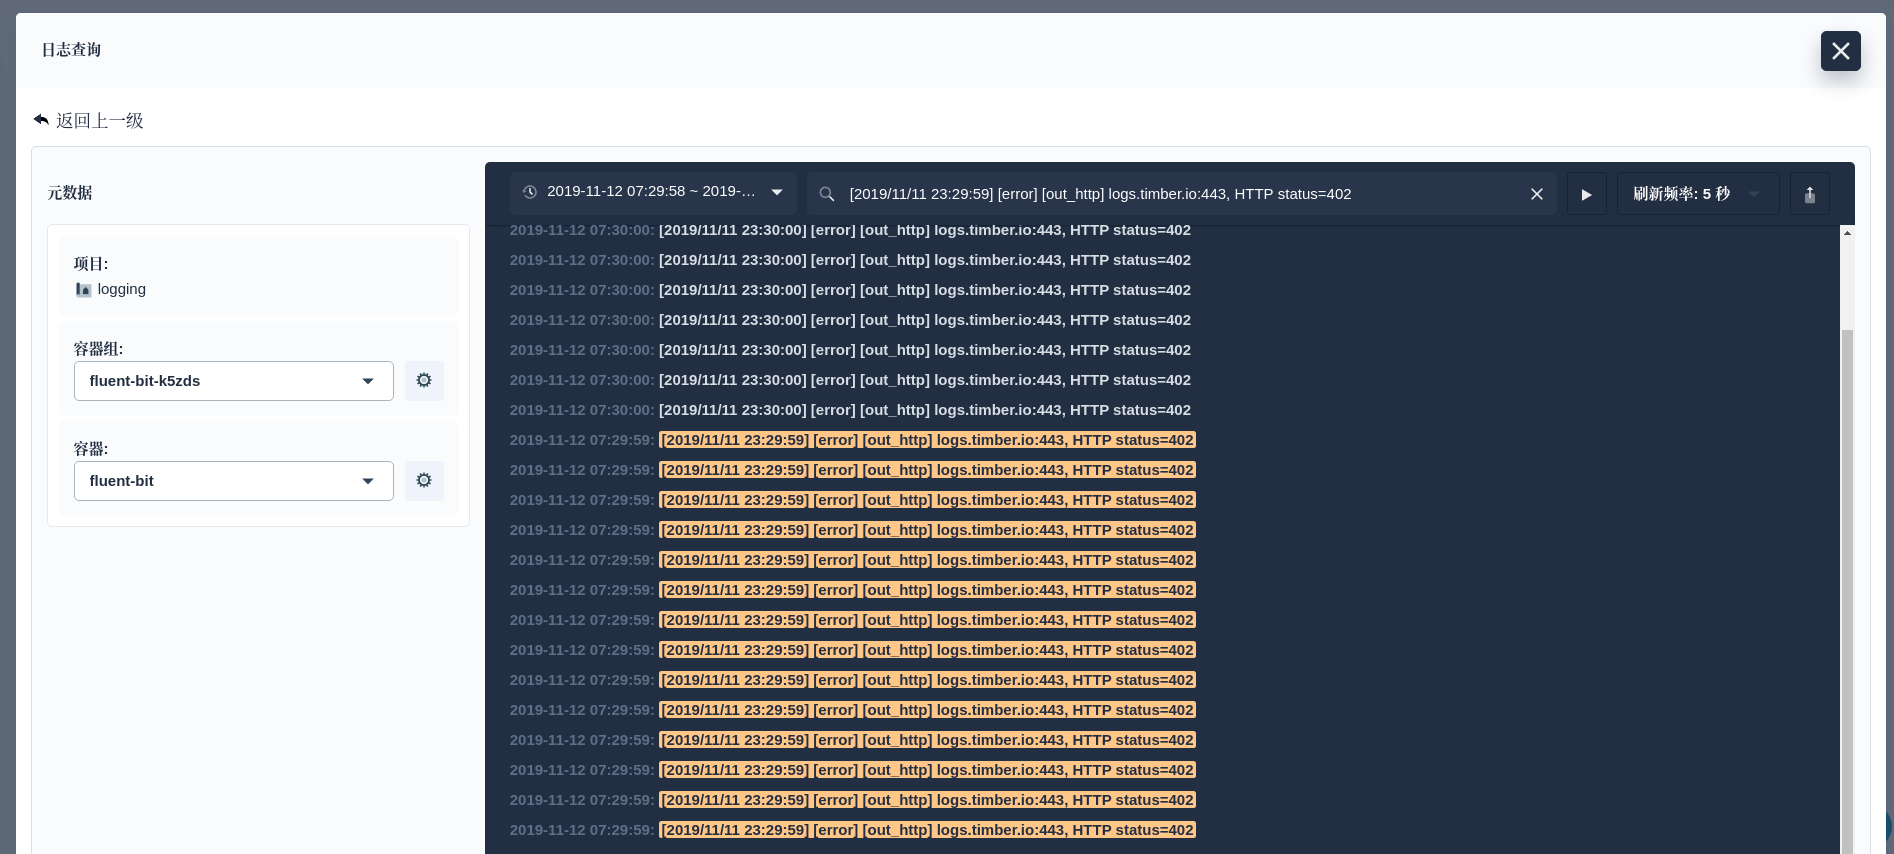
根据日志量的大小,需要等到的时间几分钟不等。我们就可以通过 KubeSphere 日志 Dashboard 查看日志了。
参考文档
ElasticSearch Reference: Snapshot And Restore
Meetup 预告
KubeSphere (https://github.com/kubesphere/kubesphere) 是一个开源的以应用为中心的容器管理平台,支持部署在任何基础设施之上,并提供简单易用的 UI,极大减轻日常开发、测试、运维的复杂度,旨在解决 Kubernetes 本身存在的存储、网络、安全和易用性等痛点,帮助企业轻松应对敏捷开发与自动化监控运维、端到端应用交付、微服务治理、多租户管理、多集群管理、服务与网络管理、镜像仓库、AI 平台、边缘计算等业务场景。