react使用redux操作购物车数据
自己在工作之余写的一个商场Demo,用的react+Antd,后端使用的是nodejs,数据库是mysql,这边只介绍使用redux对购物车的操作,也并不会对redux的使用进行解释。
我这边创建了四个文件action.js、reducers.js、store.js、visibility.js,作用呢分别是存放事件发生的动作、应用状态的变化如何响应 actions 并发送到 store 、将action和reducer联系在一起、存放用到的一些常量。话不多说,直接贴代码
store.js
import { createStore, compose, applyMiddleware } from 'redux';

import thunk from 'redux-thunk';  // 处理异步请求的数据,它允许你的action可以返回函数

import getWantData from './reducers';


const store = createStore(getWantData, compose(

  applyMiddleware(thunk)

));


export default store;
visibility.js
export const SELECT_ALL_SHOP = 'SELECT_ALL_SHOP';  // 购物车所有商品

export const GET_USER_CART = 'GET_USER_CART';  // 用户购物车数据

export const TOGGLE_SHOP = 'TOGGLE_SHOP';  // 是否选中商品

export const ADD_SHOP = 'ADD_SHOP';  // + 商品

export const SUB_SHOP = 'SUB_SHOP';  // — 商品

export const REMOVE_SHOP = 'REMOVE_SHOP';  // 删除商品
action.js
import {

  SELECT_ALL_SHOP,

  GET_USER_CART,

  TOGGLE_SHOP,

  ADD_SHOP,

  SUB_SHOP,

  REMOVE_SHOP

} from './visibility';

import { wantShopData } from '../api/shopApi';


// 同步获取用户购物车所有数据

export function asyncUserCartData(userCartData){

  let cartData = userCartData.map(item => {

    item.isSelected = true; // 通过该属性判断该条商品是否处于选中状态

    return item;

  });

  return {

    type: GET_USER_CART,

    userCartData: cartData

  }

}


// 异步获取用户购物车数据

export function getUserCarData(userId) {

  let statements = `SELECT * FROM userCart WHERE user_id = '${userId}'`;

  return (dispatch) => {

    wantShopData({ statements }).then(data => {

      dispatch(asyncUserCartData(data));

    });

  }

}


// 购物车选中或不选中

export function checkShopNumber(type, shopId) {

  return { type: TOGGLE_SHOP, shopId };

}


// 购物车全选或取消全选

export function operationAllShop(seleStatus) {

  return { type: SELECT_ALL_SHOP, seleStatus };

}


// 购物车加商品

export function userAddShop(shopId) {

  return { type: ADD_SHOP, shopId }

}


// 购物车减商品

export function userSubShop(shopId) {

  return { type: SUB_SHOP, shopId }

}


// 删除商品

export function removeCartShop(shopId) {

  return { type: REMOVE_SHOP, shopId }

}
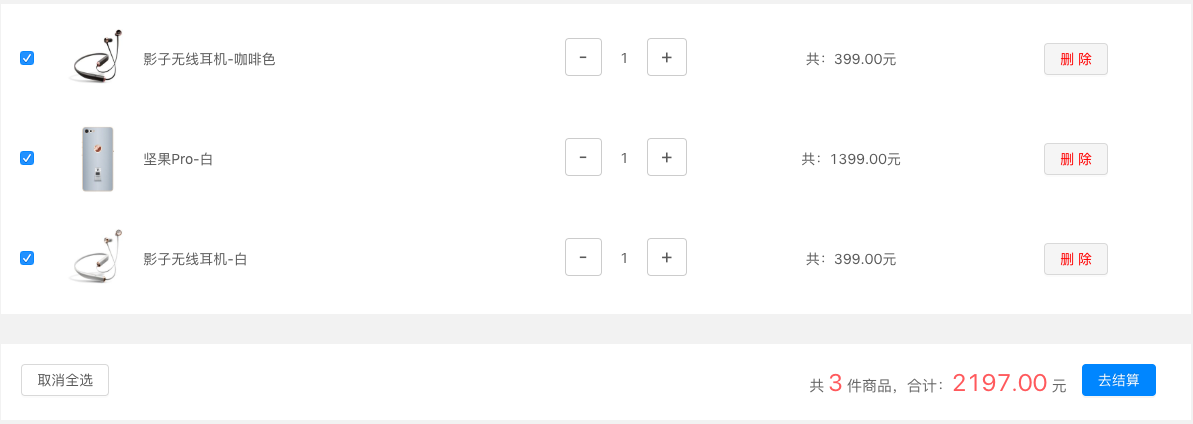
接下来就是页面具体实现调用了,在此之前先看下具体是什么样子的。
一开始购物车的商品都是默认选中的,因为上面的isSelected一开始就是true,现在要实现的就是商品在选中状态下对于商品数量的变化实现对下面总价的相应变化,注意,首先是只有选中状态下点击➕或➖操作下面所有的商品总价会变,而单个商品的总价是不受选中这个状态影响的,其次要是在未选中状态下改变单个商品数量,选中后所有商品总价跟着改变,还有就是删除选中的商品后改变总总价和总数量,最后实现全选和取消全选功能
整个至关重要的一步就是先获取购物车里的全部数据
首先定义好mapStateToProps和mapDispatchToProps函数,这里使用了react-redux里的connect
import { isLogin, getUserId } from "../../comment/methods/util";

import { getUserCarData } from '../../reduxs/action';


function mapStateToProps(state) {

  return {

    cartShopData: state.userCartData

  };

}


function mapDispatchToProps(dispatch) {

  return {

    userCartDataFn(userId) {

      dispatch(getUserCarData(userId)); // 触发action

    }

  }

}


if(isLogin()) { // 判断登录后获取

      this.props.userCartDataFn(getUserId());

}esle {

 // 没有登录即跳往登录页

}


// 使用componentWillReceiveProps监测props的变化


// reducers.js


case GET_USER_CART: // 获取购物车所有数据

      return [

        ...action.userCartData

      ];
获取到购物车全部数据后实现单个商品的选中及取消选中、删除商品
function mapDispatchToProps(dispatch) {

  return {

    shopTotalFn(type, shopId) { // 商品的选中或取消选中

      dispatch(checkShopNumber(type, shopId));

    },

    removeShop(shopId) { // 删除商品

      dispatch(removeCartShop(shopId));

    }

  }

}

// 商品的删除

<!--<Button

 type="danger"

 onClick={ () => {

          this.props.removeShop(this.state.singData.shop_id);

      } }>删除

</Button>-->


// 商品的选中事件selectCheckFn

selectCheckFn() {

    this.props.shopTotalFn(TOGGLE_SHOP, this.state.singData.shop_id);

}


// reducers.js

case REMOVE_SHOP: // 移除该商品

      let remainShop = state.filter(item => item.shop_id !== action.shopId);

      return [ ...remainShop ];

case TOGGLE_SHOP:  // 选中或取消选中商品

      state.map(item => {

        if(action.shopId === item.shop_id) {

          item.isSelected = !item.isSelected;

        }

      });

      return [

        ...state

      ];
商品数量的加减
这边得注意商品的选中状态,选中后改变单总价和总总价,未选中只改变单总价
function mapDispatchToProps(dispatch) {

  return {

    addShopNum(shopId) {

      dispatch(userAddShop(shopId));

    },

    subShopNum(shopId) {

      dispatch(userSubShop(shopId));

    }

  }

}


reducShopNum() { // 商品减操作

    if(this.state.shopNum > 1) {

      this.props.subShopNum(this.props.data.shop_id);

      this.state.shopNum --;

      this.setState({

        shopNum: this.state.shopNum

      }, () => {

        this.props.onChange(this.state.shopNum, this.state.shopPrice);

      });

    }

  }


addShopNum() { // 商品加操作

    this.props.addShopNum(this.props.data.shop_id);

    this.state.shopNum ++;

    this.setState({

      shopNum: this.state.shopNum

    }, () => {

      this.props.onChange(this.state.shopNum, this.state.shopPrice);

    });

  }


// reducers.js


case ADD_SHOP: // 商品 ++

      state.map(item => {

        if(item.shop_id === action.shopId) {

          item.shop_val ++;

        }

      });

      return [ ...state ];

case SUB_SHOP: // 商品 --

      state.map(item => {

        if(item.shop_id === action.shopId) {

          item.shop_val --;

        }

      });

      return [ ...state ];
最后就是商品的全选和取消全选了
function mapDispatchToProps(dispatch) {

  return {

    selectStatus(seleStatus) {

      dispatch(operationAllShop(seleStatus))

    }

  }

}


selectAllShop() {

    if(this.state.optxt === '全 选') {

      this.props.selectStatus('SELECTED_S');

      this.setState({

        optxt: '取消全选'

      });

    }else {

      this.props.selectStatus('CANCEL_S');

      this.setState({

        optxt: '全 选'

      });

    }

  }


// reducers.js


case SELECT_ALL_SHOP: // 选中或取消选中所有商品

      if(action.seleStatus === 'SELECTED_S') {

        state.map(item => {

          item.isSelected = true;

        });

      }

      if(action.seleStatus === 'CANCEL_S') {

        state.map(item => {

          item.isSelected = false;

        });

      }

      return [

        ...state

      ];
这样购物车基本的操作功能也就都实现了,想看完整代码的可以 点击一下 进行查看
总结一下:使用了redux后,在购物车操作中确实方便了很多,由于所有的操作都是对一开始的唯一数据源进行操作,从而使思维更加的清晰明确。