一、什么是shiro
它是一个功能强大且易于使用的Java安全框架,可以执行身份验证、授权、加密和会话管理。使用Shiro易于理解的API,您可以快速且轻松地保护任何应用程序——从最小的移动应用程序到最大的web和企业应用程序。
二、shiro的主要功能
1、Authentication:身份认证
2、Authorization:权限校验
3、SessionManager:会话管理,用户从登录到退出是一次会话,所有的信息都保存在会话中。普通的java se环境中也支持这种会话。
4、cryptography:数据加密,如对用户密码进行加密,避免将密码明文存入数据库中。
5、Web support:非常容易集成到web环境中。
6、Caching:缓存,将用户信息和角色权限等缓存起来,不必每次去查
7、Concurrency:支持多线程,在一个线程中开启新的线程,能把权限传过去。
8、Testing:提供测试功能
9、Run As:允许一个用户假装为另一个用户的身份进行访问。
10、Remember me: 记住用户,一次登录后下次不用登录。
三、核心的概念以及架构图
1、subject(主题):代表了正在操作的当前“用户”,这个用户并不一定是人也也可以指第三方进程、守护进程帐户或任何类似的东西。一旦您获得了主题,您就可以立即访问当前用户使用Shiro想要做的90%的事情,比如登录、注销、访问他们的会话、执行授权检查等。
2、securityManager(安全管理器):它是shiro的核心,所有与安全有关的操作都会与securityManager进行交互。
3、realm(数据域):充当Shiro和应用程序安全数据之间的“桥梁”,当实际需要与与安全相关的数据(如用户帐户)进行交互以执行身份验证(登录)和授权(访问控制)时,Shiro会从一个或多个为应用程序配置的领域中查找这些内容。realm可以有多个,但是至少得有一个。Shiro提供了开箱即用的realm,可以连接到许多安全数据源(即目录),如LDAP、关系数据库(JDBC)、文本配置源(如INI)和属性文件,等等。如果默认的realm不满足您的需求,可以添加您自己的领域实现来表示自定义数据源。
4、Authenticator:认证器,负责主体认证的,这是一个扩展点,如果用户觉得 Shiro 默认的 不好,可以自定义实现;其需要认证策略(Authentication Strategy),即什么情况下算用户 认证通过了
5、Authrizer:授权器,或者访问控制器,用来决定主体是否有权限进行相应的操作;即控制 着用户能访问应用中的哪些功能;
6、SessionManager:如果写过 Servlet 就应该知道 Session 的概念,Session 呢需要有人去管理 它的生命周期,这个组件就是 SessionManager;而 Shiro 并不仅仅可以用在 Web 环境,也 可以用在如普通的 JavaSE 环境、EJB 等环境;所有呢,Shiro 就抽象了一个自己的 Session 来管理主体与应用之间交互的数据;这样的话,比如我们在 Web 环境用,刚开始是一台 Web 服务器;接着又上了台 EJB 服务器;这时想把两台服务器的会话数据放到一个地方, 这个时候就可以实现自己的分布式会话(如把数据放到 Memcached 服务器);
7、SessionDAO:DAO 大家都用过,数据访问对象,用 于 会话的 CRUD,比如我们想把 Session 保存到数据库,那么可以实现自己的 SessionDAO,通过如 JDBC 写到数据库;比如想把 Session 放到 Memcached 中,可以实现自己的 Memcached SessionDAO;另外 SessionDAO 中可以使用 Cache 进行缓存,以提高性能;
8、CacheManager:缓存控制器,来管理如用户、角色、权限等的缓存的;因为这些数据基本 上很少去改变,放到缓存中后可以提高访问的性能
9、Cryptography:密码模块,Shiro 提高了一些常见的加密组件用于如密码加密/解密的

四、身份认证
使用principals(身份,也就是账号)和credentials(证明,密码或者证书)来对用户进行认证。
1、身份认证的流程图
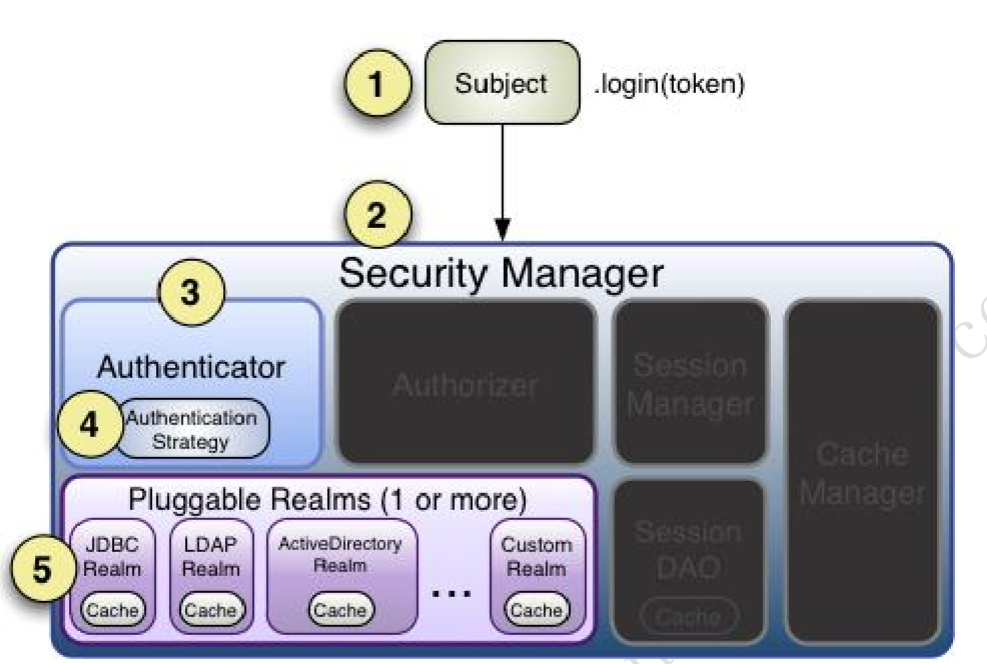
2、身份认证的具体流程
2.1、首先调用 Subject.login(token)进行登录,其会自动委托给 Security Manager,调用之前必 须通过 SecurityUtils. setSecurityManager()设置。
2.2、SecurityManager 负责真正的身份验证逻辑;它会委托给 Authenticator 进行身份验证;
2.3、Authenticator 才是真正的身份验证者,Shiro API 中核心的身份认证入口点,开发者可以自 定义插入自己的实现;
2.4、Authenticator 可能会委托给相应的 AuthenticationStrategy 进行多 Realm 身份验证,默认 ModularRealmAuthenticator 会调用 AuthenticationStrategy 进行多 Realm 身份验证;
2.5、Authenticator 会把相应的 token 传入 Realm,从 Realm 获取身份验证信息,如果没有返 回/抛出异常表示身份验证失败了。此处可以配置多个 Realm,将按照相应的顺序及策略进 行访问。
五、授权
1、授权相关的几个关键对象:
1.1、主体(Subject):在 Shiro 中使用 Subject 代表该用户。用户只有授权后才允许访 问相应的资源
1.2、资源(Resource):系统中所有可以访问的东西,如页面、按钮、链接、数据等
1.3、权限(Permission):安全策略中的原子授权单位,通过权限我们可以表示在应用中用户有没有操作某个资源的 权力。即权限表示在应用中用户能不能访问某个资源
1.4、角色(Role):可以理解为权限集合,一般情况下我们会赋予用户角色而不是权 限,即这样用户可以拥有一组权限,赋予权限时比较方便
2、授权流程图
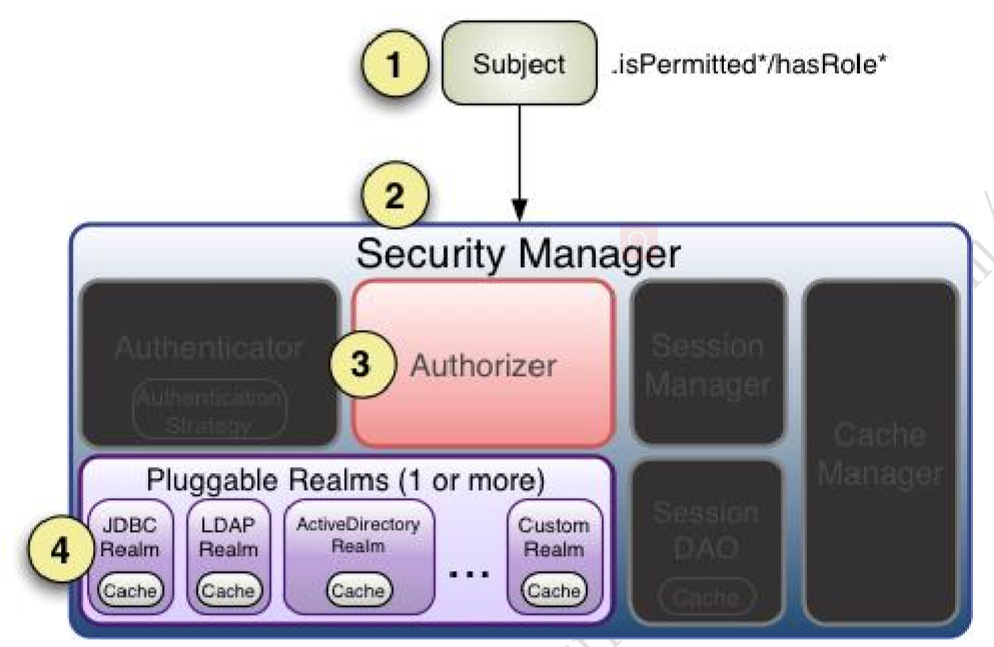
3、授权流程详细
3.1、首先调用 Subject.isPermitted*/hasRole*接口,其会委托给 SecurityManager,而 SecurityManager 接着会委托给 Authorizer
3.2、Authorizer 是真正的授权者,如果我们调用如 isPermitted(“user:view”),其首先会通过 PermissionResolver 把字符串转换成相应的 Permission 实例
3.3、在进行授权之前,其会调用相应的 Realm 获取 Subject 相应的角色/权限用于匹配传入的 角色/权限
3.4、Authorizer 会判断 Realm 的角色/权限是否和传入的匹配,如果有多个 Realm,会委托给 ModularRealmAuthorizer 进行循环判断,如果匹配如 isPermitted*/hasRole*会返回 true,否 则返回 false 表示授权失败
4、ModularRealmAuthorizer 进行多 Realm 匹配流程:
4.1、首先检查相应的 Realm 是否实现了实现了 Authorizer;
4.2、如果实现了 Authorizer,那么接着调用其相应的 isPermitted*/hasRole*接口进行匹配;
4.3、如果有一个 Realm 匹配那么将返回 true,否则返回 false;
5、如果 Realm 进行授权的话,应该继承 AuthorizingRealm,其流程是:
5.1、如果调用 hasRole(),则直接获取 AuthorizationInfo.getRoles()与传入的角色比较即可;
5.2、首先如果调用如 isPermitted(“user:view”),首先通过 PermissionResolver 将权限字符串 转换成相应的 Permission 实例,默认使用 WildcardPermissionResolver,即转换为通配符的 WildcardPermission
5.3、 通 过 AuthorizationInfo.getObjectPermissions() 得 到 Permission 实 例 集 合 ;通过 AuthorizationInfo. getStringPermissions()得到字符串集合并通过 PermissionResolver 解析为 Permission 实例;然后获取用户的角色,并通过 RolePermissionResolver 解析角色对应的权 限集合(默认没有实现,可以自己提供);通过上面的三种情况获取了所有的权限集合。
5.4、接着调用 Permission. implies(Permission p)逐个与传入的权限比较,如果有匹配的则返回 true,否则 false;
六、编码与加密
Shiro 提供了 base64 和 16 进制字符串编码/解码的 API 支持Shiro,同时也提供了多种散列算法加密:MD5,sha等和对称加密算法
下面是一些具体的操作
public class DecodeAndEncode {

    public static void main(String[] args) {
        String source = "hello world!";
        String salt = "salt";

        //base64编码和解码
        String base64Str = Base64.encodeToString(source.getBytes());
        String str1 = Base64.decodeToString(base64Str.getBytes());
        System.out.println(base64Str);
        System.out.println(str1);

        //16进制编解码
        String hexEncoded = Hex.encodeToString(source.getBytes());
        String str2 = new String(Hex.decode(hexEncoded.getBytes()));
        System.out.println(hexEncoded);
        System.out.println(str2);

        //使用sha1散列算法对源字符串加盐并散列两次,得到长度为40的字符串
        String sha1Hash = new Sha1Hash(source, salt, 2).toString();
        System.out.println(sha1Hash);

        //sha256散列算法对源字符串加盐并散列两次,得到长度为64的字段
        String sha256Hash = new Sha256Hash(source, salt,2).toString();
        System.out.println(sha256Hash);

        //sha384散列算法对源字符串加盐并散列两次,得到长度为96的字段
        String sha384Hash = new Sha384Hash(source, salt,2).toString();
        System.out.println(sha384Hash);

        //sha512散列算法对源字符串加盐并散列两次,得到长度为128的字符串
        String sha512Hash = new Sha512Hash(source, salt, 2).toString();
        System.out.println(sha512Hash);

        //使用MD5来对源字符串进行加盐加密,并得到长度为32的字符串
        String md5Hash = new Md5Hash(source, salt,2).toString();
        System.out.println(md5Hash);

        //使用通用的加密方法来对字符串进行加密
        String sha1 = new SimpleHash("SHA-1", source, salt, 2).toString();
        String sha256 = new SimpleHash("SHA-256", source, salt, 2).toString();
        String sha512 = new SimpleHash("SHA-512", source, salt, 2).toString();
        String md5 = new SimpleHash("MD5", source, salt, 2).toString();
        System.out.println(sha256);
        System.out.println(md5);
        System.out.println(sha1);
        System.out.println(sha512);

        //自动生成随机数
        SecureRandomNumberGenerator randomNumberGenerator = new SecureRandomNumberGenerator();
        randomNumberGenerator.setSeed("abc".getBytes());
        String hex = randomNumberGenerator.nextBytes().toHex();
        String string = randomNumberGenerator.nextBytes().toString();
        System.out.println(hex);
        System.out.println(string);

        String salt2 = new SecureRandomNumberGenerator().nextBytes().toHex();
        System.out.println(salt2);

        //shiro对称加密
        AesCipherService aesCipherService = new AesCipherService();
        //设置 生成的key长度
        aesCipherService.setKeySize(128);
        //生成 key
        Key key = aesCipherService.generateNewKey();
        String text = "hello";
        //加密
        String encrptText =  aesCipherService.encrypt(text.getBytes(),key.getEncoded()).toHex();
        //解密
        String text2 =  new String(aesCipherService.decrypt(Hex.decode(encrptText), key.getEncoded()).getBytes());
        System.out.println(encrptText);
        System.out.println(text2);
    }

}
七、Realm及相关对象
1、AuthenticationToken :用于收集用户提交的身份及凭据。
2、AuthenticationInfo :存储账号信息用于登录身份验证
3、PrincipalCollection :存储用户的身份信息
4、AuthorizationInfo :用来存储用户的授权信息,如角色、权限等。用于授权验证。
5、Subject :Subject 是 Shiro 的核心对象,基本所有身份验证、授权都是通过 Subject 完成
subject.getPrincipal()    //获取用户账号信息
subject.isAuthenticated()   //是否已经通过身份认证也就是login成功。 isAuthenticated/isRemembered 是互斥 的,即如果其中一个返回 true,另一个返回 false。
subject.isRemembered()    //如果返回true表示是通过记住我这个功能登录的而不是通过login登录的
subject.hasRole("aaa")    //是否有该角色
subject.isPermitted("bbb") //是否具有该权限
subject.getSession()    //获取session对象
八、非web情况下shiro简单使用代码认证和授权代码
1、配置文件版
1.1、配置文件
[main]

#authenticator
authenticator=org.apache.shiro.authc.pam.ModularRealmAuthenticator
authenticationStrategy=org.apache.shiro.authc.pam.AtLeastOneSuccessfulStrategy
authenticator.authenticationStrategy=$authenticationStrategy
securityManager.authenticator=$authenticator


#authorizer
authorizer=org.apache.shiro.authz.ModularRealmAuthorizer
permissionResolver=org.apache.shiro.authz.permission.WildcardPermissionResolver
authorizer.permissionResolver=$permissionResolver
securityManager.authorizer=$authorizer

#CredentialsMatcher
credentialsMatcher=org.apache.shiro.authc.credential.HashedCredentialsMatcher
credentialsMatcher.hashAlgorithmName=md5
credentialsMatcher.hashIterations=2
credentialsMatcher.storedCredentialsHexEncoded=true

#设置realm
myRealm=com.it.shiro.MyRealm2
myRealm.credentialsMatcher=$credentialsMatcher
#同时使用多个realm,inirealm是shiro自定义的配置文件realm
securityManager.realms=$myRealm,$iniRealm

[users]
#配置用户名/密码及其角色,格式:“用户名=密码,角色 1,角色 2”,角色部分可省略。
kyle=19912,admin,employee,employee11

[roles]
#配置角色及权限之间的关系,格式:“角色=权限 1,权限 2”
admin=system:*:*,user
employee=role:delete

[urls]
#用于 web,提供了对 web url 拦截相关的配置,url=拦截器[参数],拦截器
1.2、自定义realm
public class MyRealm2 extends AuthorizingRealm {

    @Override
    public String getName() {
        return "myRealm2";
    }

    @Override
    public boolean supports(AuthenticationToken token) {
        return token instanceof UsernamePasswordToken;
    }

    @Override
    protected AuthorizationInfo doGetAuthorizationInfo(PrincipalCollection principals) {
        //账号
        //String account = SecurityUtils.getSubject().getPrincipal().toString();
        SimpleAuthorizationInfo info = new SimpleAuthorizationInfo();

        //模拟从数据库中获取角色,并设置到AuthorizationInfo中
        List<String> roles = new ArrayList<>();
        roles.add("admin");
        roles.add("manager");
        roles.add("employee");
        info.addRoles(roles);

        //模拟从数据库中获取权限
        List<String> permissions = new ArrayList<>();
        permissions.add("aaa");
        permissions.add("bbb");
        info.addStringPermissions(permissions);

        return info;
    }

    @Override
    protected AuthenticationInfo doGetAuthenticationInfo(AuthenticationToken token) throws AuthenticationException {
        //用户输入的账号
        String account = (String)token.getPrincipal();
        //用户输入的密码
        //String password = new String((char[])token.getCredentials());
        //这是模拟从数据库中查询出来的密码
        String pwd ="a467b0ccf40fb5d371b5e6f2d6d7fe44";
        //模拟数据库中保存的盐
        String salt = "1991";
        //对用户身份进行校验
        return new SimpleAuthenticationInfo(account,pwd,ByteSource.Util.bytes(account+salt),getName());
    }
}
1.3、测试使用
//使用配置文件来进行初始化
public class TestShiro2 {

    public static void main(String[] args) {

        //先通过ini对象创建securityManager工厂
        Factory<SecurityManager> factory = new IniSecurityManagerFactory("classpath:shiro2.ini");
        //通过工厂获取securityManager
        SecurityManager securityManager = factory.getInstance();

        //将securityManager绑定到SecurityUtils
        SecurityUtils.setSecurityManager(securityManager);

        Subject subject = SecurityUtils.getSubject();
        UsernamePasswordToken token = new UsernamePasswordToken("kyle","1991");
        //设置记住我
        token.setRememberMe(true);
        try{
            //登录,进行身份验证
            subject.login(token);
            System.out.println("登录成功");
        }catch(AuthenticationException e){
            System.out.println("登录失败");
        }

        System.out.println(subject.getPrincipal());//身份信息的获取
        //是否已经通过身份认证也就是login成功。 isAuthenticated/isRemembered 是互斥 的,即如果其中一个返回 true,另一个返回 false。
        System.out.println(subject.isAuthenticated());
        System.out.println(subject.isRemembered());//如果返回true表示是通过记住我这个功能登录的而不是通过login登录的
        System.out.println(subject.hasRole("aaa"));//是否有该角色
        System.out.println(subject.isPermitted("bbb"));//是否具有该权限
        System.out.println(subject.getSession());//获取session对象

        System.out.println(subject.hasRole("admin"));
        System.out.println(subject.hasRole("manager"));
        System.out.println(subject.hasRole("employee"));
        System.out.println(subject.hasRole("employee11"));

        System.out.println(subject.isPermitted("system:add:*"));
        System.out.println(subject.isPermitted("user:add:1"));
        System.out.println(subject.isPermitted("role:delete:1"));
        System.out.println(subject.isPermitted("role:add"));

        //退出登录
        subject.logout();
    }

}
2、不使用配置文件
2.1、自定义realm
public class MyRealm extends AuthorizingRealm {

    public MyRealm(){
        this.setCredentialsMatcher(credentialsMatcher());
    }

    @Override
    public String getName() {
        return "myRealm";
    }

    @Override
    public boolean supports(AuthenticationToken token) {
        return token instanceof UsernamePasswordToken;
    }

    @Override
    protected AuthorizationInfo doGetAuthorizationInfo(PrincipalCollection principals) {
        //账号
        //String account = SecurityUtils.getSubject().getPrincipal().toString();
        SimpleAuthorizationInfo info = new SimpleAuthorizationInfo();

        //模拟从数据库中获取角色,并设置到AuthorizationInfo中
        List<String> roles = new ArrayList<>();
        roles.add("admin");
        roles.add("manager");
        roles.add("employee");
        info.addRoles(roles);

        //模拟从数据库中获取权限
        List<String> permissions = new ArrayList<>();
        permissions.add("aaa");
        permissions.add("bbb");
        info.addStringPermissions(permissions);


        return info;
    }

    @Override
    protected AuthenticationInfo doGetAuthenticationInfo(AuthenticationToken token) throws AuthenticationException {
        //用户输入的账号
        String account = (String)token.getPrincipal();
        //用户输入的密码
        //String password = new String((char[])token.getCredentials());
        //这是模拟从数据库中查询出来的密码
        String pwd ="a467b0ccf40fb5d371b5e6f2d6d7fe44";
        //模拟数据库中保存的盐
        String salt = "1991";
        //对用户身份进行校验
        return new SimpleAuthenticationInfo(account,pwd,ByteSource.Util.bytes(account+salt),getName());
    }

    private HashedCredentialsMatcher credentialsMatcher() {
        HashedCredentialsMatcher credentialsMatcher = new HashedCredentialsMatcher();
        credentialsMatcher.setHashAlgorithmName("md5");
        credentialsMatcher.setHashIterations(2);
        credentialsMatcher.setStoredCredentialsHexEncoded(true);
        return credentialsMatcher;
    }

}
2.2、测试使用
public class TestShiro {


    public static void main(String[] args) {

        //创建SecurityManager
        DefaultSecurityManager securityManager = new DefaultSecurityManager();

        /**设置身份认证器和验证策略,ModularRealmAuthenticator为shiro默认认证器
         * ModularRealmAuthenticator 默认使用 AtLeastOneSuccessfulStrategy 策略
         * FirstSuccessfulStrategy:只要有一个 Realm 验证成功即可,只返回第一个 Realm 身份验证 成功的认证信息,其他的忽略;
         * AtLeastOneSuccessfulStrategy:只要有一个 Realm 验证成功即可,和 FirstSuccessfulStrategy 不同,返回所有 Realm 身份验证成功的认证信息;
         * AllSuccessfulStrategy:所有 Realm 验证成功才算成功,且返回所有 Realm 身份验证成功的 认证信息,如果有一个失败就失败了
         */
        ModularRealmAuthenticator authenticator = new ModularRealmAuthenticator();
        authenticator.setAuthenticationStrategy(new AtLeastOneSuccessfulStrategy());
        securityManager.setAuthenticator(authenticator);

        //设置 authorizer授权
        ModularRealmAuthorizer authorizer = new ModularRealmAuthorizer();
        authorizer.setPermissionResolver(new WildcardPermissionResolver());
        securityManager.setAuthorizer(authorizer);

        //设置自己定义的realm
        securityManager.setRealm(new MyRealm());
        //将securityManager绑定到SecurityUtils
        SecurityUtils.setSecurityManager(securityManager);

        Subject subject = SecurityUtils.getSubject();
        UsernamePasswordToken token = new UsernamePasswordToken("kyle","1991");
        //设置记住我
        token.setRememberMe(true);
        try{
            //登录,进行身份验证
            subject.login(token);
            System.out.println("登录成功");
        }catch(AuthenticationException e){
            System.out.println("登录失败");
        }

        System.out.println(subject.hasRole("admin"));
        System.out.println(subject.hasRole("manager"));
        System.out.println(subject.hasRole("employee"));
        System.out.println(subject.hasRole("employee11"));

        System.out.println(subject.isPermitted("aaa"));
        System.out.println(subject.isPermitted("bbb"));

        //退出登录
        subject.logout();
    }

}
八、shiro和web集成
1、先引入jar包
dependency>
        <groupId>org.apache.shiro</groupId>
        <artifactId>shiro-web</artifactId>
        <version>1.4.0</version>
    </dependency>
    <dependency>
        <groupId>commons-logging</groupId>
        <artifactId>commons-logging</artifactId>
        <version>1.1.1</version>
    </dependency>
2、配置web.xml
  <listener>
    <listener-class>org.apache.shiro.web.env.EnvironmentLoaderListener</listener-class>
  </listener>

  <filter>
    <filter-name>iniShiroFilter</filter-name>
    <filter-class>org.apache.shiro.web.servlet.IniShiroFilter</filter-class>
    <init-param>
      <param-name>configPath</param-name>
      <param-value>classpath:shiro.ini</param-value>
    </init-param>
  </filter>
  <filter-mapping>
    <filter-name>iniShiroFilter</filter-name>
    <url-pattern>/*</url-pattern>
  </filter-mapping>
3.编写shiro.ini配置文件
[main]
#没有登录就跳转到index.html页面
authc.loginUrl=/index.html
#角色校验没有通过就跳转到rf.html页面
roles.unauthorizedUrl=/rf.html
#权限校验没有通过跳转到pf.html页面
perms.unauthorizedUrl=/pf.html


[users]
#配置用户名/密码及其角色,格式:“用户名=密码,角色 1,角色 2”,角色部分可省略。
kyle=19912,admin,employee,employee11

[roles]
#配置角色及权限之间的关系,格式:“角色=权限 1,权限 2”
admin=system:*:*,user
employee=role:delete

[urls]
#用于 web,提供了对 web url 拦截相关的配置,url=拦截器[参数],拦截器 ,拦截器按照顺序拦截,从上到下匹配。
/login=anon
/logout=logout
/getUserData=authc,roles[abcde]
/getDeptData=authc,perms["dept:get"]
/**=authc
4、编写java代码
@WebServlet("/login")
public class LoginController extends HttpServlet {
    private static final long serialVersionUID = 1L;

    protected void doGet(HttpServletRequest request, HttpServletResponse response) throws ServletException, IOException {
        String account = request.getParameter("account");
        String pwd = request.getParameter("pwd");
        Subject subject = SecurityUtils.getSubject();
        UsernamePasswordToken token = new UsernamePasswordToken(account,pwd);
        String result = null;
        try{
            subject.login(token);
            result = "登录成功";
        }catch(UnknownAccountException e){
            result = "账号或者密码错误";
        }catch(IncorrectCredentialsException e){
            result = "账号或者密码错误";
        }
        //response.getWriter().append("Served at: ").append(request.getContextPath());
        response.setCharacterEncoding("UTF-8");
        response.setContentType("text/html;charset=UTF-8");
        response.getWriter().append(result);
    }

    protected void doPost(HttpServletRequest request, HttpServletResponse response) throws ServletException, IOException {
        doGet(request, response);
    }

}
九、shiro拦截器的机制
1、Shiro 对 Servlet 容器的 FilterChain 进行了代理,即 ShiroFilter 在继续 Servlet 容器的 Filter 链的执行之前,通过 ProxiedFilterChain 对 Servlet 容器的 FilterChain 进行了代理。;Shiro 的 ProxiedFilterChain 执行流程:先执行 Shiro 自己的 Filter 链; 再执行 Servlet 容器的 Filter 链(即原始的 Filter)。
2、shiro中拦截器类型介绍:
2.1、OncePerRequestFilter :OncePerRequestFilter 用于防止多次执行 Filter 的;也就是说一次请求只会走一次拦截器链; 另外提供 enabled 属性,表示是否开启该拦截器实例,默认 enabled=true 表示开启,如果不 想让某个拦截器工作,可以设置为 false 即可。
2.2、AdviceFilter :AdviceFilter 提供了 AOP 风格的支持,类似于 SpringMVC 中的 Interceptor
2.3、PathMatchingFilter :提供了基于 Ant 风格的请求路径匹配功能及拦截器参数解析的功能,如 “roles[admin,user]”自动根据“,”分割解析到一个路径参数配置并绑定到相应的路径
2.4、AccessControlFilter :提供了访问控制的基础功能;比如是否允许访问/当访问拒绝时如何处理 等
3、自定义拦截器:通过自定义自己的拦截器可以扩展一些功能,诸如动态 url-角色/权限访问控制的实现、根 据 Subject 身份信息获取用户信息绑定到 Request(即设置通用数据)、验证码验证、在线 用户信息的保存等等,因为其本质就是一个 Filter;所以 Filter 能做的它就能做。如果要自定义拦截器只需要继承上面第二点提到的拦截器并实现其中的方法并在配置文件中使用该拦截器即可。
[filters]
myfilter=com.kyle.MyFilter

[urls]
/test=myfilter
10 、shiro的缓存机制
10.1、先引入jar包
        <dependency>
        <groupId>net.sf.ehcache</groupId>
        <artifactId>ehcache-core</artifactId>
        <version>2.6.11</version>
    </dependency>

    <dependency>
        <groupId>org.apache.shiro</groupId>
        <artifactId>shiro-ehcache</artifactId>
        <version>1.4.0</version>
    </dependency>
10.2、编写配置文件
<?xml version="1.0" encoding="UTF-8"?>
<ehcache xmlns:xsi="http://www.w3.org/2001/XMLSchema-instance"
        xsi:noNamespaceSchemaLocation="../config/ehcache.xsd">

    <!-- 溢出到磁盘的目录 -->
    <diskStore path="java.io.tmpdir"/>

 <!--
        name:缓存名称。
       maxElementsInMemory:缓存最大个数。
       eternal:对象是否永久有效,一但设置了,timeout将不起作用。
       timeToIdleSeconds:设置对象在失效前的允许闲置时间(单位:秒)。仅当eternal=false对象不是永久有效时使用,可选属性,默认值是0,也就是可闲置时间无穷大。
       timeToLiveSeconds:设置对象在失效前允许存活时间(单位:秒)。最大时间介于创建时间和失效时间之间。仅当eternal=false对象不是永久有效时使用,默认是0.,也就是对象存活时间无穷大。
       overflowToDisk:当内存中对象数量达到maxElementsInMemory时,Ehcache将会对象写到磁盘中。
       diskSpoolBufferSizeMB:这个参数设置DiskStore(磁盘缓存)的缓存区大小。默认是30MB。每个Cache都应该有自己的一个缓冲区。
       maxElementsOnDisk:硬盘最大缓存个数。
       diskPersistent:是否缓存虚拟机重启期数据 Whether the disk store persists between restarts of the Virtual Machine. The default value is false.
       diskExpiryThreadIntervalSeconds:磁盘失效线程运行时间间隔,默认是120秒。
       memoryStoreEvictionPolicy:当达到maxElementsInMemory限制时,Ehcache将会根据指定的策略去清理内存。默认策略是LRU(最近最少使用)。你可以设置为FIFO(先进先出)或是LFU(较少使用)。
       clearOnFlush:内存数量最大时是否清除。
  -->
  <defaultCache
          maxElementsInMemory="10000"
          eternal="false"
          timeToIdleSeconds="120"
          timeToLiveSeconds="120"
          overflowToDisk="true"
          maxElementsOnDisk="10000000"
          diskPersistent="false"
          diskExpiryThreadIntervalSeconds="120"
          memoryStoreEvictionPolicy="LRU"
          />
</ehcache>
10.3、编写CacheManager
public class MyShiroCacheManager extends EhCacheManager
{

    public MyShiroCacheManager()
    {
        setCacheManager(net.sf.ehcache.CacheManager.create());
    }
}
10.4、在shiro.ini中进行配置
[main]
authc.loginUrl=/index.html
roles.unauthorizedUrl=/rf.html
perms.unauthorizedUrl=/pf.html


myRealm=testShiro.MyRealm
#realm启用缓存
myRealm.cachingEnabled=true
#启用身份验证缓存,即缓存 AuthenticationInfo 信 息,默认 false
myRealm.authenticationCachingEnabled=true
#缓存 AuthenticationInfo 信息的缓存名称
myRealm.authenticationCacheName=authenticationCache
#启用授权缓存,即缓存 AuthorizationInfo 信息
myRealm.authorizationCachingEnabled=true
#缓存 AuthorizationInfo 信息的缓存名称
myRealm.authorizationCacheName=authorizationCache
securityManager.realms=$myRealm,$iniRealm

myShiroCacheManager=testShiro.MyShiroCacheManager
myShiroCacheManager.cacheManagerConfigFile=classpath:ehcache.xml
securityManager.cacheManager=$myShiroCacheManager

[users]
#配置用户名/密码及其角色,格式:“用户名=密码,角色 1,角色 2”,角色部分可省略。
kyle=1991,admin,employee,employee11

[roles]
#配置角色及权限之间的关系,格式:“角色=权限 1,权限 2”
admin=system:*:*,user
employee=role:delete

[urls]
#用于 web,提供了对 web url 拦截相关的配置,url=拦截器[参数],拦截器
/login=anon
/logout=logout
/getUserData=authc,roles[employee11]
/getUserData2=authc,roles[abcde]
/**=authc
11、shiro与spring整合
10.1、如果不需要整合到spring的框架中,直接就和普通的web项目一样组合在一起就行。
10.2、如果需要spring来帮忙进行对象的管理
10.2.1、引入jar包
<!-- 引入spring -->
    <dependency>
        <groupId>org.springframework</groupId>
        <artifactId>spring-webmvc</artifactId>
        <version>${spring.version}</version>
    </dependency>

    <!-- Spring context的扩展支持,用于MVC方面 -->
    <dependency>
        <groupId>org.springframework</groupId>
        <artifactId>spring-context-support</artifactId>
        <version>${spring.version}</version>
    </dependency>

    <!-- 引入springaop相关的jar包 -->
    <dependency>
        <groupId>org.springframework</groupId>
        <artifactId>spring-aop</artifactId>
        <version>${spring.version}</version>
    </dependency>

    <dependency>
        <groupId>org.aspectj</groupId>
        <artifactId>aspectjweaver</artifactId>
        <version>${aspectjweaver.version}</version>
    </dependency>

    <!-- shiro相关的jar包 -->
    <dependency>
        <groupId>org.apache.shiro</groupId>
        <artifactId>shiro-web</artifactId>
        <version>1.4.0</version>
    </dependency>
    <dependency>
        <groupId>commons-logging</groupId>
        <artifactId>commons-logging</artifactId>
        <version>1.1.1</version>
    </dependency>
    <dependency>
        <groupId>net.sf.ehcache</groupId>
        <artifactId>ehcache-core</artifactId>
        <version>2.6.11</version>
    </dependency>

    <dependency>
        <groupId>org.apache.shiro</groupId>
        <artifactId>shiro-ehcache</artifactId>
        <version>1.4.0</version>
    </dependency>

    <dependency>
        <groupId>org.apache.shiro</groupId>
        <artifactId>shiro-spring</artifactId>
        <version>1.4.0</version>
    </dependency>
10.2.2、spring-mvc.xml配置
<?xml version="1.0" encoding="UTF-8"?>
<beans xmlns="http://www.springframework.org/schema/beans"
    xmlns:xsi="http://www.w3.org/2001/XMLSchema-instance"
    xmlns:mvc="http://www.springframework.org/schema/mvc"
    xmlns:context="http://www.springframework.org/schema/context"
    xmlns:aop="http://www.springframework.org/schema/aop"
    xsi:schemaLocation="http://www.springframework.org/schema/beans
        http://www.springframework.org/schema/beans/spring-beans-4.0.xsd
        http://www.springframework.org/schema/context
        http://www.springframework.org/schema/context/spring-context-4.0.xsd
        http://www.springframework.org/schema/mvc
        http://www.springframework.org/schema/mvc/spring-mvc.xsd
        http://www.springframework.org/schema/aop
        http://www.springframework.org/schema/aop/spring-aop-4.0.xsd">


<!-- 开启注解扫描 -->
<mvc:annotation-driven />

<!-- 设置注解扫描的包 -->
<context:component-scan base-package="com.kyle.controller">
   <!-- 可以设置扫描哪些包或者注解 -->
   <context:include-filter type="annotation" expression="org.springframework.stereotype.Controller"/>
</context:component-scan>

<!-- 激活代理功能,实现全局日志,
之所以在这个配置文件中配置是因为springmvc的子容器能够获取父容器中的 对象,反过来却不行。
-->
<aop:aspectj-autoproxy/>


</beans>
10.2.3、spring-shiro.xml 配置
<?xml version="1.0" encoding="UTF-8"?>
<beans xmlns="http://www.springframework.org/schema/beans"
    xmlns:xsi="http://www.w3.org/2001/XMLSchema-instance"
    xmlns:mvc="http://www.springframework.org/schema/mvc"
    xmlns:context="http://www.springframework.org/schema/context"
    xmlns:aop="http://www.springframework.org/schema/aop"
    xsi:schemaLocation="http://www.springframework.org/schema/beans
        http://www.springframework.org/schema/beans/spring-beans-4.0.xsd
        http://www.springframework.org/schema/context
        http://www.springframework.org/schema/context/spring-context-4.0.xsd
        http://www.springframework.org/schema/mvc
        http://www.springframework.org/schema/mvc/spring-mvc.xsd
        http://www.springframework.org/schema/aop
        http://www.springframework.org/schema/aop/spring-aop-4.0.xsd">

<!-- 定义缓存管理器 -->
<bean id="cacheManager" class="org.apache.shiro.cache.ehcache.EhCacheManager">
    <property name="cacheManagerConfigFile" value="classpath:ehcache.xml"/>
</bean>

<!-- 定义realm -->
<bean id="myRealm" class="com.kyle.shiro.MyRealm">
    <property name="cachingEnabled" value="true"/>
    <property name="authenticationCachingEnabled" value="true"/>
    <property name="authenticationCacheName" value="authenticationCache"/>
    <property name="authorizationCachingEnabled" value="true"/>
    <property name="authorizationCacheName" value="authorizationCache"/>
</bean>

<!-- 安全管理器 -->
<bean id="securityManager" class="org.apache.shiro.web.mgt.DefaultWebSecurityManager">
    <property name="realms">
        <list><ref bean="myRealm"></ref></list>
    </property>
    <property name="cacheManager" ref="cacheManager"></property>
</bean>

<!-- 将 securityManager设置到SecurityUtils-->
<bean class="org.springframework.beans.factory.config.MethodInvokingFactoryBean">
    <property name="staticMethod"  value="org.apache.shiro.SecurityUtils.setSecurityManager"/>
    <property name="arguments" ref="securityManager"/>
</bean>


<bean id="lifecycleBeanPostProcessor"  class="org.apache.shiro.spring.LifecycleBeanPostProcessor"/>

<!-- 配置过滤器,可以不需要 -->
<bean id="shiroFilter" class="org.apache.shiro.spring.web.ShiroFilterFactoryBean">
    <property name="securityManager" ref="securityManager"/>
    <property name="loginUrl" value="/login/index"/>
    <property name="unauthorizedUrl" value="/login/index2"/>
    <property name="filterChainDefinitions">
        <value>
            /login/login = anon
            /login/logout = logout
            /user/get = authc,roles[manager1]
            /user/list = authc,roles[admin]
            /** = anon
        </value>
    </property>
</bean>

<!-- 开启注解权限需要有aop的支持 -->
<aop:config proxy-target-class="true"></aop:config>
<bean class=" org.apache.shiro.spring.security.interceptor.AuthorizationAttributeSourceAdvisor">
    <property name="securityManager" ref="securityManager"/>
</bean>


</beans>
10.2.4、web.xml配置
<?xml version="1.0" encoding="UTF-8"?>
<web-app version="3.0"
        xmlns="http://java.sun.com/xml/ns/javaee"
        xmlns:xsi="http://www.w3.org/2001/XMLSchema-instance"
        xsi:schemaLocation="http://java.sun.com/xml/ns/javaee http://java.sun.com/xml/ns/javaee/web-app_3_0.xsd">

  <display-name>Archetype Created Web Application</display-name>

    <servlet>
        <servlet-name>springDispatcherServlet</servlet-name>
        <servlet-class>org.springframework.web.servlet.DispatcherServlet</servlet-class>
        <init-param>
            <param-name>contextConfigLocation</param-name>
            <param-value>classpath:spring-mvc.xml</param-value>
        </init-param>
        <load-on-startup>1</load-on-startup>
    </servlet>

    <servlet-mapping>
        <servlet-name>springDispatcherServlet</servlet-name>
        <url-pattern>/</url-pattern>
    </servlet-mapping>

      <filter>
          <filter-name>shiroFilter</filter-name>
          <filter-class>org.springframework.web.filter.DelegatingFilterProxy</filter-class>
              <init-param>
                  <param-name>targetFilterLifecycle</param-name>
                  <param-value>true</param-value>
              </init-param>
          </filter>
      <filter-mapping>
          <filter-name>shiroFilter</filter-name>
          <url-pattern>/*</url-pattern>
      </filter-mapping>

    <context-param>
        <param-name>contextConfigLocation</param-name>
        <param-value>classpath:spring-shiro.xml</param-value>
    </context-param>

    <listener>
        <listener-class>org.springframework.web.context.ContextLoaderListener</listener-class>
    </listener>


</web-app>
10.2.5、权限注解
@RequiresAuthentication :表示当前 Subject 已经通过 login 进行了身份验证;即 Subject. isAuthenticated()返回 true
@RequiresUser :表示当前 Subject 已经身份验证或者通过记住我登录的
@RequiresGuest :表示当前 Subject 没有身份验证或通过记住我登录过,即是游客身份
@RequiresRoles(value={“admin”, “user”}, logical= Logical.AND):表示当前 Subject 需要角色 admin 和 user
@RequiresPermissions (value={“user:a”, “user:b”}, logical= Logical.OR) :表示当前 Subject 需要权限 user:a 或 user:b