一、Spring
1、Spring是什么?
(1)是一个开源框架,用于简化企业级开发。
(2)是一个轻量级的、非侵入性的、一站式的一个容器。
注:
非侵入性: 基于Spring开发的应用的对象可以不依赖Spring的API。
一站式: 可以整合其他的框架与第三方类库。
容器:包含并管理应用对象的生命周期。
(3)核心是IOC、 AOP。
注:
IOC: 反转控制,或者理解为DI,依赖注入。可以管理各层的组件。
AOP: 面向切面编程。用来管理事务、日志等。
2、IOC(Inversion of Control)、DI(Dependency Injection)
IOC,指的是反转控制,即反转资源获取的方向。一般情况下,资源查找方式为 组件向容器发送查找请求,容器响应后返回资源。使用反转控制后,容器主动将资源推送给组件,组件在需要的时候选择所需资源即可。
DI,指的是依赖注入,IOC的另一种表述形式。组件以预先定义好的形式去接收容器的资源注入(比如使用setter方法来接收值)。
3、未使用IOC前,创建实例对象
未使用IOC时,在需要用到某类的地方直接实例化(new)对象即可。
package com.hello;

class HelloWorld {
    private String name;

    public String getName() {
        return name;
    }

    public void setName(String name) {
        this.name = name;
    }

    @Override
    public String toString() {
        return "HelloWorld [name=" + name + "]";
    }
}

public class Demo {
    public static void main(String[] args) {
        HelloWorld helloWorld = new HelloWorld();
        helloWorld.setName("Tom");
        System.out.println(helloWorld); // 输出HelloWorld [name=Tom]
    }
}
4、使用IOC后,创建实例对象
使用IOC后,利用配置文件通过反射创建对象实例,并通过ApplicationContext获取对象。
注:
使用IOC功能需要导入Spring几个核心jar包。
(1)Beans : 包含访问配置文件、创建和管理bean以及进行(IOC/DI)操作相关的所有类。
(2)Core:包含Spring框架基本的核心工具类,Spring的其他组件要都要使用到这个包里的类,Core模块是其他组件的基本核心。
(3)Context :Spring的上下文,即IOC容器,通过上下文可以获得容器中的Bean(提供一种框架式的对象访问方式)。 ApplicationContext接口是Context模块的关键。
(4)SpEl : Expression Language模块提供了一个强大的表达式语言用于在运行时查询和操纵对象。
(5)commons-logging:日志jar包,也可选用log4j。
此处,我导入了(可以使用maven配置依赖信息):
spring-beans-4.3.14.RELEASE.jar
spring-context-4.3.14.RELEASE.jar
spring-core-4.3.14.RELEASE.jar
spring-expression-4.3.14.RELEASE.jar
commons-logging-1.2.jar
(6)IOC使用步骤:
step1:导入相关jar包(或者配置相关依赖信息),配置IOC环境。
step2:编写配置文件,一般命名为 applicationContext.xml,并在内部配置 bean 对象 。
step3:实例化applicationContext,并通过 getBean() 方法获取bean对象。
【applicationContext.xml,在配置文件中配置bean对象】
<?xml version="1.0" encoding="UTF-8"?>
<beans xmlns="http://www.springframework.org/schema/beans" xmlns:xsi="http://www.w3.org/2001/XMLSchema-instance"
    xmlns:context="http://www.springframework.org/schema/context" xmlns:util="http://www.springframework.org/schema/util"
    xmlns:jee="http://www.springframework.org/schema/jee" xmlns:tx="http://www.springframework.org/schema/tx"
    xmlns:jpa="http://www.springframework.org/schema/data/jpa" xmlns:mvc="http://www.springframework.org/schema/mvc"
    xsi:schemaLocation="
        http://www.springframework.org/schema/beans http://www.springframework.org/schema/beans/spring-beans-3.2.xsd
        http://www.springframework.org/schema/context http://www.springframework.org/schema/context/spring-context-3.2.xsd
        http://www.springframework.org/schema/util http://www.springframework.org/schema/util/spring-util-3.2.xsd
        http://www.springframework.org/schema/jee http://www.springframework.org/schema/jee/spring-jee-3.2.xsd
        http://www.springframework.org/schema/tx http://www.springframework.org/schema/tx/spring-tx-3.2.xsd
        http://www.springframework.org/schema/data/jpa http://www.springframework.org/schema/data/jpa/spring-jpa-1.3.xsd
        http://www.springframework.org/schema/mvc http://www.springframework.org/schema/mvc/spring-mvc-3.2.xsd">

      <!-- 配置bean对象,id为bean对象的唯一标识号, class为类路径-->
      <bean id="helloworld" class="com.hello.HelloWorld">
          <property name="name" value="Jarry"></property>
      </bean>
</beans>

【HelloWorld.java,类模板,通过反射生成的类】
package com.hello;

public class HelloWorld {
    private String name;

    public String getName() {
        return name;
    }

    public void setName(String name) {
        this.name = name;
    }

    @Override
    public String toString() {
        return "HelloWorld [name=" + name + "]";
    }
}

【Demo.java,测试类】
package com.hello;

import org.springframework.context.ApplicationContext;
import org.springframework.context.support.ClassPathXmlApplicationContext;

public class Demo {
    public static void main(String[] args) {
        // 创建IOC对象
        ApplicationContext applicationContext = new ClassPathXmlApplicationContext("applicationContext.xml");
        // 获取bean对象
        HelloWorld helloWorld = (HelloWorld) applicationContext.getBean("helloworld");
        System.out.println(helloWorld); // 输出 HelloWorld [name=Jarry]
    }
}
二、Bean对象的配置与使用
1、配置bean对象(常用方式)
在applicationContext.xml中配置 bean 标签,其中标签属性如下:
(1)class:bean的完整类名,通过反射的方式在 IOC 容器中创建一个Bean对象。
(2)id:唯一标识容器中的bean对象。
<!-- 配置bean对象,id为bean对象的唯一标识号, class为类路径-->
<bean id="helloworld" class="com.hello.HelloWorld">
</bean>
2、获取bean对象步骤
(1)创建Spring的IOC容器对象(ApplicationContext)。
注:
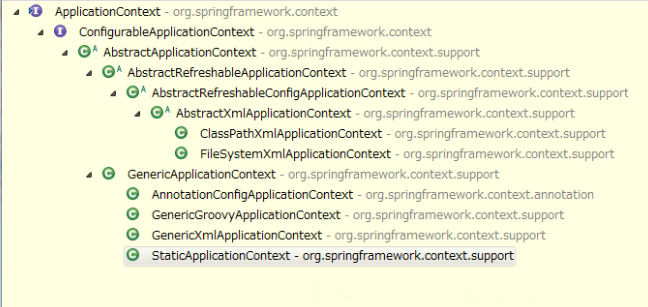
ApplicationContext是一个接口,其有一个子接口ConfigurableApplicationContext,增加了几个方法,比如refresh() 和 close() ,增加了功能,
其常用实现类:
ClassPathXmlApplicationContext : 从类路径下加载配置文件。
FileSystemXmlApplicationContext:从文件路径中加载配置文件。
ApplicationContext实例化时,会实例化所有的单例模式创建的bean。
(2)从IOC容器对象中获取Bean实例(getBean(id))
ApplicationContext applicationContext = new ClassPathXmlApplicationContext("applicationContext.xml");
HelloWorld helloWorld = (HelloWorld) applicationContext.getBean("helloworld");

HelloWorld helloWorld = applicationContext.getBean("helloworld", HelloWorld.class); // 推荐写法
三、信息注入
1、属性注入(最常用,setter注入)
属性注入指的是通过类的setter方法注入bean的属性值或者依赖的对象。
(1)注入常量值(比如String,int,double等)
在 <bean> 标签内部,通过<property> 标签注入信息。
<property>的属性如下:(类的内部必须存在相关setter方法,否则可能会报错)
name: 用于指定bean对象对应类中的属性名称。
value:用于指定属性值(常量值,比如String,int等)。
二者结合,自动匹配com.hello.HelloWorld 类的 setName()方法,并向其中赋值。
<bean id="helloworld" class="com.hello.HelloWorld">
     <property name="name" value="Jarry"></property>
</bean>

【HelloWorld.java】
package com.hello;

public class HelloWorld {
    private String name;

    public String getName() {
        return name;
    }

    public void setName(String name) {
        this.name = name;
    }

    @Override
    public String toString() {
        return "HelloWorld [name=" + name + "]";
    }
}
(2)注入对象(引用类型变量)
ref:用于指定bean对象(与配置文件中的bean形成引用关系)。
与name属性结合,可以注入bean对象(引用类型)。
【applicationContext.xml】
<?xml version="1.0" encoding="UTF-8"?>
<beans xmlns="http://www.springframework.org/schema/beans" xmlns:xsi="http://www.w3.org/2001/XMLSchema-instance"
    xmlns:context="http://www.springframework.org/schema/context" xmlns:util="http://www.springframework.org/schema/util"
    xmlns:jee="http://www.springframework.org/schema/jee" xmlns:tx="http://www.springframework.org/schema/tx"
    xmlns:jpa="http://www.springframework.org/schema/data/jpa" xmlns:mvc="http://www.springframework.org/schema/mvc"
    xsi:schemaLocation="
        http://www.springframework.org/schema/beans http://www.springframework.org/schema/beans/spring-beans-3.2.xsd
        http://www.springframework.org/schema/context http://www.springframework.org/schema/context/spring-context-3.2.xsd
        http://www.springframework.org/schema/util http://www.springframework.org/schema/util/spring-util-3.2.xsd
        http://www.springframework.org/schema/jee http://www.springframework.org/schema/jee/spring-jee-3.2.xsd
        http://www.springframework.org/schema/tx http://www.springframework.org/schema/tx/spring-tx-3.2.xsd
        http://www.springframework.org/schema/data/jpa http://www.springframework.org/schema/data/jpa/spring-jpa-1.3.xsd
        http://www.springframework.org/schema/mvc http://www.springframework.org/schema/mvc/spring-mvc-3.2.xsd">

      <!-- 配置bean对象,id为bean对象的唯一标识号, class为类路径-->
      <bean id="person" class="com.hello.Person">
          <property name="name" value="Tom"></property>
          <property name="age" value="18"></property>
      </bean>

      <!-- 使用ref属性,可以绑定 上述配置的bean 对象 -->
      <bean id="helloworld" class="com.hello.HelloWorld">
          <property name="name" value="Jarry"></property>
          <property name="person" ref="person"></property>
      </bean>
</beans>

【HelloWorld.java】
package com.hello;

public class HelloWorld {
    private String name;
    private Person person;

    public HelloWorld() {
    }

    public String getName() {
        return name;
    }

    public void setName(String name) {
        this.name = name;
    }

    public Person getPerson() {
        return person;
    }

    public void setPerson(Person person) {
        this.person = person;
    }

    @Override
    public String toString() {
        return "HelloWorld [name=" + name + ", person=" + person + "]";
    }

}

【Person.java】
package com.hello;

public class Person {
    private String name;
    private int age;

    public String getName() {
        return name;
    }

    public void setName(String name) {
        this.name = name;
    }

    public int getAge() {
        return age;
    }

    public void setAge(int age) {
        this.age = age;
    }

    @Override
    public String toString() {
        return "Person [name=" + name + ", age=" + age + "]";
    }
}

【Demo.java】
package com.hello;

import org.springframework.context.ApplicationContext;
import org.springframework.context.support.ClassPathXmlApplicationContext;

public class Demo {
    public static void main(String[] args) {
        ApplicationContext applicationContext = new ClassPathXmlApplicationContext("applicationContext.xml");
        HelloWorld helloWorld = (HelloWorld) applicationContext.getBean("helloworld");
        System.out.println(helloWorld); //输出 HelloWorld [name=Jarry, person=Person [name=Tom, age=18]]
    }
}
注:
可以使用 <ref>标签来实现 bean 的引用。
<!-- 配置bean对象,id为bean对象的唯一标识号, class为类路径-->
<bean id="person" class="com.hello.Person">
    <property name="name" value="Jom"></property>
    <property name="age" value="18"></property>
</bean>

<!-- 使用ref标签,可以绑定 上述配置的bean 对象 -->
<bean id="helloworld" class="com.hello.HelloWorld">
    <property name="name" value="Jarry"></property>
    <property name="person">
        <ref bean="person"></ref>
    </property>
</bean>
同时可以使用内部 bean,此时内部bean 不能被其他 bean 引用,只用于其外部 bean。
<!-- 使用内部bean, 不能被其他 外部bean 引用, 只用于此外部 bean, id号可省略-->
<bean id="helloworld" class="com.hello.HelloWorld">
    <property name="name" value="Jarry"></property>
    <property name="person">
      <bean class="com.hello.Person">
        <property name="name" value="Jom"></property>
        <property name="age" value="18"></property>
      </bean>
    </property>
</bean>
注:
级联赋值,可以给引用类型变量进行手动赋值。
级联(cascade)指的是 多个对象之间的映射关系,建立数据之间的级联关系提高管理效率。
<!-- 配置bean对象,id为bean对象的唯一标识号, class为类路径-->
<bean id="person" class="com.hello.Person">
    <property name="name" value="Jom"></property>
    <property name="age" value="18"></property>
</bean>

<!-- 使用级联赋值,可以给引用类型变量进行赋值-->
<bean id="helloworld" class="com.hello.HelloWorld">
    <property name="name" value="Jarry"></property>
    <property name="person" ref="person"></property> <!--此处不能少,先初始化,才能使用级联赋值-->
    <property name="person.name" value="Rick"></property>
    <property name="person.age" value="38"></property>
</bean>
(3)注入集合、数组。
注入集合。需使用<list> , <set>, <map>等标签,数组使用<list>标签赋值。且在标签内部 可以使用 <ref> 标签引用 bean对象,可以使用内部bean 来创建一个集合元素。使用<value>标签可以注入常量值(比如String,int等类型的数据)。
【HelloWorld.java】
package com.hello;

import java.util.List;

public class HelloWorld {
    private String name;

    private List<Person> personList;

    public HelloWorld() {
    }

    public String getName() {
        return name;
    }

    public void setName(String name) {
        this.name = name;
    }

    public List<Person> getPersonList() {
        return personList;
    }

    public void setPersonList(List<Person> personList) {
        this.personList = personList;
    }

    @Override
    public String toString() {
        return "HelloWorld [name=" + name + ", personList=" + personList + "]";
    }
}

【applicationContext.xml】
 <!-- 配置bean对象,id为bean对象的唯一标识号, class为类路径-->
<bean id="person" class="com.hello.Person">
    <property name="name" value="Jom"></property>
    <property name="age" value="18"></property>
</bean>

<bean id="person2" class="com.hello.Person">
    <property name="name" value="Tonny"></property>
    <property name="age" value="38"></property>
</bean>

<!-- 给集合赋值,使用<list>, <set> , <map>等标签-->
<bean id="helloworld" class="com.hello.HelloWorld">
    <property name="name" value="Jarry"></property>
    <property name="personList">
     <list>
        <!-- 使用 <ref> 标签注入bean -->
        <ref bean="person"></ref>
        <ref bean="person2"></ref>
        <!-- 使用内部bean创建集合元素 -->
        <bean class="com.hello.Person">
            <property name="name" value="Jack"></property>
            <property name="age" value="17"></property>
        </bean>
     </list>
    </property>
</bean>
注:
对于Map集合的注入,可以使用<map>标签与<entry>标签,其中<entry>是<map>的子标签,内部可以插入常量值(使用 key 与 value 属性插入) 以及 bean对象(使用key-ref 和 value-ref属性)。
也可以使用<props>与<prop>标签来注入map集合(不能注入bean对象,通常用于peoperties配置文件)。
【HelloWorld.java】
package com.hello;

import java.util.Map;

public class HelloWorld {
    private Map<String, Person> name;
    private Map<String, String> name2;

    public Map<String, Person> getName() {
        return name;
    }

    public void setName(Map<String, Person> name) {
        this.name = name;
    }

    public HelloWorld() {
    }

    public Map<String, String> getName2() {
        return name2;
    }

    public void setName2(Map<String, String> name2) {
        this.name2 = name2;
    }

    @Override
    public String toString() {
        return "HelloWorld [name=" + name + ", name2=" + name2 + "]";
    }

}

【applicationContext.xml】
<!-- 配置bean对象,id为bean对象的唯一标识号, class为类路径-->
<bean id="person" class="com.hello.Person">
    <property name="name" value="Jom"></property>
    <property name="age" value="18"></property>
</bean>

<bean id="person2" class="com.hello.Person">
    <property name="name" value="Tonny"></property>
    <property name="age" value="38"></property>
</bean>

<!-- 给集合赋值,使用<map>、<props>标签-->
<bean id="helloworld" class="com.hello.HelloWorld">
    <property name="name">
        <!-- 使用map标签,可以注入bean对象 -->
        <map>
            <entry key="Jom" value-ref="person"></entry>
            <entry key="Tonny" value-ref="person2"></entry>
        </map>
    </property>
    <property name="name2">
        <!-- 使用 props标签,不能注入bean对象 -->
        <props>
            <prop key="Jom">Jom</prop>
            <prop key="Tonny">Tonny</prop>
        </props>
    </property>
</bean>
注:
可以通过<util:list>将集合单独抽出来,当成bean对象来使用(其他bean 可以使用 ref来引用)。
此处由于使用的是<util>,若出错,可以联网试试。
<util:map id="someMap">
     <entry key="1001" value="java"></entry>
     <entry key="1002" value="android"></entry>
 </util:map>

 <property name="name2" ref="someMap"></property>
(4)spring表达式(SPEL)注入。
格式:
#{表达式}
#{id名.属性名} 或者#{id名.key}
若为list集合,
可以采用#{id名[index]}
注:
如果是某个实体类的属性,那么该属性必须存在(get属性)的方法。
<bean id="helloworld" class="com.hello.HelloWorld">
    <property name="name2">
        <!-- 使用 props标签,不能注入bean对象 -->
        <props>
            <prop key="Rick">#{person.name}</prop>
            <prop key="Jarry">#{person2.name}</prop>
        </props>
    </property>
</bean>
2、构造方法注入:
通过构造方法注入Bean 的属性值或者依赖的对象。原理类似于上述属性注入,此处简略一些重复的功能。
在<bean>标签内部,通过<constructor-arg>标签注入信息。
<constructor-arg>属性如下:
value:用于指定属性值。
index:用于指定赋值的参数位置。
type:用于匹配参数的类型。
三者结合,可以用来区分不同的构造方法。
<bean id="helloworld" class="com.hello.HelloWorld">
     <constructor-arg value="Tom" index="0"></constructor-arg>
     <constructor-arg value="18" index="1" type="int"></constructor-arg>
 </bean>

 <!-- 使用index可以指定赋值的参数位置,使用type可以匹配参数的类型,二者结合,可以用来区分不同的构造方法 -->
 <bean id="helloworld2" class="com.hello.HelloWorld">
     <constructor-arg value="Tom" index="0"></constructor-arg>
     <constructor-arg value="10000" index="1" type="double"></constructor-arg>
 </bean>


【HelloWorld.java】
package com.hello;

public class HelloWorld {
    private String name;
    private int age;
    private double salary;

    public HelloWorld(String name, int age) {
        this.name = name;
        this.age = age;
    }

    public HelloWorld(String name, double salary) {
        this.name = name;
        this.salary = salary;
    }

    @Override
    public String toString() {
        return "HelloWorld [name=" + name + ", age=" + age + ", salary=" + salary + "]";
    }
}
注:
对于value值,可以使用<value>标签的形式注入。
对于包含特殊字符的字符串,需使用<![CDATA[]]>来注入。
<bean id="helloworld2" class="com.hello.HelloWorld">
    <constructor-arg index="0">
             <!-- 注入 <Tom> 字符串 -->
        <value><![CDATA[<Tom>]]></value>
    </constructor-arg>
    <constructor-arg value="10000" index="1" type="double"></constructor-arg>
</bean>
注:
使用构造器也可以注入对象,原理同上述 ref 与 <ref>标签,此处不再赘述。
使用构造器也可以注入集合,原理同上述 <list>, <map>等标签,此处不再赘述。
3、自动注入(不常用)
IOC容器可以自动装配bean。上述两种形式中,都是自己手动配置(通过ref来配置bean)。
若想自动配置,可以使用<bean autowire="">, 其用于指定自动注入规则,其中 autowire 可以使用byType,byName,constructor,简化注入配置。
byType:根据类型自动匹配。若有两个及以上相同类型的bean,则匹配会出现异常。
byName:根据名称自动匹配。必须将bean的名称与属性名设置的完全相同,否则匹配不上。
constructor:通过构造器自动匹配,若存在多个构造器时,配置会很复杂,不推荐使用。
【HelloWorld.java】
package com.hello;

public class HelloWorld {
    private Person person1;
    private Person person2;

    public Person getPerson1() {
        return person1;
    }

    public void setPerson1(Person person1) {
        this.person1 = person1;
    }

    public Person getPerson2() {
        return person2;
    }

    public void setPerson2(Person person2) {
        this.person2 = person2;
    }

    @Override
    public String toString() {
        return "HelloWorld [person1=" + person1 + ", person2=" + person2 + "]";
    }

}

【applicationContext.xml】
<?xml version="1.0" encoding="UTF-8"?>
<beans xmlns="http://www.springframework.org/schema/beans" xmlns:xsi="http://www.w3.org/2001/XMLSchema-instance"
    xmlns:context="http://www.springframework.org/schema/context" xmlns:util="http://www.springframework.org/schema/util"
    xmlns:jee="http://www.springframework.org/schema/jee" xmlns:tx="http://www.springframework.org/schema/tx"
    xmlns:jpa="http://www.springframework.org/schema/data/jpa" xmlns:mvc="http://www.springframework.org/schema/mvc"
    xsi:schemaLocation="
        http://www.springframework.org/schema/beans http://www.springframework.org/schema/beans/spring-beans-3.2.xsd
        http://www.springframework.org/schema/context http://www.springframework.org/schema/context/spring-context-3.2.xsd
        http://www.springframework.org/schema/util http://www.springframework.org/schema/util/spring-util-3.2.xsd
        http://www.springframework.org/schema/jee http://www.springframework.org/schema/jee/spring-jee-3.2.xsd
        http://www.springframework.org/schema/tx http://www.springframework.org/schema/tx/spring-tx-3.2.xsd
        http://www.springframework.org/schema/data/jpa http://www.springframework.org/schema/data/jpa/spring-jpa-1.3.xsd
        http://www.springframework.org/schema/mvc http://www.springframework.org/schema/mvc/spring-mvc-3.2.xsd">

      <!-- 配置bean对象,id为bean对象的唯一标识号, class为类路径-->
      <bean id="person" class="com.hello.Person">
          <property name="name" value="Jom"></property>
          <property name="age" value="18"></property>
      </bean>

      <bean id="person2" class="com.hello.Person">
          <property name="name" value="Tonny"></property>
          <property name="age" value="38"></property>
      </bean>

      <!-- 根据名字匹配,若未匹配上,则赋值为null-->
      <bean id="helloworld" class="com.hello.HelloWorld" autowire="byName"></bean>
</beans>
此时由于,person不能与helloworld中的person1匹配,所以最后person1为null。
输出:
HelloWorld [person1=null, person2=Person [name=Tonny, age=38]]
此时若将autowire的值改为 byType,会报错,因为有两个相同类型的bean。
<bean id="helloworld" class="com.hello.HelloWorld" autowire="byType"></bean>
4、Bean间的关系(继承、依赖)
(1)继承:
一个bean的配置可以继承另一个bean的配置,即获取父bean的属性值。
在<bean>标签中,使用parent属性获取被继承的bean的id即可,可以继承父bean的大部分属性(比如abstract、autowire不会被继承)。
<!-- 配置bean对象,id为bean对象的唯一标识号, class为类路径-->
<bean id="person1" class="com.hello.Person">
    <property name="name" value="Jom"></property>
    <property name="age" value="18"></property>
</bean>

<!-- 配置bean时,可以继承另一个bean的配置,并添加其他修改 -->
<bean id="person2" parent="person1">
    <property name="age" value="38"></property>
</bean>

<bean id="helloworld" class="com.hello.HelloWorld">
    <property name="person1" ref="person1"></property>
    <property name="person2" ref="person2"></property>
</bean>
一个bean可以定义为抽象bean,使用abstract="true"。此时不能被IOC容器实例化,只能被继承。且此时抽象bean的class可以忽略(此时abstract="true"必须有),由子类实现class。
<!-- 配置bean对象,id为bean对象的唯一标识号, class为类路径-->
<bean id="person1" abstract="true">
    <property name="name" value="Jom"></property>
    <property name="age" value="18"></property>
</bean>

<!-- 配置bean时,可以继承另一个bean的配置,并添加其他修改 -->
<bean id="person2" class="com.hello.Person" parent="person1">
    <property name="age" value="38"></property>
</bean>

<bean id="helloworld" class="com.hello.HelloWorld">
    <property name="person1" ref="person1"></property>
    <property name="person2" ref="person2"></property>
</bean>
(2)依赖
一个bean可以依赖于其他bean(可以为多个)。此时需要被依赖的bean被实例化,才能实例化bean。若被依赖的bean没有被IOC容器实例化,会报错。
在<bean>标签中使用depends-on来指定被依赖的bean。
其中 多个bean间使用 “,” 隔开。
<!-- 配置bean对象,id为bean对象的唯一标识号, class为类路径-->
<bean id="person1" class="com.hello.Person">
    <property name="name" value="Jom"></property>
    <property name="age" value="18"></property>
</bean>

<!-- 配置bean时,可以继承另一个bean的配置,并添加其他修改 -->
<bean id="person2" parent="person1">
    <property name="age" value="38"></property>
</bean>

<bean id="helloworld" class="com.hello.HelloWorld" depends-on="person1, person2">
    <property name="person1" ref="person1"></property>
    <property name="person2" ref="person2"></property>
</bean>
四、Spring控制Bean对象(创建、销毁、初始化)
1、控制对象的创建方式(即其使用范围)。
在<bean>标签中由scope属性控制。scope有两个值singleton(默认值)和prototype。
比如:
<bean scope="singleton" id="s"></bean> //单例模式,该组件在Spring容器中只有一个bean对象。无论getBean("id")多少次,都是同一个对象。
<bean scope="prototype" id="p"></bean> //原型模式,该组件每次getBean("id")都会返回一个新的对象。
2、指定对象的初始化方法。
在<bean>标签中由init-method属性控制。
比如:
<bean init-method="init"></bean>, 其中init可以为任何方法名,但此方法必须存在。则创建对象后会自动调用 public void init(){} 方法,若没有此方法,会报错。
3、指定对象的销毁方法。
在<bean>标签中由destroy-method属性控制(调用某方法,类似init-method)。
4、控制单例对象的创建时机。
默认情况下,单例对象在Spring容器创建时同时实例化,并调用初始化方法(init-method属性存在的话)。可以使用<bean>标签的lazy-init="true"属性将创建时机推迟到getBean()方法调用时。
【Person.java】
package com.hello;

public class Person {
    private String name;
    private int age;

    public Person() {
        System.out.println("create...");
    }

    public String getName() {
        return name;
    }

    public void setName(String name) {
        this.name = name;
    }

    public int getAge() {
        return age;
    }

    public void setAge(int age) {
        this.age = age;
    }

    @Override
    public String toString() {
        return "Person [name=" + name + ", age=" + age + "]";
    }

    public void init() {
        System.out.println("init...");
    }

    public void destory() {
        System.out.println("destory...");
    }
}

【applicationContext.xml】
<?xml version="1.0" encoding="UTF-8"?>
<beans xmlns="http://www.springframework.org/schema/beans" xmlns:xsi="http://www.w3.org/2001/XMLSchema-instance"
    xmlns:context="http://www.springframework.org/schema/context" xmlns:util="http://www.springframework.org/schema/util"
    xmlns:jee="http://www.springframework.org/schema/jee" xmlns:tx="http://www.springframework.org/schema/tx"
    xmlns:jpa="http://www.springframework.org/schema/data/jpa" xmlns:mvc="http://www.springframework.org/schema/mvc"
    xsi:schemaLocation="
        http://www.springframework.org/schema/beans http://www.springframework.org/schema/beans/spring-beans-3.2.xsd
        http://www.springframework.org/schema/context http://www.springframework.org/schema/context/spring-context-3.2.xsd
        http://www.springframework.org/schema/util http://www.springframework.org/schema/util/spring-util-3.2.xsd
        http://www.springframework.org/schema/jee http://www.springframework.org/schema/jee/spring-jee-3.2.xsd
        http://www.springframework.org/schema/tx http://www.springframework.org/schema/tx/spring-tx-3.2.xsd
        http://www.springframework.org/schema/data/jpa http://www.springframework.org/schema/data/jpa/spring-jpa-1.3.xsd
        http://www.springframework.org/schema/mvc http://www.springframework.org/schema/mvc/spring-mvc-3.2.xsd">

      <!-- 配置bean对象,id为bean对象的唯一标识号, class为类路径-->
      <bean id="person" class="com.hello.Person" init-method="init" destroy-method="destory">
          <property name="name" value="Jom"></property>
          <property name="age" value="18"></property>
      </bean>
</beans>

【Demo.java】
package com.hello;

import org.springframework.context.support.AbstractApplicationContext;
import org.springframework.context.support.ClassPathXmlApplicationContext;

public class Demo {
    public static void main(String[] args) {
        AbstractApplicationContext applicationContext = new ClassPathXmlApplicationContext("applicationContext.xml");
        Person person = (Person) applicationContext.getBean("person"); // 获取bean对象
        System.out.println(person);
        Person person1 = (Person) applicationContext.getBean("person"); // 获取bean对象
        System.out.println(person1);
        System.out.println(person == person1); // 输出 true , 默认使用单例模式创建,即获取的是同一个bean对象
        applicationContext.close();// 这里已经销毁了bean实例
        Person person2 = (Person) applicationContext.getBean("person"); // 再次创建时,会报错
        System.out.println(person2);
    }
}
五、其余配置bean对象的方式
上述用的都是使用 全类名的方式实现bean对象的配置。还有其余的方式可以配置bean对象。
1、静态工厂方法配置bean
将对象的创建过程封装到静态方法中,当需要用到某对象时,直接从静态方法中获取。
(1)使用静态方法,并返回一个bean对象。
(2)配置<bean>,其有三个属性,
id为对象唯一标识号,
class为bean对象对应的类,
factory-method为静态方法。
其中可以使用<constructor-arg>向方法传递参数。
【Person.java】
package com.hello;

public class Person {
    private String name;
    private int age;

    public Person(String name, int age) {
        super();
        this.name = name;
        this.age = age;
    }

    public static Person getInstance(String name, int age) {
        return new Person(name, age);
    }

    @Override
    public String toString() {
        return "Person [name=" + name + ", age=" + age + "]";
    }
}

【applicationContext.xml】
<?xml version="1.0" encoding="UTF-8"?>
<beans xmlns="http://www.springframework.org/schema/beans" xmlns:xsi="http://www.w3.org/2001/XMLSchema-instance"
    xmlns:context="http://www.springframework.org/schema/context" xmlns:util="http://www.springframework.org/schema/util"
    xmlns:jee="http://www.springframework.org/schema/jee" xmlns:tx="http://www.springframework.org/schema/tx"
    xmlns:jpa="http://www.springframework.org/schema/data/jpa" xmlns:mvc="http://www.springframework.org/schema/mvc"
    xsi:schemaLocation="
        http://www.springframework.org/schema/beans http://www.springframework.org/schema/beans/spring-beans-3.2.xsd
        http://www.springframework.org/schema/context http://www.springframework.org/schema/context/spring-context-3.2.xsd
        http://www.springframework.org/schema/util http://www.springframework.org/schema/util/spring-util-3.2.xsd
        http://www.springframework.org/schema/jee http://www.springframework.org/schema/jee/spring-jee-3.2.xsd
        http://www.springframework.org/schema/tx http://www.springframework.org/schema/tx/spring-tx-3.2.xsd
        http://www.springframework.org/schema/data/jpa http://www.springframework.org/schema/data/jpa/spring-jpa-1.3.xsd
        http://www.springframework.org/schema/mvc http://www.springframework.org/schema/mvc/spring-mvc-3.2.xsd">

      <!-- 配置bean对象,id为bean对象的唯一标识号, class为类路径-->
      <bean id="person" class="com.hello.Person" factory-method="getInstance">
          <constructor-arg index="0" value="Tom"></constructor-arg>
          <constructor-arg index="1" value="20"></constructor-arg>
      </bean>
</beans>

【Demo.java】
package com.hello;

import org.springframework.context.ApplicationContext;
import org.springframework.context.support.ClassPathXmlApplicationContext;

public class Demo {
    public static void main(String[] args) {
        ApplicationContext applicationContext = new ClassPathXmlApplicationContext("applicationContext.xml");
        Person person = (Person) applicationContext.getBean("person"); // 获取bean对象
        System.out.println(person);  // 输出 Person [name=Tom, age=20]
    }
}
2、对象工厂方法配置bean
首先得实例化一个bean对象,再去调用bean对象的实例方法去返回一个bean对象。
(1)使用非静态(实例)方法,并返回一个bean对象。
(2)配置一个<bean>,用于实例化某对象。
(3)再配置一个<bean>,通过 factory-bean 来引用上个<bean>,并使用factory-method来选择方法。
【Person.java】
package com.hello;

public class Person {
    private String name;
    private int age;

    public Person() {
        super();
    }

    public Person(String name, int age) {
        super();
        this.name = name;
        this.age = age;
    }

    public Person getInstance(String name, int age) {
        return new Person(name, age);
    }

    @Override
    public String toString() {
        return "Person [name=" + name + ", age=" + age + "]";
    }
}

【applicationContext.xml】
<?xml version="1.0" encoding="UTF-8"?>
<beans xmlns="http://www.springframework.org/schema/beans" xmlns:xsi="http://www.w3.org/2001/XMLSchema-instance"
    xmlns:context="http://www.springframework.org/schema/context" xmlns:util="http://www.springframework.org/schema/util"
    xmlns:jee="http://www.springframework.org/schema/jee" xmlns:tx="http://www.springframework.org/schema/tx"
    xmlns:jpa="http://www.springframework.org/schema/data/jpa" xmlns:mvc="http://www.springframework.org/schema/mvc"
    xsi:schemaLocation="
        http://www.springframework.org/schema/beans http://www.springframework.org/schema/beans/spring-beans-3.2.xsd
        http://www.springframework.org/schema/context http://www.springframework.org/schema/context/spring-context-3.2.xsd
        http://www.springframework.org/schema/util http://www.springframework.org/schema/util/spring-util-3.2.xsd
        http://www.springframework.org/schema/jee http://www.springframework.org/schema/jee/spring-jee-3.2.xsd
        http://www.springframework.org/schema/tx http://www.springframework.org/schema/tx/spring-tx-3.2.xsd
        http://www.springframework.org/schema/data/jpa http://www.springframework.org/schema/data/jpa/spring-jpa-1.3.xsd
        http://www.springframework.org/schema/mvc http://www.springframework.org/schema/mvc/spring-mvc-3.2.xsd">

      <!-- 配置bean对象,id为bean对象的唯一标识号, class为类路径-->
      <bean id="people" class="com.hello.Person"></bean>

      <bean id="person" factory-bean="people" factory-method="getInstance">
          <constructor-arg index="0" value="Tom"></constructor-arg>
          <constructor-arg index="1" value="20"></constructor-arg>
      </bean>
</beans>

【Demo.java】
package com.hello;

import org.springframework.context.ApplicationContext;
import org.springframework.context.support.ClassPathXmlApplicationContext;

public class Demo {
    public static void main(String[] args) {
        ApplicationContext applicationContext = new ClassPathXmlApplicationContext("applicationContext.xml");
        Person person = (Person) applicationContext.getBean("person"); // 获取bean对象
        System.out.println(person);  // 输出 Person [name=Tom, age=20]
    }
}
3、使用FactoryBean的方式配置bean
(1)实现FactoryBean接口,并重写相关方法。
getObject() 用于返回一个对象。
isSingleton() 用于判断是否为单例模式。
(2)配置bean对象,其调用 getObject()方法返回bean对象。
【PersonFactory.java】
package com.hello;

import org.springframework.beans.factory.FactoryBean;

public class PersonFactory implements FactoryBean<Person> {

    private String name;
    private int age;

    public String getName() {
        return name;
    }

    public void setName(String name) {
        this.name = name;
    }

    public int getAge() {
        return age;
    }

    public void setAge(int age) {
        this.age = age;
    }

    /**
     * 返回一个对象
     */
    @Override
    public Person getObject() throws Exception {
        return new Person(name, age);
    }

    @Override
    public Class<Person> getObjectType() {
        return Person.class;
    }

    @Override
    public boolean isSingleton() {
        return true;
    }
}

【applicationContext.xml】
<?xml version="1.0" encoding="UTF-8"?>
<beans xmlns="http://www.springframework.org/schema/beans" xmlns:xsi="http://www.w3.org/2001/XMLSchema-instance"
    xmlns:context="http://www.springframework.org/schema/context" xmlns:util="http://www.springframework.org/schema/util"
    xmlns:jee="http://www.springframework.org/schema/jee" xmlns:tx="http://www.springframework.org/schema/tx"
    xmlns:jpa="http://www.springframework.org/schema/data/jpa" xmlns:mvc="http://www.springframework.org/schema/mvc"
    xsi:schemaLocation="
        http://www.springframework.org/schema/beans http://www.springframework.org/schema/beans/spring-beans-3.2.xsd
        http://www.springframework.org/schema/context http://www.springframework.org/schema/context/spring-context-3.2.xsd
        http://www.springframework.org/schema/util http://www.springframework.org/schema/util/spring-util-3.2.xsd
        http://www.springframework.org/schema/jee http://www.springframework.org/schema/jee/spring-jee-3.2.xsd
        http://www.springframework.org/schema/tx http://www.springframework.org/schema/tx/spring-tx-3.2.xsd
        http://www.springframework.org/schema/data/jpa http://www.springframework.org/schema/data/jpa/spring-jpa-1.3.xsd
        http://www.springframework.org/schema/mvc http://www.springframework.org/schema/mvc/spring-mvc-3.2.xsd">

      <!-- 配置bean对象,id为bean对象的唯一标识号, class为类路径-->
      <bean id="person" class="com.hello.PersonFactory">
          <property name="name" value="Jarry"></property>
          <property name="age" value="20"></property>
      </bean>
</beans>

【Demo.java】
package com.hello;

import org.springframework.context.ApplicationContext;
import org.springframework.context.support.ClassPathXmlApplicationContext;

public class Demo {
    public static void main(String[] args) {
        ApplicationContext applicationContext = new ClassPathXmlApplicationContext("applicationContext.xml");
        Person person = (Person) applicationContext.getBean("person"); // 获取bean对象
        System.out.println(person);  // 输出 Person [name=Jarry, age=20]
    }
}