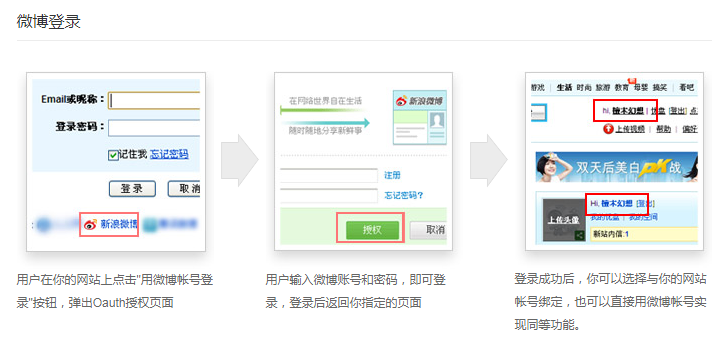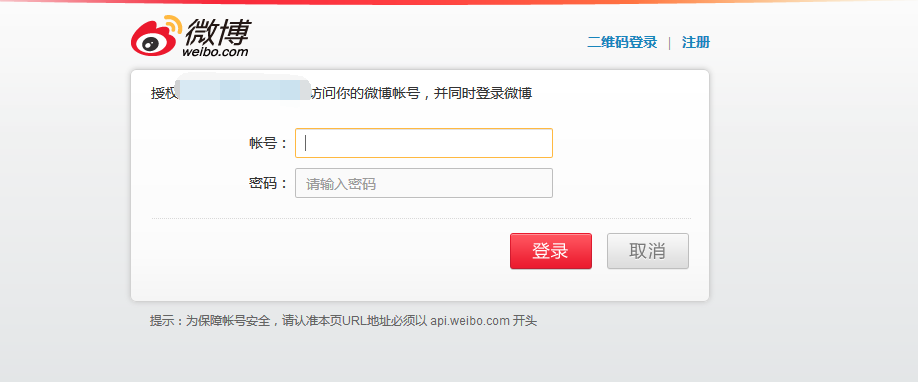
为了吸纳用户、提高网站的用户体验性,现在很多网站都采取第三方登陆,比较常用的就是微信、QQ、微博了,接下来我来分享一下微博登陆接入的过程:
开发文档:http://open.weibo.com/wiki/%E6%8E%88%E6%9D%83%E6%9C%BA%E5%88%B6
开发步骤:
1、通过新浪微博的开放平台去注册一个应用。
之后你会得到一个App Key和一个App Secret。拥有它们,你才可以申请权限。

2、在高级信息中编辑授权回调页,这里与后面代码里的回调地址要一致

3、 微博登录标识的地址如下:
https://api.weibo.com/oauth2/authorize?client_id=YOUR_CLIENT_ID&response_type=code&redirect_uri=YOUR_REGISTERED_REDIRECT_URI
参数
|
|
必选 |
类型及范围 |
说明 |
|---|---|---|---|
|
client_id |
true |
string |
申请应用时分配的AppKey。 |
|
redirect_uri |
true |
string |
授权回调地址,站外应用需与设置的回调地址一致,站内应用需填写canvas page的地址。 |
|
response_type |
false |
string |
code |
返回值
|
返回值字段 |
字段类型 |
字段说明 |
|---|---|---|
|
code |
string |
用于第二步调用oauth2/access_token接口,获取授权后的access token。 |
|
state |
string |
如果传递参数,会回传该参数。 |
4、如果用户同意授权,页面跳转至 YOUR_REGISTERED_REDIRECT_URI/?code=CODE

示例:
http://www.xxxxx.com/callback.php?code=1f5848d0562f39fbbaf8d35cbc853ea3
5、get获取code值,用CURL方式请求Access Token
请求地址:
https://api.weibo.com/oauth2/access_token?client_id=YOUR_CLIENT_ID&client_secret=YOUR_CLIENT_SECRET&grant_type=authorization_code&redirect_uri=YOUR_REGISTERED_REDIRECT_URI&code=CODE
请求方式:
POST
请求参数:
|
|
必选 |
类型及范围 |
说明 |
|---|---|---|---|
|
client_id |
true |
string |
申请应用时分配的AppKey。 |
|
client_secret |
true |
string |
申请应用时分配的AppSecret。 |
|
grant_type |
true |
string |
请求的类型,填写authorization_code |
|
code |
ture |
string |
调用authorize获得的code值。 |
|
rediect_url |
ture |
string |
回调地址,需需与注册应用里的回调地址一致。 |
返回值
{
    "access_token": "SlAV32hkKG",
    "remind_in": 3600,
    "expires_in": 3600,
    "uid":1887188234
}
6、使用获得的Access Token和uid调用API
获取用户信息API:
https://api.weibo.com/2/users/show.json
请求参数:
|
|
必选 |
类型及范围 |
说明 |
|---|---|---|---|
|
access_token |
true |
string |
采用OAuth授权方式为必填参数,OAuth授权后获得。 |
|
uid |
false |
int64 |
需要查询的用户ID。 |
|
screen_name |
false |
string |
需要查询的用户昵称。 |
参数uid与screen_name二者必选其一,且只能选其一;
返回示例:
{
  "id": 1404376560,
    "screen_name": "zaku",
    "name": "zaku",
    "province": "11",
    "city": "5",
    "location": "北京 朝阳区",
    "description": "人生五十年,乃如梦如幻;有生斯有死,壮士复何憾。",
    "url": "http://blog.sina.com.cn/zaku",
    "profile_image_url": "http://tp1.sinaimg.cn/1404376560/50/0/1",
    "domain": "zaku",
    "gender": "m",
    "followers_count": 1204,
    "friends_count": 447,
    "statuses_count": 2908,
    "favourites_count": 0,
    "created_at": "Fri Aug 28 00:00:00 +0800 2009",
    "following": false,
    "allow_all_act_msg": false,
    "geo_enabled": true,
    "verified": false,
    "status": {
        "created_at": "Tue May 24 18:04:53 +0800 2011",
        "id": 11142488790,
        "text": "我的相机到了。",
        "source": "<a href="http://weibo.com" rel="nofollow">新浪微博</a>",
        "favorited": false,
        "truncated": false,
        "in_reply_to_status_id": "",
        "in_reply_to_user_id": "",
        "in_reply_to_screen_name": "",
        "geo": null,
        "mid": "5610221544300749636",
        "annotations": [],
        "reposts_count": 5,
        "comments_count": 8
    },
    "allow_all_comment": true,
    "avatar_large": "http://tp1.sinaimg.cn/1404376560/180/0/1",
    "verified_reason": "",
    "follow_me": false,
    "online_status": 0,
    "bi_followers_count": 215
}
返回值:
|
返回值字段 |
字段类型 |
字段说明 |
|---|---|---|
|
id |
int64 |
用户UID |
|
idstr |
string |
字符串型的用户UID |
|
screen_name |
string |
用户昵称 |
|
name |
string |
友好显示名称 |
|
province |
int |
用户所在省级ID |
|
city |
int |
用户所在城市ID |
|
location |
string |
用户所在地 |
|
description |
string |
用户个人描述 |
|
url |
string |
用户博客地址 |
|
profile_image_url |
string |
用户头像地址(中图),50×50像素 |
|
profile_url |
string |
用户的微博统一URL地址 |
|
domain |
string |
用户的个性化域名 |
|
weihao |
string |
用户的微号 |
|
gender |
string |
性别,m:男、f:女、n:未知 |
|
followers_count |
int |
粉丝数 |
|
friends_count |
int |
关注数 |
|
statuses_count |
int |
微博数 |
|
favourites_count |
int |
收藏数 |
|
created_at |
string |
用户创建(注册)时间 |
|
following |
boolean |
暂未支持 |
|
allow_all_act_msg |
boolean |
是否允许所有人给我发私信,true:是,false:否 |
|
geo_enabled |
boolean |
是否允许标识用户的地理位置,true:是,false:否 |
|
verified |
boolean |
是否是微博认证用户,即加V用户,true:是,false:否 |
|
verified_type |
int |
暂未支持 |
|
remark |
string |
用户备注信息,只有在查询用户关系时才返回此字段 |
|
status |
object |
用户的最近一条微博信息字段 详细 |
|
allow_all_comment |
boolean |
是否允许所有人对我的微博进行评论,true:是,false:否 |
|
avatar_large |
string |
用户头像地址(大图),180×180像素 |
|
avatar_hd |
string |
用户头像地址(高清),高清头像原图 |
|
verified_reason |
string |
认证原因 |
|
follow_me |
boolean |
该用户是否关注当前登录用户,true:是,false:否 |
|
online_status |
int |
用户的在线状态,0:不在线、1:在线 |
|
bi_followers_count |
int |
用户的互粉数 |
|
lang |
string |
用户当前的语言版本,zh-cn:简体中文,zh-tw:繁体中文,en:英语 |

如图,此时就可以获取想要的用户信息(用户昵称、头像等),可让用户直接登录访问网站了
其实像微信登陆、QQ登陆的原理都一样,都是:
1、获取用户授权,取得code
2、将code发送到授权服务器获取Access Token
3、通过Access Token调取API接口获取用户信息