同样的,在使用pytest进行自动化测试时,需要将实时日志打印出来,而不是跑完后才在报告中出结果。
不过,好在pytest在3.3版本开始,就支持这一功能了,而不用再像nose一样,再去装第三方插件。
网上也有相关实时的日志输入说明,但我尝试后,不是我想要的,比如:pytest输出Log
看看我们下面这样一段代码,以unittest模式写的:
#coding:utf-8
'''
Created on 2017年8月31日
@author: huzq
'''

from __future__ import print_function
import pytest
from unittest import TestCase
from selenium import webdriver
import logging,sys


log = logging.getLogger(__name__)


class TestClass(TestCase):

    @classmethod
    def setUpClass(cls):
        log.info('setup_class()')
        cls.driver = webdriver.Firefox()
        cls.driver.get("http://www.baidu.com")
        log.info("xxxxxxxxxxxxxxx")

    @classmethod
    def teardown_class(cls):

        log.info('teardown_class()')


    def setUp(self):
        log.info('
setup_method()')
        self.addCleanup(self.screen_shot)

    def screen_shot(self):
        log.info("yyyyyyyyyyyyyy")
        log.info("sereen_shot")

    def qqq(self):
        log.info("xxxxxxxxxxxqqqq")
        assert 4==5


    #def teardown_method(self, method):
    def tearDown(self):
        log.info("ffjiafuiodafdfj___teardown")

    @pytest.mark.slow
    def test_7(self):
        import time
        time.sleep(10)
        log.info('- test_7()')

    @pytest.mark.qq
    def test_4(self):
        import pdb;pdb.set_trace()
        self.result=self.addCleanup(self.qqq)
        log.info('- test_4()')


    def test_5(self):
        log.info('- test_4()')
        assert 4==5
如果没有加日志实时输出会是怎么样的,如下:
可以看出,日志在过程中没有实时输出,在实际跑项目录,这个有点不太好看。
解决:
看看pytest是怎么解决的呢。
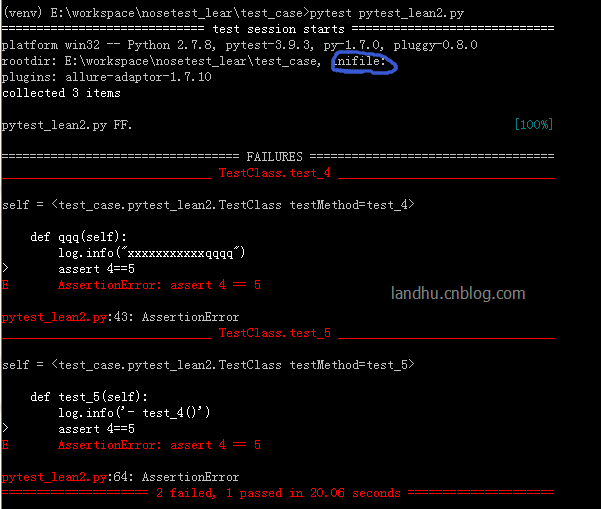
首先pytest是从pytest.ini中读取log_cli配置的,默认是关闭的。如上图中显示,我们的pytest.ini文件是空的
再看看pytest -h文件:
关于log的help有以下:


 --no-print-logs       disable printing caught logs on failed tests.
 --log-level=LOG_LEVEL
                       logging level used by the logging module
 --log-format=LOG_FORMAT
                       log format as used by the logging module.
 --log-date-format=LOG_DATE_FORMAT
                       log date format as used by the logging module.
 --log-cli-level=LOG_CLI_LEVEL
                       cli logging level.
 --log-cli-format=LOG_CLI_FORMAT
                       log format as used by the logging module.
 --log-cli-date-format=LOG_CLI_DATE_FORMAT
                       log date format as used by the logging module.
 --log-file=LOG_FILE   path to a file when logging will be written to.
 --log-file-level=LOG_FILE_LEVEL
                       log file logging level.
 --log-file-format=LOG_FILE_FORMAT
                       log format as used by the logging module.
 --log-file-date-format=LOG_FILE_DATE_FORMAT
                       log date format as used by the logging module.
然后你还会发现一行:
[pytest] ini-options in the first pytest.ini|tox.ini|setup.cfg file found:
所以,有两种方法解决
1) 在当前文件夹下写pytest.ini或tox.ini或setup.cfg文件,然后将日志相关写在里面,如下:
[pytest]
log_cli = 1
log_cli_level = INFO
log_cli_format = %(asctime)s [%(levelname)8s] %(message)s (%(filename)s:%(lineno)s)
log_cli_date_format=%Y-%m-%d %H:%M:%S
这时就可以正常打印日志出来。
2) 直接用pytest -o方式重写,这个功能在pytest 3.4之后才实现,如下
pytest pytest_lean2.py -o log_cli=true -o log_cli_level=INFO
结果如下:

update更新下:
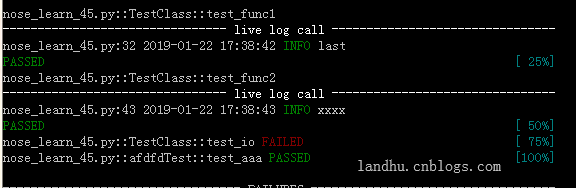
实际在项目过程中,实时日志需要时间及文件名还有行号,可在后面加这样的参数:
-vv -o log_cli=true -o log_cli_level=INFO --log-date-format="%Y-%m-%d %H:%M:%S" --log-format="%(filename)s:%(lineno)s %(asctime)s %(levelname)s %(message)s"
结果就会像下面这样