1、PXE和kickstart介绍
1.1 什么是PXE
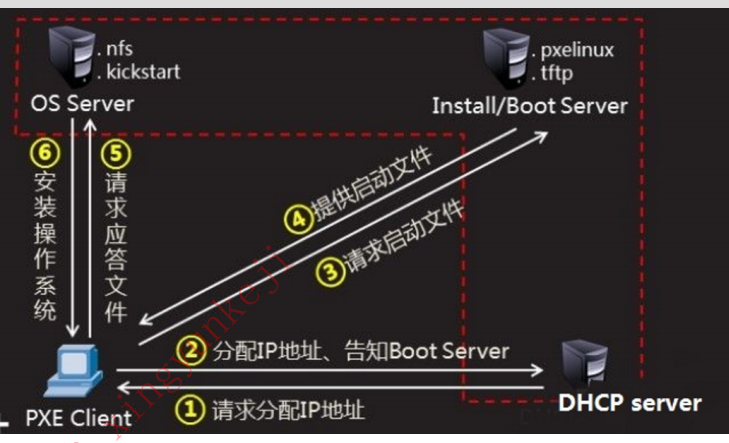
PXE:一种引导方式,进行 PXE 安装的必要条件是要安装的计算机中包含一个 PXE 支持的网卡(NIC) 即网卡中必须要有 PXE Client。PXE (Pre-boot Execution Environment)协议使计算机可以通过网络启动。
协议分为client和server端,PXE client在网卡的ROM中,当计算机引导时,BIOS把PXE client调入内存执行,由PXE client将放置在远端的文件通过网络下载到本地运行。运行工PXE协议需要设置DHCP服务器和TFTP服务器。DHCP服务器用来给PXE client(将要安装系统的主机)分配一个IP地址,由于是给PXE client分配IP地址,所以在配置DHCP服务器时需要增加相应的PXE设置。此外,在PXE client的ROM中,已经存在了TFTP Client。PXE Client通过TFTP协议到Server上下载所需要的文件。
1.2 什么是kickstart
kickstart是一种无人值守安装方式。Kickstart的工作原理是通过记录典型的安装过程中所需要人工干预填写的各种参数,并生成一个名为ks.cfg的文件;在其后的安装过程中(不只局限于生成Kickstart安装文件的机器),当出现要求填写参数的情况时,安装程序会首先查找Kickstart生成的文件,当找到合适的参数时,就采用找到的参数,当没有找到合适的参数时,才需要安装者手工干预。
2、安装配置kickstart
PXE安装流程
环境准备
| 节点信息 | 备注 |
| server | 192.168.253.131 gw:192.168.253.2 |
| client | 被安装机器 |
• DHCP 服务器用来给客户机分配IP;

• TFTP 服务器用来存放PXE的相关文件,比如:系统引导文件;

• FTP 服务器用来存放系统安装文件;

• KickStart所生成的ks.cfg配置文件;

• 带有一个 PXE 支持网卡的将安装的主机;
2.1初始化环境
关闭防火墙
systemctl stop firewalld
systemctl enable firewalld

关闭selinux
sed -i.bak "s/SELINUX=enforcing/SELINUX=disabled/g" /etc/selinux/config
setenforce 0
2.2安装配置DHCP服务
[root@m01 ~]# yum -y install dhcp
[root@m01 ~]# rpm -ql dhcp |grep "dhcpd.conf"
/etc/dhcp/dhcpd.conf
/usr/share/doc/dhcp-4.1.1/dhcpd-conf-to-ldap
/usr/share/doc/dhcp-4.1.1/dhcpd.conf.sample
/usr/share/man/man5/dhcpd.conf.5.gz

cp /usr/share/doc/dhcp-4.2.5/dhcpd.conf.example /etc/dhcp/dhcpd.conf
vim /etc/dhcpd/dhcpd.conf
[root@localhost ~]# cat /etc/dhcp/dhcpd.conf
#
# DHCP Server Configuration file.
# see /usr/share/doc/dhcp*/dhcpd.conf.example
# see dhcpd.conf(5) man page
#
subnet 192.168.253.0 netmask 255.255.255.0 {
option routers 192.168.253.2; #网关地址
option domain-name-servers 192.168.253.100;#设置给客户端DNS地址
range 192.168.253.100 192.168.253.200; #可分配IP范围
option subnet-mask 255.255.255.0;#设置netmask
default-lease-time 21600;#设置默认IP租用期限
max-lease-time 43200;#设置最大IP租用期限
next-server 192.168.253.131; #告知客户点TFTP服务器ip
filename "pxelinux.0"; #告知客户端从TFTP根目录下载pxelinux.0文件
}
[root@localhost ~]#systemctl start dhcpd
[root@localhost ~]#systemctl enable dhcpd
2.2配置TFTP服务
# yum -y install syslinux xinetd tftp-server

vim /etc/xinetd.d/tftp
# default: off
# description: The tftp server serves files using the trivial file transfer
#       protocol.  The tftp protocol is often used to boot diskless
#       workstations, download configuration files to network-aware printers,
#       and to start the installation process for some operating systems.
service tftp
{
        socket_type             = dgram
        protocol                = udp
        wait                    = yes
        user                    = root
        server                  = /usr/sbin/in.tftpd
        server_args             = -s /var/lib/tftpboot
        disable                 = no #设置为启动
        per_source              = 11
        cps                     = 100 2
        flags                   = IPv4
}

# systemctl restart xinetd
# systemctl enable xinetd

将pxelinux.0拷贝到/var/lib/tftpboot/
# cp /usr/share/syslinux/pxelinux.0 /var/lib/tftpboot/

mkdir /var/lib/tftpboot/centos7
2.3 配置FTP服务
创建一个目录存放centos7镜像,把对应镜像放进去
mkdir /iso

创建centos7的目录,可以创建多个,以挂载不同的镜像
mkdir /var/tfp/centos7

把目录挂载到ftp根目录下
mount -o loop -t iso9660 /iso/CentOS-7-x86_64-Minimal-1708.iso /var/ftp/centos7

cd /var/ftp/centos7/isolinux/
cp vesamenu.c32 /var/lib/tftpboot/
cp vmkinuz /var/lib/tftpboot/centos7
cp initrd.img /var/lib/tftpboot/centos7

mkdir pxelinux.cfg
cp isolinux.cfg /var/lib/tftpboot/centos7/pxelinux.cfg/default
chmod 644 /var/lib/tftpboot/pxelinux.cfg/default
vim  /var/lib/tftpboot/pxelinux.cfg/default
default vesamenu.c32
timeout 60display boot.msg
# Clear the screen when exiting the menu, instead of leaving the menu displayed.
# For vesamenu, this means the graphical background is still displayed without
# the menu itself for as long as the screen remains in graphics mode.
menu clear
menu background splash.png #菜单背景图片
menu title CentOS 7
menu vshift 8
menu rows 18
menu margin 8
menu helpmsgrow 15
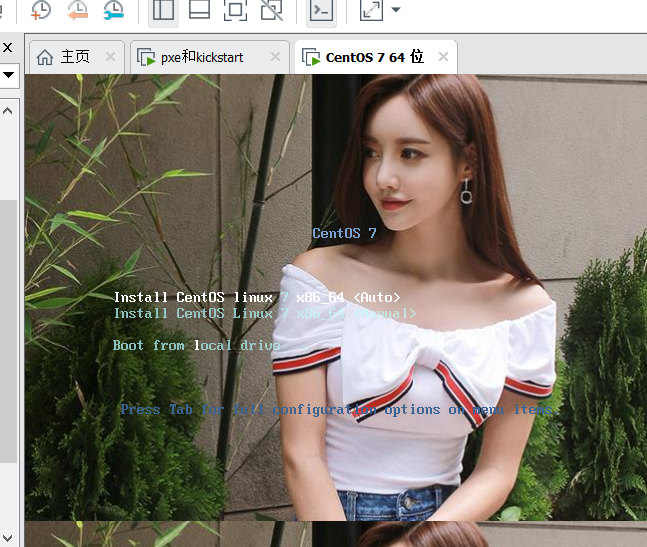
menu tabmsgrow 13label centos7 64 <Auto Installation>
menu label Install CentOS linux ^7 x86_64 <Auto>
kernel centos7/vmlinuz
append initrd=centos7/initrd.img inst.stage2=ftp://192.168.253.131/centos7 inst.repo=ftp://192.168.253.131/centos7 inst.ks=ftp://192.168.253.131/centos-7-ks.cfglabel centos7 64 <Manual Installation>
menu label Install CentOS Linux ^7 x86_64 <Manual>
kernel centos7/vmlinuz
append initrd=centos7u4/initrd.img inst.stage2=ftp://192.168.253.131/centos7menu separator # insert an empty line
label local
menu label Boot from ^local drive
localboot 0xffffmenu end
创建自动应答文件
yum -y install system-config-kickstart
yum -y install xorg-x11-xauth

system-config-kickstart
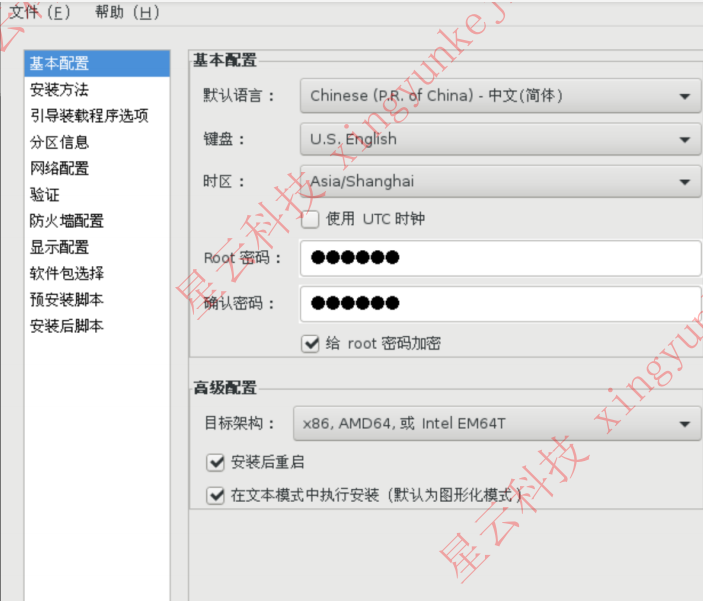


保存路径选择root下
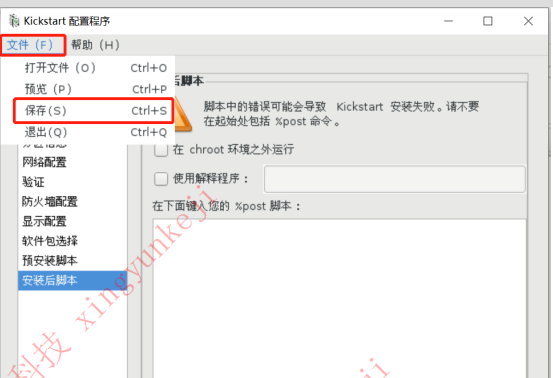
vim ks.cfg
#platform=x86, AMD64, or Intel EM64T
#version=DEVEL
# Install OS instead of upgrade
install
# Keyboard layouts
keyboard 'us'
# Root password
rootpw --iscrypted $1$scD1AAy6$SpSzY1aT49qvr5W/5o8Ze1
# System language
lang zh_CN
# System authorization information
auth --useshadow --passalgo=sha512
# Use text mode install
text
# SELinux configuration
selinux --disabled
# Do not configure the X Window System
skipx
# Firewall configuration
firewall --disabled
# Reboot after installation
reboot
# System timezone
timezone Asia/Shanghai
# Use network installation
url --url="ftp://192.168.253.131/centos7"
# System bootloader configuration
bootloader --location=mbr
# Clear the Master Boot Record
zerombr
# Partition clearing information
clearpart --all --initlabel
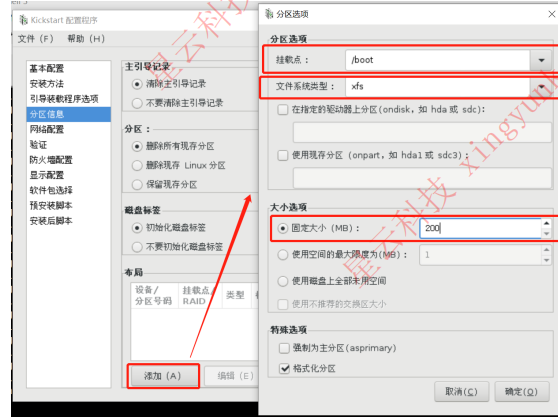
# Disk partitioning information
part /boot --fstype="xfs" --size=200
part swap --fstype="swap" --size=1000
part / --fstype="xfs" --grow --size=1
#下面的内容为手动添加编写内容,%package开始,%end结尾,中间是需要安装的软件包或者软件包组的名称,这里安装了core和base
%packages
@base
@core
%end
检查又无语法错误
ksvalidator ks.cfg
将ks文件移动到/var/lib/tftp下,根据default文件,修改文件名
mv ks.cfg /var/ftp/centos-7-ks.cfg
重启FTP
systemctl start vsftpd
systemctl enable vsftpd
3、测试
新创建一个虚拟机


这样就成功了!!