版权声明:本文为博主原创文章,遵循 CC 4.0 BY-SA 版权协议,转载请附上原文出处链接和本声明。
本文链接:https://blog.csdn.net/u013517797/article/details/79778241
了解了RabbitMQ的基本知识和几大队列模式,以及Spring-Rabbit开源工程的基本原理后,我们动手来实现在实际工作开发中需要与SSM框架结合使用的工程场景。
该场景模拟以下活动:
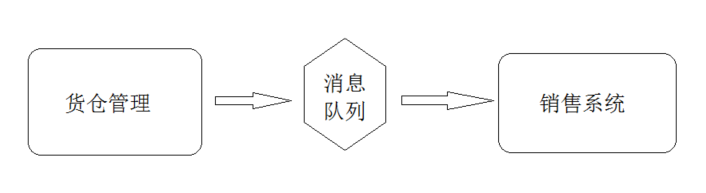
货仓管理系统用于对货物的管理,它的每一次进货(insert)和修改(update)、删除(delete)都会向消息中间件推送消息,而销售系统会从消息中间件中获取货物的信息,同步至销售系统的数据库。
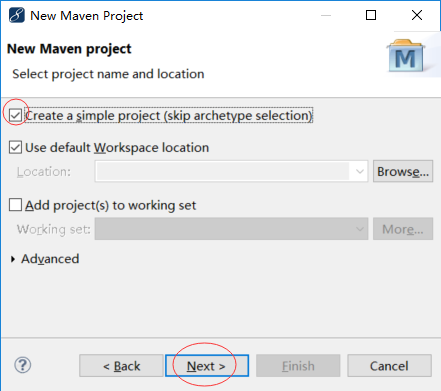
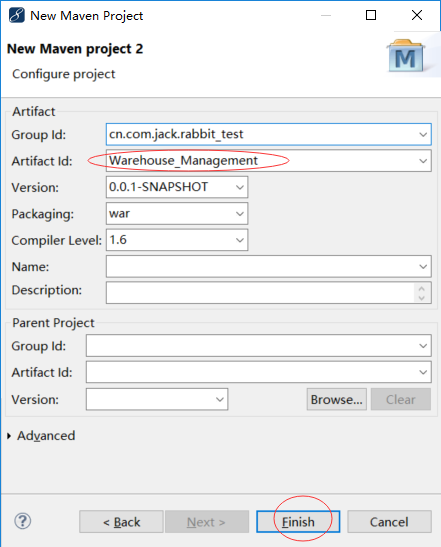
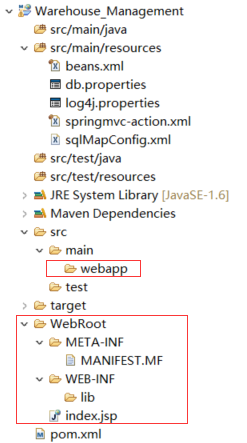
首先我们创建货仓管理系统,在Eclipse中创建一个名为“Warehouse_Management”的Maven工程:

然后在pom.xml文件中加入Spring/Spring MVC以及MyBatis框架环境需要的依赖:
<project xmlns="http://maven.apache.org/POM/4.0.0" xmlns:xsi="http://www.w3.org/2001/XMLSchema-instance" xsi:schemaLocation="http://maven.apache.org/POM/4.0.0 http://maven.apache.org/xsd/maven-4.0.0.xsd">
  <modelVersion>4.0.0</modelVersion>
  <groupId>cn.com.jack.rabbit_test</groupId>
  <artifactId>Warehouse_Management</artifactId>
  <version>0.0.1-SNAPSHOT</version>
  <packaging>war</packaging>

  <properties>
    <project.build.sourceEncoding>UTF-8</project.build.sourceEncoding>
    <project.reporting.outputEncoding>UTF-8</project.reporting.outputEncoding>
    <!-- spring版本号 -->
    <spring.version>4.2.5.RELEASE</spring.version>
    <!-- mybatis版本号 -->
    <mybatis.version>3.2.8</mybatis.version>
    <!-- mysql驱动版本号 -->
    <mysql-driver.version>5.1.29</mysql-driver.version>
    <!-- log4j日志包版本号 -->
    <slf4j.version>1.7.18</slf4j.version>
    <log4j.version>1.2.17</log4j.version>
  </properties>

  <dependencies>
    <!-- 添加jstl依赖 -->
    <dependency>
      <groupId>jstl</groupId>
      <artifactId>jstl</artifactId>
      <version>1.2</version>
    </dependency>

    <dependency>
      <groupId>javax</groupId>
      <artifactId>javaee-api</artifactId>
      <version>7.0</version>
    </dependency>

    <!-- 添加junit4依赖 -->
    <dependency>
      <groupId>junit</groupId>
      <artifactId>junit</artifactId>
      <version>4.11</version>
      <!-- 指定范围,在测试时才会加载 -->
      <scope>test</scope>
    </dependency>

    <!-- 添加spring核心依赖 -->
    <dependency>
      <groupId>org.springframework</groupId>
      <artifactId>spring-core</artifactId>
      <version>${spring.version}</version>
    </dependency>
    <dependency>
      <groupId>org.springframework</groupId>
      <artifactId>spring-web</artifactId>
      <version>${spring.version}</version>
    </dependency>
    <dependency>
      <groupId>org.springframework</groupId>
      <artifactId>spring-oxm</artifactId>
      <version>${spring.version}</version>
    </dependency>
    <dependency>
      <groupId>org.springframework</groupId>
      <artifactId>spring-tx</artifactId>
      <version>${spring.version}</version>
    </dependency>
    <dependency>
      <groupId>org.springframework</groupId>
      <artifactId>spring-jdbc</artifactId>
      <version>${spring.version}</version>
    </dependency>
    <dependency>
      <groupId>org.springframework</groupId>
      <artifactId>spring-webmvc</artifactId>
      <version>${spring.version}</version>
    </dependency>
    <dependency>
      <groupId>org.springframework</groupId>
      <artifactId>spring-context</artifactId>
      <version>${spring.version}</version>
    </dependency>
    <dependency>
      <groupId>org.springframework</groupId>
      <artifactId>spring-context-support</artifactId>
      <version>${spring.version}</version>
    </dependency>
    <dependency>
      <groupId>org.springframework</groupId>
      <artifactId>spring-aop</artifactId>
      <version>${spring.version}</version>
    </dependency>

    <dependency>
      <groupId>org.springframework</groupId>
      <artifactId>spring-test</artifactId>
      <version>${spring.version}</version>
    </dependency>
    <dependency>
	    <groupId>org.aspectj</groupId>
	    <artifactId>aspectjweaver</artifactId>
	    <version>1.8.10</version>
	</dependency>

    <!-- 添加mybatis依赖 -->
    <dependency>
      <groupId>org.mybatis</groupId>
      <artifactId>mybatis</artifactId>
      <version>${mybatis.version}</version>
    </dependency>

    <!-- 添加mybatis/spring整合包依赖 -->
    <dependency>
      <groupId>org.mybatis</groupId>
      <artifactId>mybatis-spring</artifactId>
      <version>1.2.2</version>
    </dependency>

    <!-- 添加mysql驱动依赖 -->
    <dependency>
      <groupId>mysql</groupId>
      <artifactId>mysql-connector-java</artifactId>
      <version>${mysql-driver.version}</version>
    </dependency>
    <!-- 引入c3p0数据库连接池 -->
	<dependency>
		<groupId>c3p0</groupId>
		<artifactId>c3p0</artifactId>
		<version>0.9.1.2</version>
	</dependency>

    <!-- 添加日志相关jar包 -->
    <dependency>
      <groupId>log4j</groupId>
      <artifactId>log4j</artifactId>
      <version>${log4j.version}</version>
    </dependency>
    <dependency>
      <groupId>org.slf4j</groupId>
      <artifactId>slf4j-api</artifactId>
      <version>${slf4j.version}</version>
    </dependency>
    <dependency>
      <groupId>org.slf4j</groupId>
      <artifactId>slf4j-log4j12</artifactId>
      <version>${slf4j.version}</version>
    </dependency>

    <!-- log end -->

    <!-- 文件上传相关依赖 -->
    <dependency>
      <groupId>commons-fileupload</groupId>
      <artifactId>commons-fileupload</artifactId>
      <version>1.3.1</version>
    </dependency>

    <dependency>
      <groupId>commons-io</groupId>
      <artifactId>commons-io</artifactId>
      <version>2.4</version>
    </dependency>

    <dependency>
      <groupId>commons-codec</groupId>
      <artifactId>commons-codec</artifactId>
      <version>1.9</version>
    </dependency>
  </dependencies>

  <build>
    <plugins>
      <plugin>
        <artifactId>maven-compiler-plugin</artifactId>
        <configuration>
          <source>1.6</source>
          <target>1.6</target>
        </configuration>
      </plugin>
      <plugin>
      	<artifactId>maven-war-plugin</artifactId>
      	<configuration>
      		<version>3.0</version>
      	</configuration>
      </plugin>
    </plugins>
  </build>
</project>
工程目录如下:
接下来先创建数据库,我使用的是Mysql数据库,操作数据时使用的是sqlyog的图形化工具。我们在sqlyog中创建一个数据库名称叫“warehouse_management”,是货仓管理的数据库:
其中创建一个名为product的表,存储货物信息:
建表语句为:


CREATE TABLE `product` (
   `id` int(11) NOT NULL AUTO_INCREMENT COMMENT '主键',
   `pname` varchar(200) COLLATE utf8_bin NOT NULL COMMENT '货物名称',
   `price` double NOT NULL COMMENT '价格',
   `pdesc` text COLLATE utf8_bin COMMENT '货物描述',
   `weight` int(11) DEFAULT NULL COMMENT '重量',
   `model` varchar(100) COLLATE utf8_bin DEFAULT NULL COMMENT '型号规格',
   PRIMARY KEY (`id`)
 ) ENGINE=InnoDB AUTO_INCREMENT=5 DEFAULT CHARSET=utf8 COLLATE=utf8_bin
然后是MyBtais的配置文件“sqlMapConfig.xml”,因为MyBatis交给了Spring托管,所以这里仅配置了一个别名:
<?xml version="1.0" encoding="UTF-8"?>
<!DOCTYPE configuration
PUBLIC "-//mybatis.org//DTD Config 3.0//EN"
"http://mybatis.org/dtd/mybatis-3-config.dtd">
<configuration>

    <!-- 全局setting配置,根据需要添加 -->

    <!-- 配置别名 -->
    <typeAliases>
        <!-- 批量扫描别名 -->
        <package name="com.warehouse_management.po"/>
    </typeAliases>

    <!-- 配置mapper
       由于使用spring和mybatis的整合包进行mapper扫描,这里不需要配置了。
       但必须遵循:mapper.xml和mapper.java文件同名且在一个目录-->
    <!-- <mappers></mappers> -->
</configuration>
然后在src/mian/resource下创建spring的配置文件“beans.xml”:
<?xml version="1.0" encoding="UTF-8"?>
<beans xmlns="http://www.springframework.org/schema/beans"
	xmlns:xsi="http://www.w3.org/2001/XMLSchema-instance" xmlns:mvc="http://www.springframework.org/schema/mvc"
	xmlns:context="http://www.springframework.org/schema/context"
	xmlns:aop="http://www.springframework.org/schema/aop" xmlns:tx="http://www.springframework.org/schema/tx"
	xsi:schemaLocation="http://www.springframework.org/schema/beans
			http://www.springframework.org/schema/beans/spring-beans-3.0.xsd
			http://www.springframework.org/schema/mvc
			http://www.springframework.org/schema/mvc/spring-mvc-3.0.xsd
			http://www.springframework.org/schema/context
			http://www.springframework.org/schema/context/spring-context-3.0.xsd
			http://www.springframework.org/schema/aop
			http://www.springframework.org/schema/aop/spring-aop-3.0.xsd
			http://www.springframework.org/schema/tx
			http://www.springframework.org/schema/tx/spring-tx-3.0.xsd ">

		<!-- 1.加载数据库配置的属性文件 -->
		<context:property-placeholder location="classpath:db.properties"/>

		<!-- 2.包扫描:dao,service -->
		<context:component-scan base-package="com.warehouse_management.dao,com.warehouse_management.service"/>

		<!-- 3,dataSource数据源 -->
		<bean id="dataSource" class="com.mchange.v2.c3p0.ComboPooledDataSource">
			<property name="driverClass" value="${jdbc.driver}"/>
			<property name="jdbcUrl" value="${jdbc.url}"/>
			<property name="user" value="${jdbc.username}"/>
			<property name="password" value="${jdbc.password}"/>

			<!-- 连接池中保留的最大连接数。默认为15 -->
			<property name="maxPoolSize" value="${c3p0.pool.maxPoolSize}"/>
			<!-- 连接池中保留的最小连接数。默认为15 -->
			<property name="minPoolSize" value="${c3p0.pool.minPoolSize}" />
			<!-- 初始化时创建的连接数,应在minPoolSize与maxPoolSize之间取值。默认为3 -->
			<property name="initialPoolSize" value="${c3p0.pool.initialPoolSize}"/>
			<!-- 定义在从数据库获取新连接失败后重复尝试获取的次数,默认为30 -->
			<property name="acquireIncrement" value="${c3p0.pool.acquireIncrement}"/>
		</bean>

		<!-- 4.SessionFactory -->
		<bean id="sessionFactory" class="org.mybatis.spring.SqlSessionFactoryBean">
			<property name="dataSource" ref="dataSource"/>
			<!-- 整合mybatis,包扫描mapper文件 -->
			<property name="configLocation" value="classpath:sqlMapConfig.xml"></property>
			<property name="mapperLocations" value="classpath:com/warehouse_management/mapper/*.xml"></property>
		</bean>

		<!-- 5.事务管理 -->
		<bean id="txManager" class="org.springframework.jdbc.datasource.DataSourceTransactionManager">
			<property name="dataSource" ref="dataSource"/>
		</bean>

		<!-- 事务通知 -->
		<tx:advice id="txAdivce" transaction-manager="txManager">
			<tx:attributes>
				<tx:method name="insert*" propagation="REQUIRED"/>
				<tx:method name="update*" propagation="REQUIRED"/>
				<tx:method name="delete*" propagation="REQUIRED"/>
				<tx:method name="save*" propagation="REQUIRED"/>

				<tx:method name="find*" read-only="false"/>
				<tx:method name="get*" read-only="false"/>
				<tx:method name="view*" read-only="false"/>
			</tx:attributes>
		</tx:advice>

		<aop:config>
			<aop:pointcut expression="execution(* com.warehouse_managementservice.*.*(..))" id="txPointcut"/>
			<aop:advisor advice-ref="txAdivce" pointcut-ref="txPointcut"/>
		</aop:config>

		<!-- 开启事务注解驱动 -->
	    <!-- <tx:annotation-driven transaction-manager="txManager" /> -->

</beans>
其中首先加载数据库配置的属性文件“db.properties”,然后设置包扫描的路径,用于扫描DAO或者Service的暴露以及注入注解 ,之后设置DataSource数据源,将“db.properties”中的参数动态设置进去。然后设置MyBatis的SessionFactory会话工厂,用与处理系统与数据库之间的交互。下面是事务管理和事务通知的配置,事务通知以切面的方式切入Service层中。
然后创建spring mvc的配置文件“springmvc-action.xml”:
<?xml version="1.0" encoding="UTF-8"?>
<beans xmlns="http://www.springframework.org/schema/beans"
	xmlns:xsi="http://www.w3.org/2001/XMLSchema-instance"
	xmlns:mvc="http://www.springframework.org/schema/mvc"
	xmlns:context="http://www.springframework.org/schema/context"
	xmlns:aop="http://www.springframework.org/schema/aop"
	xmlns:tx="http://www.springframework.org/schema/tx"
	xsi:schemaLocation="http://www.springframework.org/schema/beans
	http://www.springframework.org/schema/beans/spring-beans-3.0.xsd
	http://www.springframework.org/schema/mvc
	http://www.springframework.org/schema/mvc/spring-mvc-3.0.xsd
	http://www.springframework.org/schema/context
	http://www.springframework.org/schema/context/spring-context-3.0.xsd
	http://www.springframework.org/schema/aop
	http://www.springframework.org/schema/aop/spring-aop-3.0.xsd
	http://www.springframework.org/schema/tx
	http://www.springframework.org/schema/tx/spring-tx-3.0.xsd ">

	<!-- 1.扫描controller包 -->
	<context:component-scan base-package="com.warehouse_management.controller"/>

	<!-- 2.内部资源视图解析器,suffix为空,方便跟参数 url?id=xxx -->
	<bean id="jspViewResolver" class="org.springframework.web.servlet.view.InternalResourceViewResolver">
		<property name="prefix" value="/WEB-INF/pages"/>
		<property name="suffix" value=""/>
	</bean>

	<!-- 3.注解驱动 -->
	<mvc:annotation-driven/>

	<!-- 4.拦截器配置 -->
	<!-- <mvc:interceptors>
		<mvc:interceptor>
			<mvc:mapping path="/**"/>
			<bean class="com.warehouse_management.interceptor.LoginInterceptor"/>
		</mvc:interceptor>
	</mvc:interceptors> -->


	<!-- 5.文件上传解析器,最大能上传10M文件(1024*1024*10)-->
	<bean id="multipartResolver" class="org.springframework.web.multipart.commons.CommonsMultipartResolver">
		<property name="maxUploadSize" value="10485760"/>
	</bean>

	<mvc:resources location="/js/" mapping="/js/**"/>
	<mvc:resources location="/images/" mapping="/images/**"/>
	<mvc:resources location="/css/" mapping="/css/**"/>
</beans>
在springmvc配置文件中,我们配置了扫描controller包注解的配置、视图解析器、注解驱动、文件上传解析器(其实没用到)。因为我们做的小实例,不做登录系统,也不做权限控制,所以这里拦截器配置注释掉,忽略。
最后配置的是日志的配置文件“log4j.properties”:
# Global logging configuration
log4j.rootLogger=DEBUG, stdout
# Console output...
log4j.appender.stdout=org.apache.log4j.ConsoleAppender
log4j.appender.stdout.layout=org.apache.log4j.PatternLayout
log4j.appender.stdout.layout.ConversionPattern=%5p [%t] - %m%n
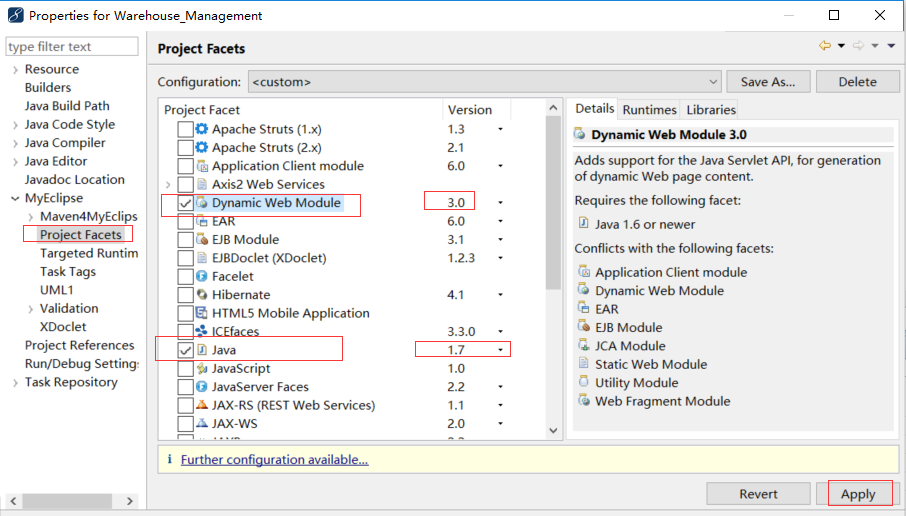
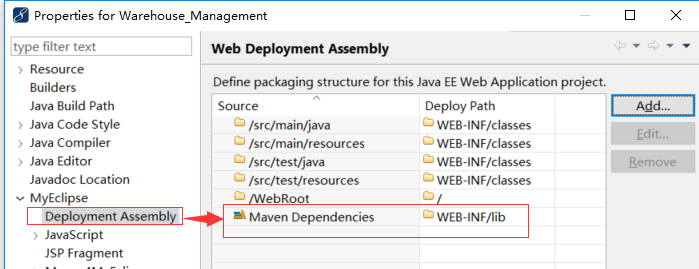
因为我们是Web工程,要把Maven改为Web结构。邮件工程点击properties,进入“project Facets”中设置Web属性:
可以看到maven生成了Web相关结构目录:
我们在WEB-INF下创建“page”文件夹,用于放置jsp视图(上面配置文件配置的就是这个目录)。
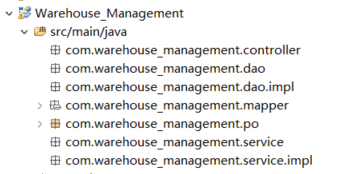
然后我们在src/main/java下创建一些包,用于放置各种类型的类:
下面在“com.warehouse_management.mapper”包下编写一个mapper配置,用户货物数据的增删改查:
<?xml version="1.0" encoding="UTF-8"?>
<!DOCTYPE mapper
PUBLIC "-//mybatis.org//DTD Mapper 3.0//EN"
"http://mybatis.org/dtd/mybatis-3-mapper.dtd">


<mapper namespace="com.warehouse_management.mapper.ProductMapper">
    <!-- resultMap映射 -->
	<resultMap type="com.warehouse_management.po.Product" id="productRM">
		<!-- 主键 -->
		<id property="id" column="id" jdbcType="INTEGER" />
		<!-- 一般属性 -->
		<result property="name" column="pname" jdbcType="VARCHAR"/>
		<result property="price" column="price" jdbcType="DOUBLE"/>
		<result property="desc" column="pdesc"/>
		<result property="weight" column="weight" jdbcType="INTEGER"/>
		<result property="model" column="model" jdbcType="VARCHAR"/>
	</resultMap>

	<!-- 查询一个 -->
	<select id="selectById" parameterType="int" resultMap="productRM">
		select * from product
		where id=#{id}
	</select>

	<!-- 查询 -->
	<select id="selectAll" resultMap="productRM">
		select * from product
	</select>

	<insert id="insert" parameterType="com.warehouse_management.po.Product">
		insert into product
		(PNAME,PRICE,PDESC,WEIGHT,MODEL)
		values
		(
			#{name,jdbcType=VARCHAR},
			#{price,jdbcType=DOUBLE},
			#{desc},
			#{weight,jdbcType=INTEGER},
			#{model,jdbcType=VARCHAR}
		)
	</insert>

	<!-- 修改语句 -->
	<update id="update" parameterType="com.warehouse_management.po.Product">
		update product
		<set>
	 	   <if test="name != null">pname=#{name},</if>
		   <if test="price != null">price=#{price},</if>
		   <if test="desc != null">pdesc = #{desc},</if>
		   <if test="weight != null">weight=#{weight},</if>
		   <if test="model != null">model=#{model}</if>
		</set>
		where id=#{id}
	</update>

	<!-- 删除一条 -->
	<delete id="deleteById" parameterType="int">
		delete from product
		where id=#{id}
	</delete>
</mapper>
然后在com.warehouse_management.po包下创建名为“Product”的实体类:
package com.warehouse_management.po;

public class Product {
	private int id;
	private String name;
	private Double price;
	private String desc;
	private Integer weight;
	private String model;
	public int getId() {
		return id;
	}
	public void setId(int id) {
		this.id = id;
	}
	public String getName() {
		return name;
	}
	public void setName(String name) {
		this.name = name;
	}
	public Double getPrice() {
		return price;
	}
	public void setPrice(Double price) {
		this.price = price;
	}
	public String getDesc() {
		return desc;
	}
	public void setDesc(String desc) {
		this.desc = desc;
	}
	public Integer getWeight() {
		return weight;
	}
	public void setWeight(Integer weight) {
		this.weight = weight;
	}
	public String getModel() {
		return model;
	}
	public void setModel(String model) {
		this.model = model;
	}
}
然后我们分别在Dao包下编写Dao的基础类,使用SqlSession调用相关的SQL配置的公用封装:
接口:
package com.warehouse_management.dao;

import java.io.Serializable;
import java.util.List;
import java.util.Map;

//泛型类,基础的DAO接口
public interface BaseDao<T> {
  public T selectById(int id);//只查询一个,常用于修改
  public List<T> selectAll(Map map);//根据条件查询多个结果
  public void insert(T entity);//插入,用实体作为参数
  public void update(T entity);//修改,用实体作为参数
  public void deleteById(int id);//按id删除,删除一条
}
实现类:
package com.warehouse_management.dao.impl;

import java.util.List;
import java.util.Map;
import org.apache.ibatis.session.SqlSessionFactory;
import org.mybatis.spring.support.SqlSessionDaoSupport;
import org.springframework.beans.factory.annotation.Autowired;
import com.warehouse_management.dao.BaseDao;

public abstract class BaseDaoImpl<T> extends SqlSessionDaoSupport implements BaseDao<T>{
    @Autowired
    //mybatis-spring 1.0无需此方法;mybatis-spring1.2必须注入。
    public void setSqlSessionFactory(SqlSessionFactory sqlSessionFactory){
        super.setSqlSessionFactory(sqlSessionFactory);
    }

    private String ns;      //命名空间
    public String getNs() {
        return ns;
    }
    public void setNs(String ns) {
        this.ns = ns;
    }

    public List<T> selectAll(Map map) {
        List<T> oList = this.getSqlSession().selectList(ns + ".selectAll", map);
        return oList;
    }
    public T selectById(int id) {
        return this.getSqlSession().selectOne(ns + ".selectById", id);
    }

    public void insert(T entity) {
        this.getSqlSession().insert(ns + ".insert", entity);
    }

    public void update(T entity) {
        this.getSqlSession().update(ns + ".update", entity);
    }

    public void deleteById(int id) {
        this.getSqlSession().delete(ns + ".deleteById", id);
    }
}
然后在Dao与Service下创建Product相关的增删改查类:
Dao层接口:
package com.warehouse_management.dao;

import java.util.List;
import java.util.Map;
import com.warehouse_management.po.Product;

public interface ProductDao extends BaseDao<Product>{
	public Product selectById(int id);//只查询一个,常用于修改
    public List<Product> selectAll(Map map);//根据条件查询多个结果
    public void insert(Product commodties);//插入,用实体作为参数
    public void update(Product commodties);//修改,用实体作为参数
    public void deleteById(int id);//按id删除,删除一条
}
Dao层实现:
package com.warehouse_management.dao.impl;

import org.springframework.stereotype.Repository;
import com.warehouse_management.dao.ProductDao;
import com.warehouse_management.po.Product;

@Repository //为了包扫描的时候这个Dao被扫描到
public class ProductDaoImpl extends BaseDaoImpl<Product> implements ProductDao{
    public ProductDaoImpl(){
        //设置命名空间
        super.setNs("com.warehouse_management.mapper.ProductMapper");
    }
    //在下面可以实现自己的查询方法
Service层接口
package com.warehouse_management.service;

import java.util.List;
import java.util.Map;
import com.warehouse_management.po.Product;

public interface ProductService{
	public Product selectById(int id);//只查询一个,常用于修改
    public List<Product> selectAll(Map map);//根据条件查询多个结果
    public void insert(Product commodties);//插入,用实体作为参数
    public void update(Product commodties);//修改,用实体作为参数
    public void deleteById(int id);//按id删除,删除一条
}
Service层实现:
package com.warehouse_management.service.impl;

import java.util.List;
import java.util.Map;
import org.springframework.beans.factory.annotation.Autowired;
import org.springframework.stereotype.Service;
import com.warehouse_management.dao.ProductDao;
import com.warehouse_management.po.Product;
import com.warehouse_management.service.ProductService;

@Service  //为了包扫描的时候这个Service被扫描到
public class ProductServiceImpl implements ProductService{

    @Autowired
    private ProductDao productDao;

	@Override
	public Product selectById(int id) {
		return productDao.selectById(id);
	}


	@Override
	public List<Product> selectAll(Map map) {
		return productDao.selectAll(map);
	}


	@Override
	public void insert(Product product) {
		productDao.insert(product);
	}


	@Override
	public void update(Product product) {
		productDao.update(product);
	}


	@Override
	public void deleteById(int id) {
		productDao.deleteById(id);
	}


}
然后在Controller创建相关服务响应:
package com.warehouse_management.controller;

import java.util.List;
import org.apache.commons.logging.Log;
import org.apache.commons.logging.LogFactory;
import org.springframework.beans.factory.annotation.Autowired;
import org.springframework.ui.Model;
import org.springframework.web.bind.annotation.RequestMapping;
import com.warehouse_management.po.Product;
import com.warehouse_management.service.ProductService;

@Controller
public class ProductController {

	@Autowired
	private ProductService productService;
	//创建该类的日志对象
	Log log = LogFactory.getLog(this.getClass());


	//跳转至列表页面
	@RequestMapping("/product/home.action")
    public String list(Model model){
		List<Product> productList = productService.selectAll(null);
		model.addAttribute("productList",productList);//货物列表
		return "/product/home.jsp";//转向首页
	}

	@RequestMapping("/product/toAdd.action")
    public String toAdd(Model model){
		return "/product/add.jsp";//转向添加页
    }

	@RequestMapping("/product/add.action")
    public String add(Model model,Product product){
		productService.insert(product);
		//重新刷新至分页列表页首页
		return list(model);
    }

	@RequestMapping("/product/toEdit.action")
    public String toEdit(Model model,Integer id){
		if(id!=null){
			model.addAttribute("product", productService.selectById(id));
		}
		return "/product/edit.jsp";//转向编辑页
    }

	@RequestMapping("/product/edit.action")
    public String edit(Model model,Product product){
		productService.update(product);
		//重新刷新至分页列表页首页
		return list(model);
    }


    	@RequestMapping("/product/delete.action")
    public String delete(Model model,Integer id){
		productService.deleteById(id);
		//重新刷新至分页列表页首页
		return list(model);
    }
}
分别是加载所有商品、新增跳转、执行新增、编辑跳转、进行编辑的服务
然后在WEB-INF下创建一个“pages”文件夹,在下面创建“product”文件夹,在下面放置商品列表、新增、编辑的Jsp文件:
home.jsp:
<%@ page language="java" import="java.util.*" pageEncoding="UTF-8"%>
<%@ taglib uri="http://java.sun.com/jsp/jstl/core" prefix="c" %>
<!DOCTYPE HTML PUBLIC "-//W3C//DTD HTML 4.01 Transitional//EN">
<html>
  <head>
    <title>仓储管理系统首页</title>
  </head>

  <body>
    <h1>仓储管理系统</h1>
    <hr/>
    <a href="toAdd.action">
    <button style="background-color:#173e65;color:#ffffff;70px;">添加</button>
    </a>
  	<c:if test="${productList!=null}">
	  <table style="margin-top: 10px;700px;text-align:center;" border=1>
	    <tr>
	      <td>序号</td><td>货物名称</td><td>价格</td><td>货物描述</td>
	      <td>重量</td><td>型号规格</td><td>操作</td>
	   </tr>
      	 <c:forEach items="${productList}" var="item" varStatus="status">
		     <tr>
		       <td>${status.index+1}</td><td>${item.name }</td>
		       <td>${item.price}</td><td>${item.desc }</td>
		       <td>${item.weight}</td><td>${item.model}</td>
		       <td>
		       		<a href="toEdit.action?id=${item.id}">编辑</a>|
		       		<a href="delete.action?id=${item.id}">删除</a>
		       </td>
		     </tr>
	     </c:forEach>
	    </table>
   </c:if>
   <c:if test="${productList==null}">
       <b>搜索结果为空!</b>
   </c:if>
  </body>
</html>
add.jsp:
<%@ page language="java" import="java.util.*" pageEncoding="utf-8"%>
<!DOCTYPE HTML PUBLIC "-//W3C//DTD HTML 4.01 Transitional//EN">
<html>
  <head>
    <title>新增</title>
    <script type="text/javascript">
    	function checkAdd(){
    	   var addName = document.getElementById("addName").value;
    	   var addPrice = document.getElementById("addPrice").value;
    	   var addWeight = document.getElementById("addWeight").value;
           if(addName==null||addName==""){
               alert("用户名不能为空!");
               return false;
           }
           if(addPrice==null||addPrice==""){
               alert("手机号不能为空!");
               return false;
           }
           var myreg = /^[-+]?d+(.d+)?$/;
           if(!myreg.test(addPrice)||!myreg.test(addWeight))
           {
               alert("价格或重量请输入数字!");
               return false;
           }
           return true;
	   }
    </script>
  </head>

  <body>
    <form id="addForm" action="add.action" method="post" οnsubmit="checkAdd()">
	        商品名称:<input type="text" id="addName" name="name" style="120px"/> <br/>
	        价格:<input type="text" id="addPrice" name="price" style="120px"/><br/>
	        描述:<input type="text" name="desc" style="120px"/><br/>
	        重量:<input type="text" id="addWeight" name="weight" style="120px"/><br/>
	        型号规格:<input type="text" name="model" style="120px"/><br/>
	   <input type="submit" value="添加" style="background-color:#173e65;color:#ffffff;70px;"/>
    </form>
  </body>
</html>
edit.jsp:
<%@ page language="java" import="java.util.*" pageEncoding="utf-8"%>
<!DOCTYPE HTML PUBLIC "-//W3C//DTD HTML 4.01 Transitional//EN">
<html>
  <head>
    <title>新增</title>
    <script type="text/javascript">
    	function checkAdd(){
    	   var addName = document.getElementById("addName").value;
    	   var addPrice = document.getElementById("addPrice").value;
    	   var addWeight = document.getElementById("addWeight").value;
           if(addName==null||addName==""){
               alert("用户名不能为空!");
               return false;
           }
           if(addPrice==null||addPrice==""){
               alert("手机号不能为空!");
               return false;
           }
           var myreg = /^[-+]?d+(.d+)?$/;
           if(!myreg.test(addPrice)||!myreg.test(addWeight))
           {
               alert("价格或重量请输入数字!");
               return false;
           }
           return true;
	   }
    </script>
  </head>

  <body>
    <form id="addForm" action="edit.action" method="post" οnsubmit="checkAdd()">
	        商品名称:<input type="text" id="addName" name="name" value="${product.name }" style="120px"/> <br/>
	        价格:<input type="text" id="addPrice" name="price" value="${product.price }" style="120px"/><br/>
	        描述:<input type="text" name="desc" value="${product.desc }" style="120px"/><br/>
	        重量:<input type="text" id="addWeight" name="weight" value="${product.weight }" style="120px"/><br/>
	        型号规格:<input type="text" name="model" value="${product.model }" style="120px"/><br/>
	        <input type="hidden" name="id" style="120px" value="${product.id }"/>
	   <input type="submit" value="修改" style="background-color:#173e65;color:#ffffff;70px;"/>
    </form>
  </body>
</html>
最后在默认的index.jsp添加一个跳转路径,默认执行home服务,这样进入系统直接可以看到列表界面:
<%@ page language="java" import="java.util.*" pageEncoding="utf-8"%>
<!DOCTYPE HTML PUBLIC "-//W3C//DTD HTML 4.01 Transitional//EN">
<html>
  <head>
    <title>index</title>
  </head>
  <body>
    <script language="JavaScript">
	 window.location.href = "product/home.action";
	</script>
  </body>
</html>
最后在WEB-INF下创建web.xml,配置spring mvc的拦截器:
<?xml version="1.0" encoding="UTF-8"?>
<web-app version="2.4"
	xmlns="http://java.sun.com/xml/ns/j2ee"
	xmlns:xsi="http://www.w3.org/2001/XMLSchema-instance"
	xsi:schemaLocation="http://java.sun.com/xml/ns/j2ee
	http://java.sun.com/xml/ns/j2ee/web-app_2_4.xsd">
	<!-- 加载spring容器 -->
	<context-param>
		<param-name>contextConfigLocation</param-name>
		<param-value>/WEB-INF/classes/beans.xml</param-value>
	</context-param>
	<listener>
		<listener-class>org.springframework.web.context.ContextLoaderListener</listener-class>
	</listener>

	<!-- SpringMvc前端控制器 -->
	<servlet>
		<servlet-name>springmvc</servlet-name>
		<servlet-class>org.springframework.web.servlet.DispatcherServlet</servlet-class>
		<init-param>
			<param-name>contextConfigLocation</param-name>
			<param-value>classpath:springmvc-action.xml</param-value>
		</init-param>
	</servlet>

	<servlet-mapping>
		<servlet-name>springmvc</servlet-name>
		<url-pattern>/</url-pattern>
	</servlet-mapping>

	<!-- post乱码过虑器 -->
	<filter>
		<filter-name>CharacterEncodingFilter</filter-name>
		<filter-class>org.springframework.web.filter.CharacterEncodingFilter</filter-class>
		<init-param>
			<param-name>encoding</param-name>
			<param-value>utf-8</param-value>
		</init-param>
	</filter>
	<filter-mapping>
		<filter-name>CharacterEncodingFilter</filter-name>
		<url-pattern>/*</url-pattern>
	</filter-mapping>

  <welcome-file-list>
    <welcome-file>index.jsp</welcome-file>
  </welcome-file-list>
</web-app>
最后,别忘记在编译路径中添加Maven依赖的编译路径:
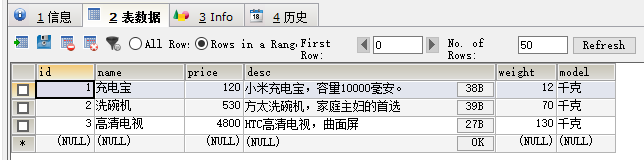
为了测试数据读取,我们在数据库中预先添加一些数据:
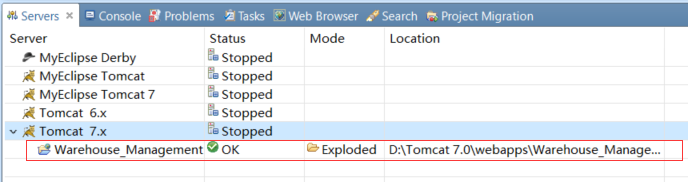
将应用部署至Tomcat:
然后启动Tomcat,我这里端口是80,所以不用输入端口号,在浏览器中访问“http://localhost/Warehouse_Management/”:
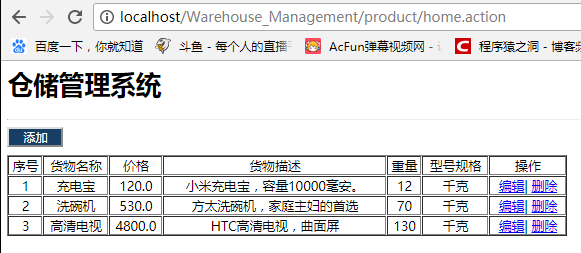
可以看到,我们的仓储系统已经完全创建完毕。
下一篇我们在该工程的基础上集成RabbitMQ,然后实现在新增和编辑、删除的时候向消息队列推送信息。
转载请注明出处:https://blog.csdn.net/acmman/article/details/79778241
————————————————
版权声明:本文为CSDN博主「光仔December」的原创文章,遵循 CC 4.0 BY-SA 版权协议,转载请附上原文出处链接及本声明。
原文链接:https://blog.csdn.net/acmman/article/details/79778241