作为开发人员,通常是离不开Python环境的(即便你是Java-er、Js-er、Php-er .etc.)。
为何要保留Python2
Mac大多自带了python 2的环境,但是Python2在2020年1月1号已经EOF了。所以现在主流是python 3,但是我们又不能马上卸载python 2,因为还有很多软件包是基于python 2的(这点很无奈,只能等Apple完全移除Python2依赖)。于是,我们就要在保留python 2的情况下再安装一套python 3环境。
Python3发行版选择
通常我们讲的Python是指官方的CPython版本,这个版本提供了最基础、最通用的功能实现。但是这个版本默认缺少很多高级特性,例如虚拟环境、JIT、数学计算相关软件包等,需要使用者在安装后自行设置或安装。这就很耗费时间了,因此我选择了Anaconda Python的版本。
更多发行版对比可以参考 关于各Python发行版,我们需要了解的一切。
安装Anaconda
Homebrew在cask中已经集成了Anaconda
$ brew search anaconda
==> Casks
anaconda ✔

$ brew cask info anaconda
anaconda: 2019.10 (auto_updates)
https://www.anaconda.com/
/usr/local/Caskroom/anaconda/2019.10 (424.2MB)
From: https://mirrors.ustc.edu.cn/homebrew-cask.git
==> Name
Continuum Analytics Anaconda
==> Artifacts
Anaconda3-2019.10-MacOSX-x86_64.sh (Installer)
==> Caveats
Cask anaconda installs files under /usr/local. The presence of such
files can cause warnings when running `brew doctor`, which is considered
to be a bug in Homebrew Cask.
因此我们只需要通过brew cask install anaconda就能很简单的完成安装。
环境切换
anaconda默认安装到了/usr/local/anaconda3,可以通过以下命令设置环境变量:
$ echo 'export PATH=/usr/local/anaconda3/bin:$PATH' >> ~/.bash_profile
$ source ~/.bash_profile
此时在终端执行python就会看到默认python环境已被切换到Anaconda:
$ python
Python 3.7.4 (default, Aug 13 2019, 15:17:50)
[Clang 4.0.1 (tags/RELEASE_401/final)] :: Anaconda, Inc. on darwin
Type "help", "copyright", "credits" or "license" for more information.
>>>
那么Python2环境去哪了呢?别慌,只是python命令链接到了Anaconda,原来的Python2环境丝毫不受影响,通过python2就能唤起:
$ python2

WARNING: Python 2.7 is not recommended.
This version is included in macOS for compatibility with legacy software.
Future versions of macOS will not include Python 2.7.
Instead, it is recommended that you transition to using 'python3' from within Terminal.

Python 2.7.16 (default, Nov  9 2019, 05:55:08)
[GCC 4.2.1 Compatible Apple LLVM 11.0.0 (clang-1100.0.32.4) (-macos10.15-objc-s on darwin
Type "help", "copyright", "credits" or "license" for more information.
>>>
如果你想把默认Python环境改回到Python2,只需执行以下命令:
$ echo 'alias python="/usr/bin/python"' >> ~/.bash_profile
$ source ~/.bash_profile
再次执行pyhton就会变回Python2环境了
$ python

WARNING: Python 2.7 is not recommended.
This version is included in macOS for compatibility with legacy software.
Future versions of macOS will not include Python 2.7.
Instead, it is recommended that you transition to using 'python3' from within Terminal.

Python 2.7.16 (default, Nov  9 2019, 05:55:08)
[GCC 4.2.1 Compatible Apple LLVM 11.0.0 (clang-1100.0.32.4) (-macos10.15-objc-s on darwin
Type "help", "copyright", "credits" or "license" for more information.
>>>
此时启动Anaconda就需要用python3命令了:
$ python3
Python 3.7.4 (default, Aug 13 2019, 15:17:50)
[Clang 4.0.1 (tags/RELEASE_401/final)] :: Anaconda, Inc. on darwin
Type "help", "copyright", "credits" or "license" for more information.
>>>
设置国内镜像源
和其他包管理器一样,Anaconda自带的conda以及pip也需要设置国内镜像。不久前中科大的镜像停止更新Anaconda源,截止我写这篇blog为止都未恢复,详见 Anaconda 源使用帮助。幸而清华大学的镜像已经恢复了更新,详见Anaconda 相关镜像已恢复。
conda源设置
首先创建.condarc配置文件:
$ conda config --set show_channel_urls yes
然后参考Anaconda 镜像使用帮助修改.condarc文件即可。
pip源设置
和conda一样,这里使用清华大学的源,参考pypi 镜像使用帮助
$ pip install -i https://pypi.tuna.tsinghua.edu.cn/simple pip -U
$ pip config set global.index-url https://pypi.tuna.tsinghua.edu.cn/simple
Anaconda使用
以下说明均在默认python环境为anaconda的情况下。
# ~ [15:49:51]
$ python --version
Python 3.7.4

# ~ [15:49:55]
$ python
Python 3.7.4 (default, Aug 13 2019, 15:17:50)
[Clang 4.0.1 (tags/RELEASE_401/final)] :: Anaconda, Inc. on darwin
Type "help", "copyright", "credits" or "license" for more information.
>>>
虚拟环境
anaconda支持管理多个python虚拟环境。
创建虚拟环境
创建一个环境的方法很简单,例如创建python2.7的环境:
conda create --name python27 python=2.7
anaconda在准备好后,会请求在/usr/local/anaconda3/evns/python27中安装最新版的python 2.7.x :
$ conda create --name python27 python=2.7
Collecting package metadata (current_repodata.json): done
Solving environment: done

## Package Plan ##

  environment location: /usr/local/anaconda3/envs/python27

  added / updated specs:
    - python=2.7


The following packages will be downloaded:

    package                    |            build
    ---------------------------|-----------------
    ca-certificates-2019.11.27 |                0         131 KB  defaults
    certifi-2019.11.28         |           py27_0         156 KB  defaults
    libcxx-4.0.1               |       hcfea43d_1         947 KB  defaults
    libcxxabi-4.0.1            |       hcfea43d_1         350 KB  defaults
    libedit-3.1.20181209       |       hb402a30_0         136 KB  defaults
    libffi-3.2.1               |       h475c297_4          37 KB  defaults
    ncurses-6.1                |       h0a44026_1         732 KB  defaults
    pip-19.3.1                 |           py27_0         1.9 MB  defaults
    python-2.7.17              |       h97142e2_0         9.3 MB  defaults
    readline-7.0               |       h1de35cc_5         316 KB  defaults
    setuptools-44.0.0          |           py27_0         513 KB  defaults
    sqlite-3.30.1              |       ha441bb4_0         2.4 MB  defaults
    tk-8.6.8                   |       ha441bb4_0         2.8 MB  defaults
    wheel-0.33.6               |           py27_0          40 KB  defaults
    zlib-1.2.11                |       h1de35cc_3          90 KB  defaults
    ------------------------------------------------------------
                                           Total:        19.7 MB

The following NEW packages will be INSTALLED:

  ca-certificates    anaconda/pkgs/main/osx-64::ca-certificates-2019.11.27-0
  certifi            anaconda/pkgs/main/osx-64::certifi-2019.11.28-py27_0
  libcxx             anaconda/pkgs/main/osx-64::libcxx-4.0.1-hcfea43d_1
  libcxxabi          anaconda/pkgs/main/osx-64::libcxxabi-4.0.1-hcfea43d_1
  libedit            anaconda/pkgs/main/osx-64::libedit-3.1.20181209-hb402a30_0
  libffi             anaconda/pkgs/main/osx-64::libffi-3.2.1-h475c297_4
  ncurses            anaconda/pkgs/main/osx-64::ncurses-6.1-h0a44026_1
  pip                anaconda/pkgs/main/osx-64::pip-19.3.1-py27_0
  python             anaconda/pkgs/main/osx-64::python-2.7.17-h97142e2_0
  readline           anaconda/pkgs/main/osx-64::readline-7.0-h1de35cc_5
  setuptools         anaconda/pkgs/main/osx-64::setuptools-44.0.0-py27_0
  sqlite             anaconda/pkgs/main/osx-64::sqlite-3.30.1-ha441bb4_0
  tk                 anaconda/pkgs/main/osx-64::tk-8.6.8-ha441bb4_0
  wheel              anaconda/pkgs/main/osx-64::wheel-0.33.6-py27_0
  zlib               anaconda/pkgs/main/osx-64::zlib-1.2.11-h1de35cc_3


Proceed ([y]/n)?
同意后会执行下载安装:
Downloading and Extracting Packages
libffi-3.2.1         | 37 KB     | ################################################################################################################################################################### | 100%
pip-19.3.1           | 1.9 MB    | ################################################################################################################################################################### | 100%
readline-7.0         | 316 KB    | ################################################################################################################################################################### | 100%
ca-certificates-2019 | 131 KB    | ################################################################################################################################################################### | 100%
sqlite-3.30.1        | 2.4 MB    | ################################################################################################################################################################### | 100%
tk-8.6.8             | 2.8 MB    | ################################################################################################################################################################### | 100%
certifi-2019.11.28   | 156 KB    | ################################################################################################################################################################### | 100%
ncurses-6.1          | 732 KB    | ################################################################################################################################################################### | 100%
libedit-3.1.20181209 | 136 KB    | ################################################################################################################################################################### | 100%
libcxx-4.0.1         | 947 KB    | ################################################################################################################################################################### | 100%
libcxxabi-4.0.1      | 350 KB    | ################################################################################################################################################################### | 100%
zlib-1.2.11          | 90 KB     | ################################################################################################################################################################### | 100%
setuptools-44.0.0    | 513 KB    | ################################################################################################################################################################### | 100%
python-2.7.17        | 9.3 MB    | ################################################################################################################################################################### | 100%
wheel-0.33.6         | 40 KB     | ################################################################################################################################################################### | 100%
Preparing transaction: done
Verifying transaction: / WARNING conda.core.path_actions:verify(963): Unable to create environments file. Path not writable.
  environment location: /Users/zhang/.conda/environments.txt

done
Executing transaction:  WARNING conda.core.envs_manager:register_env(52): Unable to register environment. Path not writable or missing.
  environment location: /usr/local/anaconda3/envs/python27
  registry file: /Users/zhang/.conda/environments.txt
done
#
# To activate this environment, use
#
#     $ conda activate python27
#
# To deactivate an active environment, use
#
#     $ conda deactivate
可以看到有警告(影响conda activate / conda deactivate切换环境,虽然可以用source activate / source deactivate代替)
Verifying transaction: / WARNING conda.core.path_actions:verify(963): Unable to create environments file. Path not writable.
  environment location: /Users/zhang/.conda/environments.txt

done
Executing transaction:  WARNING conda.core.envs_manager:register_env(52): Unable to register environment. Path not writable or missing.
  environment location: /usr/local/anaconda3/envs/python27
  registry file: /Users/zhang/.conda/environments.txt
done
这个是因为Homebrew在安装anaconda时自动以root账户创建了~/.conda,而当前用户权限不足导致的,解决方法很简单,就是把这个目录下的文件权限全部改成当前用户可编辑:
$ sudo chmod 777 ~/.conda/*
然后删除有问题的环境并重建:
$ conda remove -n python27 --all
$ conda create --name python27 python=2.7
切换虚拟环境
安装完成后其实anaconda已经提示如何切换环境了:
#
# To activate this environment, use
#
#     $ conda activate python27
#
# To deactivate an active environment, use
#
#     $ conda deactivate
按照提示切换到python27环境,并用python --version验证:
# ~ [16:45:54]
$ conda activate python27
(python27)
# ~ [16:48:06]
$ python --version
Python 2.7.17 :: Anaconda, Inc.
(python27)
退出python27环境,并用python --version验证:
# ~ [16:53:10]
$ conda deactivate

# ~ [16:53:25]
$ python --version
Python 3.7.4
查询虚拟环境
conda info -e可以列出所有环境。
包管理
anaconda默认有两个包管理器conda和pip,conda是跨环境统一的,但是pip是各个环境隔离的。
默认的Python3环境:
# ~ [17:12:31]
$ conda info

     active environment : None
            shell level : 0
       user config file : /Users/zhang/.condarc
 populated config files : /Users/zhang/.condarc
          conda version : 4.7.12
    conda-build version : 3.18.9
         python version : 3.7.4.final.0
       virtual packages :
       base environment : /usr/local/anaconda3  (writable)
           channel URLs : https://mirrors.tuna.tsinghua.edu.cn/anaconda/pkgs/main/osx-64
                          https://mirrors.tuna.tsinghua.edu.cn/anaconda/pkgs/main/noarch
                          https://mirrors.tuna.tsinghua.edu.cn/anaconda/pkgs/free/osx-64
                          https://mirrors.tuna.tsinghua.edu.cn/anaconda/pkgs/free/noarch
                          https://mirrors.tuna.tsinghua.edu.cn/anaconda/pkgs/r/osx-64
                          https://mirrors.tuna.tsinghua.edu.cn/anaconda/pkgs/r/noarch
          package cache : /usr/local/anaconda3/pkgs
                          /Users/zhang/.conda/pkgs
       envs directories : /usr/local/anaconda3/envs
                          /Users/zhang/.conda/envs
               platform : osx-64
             user-agent : conda/4.7.12 requests/2.22.0 CPython/3.7.4 Darwin/19.2.0 OSX/10.15.2
                UID:GID : 501:20
             netrc file : None
           offline mode : False


# ~ [17:12:36]
$ pip --version
pip 19.3.1 from /usr/local/anaconda3/lib/python3.7/site-packages/pip (python 3.7)
切到Python27环境后:
# ~ [17:06:10]
$ conda info

     active environment : python27
    active env location : /usr/local/anaconda3/envs/python27
            shell level : 1
       user config file : /Users/zhang/.condarc
 populated config files : /Users/zhang/.condarc
          conda version : 4.7.12
    conda-build version : 3.18.9
         python version : 3.7.4.final.0
       virtual packages :
       base environment : /usr/local/anaconda3  (writable)
           channel URLs : https://mirrors.tuna.tsinghua.edu.cn/anaconda/pkgs/main/osx-64
                          https://mirrors.tuna.tsinghua.edu.cn/anaconda/pkgs/main/noarch
                          https://mirrors.tuna.tsinghua.edu.cn/anaconda/pkgs/free/osx-64
                          https://mirrors.tuna.tsinghua.edu.cn/anaconda/pkgs/free/noarch
                          https://mirrors.tuna.tsinghua.edu.cn/anaconda/pkgs/r/osx-64
                          https://mirrors.tuna.tsinghua.edu.cn/anaconda/pkgs/r/noarch
          package cache : /usr/local/anaconda3/pkgs
                          /Users/zhang/.conda/pkgs
       envs directories : /usr/local/anaconda3/envs
                          /Users/zhang/.conda/envs
               platform : osx-64
             user-agent : conda/4.7.12 requests/2.22.0 CPython/3.7.4 Darwin/19.2.0 OSX/10.15.2
                UID:GID : 501:20
             netrc file : None
           offline mode : False

(python27)
# ~ [17:06:22]
$ pip --version
pip 19.3.1 from /usr/local/anaconda3/envs/python27/lib/python2.7/site-packages/pip (python 2.7)
(python27)
可以很明显的看出两者在环境隔离方面的差异。因此,每当创建一个虚拟环境,都需要重新设置一下pip的国内镜像
$ pip install -i https://pypi.tuna.tsinghua.edu.cn/simple pip -U
$ pip config set global.index-url https://pypi.tuna.tsinghua.edu.cn/simple
软件包安装
因为pip是各个环境独立一套的,因此和单个环境使用没有任何区别,软件包也是安装到各个虚拟环境的/site-packages/目录下,例如/usr/local/anaconda3/envs/python27/lib/python2.7/site-packages/。
conda因为各个环境共用一套,所以在执行时需要指定环境,不指定就默认为当前活跃环境:
# 查看当前环境下已安装的包
conda list

# 查看某个指定环境的已安装包
conda list -n python27

# 查找package信息
conda search numpy

# 安装package
conda install -n python27 numpy
# 如果不用-n指定环境名称,则被安装在当前活跃环境
# 也可以通过-c指定通过某个channel安装

# 更新package
conda update -n python27 numpy

# 删除package
conda remove -n python27 numpy
conda也能管理conda、python、anaconda的版本:
# 更新conda,保持conda最新
conda update conda

# 更新anaconda
conda update anaconda

# 更新python
conda update python
# 假设当前环境是python 3.7, conda会将python升级为3.7.x系列的当前最新版本
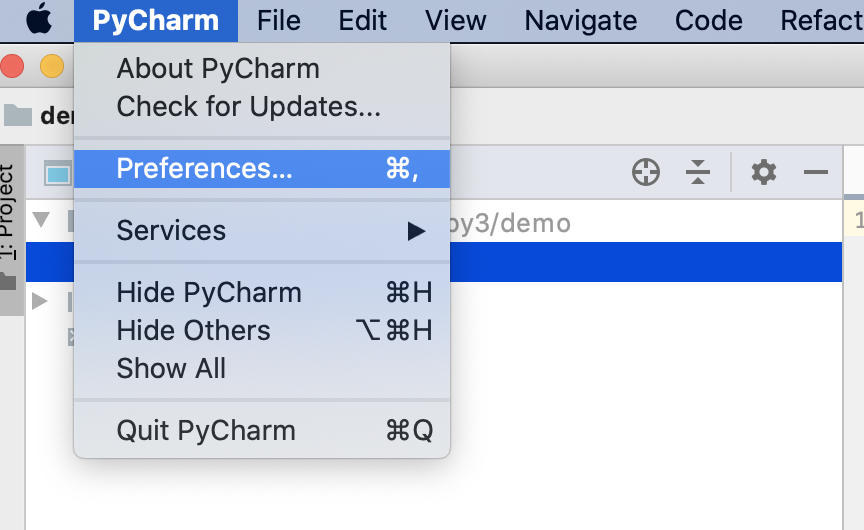
IDE设置
开发总是离不开IDE,这里仅介绍PyCharm的设置,VS Code可以参考官方文档Using Python environments in VS Code。
PyCharm
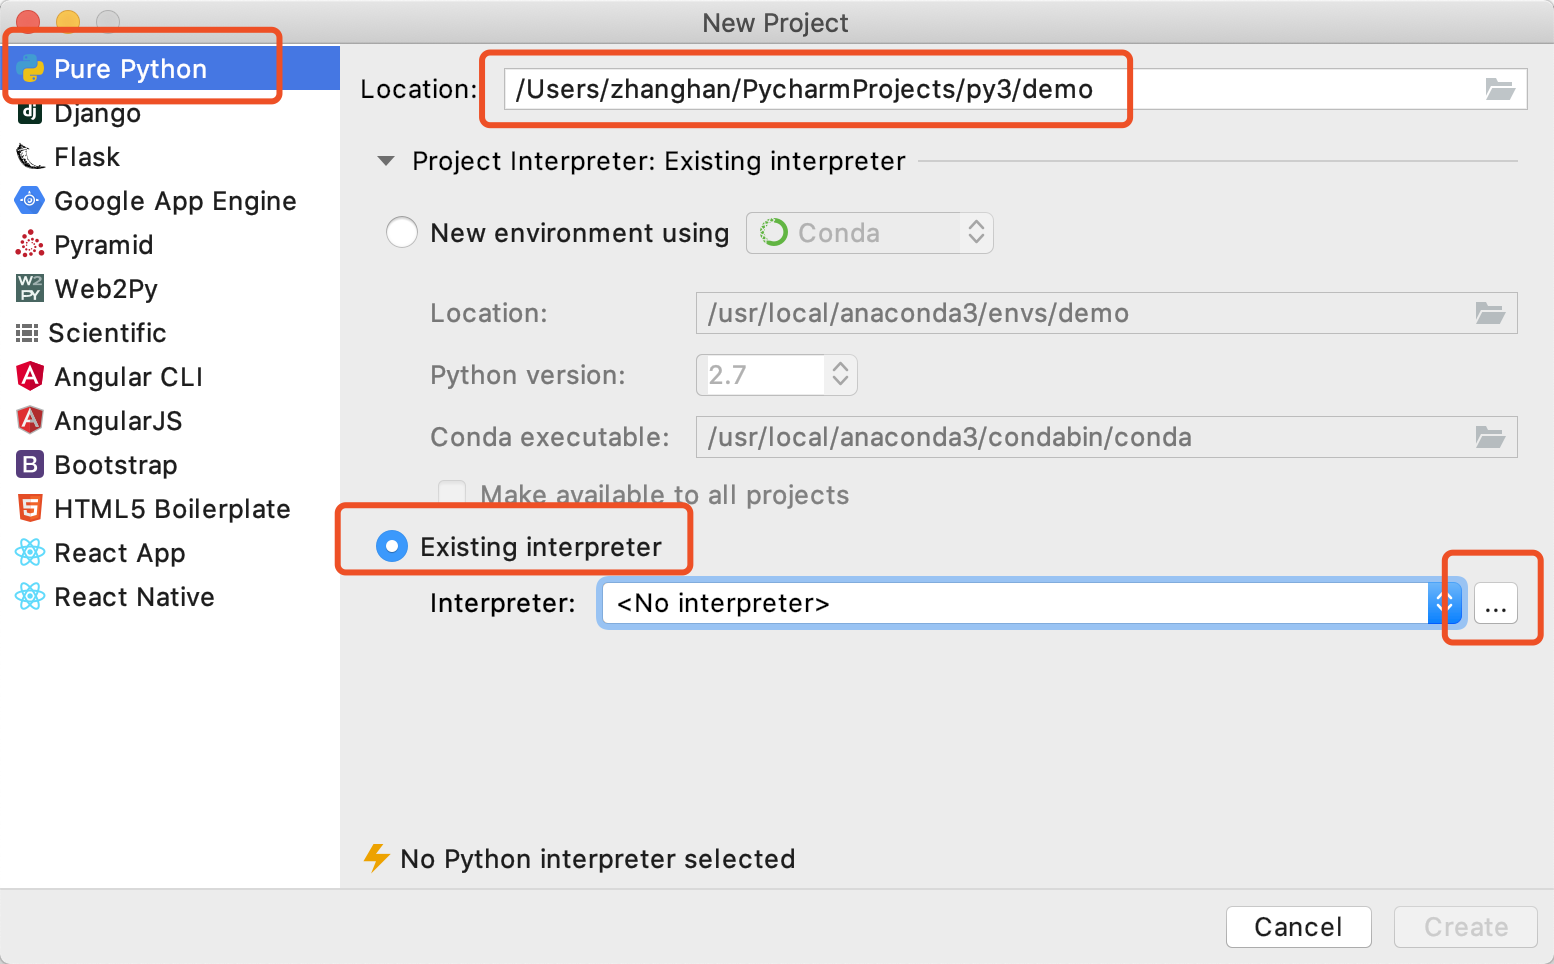
首先需要先创建好虚拟环境,还是以python27这个环境为例。
创建Project时选择环境
-
打开PyCharm,选择Create New Project
-
修改项目的名字,然后选择Project Interpreter》Existing Interpreter>...
-
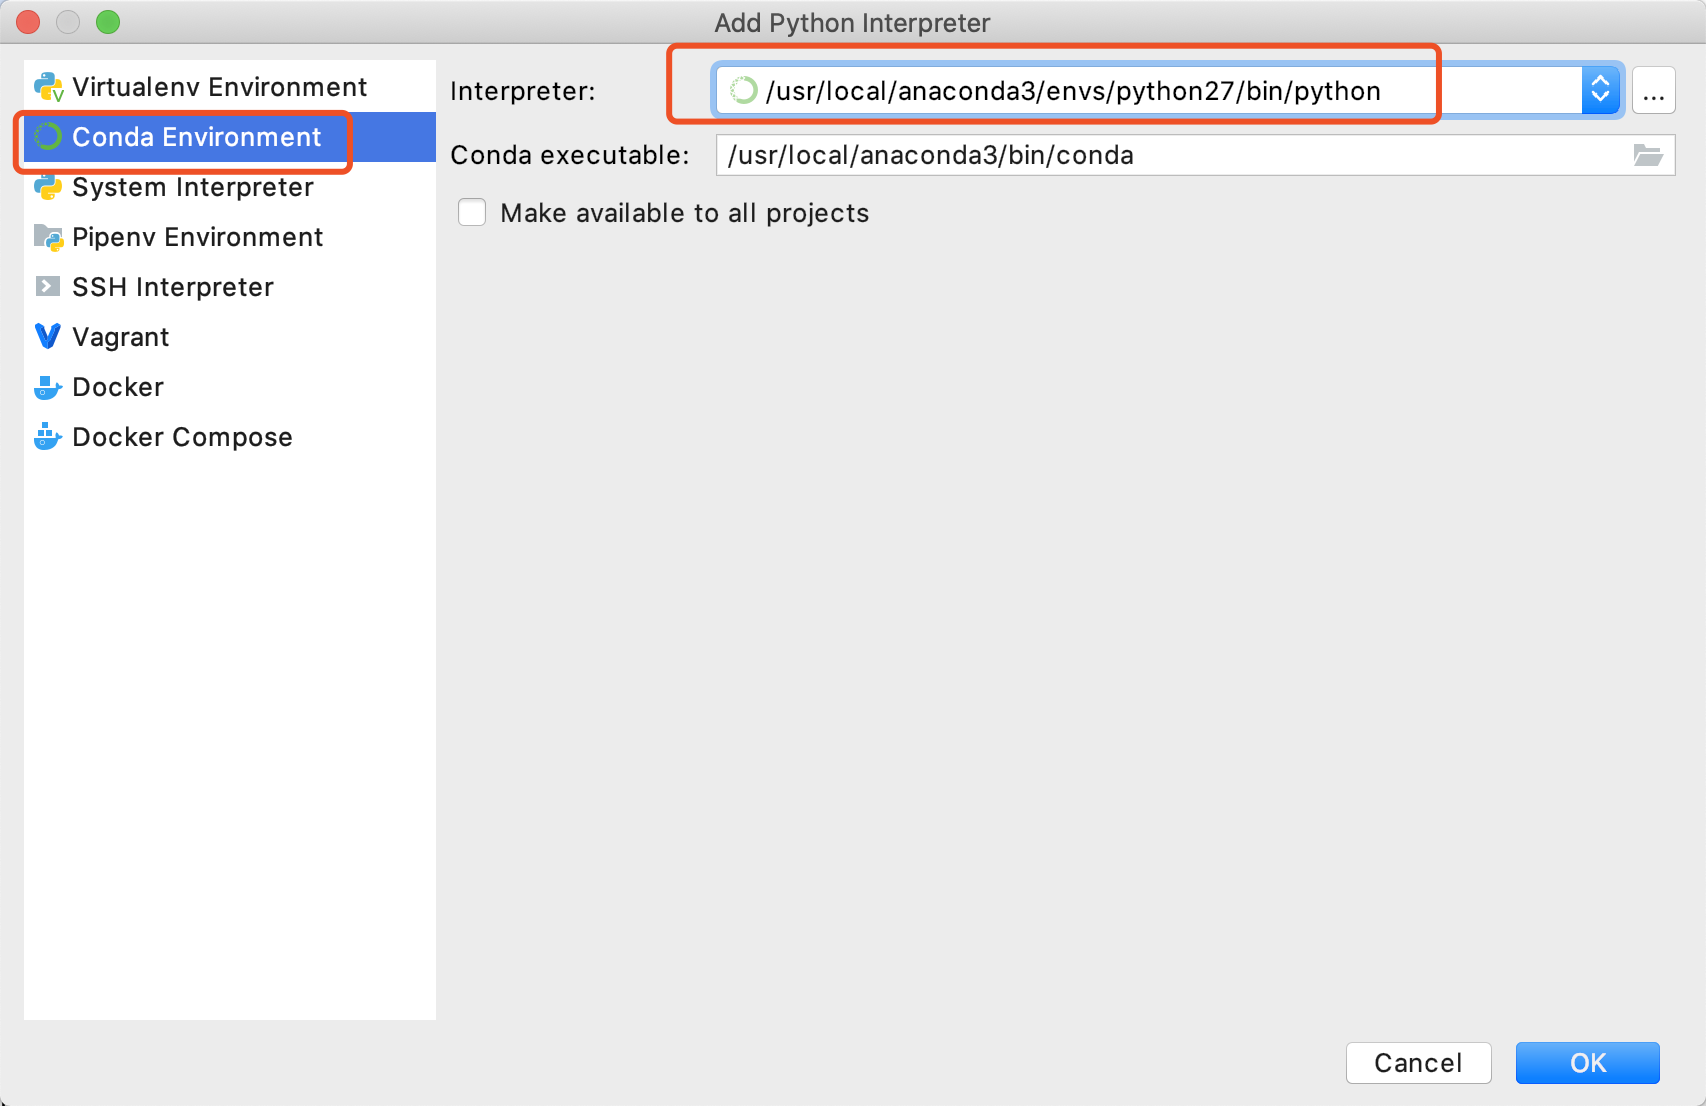
选择Conda Environment==》... ,设置为之前创建的python27环境的文件夹
-
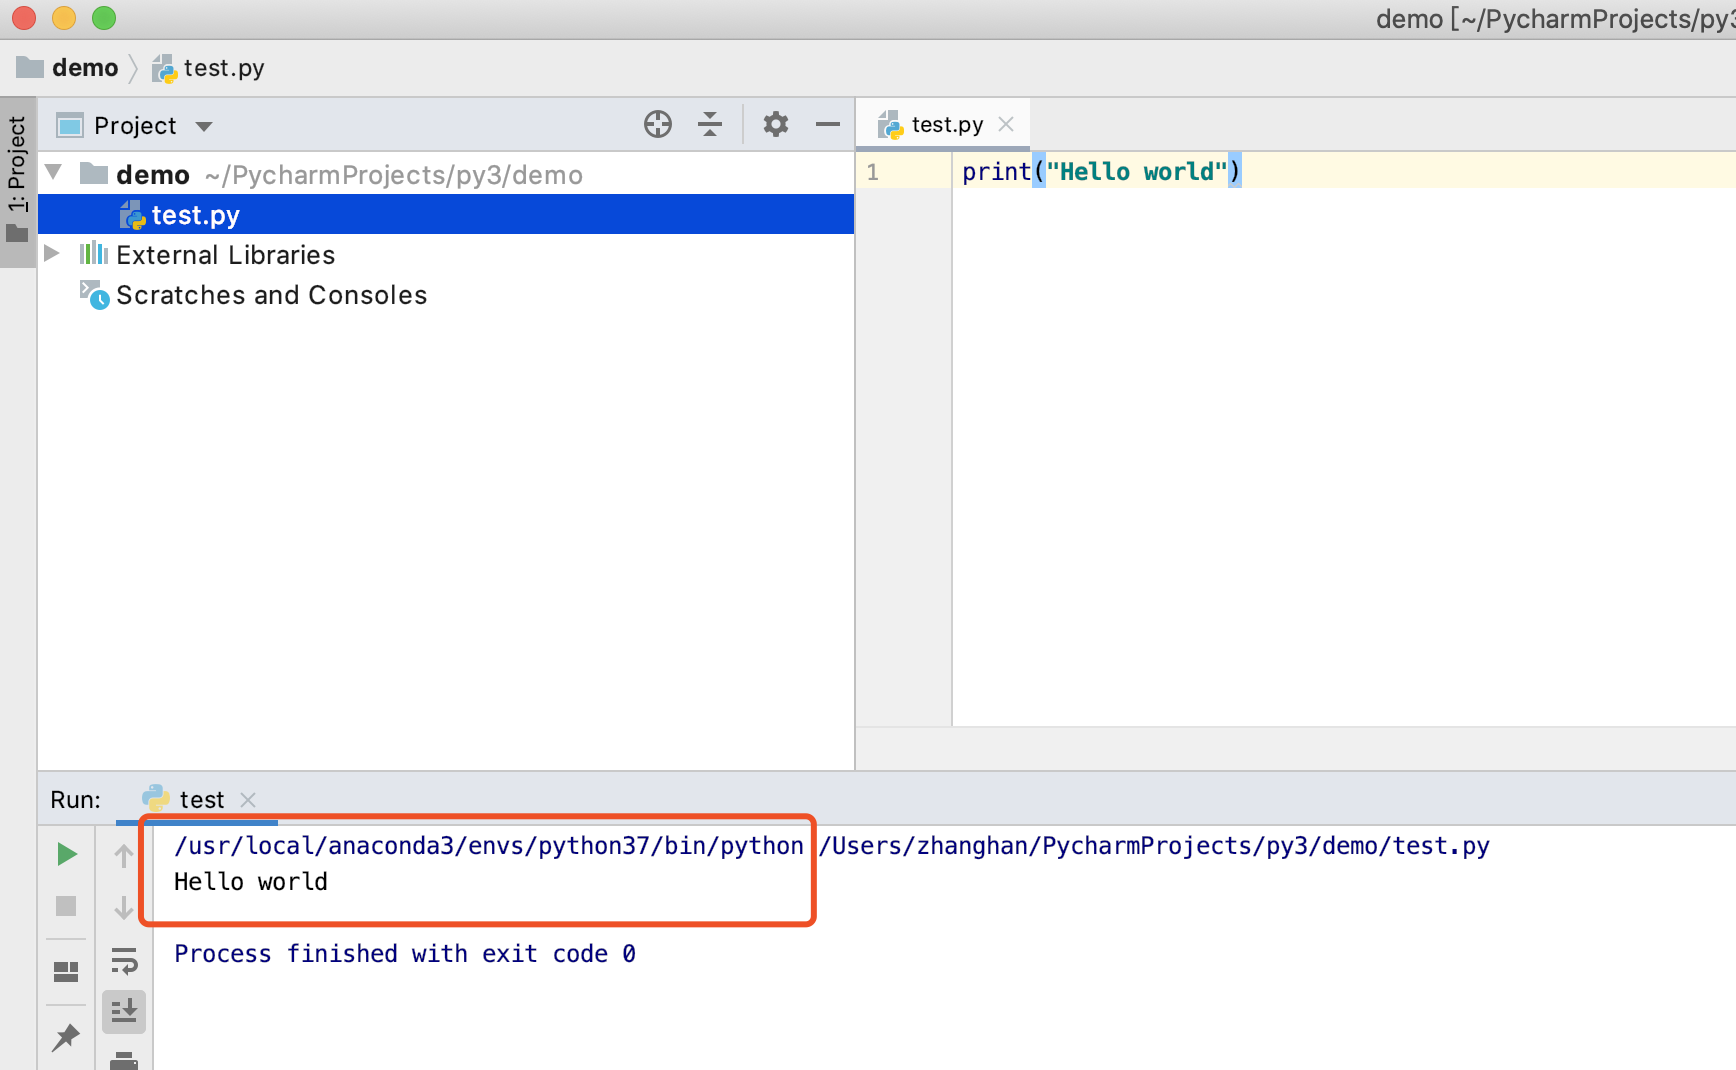
创建完工程,然后新建一个python文件,输出Hello world:
print("Hello world")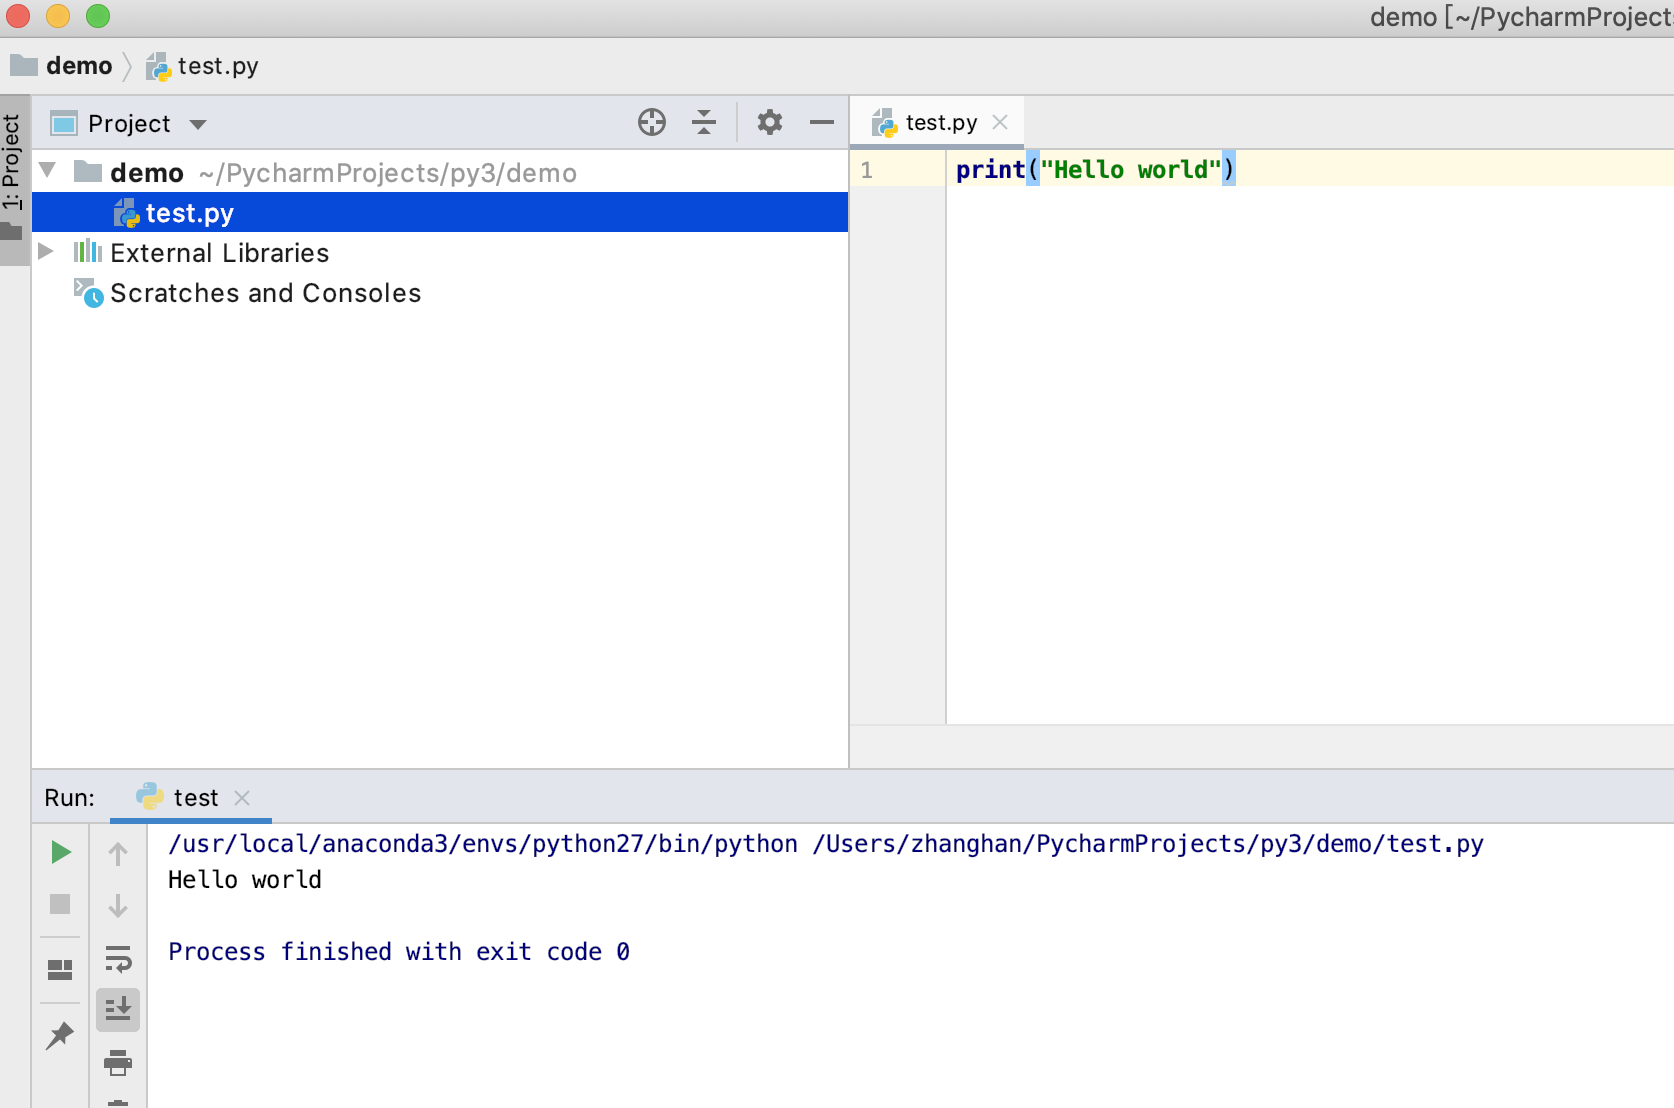
已有Project修改环境