1、在项目pom文件中引入swagger2的jar包
<!-- swagger2开始 -->
<dependency>
	<groupId>io.springfox</groupId>
	<artifactId>springfox-swagger2</artifactId>
	<version>2.4.0</version>
</dependency>
<dependency>
	<groupId>io.springfox</groupId>
	<artifactId>springfox-swagger-ui</artifactId>
	<version>2.4.0</version>
</dependency>
<!-- swagger2结束 -->
2、编写用于配置swagger2的类 Swagger2.java(名字可任意取)
package com.example.demo;

import org.springframework.context.annotation.Bean;
import org.springframework.context.annotation.Configuration;
import springfox.documentation.builders.ApiInfoBuilder;
import springfox.documentation.builders.PathSelectors;
import springfox.documentation.builders.RequestHandlerSelectors;
import springfox.documentation.service.ApiInfo;
import springfox.documentation.service.Contact;
import springfox.documentation.spi.DocumentationType;
import springfox.documentation.spring.web.plugins.Docket;
import springfox.documentation.swagger2.annotations.EnableSwagger2;

@Configuration
@EnableSwagger2
public class Swagger2 {
    //swagger2的配置文件,这里可以配置swagger2的一些基本的内容,比如扫描的包等等
    @Bean
    public Docket createRestApi(){
        return new Docket(DocumentationType.SWAGGER_2)
                .apiInfo(apiInfo())
                .select()
                //为当前需要扫描到的包的路径
                .apis(RequestHandlerSelectors.basePackage("com.example.demo"))
                .paths(PathSelectors.any())
                .build();
    }
    //构建 api文档的详细信息函数,注意这里的注解引用的是哪个
    private ApiInfo apiInfo() {
        return new ApiInfoBuilder()
                //页面标题
                .title("SpringBoot的Swagger2构建RESTful API接口形式")
                //创建人
                .contact(new Contact("cxy", "https://www.cnblogs.com/lazycxy/", "cxymasters@163.com"))
                //版本号
                .version("1.0")
                //描述
                .description("API相关描述")
                .build();
    }
}
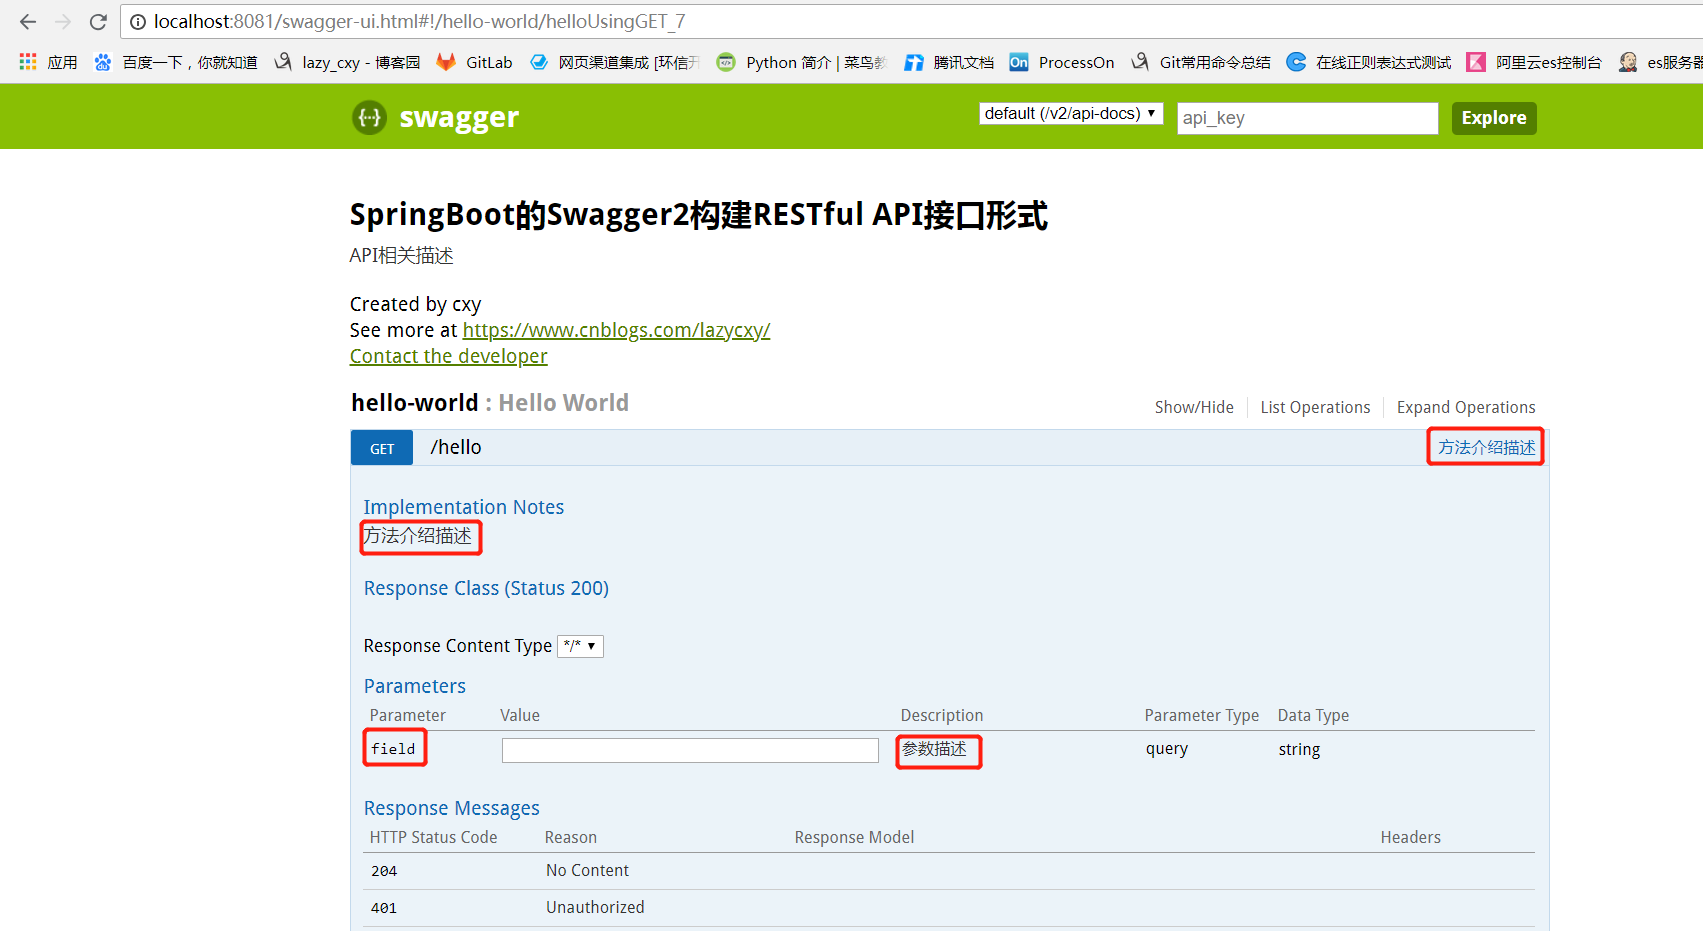
3、在你的接口类中添加如下注释
@RestController
@Api("测试接口描述")
public class HelloWorld {
    @RequestMapping("/hello")
    @ApiOperation(value = "方法介绍描述", httpMethod = "GET", response = String.class, notes = "方法介绍描述")
    public String hello(
            @RequestParam(value = "field", required = false)@ApiParam("参数描述") String field
    ){
        return "hello world~~~";
    }
}
4、启动你的项目,输入localhost:8081/swagger-ui.html 进行访问swagger页面 ps:这个swagger-ui.html 是封装到swagger的jar包里的
整合完毕