1.乐鑫官网
2.ESP32踩坑
ESP32控制摇杆,定义sw的引脚时一定要设置为上拉才行。
微信控制ESP8266操控舵机(使用MicroPython)


import network
import socket     #网络套接字和python一样
from machine import Pin,PWM
import time

UDP_server_addr = ('115.28.93.201', 7005)  #115.28.93.201 端口:UDP 7005
SSID = your_wifi_ssid    #路由器名称
PASSWORD = your_wifi_password    #路由器密码
wlan = network.WLAN(network.STA_IF)

UserID = your_user_ID
DeviceID = your_device_id
MM = your_mm    #16位密码


servo1 = PWM(Pin(12), freq = 50)
servo1.duty(130)
servo2 = PWM(Pin(14), freq = 50)
servo2.duty(130)
time.sleep(2)
servo1.deinit()
servo2.deinit()

client = socket.socket(socket.AF_INET, socket.SOCK_DGRAM)  #生成新的套接字对象
Heart = r"004532A01" + DeviceID + MM +  r"123401hi05" #心跳包

# 连接网络
def do_connect():
    wlan.active(True)
    if not wlan.isconnected():
        print('connecting to network...')
        wlan.connect(SSID, PASSWORD)
    start = time.time()
    while not wlan.isconnected():
        time.sleep(1)
        if time.time()-start > 5:
            print("connect timeout!")
            break
    #如果连接成功
    if wlan.isconnected():
        print('network connect success . \nnetwork config:', wlan.ifconfig())

def shakeHand_UDP_server():
    global client
    client = socket.socket(socket.AF_INET, socket.SOCK_DGRAM)  #生成新的套接字对象
    client.settimeout(5)  #设置连接超时时间
    while True:
        print("sendto: " + Heart)
        len = client.sendto(Heart, UDP_server_addr)  #向服务器发送心跳包
        print("sendlen : " + str(len) )
        time.sleep(0.5)
        try:
            print("now recv...")
            data, addr = client.recvfrom(64)  #接收心跳包数据
            print(b"recv :" + data)
            break
        except:
            print("recv error!")
        time.sleep(10)

def revMsgAndKeepConnect ():
    client.settimeout(20)  #设置连接超时时间
    time.sleep(0.2)
    try:
        print("try recv data...")
        data, addr = client.recvfrom(64)  #从服务器接收数据
        print(b"recv: " + data)
        if b'open' in  data:
            DataFlag = data[9:13]
            SendData = b'005532A01' +  DeviceID + MM  + DataFlag + b'09' + UserID + b'OK05'
            print(b"sendto: " + SendData)
            servo1.init(duty = 20)
            servo2.init(duty = 20)
            client.sendto(SendData, UDP_server_addr)  #向服务器发送数据转为bytes
            time.sleep(4)
            servo1.duty(130)
            servo2.duty(130)
            time.sleep(1)
            servo1.deinit()
            servo2.deinit()
        else:
            pass
    except:
        client.sendto(Heart, UDP_server_addr)  #向服务器发送心跳包
        print("sendto heart:" + Heart)
if __name__=='__main__':
    time.sleep(1)
    do_connect()
    shakeHand_UDP_server()
    while True:
        revMsgAndKeepConnect()
ESP32与PC端使用阿里云物联网平台通过MQTT发布订阅消息(使用MicroPython)
from umqtt.simple import MQTTClient
import usocket as socket
import time
import wifi

wifi.connect()

#Demo_01
ProductKey = "*********"#使用你自己的
ClientId = "1234|securemode=3,signmethod=hmacsha1|"
DeviceName = "Demo_01"
DeviceSecret = "*******************************"#使用你自己的

strBroker = ProductKey + ".iot-as-mqtt.cn-shanghai.aliyuncs.com"
Brokerport = 1883

user_name = "Demo_01&*********"#使用你自己的
user_password = "**********************************************"#使用你自己的

print("clientid:",ClientId,"\n","Broker:",strBroker,"\n","User Name:",user_name,"\n","Password:",user_password,"\n")


def connect():
    client = MQTTClient(client_id = ClientId,server= strBroker,port=Brokerport,user=user_name, password=user_password,keepalive=60)
    #please make sure keepalive value is not 0

    client.connect()

    temperature =25.00
    while temperature < 30:
        temperature += 0.5

        send_mseg = '{"params": {"IndoorTemperature": %s},"method": "thing.event.property.post"}' % (temperature)
        client.publish(topic="/sys/*************/Demo_01/thing/event/property/post", msg=send_mseg,qos=1, retain=False)#*号处为product id

        time.sleep(3)

    while True:
        pass

    #client.disconnect()
# coding=utf-8
import datetime
import time
import hmac
import hashlib
import math

try:
    import paho.mqtt.client as mqtt
except ImportError:
    print("MQTT client not find. Please install as follow:")
    print("pip install paho-mqtt")

# 设置连接信息

#Demo_02
ProductKey = "*********"#使用你自己的
ClientId = "2234"  # 自定义clientId
DeviceName = "Demo_02"
DeviceSecret ="************************************8**"#使用你自己的

# 获取时间戳(当前时间毫秒值)
us = math.modf(time.time())[0]
ms = int(round(us * 1000))
timestamp = str(ms)

# 计算密码(签名值)
def calculation_sign(signmethod):
    data = "".join(("clientId", ClientId, "deviceName", DeviceName,
                    "productKey", ProductKey, "timestamp", timestamp))

    if "hmacsha1" == signmethod:
        # ret = hmac.new(bytes(DeviceSecret),
        #                bytes(data), hashlib.sha1).hexdigest()
        ret = hmac.new(bytes(DeviceSecret, encoding="utf-8"),
                       bytes(data, encoding="utf-8"),
                       hashlib.sha1).hexdigest()
    elif "hmacmd5" == signmethod:
        # ret = hmac.new(bytes(DeviceSecret, encoding="utf-8"),
        #                bytes(data, encoding="utf-8"), hashlib.md5).hexdigest()
        ret = hmac.new(bytes(DeviceSecret, encoding="utf-8"),
                       bytes(data, encoding="utf-8"),
                       hashlib.md5).hexdigest()
    else:
        raise ValueError
    return ret


# ======================================================

strBroker = ProductKey + ".iot-as-mqtt.cn-shanghai.aliyuncs.com"
port = 1883

client_id = "".join((ClientId,
                     "|securemode=3",
                     ",signmethod=", "hmacsha1",
                     ",timestamp=", timestamp,
                     "|"))
username = "".join((DeviceName, "&", ProductKey))
password = calculation_sign("hmacsha1")

print("="*60)
print(strBroker)
print("client_id:", client_id)
print("username:", username)
print("password:", password)
print("="*60)


# 成功连接后的操作
def on_connect(client, userdata, flags, rc):
    print("OnConnetc, rc: " + str(rc))


# 成功发布消息的操作
def on_publish(client, msg, rc):
    if rc == 0:
        print("publish success, msg = " + msg)


# 成功订阅消息的操作
def on_subscribe(mqttc, obj, mid, granted_qos):
    print("Subscribed: " + str(mid) + " " + str(granted_qos))


def on_log(mqttc, obj, level, string):
    print("Log:" + string)


def on_message(mqttc, obj, msg):
    curtime = datetime.datetime.now()
    strcurtime = curtime.strftime("%Y-%m-%d %H:%M:%S")
    print(strcurtime + ": " + msg.topic + " " + str(msg.qos) + " " + str(msg.payload))
    on_exec(str(msg.payload))


def on_exec(strcmd):
    print("Exec:", strcmd)
    strExec = strcmd


if __name__ == '__main__':
    mqttc = mqtt.Client(client_id)
    mqttc.username_pw_set(username, password)
    mqttc.on_message = on_message
    mqttc.on_connect = on_connect
    mqttc.on_publish = on_publish
    mqttc.on_subscribe = on_subscribe
    mqttc.on_log = on_log
    mqttc.connect(strBroker, port, 120)
    # mqttc.loop_start()
    time.sleep(1)
    temperature =27.55
    mqttc.subscribe("/sys/************/Demo_02/thing/service/property/set", qos=1)  # 换成自己的
    #send_mseg = '{"pm_25": %s,"area":"%s","time":"%s"}' % (0, 0, datetime.datetime.now())
    #send_mseg = '{"id": "1234", "version": "1.0","params": {"IndoorTemperature": %s},"method": "thing.event.property.post"}'%(temperature)
    send_mseg = '{"params": {"IndoorTemperature": %s},"method": "thing.event.property.post"}' % (temperature)

    print('send_mseg is : ',send_mseg)

    mqttc.loop_forever()
6.APP控制ESP32
点灯blinker app:
三分钟实现手机控制Arduino/esp8266/esp32
Blynk app:
7.微信公众号控制ESP32
使用MicroPython开发ESP32(04):无线网络使用和WebREPL
ESP32教程大全:http://mc.dfrobot.com.cn/thread-271930-1-1.html
成果:
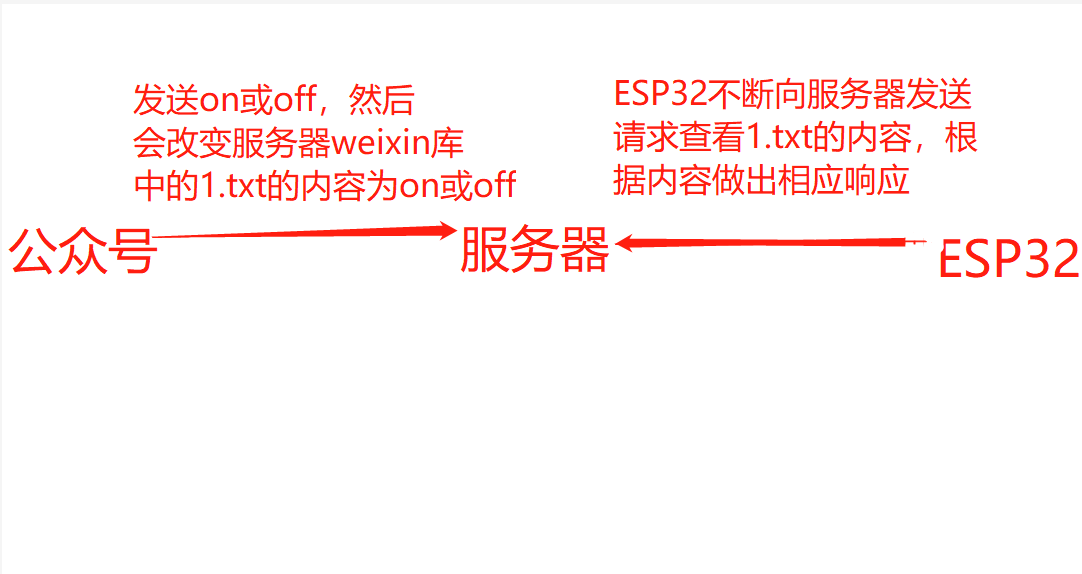
7.1微信公众号控制LED(缺点:所有人修改同一个文件,不适合多人使用)
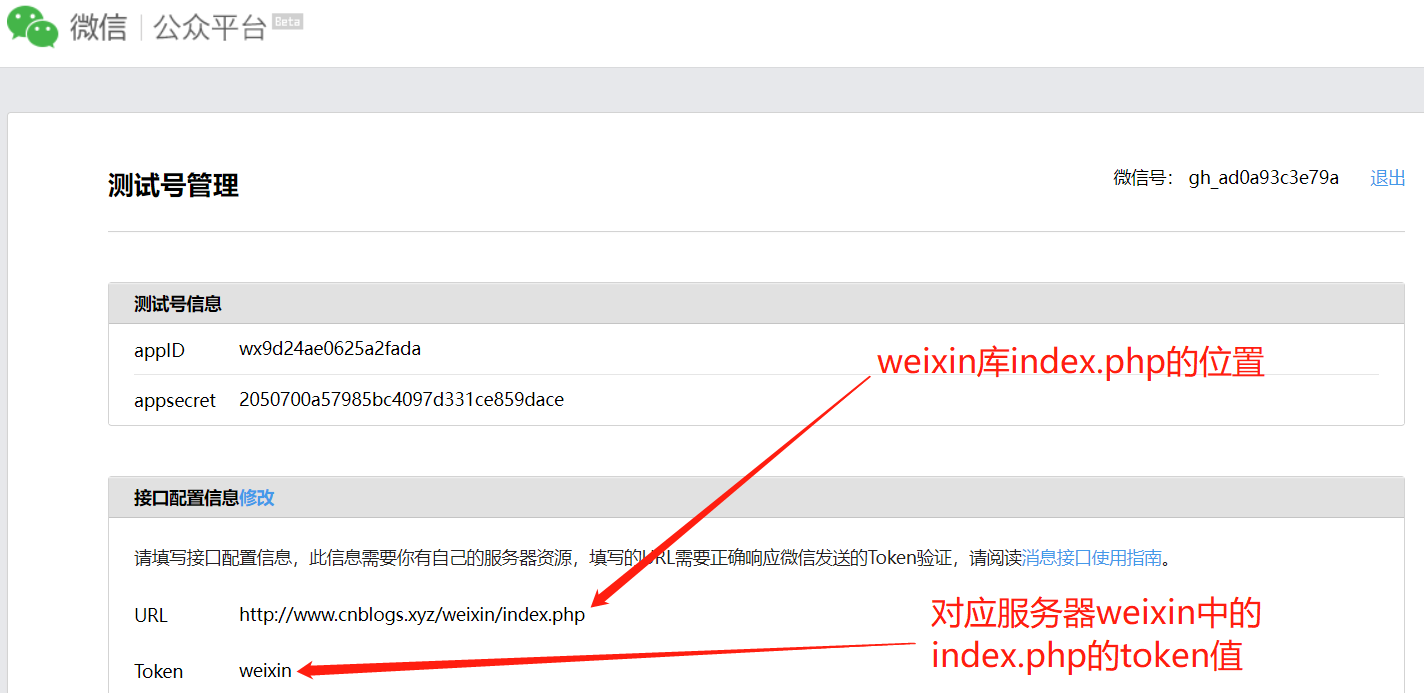
第一步:在阿里云或其他云买服务器和域名,服务器开启8888 20 443 22等端口,然后上传weixin库到根目录
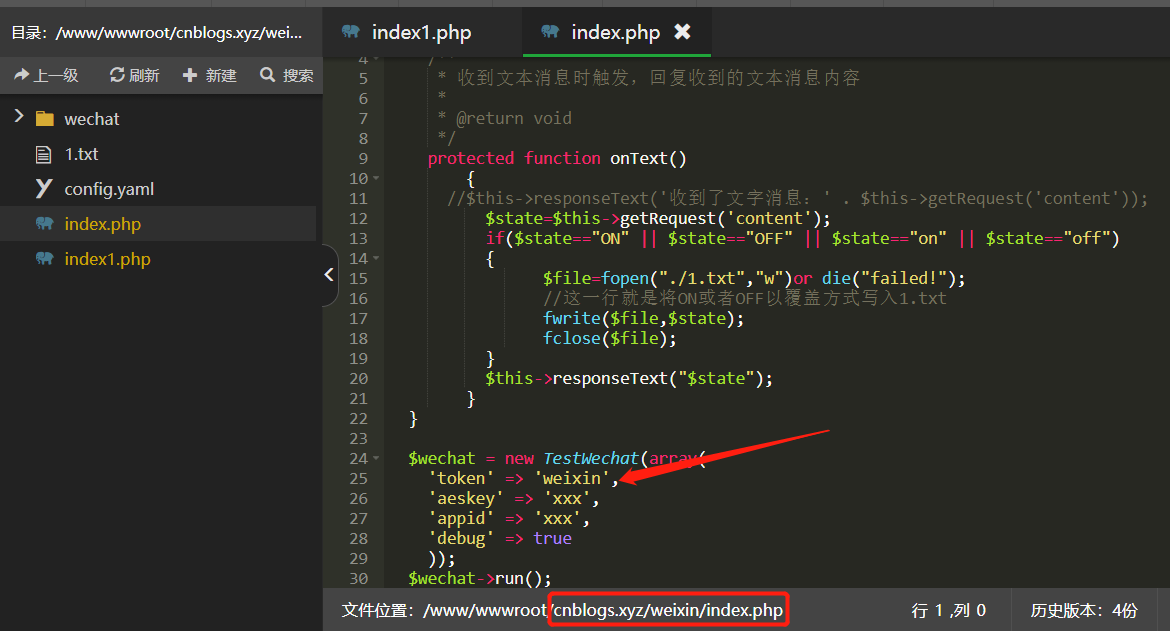
第二步:申请公众号(这里可以使用微信公众平台测试账号)并开启设备功能然后绑定服务器接口(URL填写weixin库的index.php的位置,这里我填的是http://www.cnblogs.xyz/weixin/index.php, token填写index.php文件中token的值,这里我填的是weixin)
第三步:上载urequests.py库(文件中已上传)到ESP32开发板中,示例代码也可以另存到ESP32开发板中;然后插上传感器,运行代码,打开公众号发送‘on’或‘off’来控制红灯亮灭。
# 说明:微信公众号控制LED
# 使用ESP32 micropython API中提供的库来创建web服务器
try:
  import usocket as socket
except:
  import socket

from machine import Pin
import network  # 使用ESP32 micropython API中提供的network库来建立网络连接
import urequests

import esp
esp.osdebug(None)

import gc
gc.collect()  # 清理内存

# wifi名称及密码
ssid = 'TP-LINK_ZLTech'
password = 'zhonglingkeji'

# 把wifi模式设置为STA模式,连接路由器模式并激活
station = network.WLAN(network.STA_IF)
station.active(True)
station.connect(ssid, password)

while station.isconnected() == False:  # 判断wifi连接是否成功
  pass

print('Connection successful')
print(station.ifconfig())  # 显示IP地址

led = Pin(26, Pin.OUT)

try:
  while True:
    res = urequests.get('http://www.cnblogs.xyz/weixin/1.txt').text
    # print(res)
    if res == 'on' or res == 'ON':
      print('LED ON')
      led.value(1)
    if res == 'off' or res == 'OFF':
      print('LED OFF')
      led.value(0)
    print()
finally:
    print('Connection closed')
注意:坑1:使用过另一个urequests.py库,不过在ESP32发送请求时会每隔一段时间报错一次OSError23,不好用。