平台:
深圳市优龙科技有限公司的FS2410(基于ARM9)
准备:
1、用串口(UART1,J8)线与PC机相连,这个是用来传输数据和显示信息的
2、连接USB数据下载线(usb device),注意需要自己装usb驱动,这个是用来下载文件的
3、设置好串口工具(超级终端或DNW工具)的参数
说明:
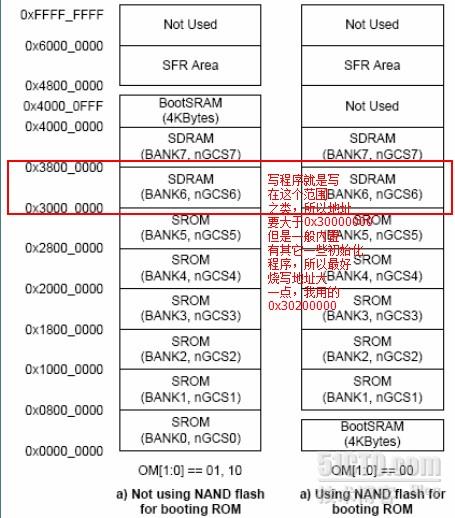
1、S3C2410支持两种启动模式:一种是从NAND FLASH启动;一种是从外部nGCS0片选的Nor Flash启动(jp1接上跳线帽,从NAND FLASH启动;jp1不接上跳线帽,从NOR FLASH启动)
2、在这两种启动模式下,各片选的存储空间分配是不同的,这两种启动模式的存储分配图如下
3、由于三星公司提供工具软件的缺陷,导致NorFlash烧写成功率很低,所以尽量避免烧写NorFlash,而应当去烧写NandFlash,因为如果把NandFlash烧写坏了,从NorFlash中启动BIOS,还可以马上恢复NandFlash内容,但一旦NorFlash烧写坏了,就不能从NandFlash启动来恢复NorFlash中内容了。这个时候只能用SJF来烧写,而三星提供的SJF不是很完善,不容易烧写成功!
过程
虽然是第一次设置这个东西,但是好奇的心理还是让我忍不住想自己动手把整个过程走一遍,于是我进入NorFlash把NandFlash里面的所有东西全部擦除了,然后全部重新烧写。
1.拨掉跳线帽,进入NOR,如下所示
Power on reset
Env.Os_Lcd_Flag=0
Env.Os_Auto_Flag=0
<*******************************************>
<*                                         *>
<*         S3C2410 Board BIOS V2006        *>
<*                                         *>
<*         Http://www.ucdragon.com         *>
<*                                         *>
<*         深圳市优龙科技有限公司          *>
<*                                         *>
<*             版  权  所  有              *>
<*                                         *>
<*******************************************>
NOR Flash Boot, Read ID is : 0x234b00bf
SST39VF1601 found
Please select function :
0 : USB download file
1 : Uart download file
2 : Write Nand flash with download file
3 : Load Pragram from Nand flash and run
4 : Erase Nand flash regions
5 : Write NOR flash with download file
6 : Set boot params
7 : Set AutoBoot parameter,1:linux 2:wince
8 : Set Lcd Display,1:DH3.5' 2:DH4.3' 3:QC7.0' 4:QC8.0'
这里选择4,然后再选择擦除0,1,2,3便可以将NAND里面的所有东西全部擦除掉了
2.选择0,用USB下载准备的S3C2410_BIOS.bin,再这之前需要安装usb手动驱动,出现
USB download file, press Esc key to exit
Now USB is connected.
则说明可以用usb下载文件了,文件下载完成后会提示是否运行
Do you want to run? [y/n] : n
这里选择否,原因是usb下载文件只是存在内存中,还没有烧写到FLASH里面,现在需要把bios信息写到NAND FLASH里面去,才能直到引导系统的作用。
3.现在选择2,准备把刚下载的文件烧写到NAND FLASH里面去
2 : Write Nand flash with download file
选择2后会出现几个选项
Please select which region to write : Esc to abort

0 : offset 0x0       , size 0x40000    [bootloader]
1 : offset 0x40000   , size 0x1c0000   [zImage]
2 : offset 0x200000  , size 0x1e00000  [cramfs]
3 : offset 0x2000000 , size 0x2000000  [WinCE]
对应的分别是烧写bootloader、linux系统、文件系统和WinCE系统,这里我们先烧写bootloader,所以选择0
Now write nand flash page 0x200 from ram address 0x30200000, filesize = 1273724

Are you sure? [y/n]
..............................................................................
Program nand flash partition success
烧写完成后出现类似这样的信息,现在我们就可以进入NAND的bios了
4.插上跳线帽,重启电源,进入NAND的bios,如下所示
Power on reset
Env.Os_Lcd_Flag=0
Env.Os_Auto_Flag=0
<*******************************************>
<*                                         *>
<*         S3C2410 Board BIOS V2006        *>
<*                                         *>
<*         Http://www.ucdragon.com         *>
<*                                         *>
<*         深圳市优龙科技有限公司          *>
<*                                         *>
<*             版  权  所  有              *>
<*                                         *>
<*******************************************>

NAND Flash Boot
Please select function :
0 : USB download file
1 : Uart download file
2 : Write Nand flash with download file
3 : Load Pragram from Nand flash and run
4 : Erase Nand flash regions
5 : Write NOR flash with download file
6 : Set boot params
7 : Set AutoBoot parameter,1:linux 2:wince
8 : Set Lcd Display,1:DH3.5' 2:DH4.3' 3:QC7.0' 4:QC8.0' 5:VGA
d3
可以看到上面的NAND Flash Boot字样,现在boot成功了,接下来就是烧写linux系统了
5.像刚才一样用usb选择下载linux系统(zImage)和filesystem(yl2410_demo.cramfs),在烧写时选择1和2就行了
Please select which region to write : Esc to abort

0 : offset 0x0       , size 0x40000    [bootloader]
1 : offset 0x40000   , size 0x1c0000   [zImage]
2 : offset 0x200000  , size 0x1e00000  [cramfs]
3 : offset 0x2000000 , size 0x2000000  [WinCE]

Now write nand flash page 0x1000 from ram address 0x30200000, filesize = 28254208

Are you sure? [y/n]

..........................................................................................
..........................................................................................
..........................................................................................
..........................................................................................
..........................................................................................
..........................................................................................
...............Program nand flash partition success
可以看到烧写文件系统的时候需要多一点的时间,不过看到success时还是会激动一下子的
6.好了,现在东西都准备好了,可以开机啦,选择3吧
3 : Load Pragram from Nand flash and run
7.进入系统了有木有啊
Set boot params = root=1f02 init=/linuxrc console=ttyS0,115200 devfs=mountdisplay=dh240

Linux version 2.6.8.1-ptx1 (root@localhost.localdomain) (gcc version 3.3.2)
#256 Mon Oct 29 11:46:28 HKT 2012
CPU: ARM920Tid(wb) [41129200] revision 0 (ARMv4T)
CPU: D VIVT write-back cache
CPU: I cache: 16384 bytes, associativity 64, 32 byte lines, 8 sets
CPU: D cache: 16384 bytes, associativity 64, 32 byte lines, 8 sets
Machine: SMDK2410
ATAG_INITRD is deprecated; please update your bootloader.
Memory policy: ECC disabled, Data cache writeback
S3C2410: core 200.000 MHz, memory 100.000 MHz, peripheral 50.000 MHz
Built 1 zonelists
Kernel command line: root=1f02init=/linuxrc console=ttyS0,115200 devfs=mount
display=dh240
irq: clearing pending ext status 00041000
irq: clearing pending status 00002000
irq: clearing subpending status 00000093
irq: clearing subpending status 00000092
irq: clearing subpending status 00000092
irq: clearing subpending status 00000092
Trying to install chained handler for IRQ47
PID hash table entries: 512 (order 9: 4096 bytes)
setup_timer tcon=00090d09, tcnt c350, tcfg 0000040f,00001032
Console: colour dummy device 80x30
……………
呵呵,下面还有很多,就省略了哈
总结:
回过头来看,过程也很简单啊,不过“会者不难,难者不会”,我也是第一天接触arm开发板,留下笔记,也许将来和我一样的人看见了,能帮助到他们。在这里谢谢f--ing(465692031)和优龙(1758893489)的帮助!