XmpPullParser
鉴于xmpp协议都是以xml格式来传输,因此源码中解析协议都是用到XmpPullParser来解析xml
XmpPullParser很简单,先简单介绍几个比较常用的方法


//定义一个事件采用回调方式,直到xml完毕
public int getEventType() throws XmlPullParserException ;
//遍历下一个事件,返回一个事件类型
public int next() throws XmlPullParserException, IOException
//得到当前tag的名字
public String getName();
//获得当前文本
public String getText();
//当前tag下的属性数量
public int getAttributeCount() ;
//获得当前指定属性位置的名称
public String getAttributeName(int index);
//获得当前指定属性位置的值
public String getAttributeValue(int index);
为了更好的理解后面的源码,加一段代码来分析:
public PacketExtension parseExtension(XmlPullParser parser) throws Exception {
   MUCUser mucUser = new MUCUser();
   boolean done = false;
   while (!done) {
       int eventType = parser.next();
       if (eventType == XmlPullParser.START_TAG) {
           if (parser.getName().equals("invite")) {
               mucUser.setInvite(parseInvite(parser));
           }
           if (parser.getName().equals("item")) {
               mucUser.setItem(parseItem(parser));
           }
           if (parser.getName().equals("password")) {
               mucUser.setPassword(parser.nextText());
           }
           if (parser.getName().equals("status")) {
               mucUser.setStatus(new MUCUser.Status(parser.getAttributeValue("", "code")));
           }
           if (parser.getName().equals("decline")) {
               mucUser.setDecline(parseDecline(parser));
           }
           if (parser.getName().equals("destroy")) {
               mucUser.setDestroy(parseDestroy(parser));
           }
       }
       else if (eventType == XmlPullParser.END_TAG) {
           if (parser.getName().equals("x")) {
               done = true;
           }
       }
   }

   return mucUser;
}
里面的对象先不用理它,只需看他是如何分析这段xml的:
//协议解释,从123456789发送一段协议给12345678这个用户,邀请用户123456789进入房间,理由hi join us。
<message id="WEzG6-11" to="123456789@xxx-pc/Smack" from="12345678@xxx-pc/Smack" type="get">
<x xmlns="http://jabber.org/protocol/muc#user">
<invite to="123456789@xxx-pc">
<reason>hi join us</reason>
</invite>
</x>
</message>
parser.next();
- 获得第一个事件,判断是否开始标签(XmlPullParser.START_TAG)
- 然后再里面判断每个标签的名字
- 处理完后判断结尾标签(XmlPullParser.END_TAG)是否需要结束本次循环。
//取xmlpullparse对象
- XmlPullParserFactory factory = XmlPullParserFactory.newInstance();
- XmlPullParser parser = factory.newPullParser();
//设置关联数据源
parser.setInput(reader);
接收消息以及如何解析消息
- 在android里面用的smack包其实叫做asmack,该包提供了两种不同的连接方式:socket和httpclient。
- 该包并且提供了很多操作xmpp协议的API,也方便各种不同自定义协议的扩展。
- 我们不需要自己重新去定义一套接收机制来扩展新的协议,只需继承然后在类里处理自己的协议就可以了。
总的思路
- 使用socket连接服务器
- 将XmlPullParser的数据源关联到socket的InputStream
- 启动线程不断循环处理消息
- 将接收到的消息解析xml处理封装好成一个Packet包
- 将包广播给所有注册事件监听的类
逐步击破
先理解一下smack的使用,看下smack类图
下图只显示解释所要用到的类和方法,减缩了一些跟本文主题无关的代码,只留一条贯穿着从建立连接到接收消息的线。
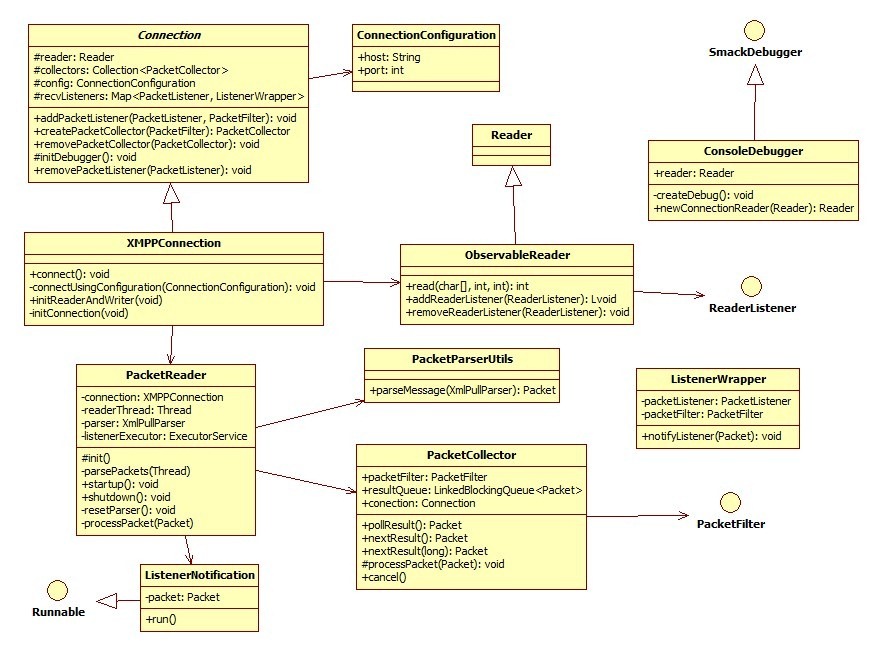
1.解析这块东西打算从最初的调用开始作为入口,抽丝剥茧,逐步揭开。
PacketListener packetListener = new PacketListener() {
    @Override
    public void processPacket(Packet packet) {
        System.out.println("Activity----processPacket" + packet.toXML());
    }
};

PacketFilter packetFilter = new PacketFilter() {

    @Override
    public boolean accept(Packet packet) {
        System.out.println("Activity----accept" + packet.toXML());
        return true;
    }
};
解释:创建包的监听以及包的过滤,当有消息到时就会广播到所有注册的监听,当然前提是要通过packetFilter的过滤。
2.在这构造函数里面主要配置ip地址和端口
super(new ConnectionConfiguration("169.254.141.109", 9991));
3.注册监听,开始初始化连接。
connection.addPacketListener(packetListener, packetFilter);

connection.connect();
4.通过之前设置的ip和端口,建立socket对象
public void connect() {
        // Stablishes the connection, readers and writers
        connectUsingConfiguration(config);
}

private void connectUsingConfiguration(ConnectionConfiguration config) {
    String host = config.getHost();
    int port = config.getPort();
    try {
        this.socket = new Socket(host, port);
    } catch (UnknownHostException e) {
        e.printStackTrace();
    } catch (IOException e) {
        e.printStackTrace();
    }
    initConnection();
}
5.建立reader和writer的对象关联到socket的InputStream
private void initReaderAndWriter() {
    try {
        reader = new BufferedReader(new InputStreamReader(socket
                .getInputStream(), "UTF-8"));
    } catch (UnsupportedEncodingException e) {
        // TODO Auto-generated catch block
        e.printStackTrace();
    } catch (IOException e) {
        // TODO Auto-generated catch block
        e.printStackTrace();
    }
    initDebugger();
}
6.实例化ConsoleDebugger,该类主要是打印出接收到的消息,给reader设置了一个消息的监听
protected void initDebugger() {
    Class<?> debuggerClass = null;
    try {
        debuggerClass = Class.forName("com.simualteSmack.ConsoleDebugger");

        Constructor<?> constructor = debuggerClass.getConstructor(
                Connection.class, Writer.class, Reader.class);
        debugger = (SmackDebugger) constructor.newInstance(this, writer,
                reader);
        reader = debugger.getReader();
    } catch (ClassNotFoundException e1) {
        // TODO Auto-generated catch block
        e1.printStackTrace();
    } catch (Exception e) {
        throw new IllegalArgumentException(
                "Can't initialize the configured debugger!", e);
    }
}
7.接着建立PacketReader对象,并启动。PacketReader主要负责消息的处理和通知
private void initConnection() {
    // Set the reader and writer instance variables
    initReaderAndWriter();

    packetReader = new PacketReader(this);

    addPacketListener(debugger.getReaderListener(), null);
    // Start the packet reader. The startup() method will block until we
    // get an opening stream packet back from server.
    packetReader.startup();
}
看看PacketReader类
public class PacketReader {
    private ExecutorService listenerExecutor;
    private boolean done;
    private XMPPConnection connection;
    private XmlPullParser parser;
    private Thread readerThread;

    protected PacketReader(final XMPPConnection connection) {
        this.connection = connection;
        this.init();
    }

    /**
     * Initializes the reader in order to be used. The reader is initialized
     * during the first connection and when reconnecting due to an abruptly
     * disconnection.
     */
    protected void init() {
        done = false;

        readerThread = new Thread() {
            public void run() {
                parsePackets(this);
            }
        };

        readerThread.setName("Smack Packet Reader ");
        readerThread.setDaemon(true);

        // create an executor to deliver incoming packets to listeners.
        // we will use a single thread with an unbounded queue.
        listenerExecutor = Executors
                .newSingleThreadExecutor(new ThreadFactory() {

                    @Override
                    public Thread newThread(Runnable r) {
                        Thread thread = new Thread(r,
                                "smack listener processor");
                        thread.setDaemon(true);
                        return thread;
                    }
                });
        resetParser();
    }

    /**
     * Starts the packet reader thread and returns once a connection to the
     * server has been established. A connection will be attempted for a maximum
     * of five seconds. An XMPPException will be thrown if the connection fails.
     *
     */
    public void startup() {
        readerThread.start();
    }

    /**
     * Shuts the packet reader down.
     */
    public void shutdown() {
        done = true;
        // Shut down the listener executor.
        listenerExecutor.shutdown();
    }

    private void resetParser() {
        try {
            parser = XmlPullParserFactory.newInstance().newPullParser();
            parser.setFeature(XmlPullParser.FEATURE_PROCESS_NAMESPACES, true);
            parser.setInput(connection.reader);
        } catch (XmlPullParserException xppe) {
            xppe.printStackTrace();
        }
    }

    /**
     * Parse top-level packets in order to process them further.
     *
     * @param thread
     *            the thread that is being used by the reader to parse incoming
     *            packets.
     */
    private void parsePackets(Thread thread) {
        try {
            int eventType = parser.getEventType();
            do {
                if (eventType == XmlPullParser.START_TAG) {
                    if (parser.getName().equals("message")) {
                        processPacket(PacketParserUtils.parseMessage(parser));
                    }
                    System.out.println("START_TAG");
                } else if (eventType == XmlPullParser.END_TAG) {
                    System.out.println("END_TAG");
                }
                eventType = parser.next();
            } while (!done && eventType != XmlPullParser.END_DOCUMENT
                    && thread == readerThread);
        } catch (Exception e) {
            e.printStackTrace();
            if (!done) {
            }
        }
    }

    private void processPacket(Packet packet) {
        if (packet == null) {
            return;
        }

        // Loop through all collectors and notify the appropriate ones.
        for (PacketCollector collector : connection.getPacketCollectors()) {
            collector.processPacket(packet);
        }

        // Deliver the incoming packet to listeners.
        listenerExecutor.submit(new ListenerNotification(packet));
    }

    /**
     * A runnable to notify all listeners of a packet.
     */
    private class ListenerNotification implements Runnable {

        private Packet packet;

        public ListenerNotification(Packet packet) {
            this.packet = packet;
        }

        public void run() {
            for (ListenerWrapper listenerWrapper : connection.recvListeners
                    .values()) {
                listenerWrapper.notifyListener(packet);
            }
        }
    }

}
- 创建该类时就初始化线程和ExecutorService
- 接着调用resetParser() 方法为parser设置输入源(这里是重点,parser的数据都是通过这里获取)
- 调用startup启动线程,循环监听parser
- 如果接收到消息根据消息协议的不同将调用PacketParserUtils类里的不同方法,这里调用parseMessage()该方法主要处理message的消息,在该方法里分析message消息并返回packet包。
- 返回的包将调用processPacket方法,先通知所有注册了PacketCollector的监听,接着消息(listenerExecutor.submit(new ListenerNotification(packet)); )传递给所有注册了PacketListener的监听。
- 这样在activity开始之前注册的那个监听事件就会触发,从而完成了整个流程。
辅助包
比如PacketCollector 这个类,它的用处主要用来处理一些需要在发送后需要等待一个答复这样的请求。
protected synchronized void processPacket(Packet packet) {
    System.out.println("PacketCollector---processPacket");
    if (packet == null) {
        return;
    }
    if (packetFilter == null || packetFilter.accept(packet)) {
        while (!resultQueue.offer(packet)) {
            resultQueue.poll();
        }
    }
}
该方法就是将获取到的包,先过滤然后放到队列里,最后通过nextResult来获取包,这样就完成一个请求收一个答复。
public Packet nextResult(long timeout) {
    long endTime = System.currentTimeMillis() + timeout;
    System.out.println("nextResult");
    do {
        try {
            return resultQueue.poll(timeout, TimeUnit.MILLISECONDS);
        } catch (InterruptedException e) { /* ignore */
        }
    } while (System.currentTimeMillis() < endTime);
    return null;
}
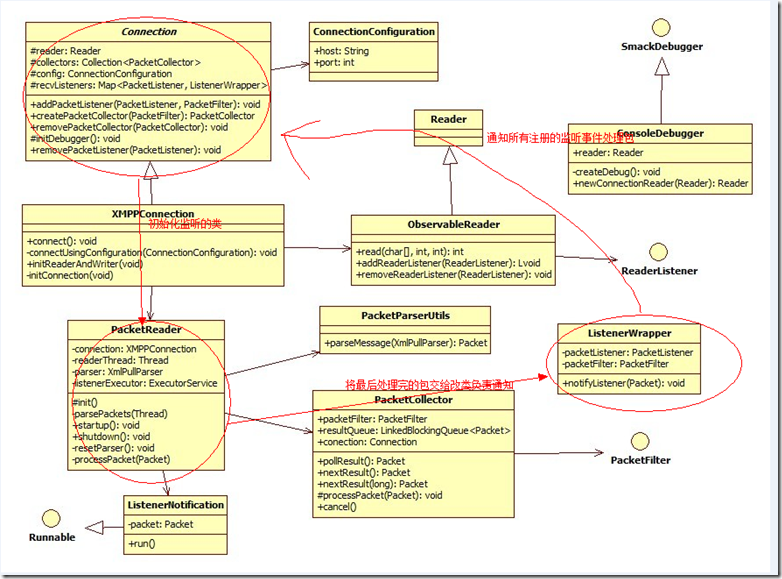
这样整个流程就完成了,最后总结一下,如图
参考文章
http://www.cnblogs.com/not-code/archive/2011/08/01/2124340.html