1、TableLayout简介
2、TableLayout行列数的确定
3、TableLayout可设置的属性详解
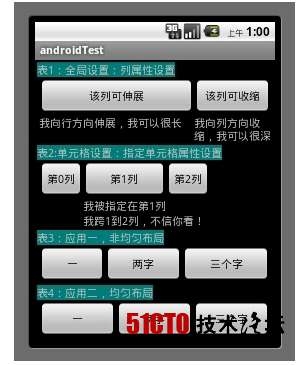
4、一个包含4个TableLayout布局的实例及效果图
一、Tablelayout简介 Tablelayout类以行和列的形式对控件进行管理,每一行为一个TableRow对象,或一个View控件。 当为TableRow对象时,可在TableRow下添加子控件,默认情况下,每个子控件占据一列。 当为View时,该View将独占一行。二、TableLayout行列数的确定 TableLayout的行数由开发人员直接指定,即有多少个TableRow对象(或View控件),就有多少行。
TableLayout的列数等于含有最多子控件的TableRow的列数。如第一TableRow含2个子控件,第二个TableRow含3个,第三个TableRow含4个,那么该TableLayout的列数为4.
三、TableLayout可设置的属性详解
TableLayout可设置的属性包括全局属性及单元格属性。
1、全局属性也即列属性,有以下3个参数:
android:stretchColumns 设置可伸展的列。该列可以向行方向伸展,最多可占据一整行。
android:shrinkColumns 设置可收缩的列。当该列子控件的内容太多,已经挤满所在行,那么该子控件的内容将往列方向显示。
android:collapseColumns 设置要隐藏的列。
示例:
android:stretchColumns="0" 第0列可伸展
android:shrinkColumns="1,2" 第1,2列皆可收缩
android:collapseColumns="*" 隐藏所有行
说明:列可以同时具备stretchColumns及shrinkColumns属性,若此,那么当该列的内容N多时,将“多行”显示其内容。(这里不是真正的多行,而是系统根据需要自动调节该行的layout_height)
2、单元格属性,有以下2个参数:
android:layout_column 指定该单元格在第几列显示
android:layout_span 指定该单元格占据的列数(未指定时,为1)
示例:
android:layout_column="1" 该控件显示在第1列
android:layout_span="2" 该控件占据2列
说明:一个控件也可以同时具备这两个特性。
四、一个包含4个TableLayout布局的实例及效果图
<?xml version="1.0" encoding="utf-8"?>
<LinearLayout xmlns:android="http://schemas.android.com/apk/res/android"
android:orientation="vertical"
android:layout_width="fill_parent"
android:layout_height="fill_parent"
android:padding="3dip"
>
<!-- 第1个TableLayout,用于描述表中的列属性。第0列可伸展,第1列可收缩,第2列被隐藏-->
<TextView
android:text="表1:全局设置:列属性设置"
android:layout_height="wrap_content"
android:layout_width="wrap_content"
android:textSize="15sp"
android:background="#7f00ffff"/>
<TableLayout
android:id="@+id/table1"
android:layout_width="fill_parent"
android:layout_height="wrap_content"
android:stretchColumns="0"
android:shrinkColumns="1"
android:collapseColumns="2"
android:padding="3dip">
<TableRow>
<Button android:text="该列可伸展"/>
<Button android:text="该列可收缩"/>
<Button android:text="我被隐藏了"/>
</TableRow>
<TableRow>
<TextView android:text="我向行方向伸展,我可以很长 "/>
<TextView android:text="我向列方向收缩,我可以很深"/>
</TableRow>
</TableLayout>
<!-- 第2个TableLayout,用于描述表中单元格的属性,包括:android:layout_column 及android:layout_span-->
<TextView
android:text="表2:单元格设置:指定单元格属性设置"
android:layout_height="wrap_content"
android:layout_width="wrap_content"
android:textSize="15sp"
android:background="#7f00ffff"/>
<TableLayout
android:id="@+id/table2"
android:layout_width="fill_parent"
android:layout_height="wrap_content"
android:padding="3dip">
<TableRow>
<Button android:text="第0列"/>
<Button android:text="第1列"/>
<Button android:text="第2列"/>
</TableRow>
<TableRow>
<TextView android:text="我被指定在第1列" android:layout_column="1"/>
</TableRow>
<TableRow>
<TextView
android:text="我跨1到2列,不信你看!"
android:layout_column="1"
android:layout_span="2"
/>
</TableRow>
</TableLayout>
<!-- 第3个TableLayout,使用可伸展特性布局-->
<TextView
android:text="表3:应用一,非均匀布局"
android:layout_height="wrap_content"
android:layout_width="wrap_content"
android:textSize="15sp"
android:background="#7f00ffff"/>
<TableLayout
android:id="@+id/table3"
android:layout_width="fill_parent"
android:layout_height="wrap_content"
android:stretchColumns="*"
android:padding="3dip"
>
<TableRow>
<Button android:text="一" ></Button>
<Button android:text="两字"></Button>
<Button android:text="三个字" ></Button>
</TableRow>
</TableLayout>
<!-- 第4个TableLayout,使用可伸展特性,并指定每个控件宽度一致,如1dip-->
<TextView
android:text="表4:应用二,均匀布局"
android:layout_height="wrap_content"
android:layout_width="wrap_content"
android:textSize="15sp"
android:background="#7f00ffff"/>
<TableLayout
android:id="@+id/table4"
android:layout_width="fill_parent"
android:layout_height="wrap_content"
android:stretchColumns="*"
android:padding="3dip"
>
<TableRow>
<Button android:text="一" android:layout_width="1dip"></Button>
<Button android:text="两字" android:layout_width="1dip"></Button>
<Button android:text="三个字" android:layout_width="1dip"></Button>
</TableRow>
</TableLayout>
</LinearLayout>
说明:第4个TableLayout里的均匀布局的均匀效果是有限的。其有限性体现在,当该行有N列,则每列的控件内容不能多于1/N。
效果图如下: