参考:http://python.jobbole.com/82208/
注:1)# %matplotlib inline 注解可以使Jupyter中显示图片
2)注意包的导入方式
一、使用的Python包
1)numpy
numpy(Numerical Python)提供了python对多维数组对象的支持:ndarray,具有矢量运算能力,快速、节省空间。numpy支持高级大量的维度数组与矩阵运算,此外也针对数组运算提供大量的数学函数库。
参考:http://blog.csdn.net/cxmscb/article/details/54583415
2)sklearn
机器学习的一个实用工具,提供了数据集,数据预处理,常用的数据模型等
参考:https://www.cnblogs.com/lianyingteng/p/7811126.html
3)matplotlib
matplotlib在Python中应用最多的2D图像的绘图工具包,使用matplotlib能够非常简单的可视化数据。
参考:http://blog.csdn.net/claroja/article/details/70173026
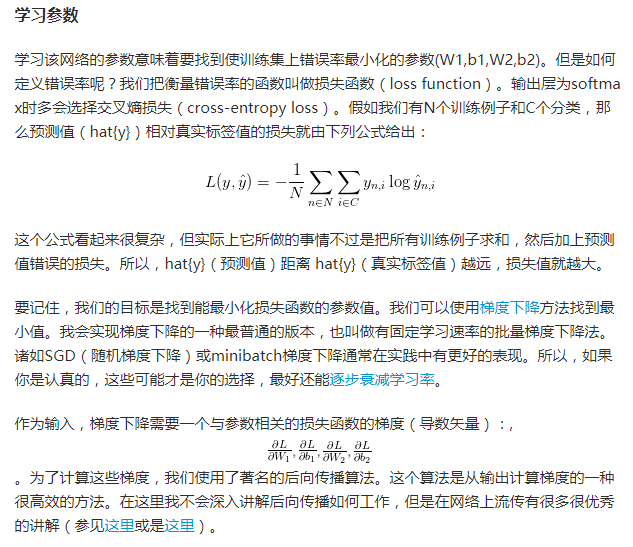
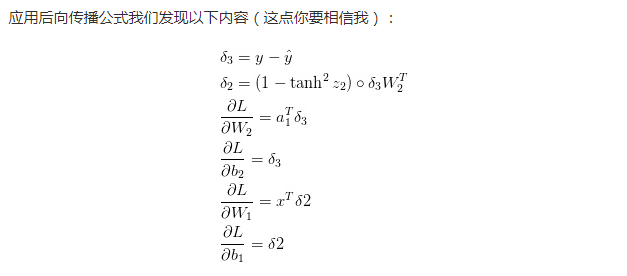
二、神经网络学习原理
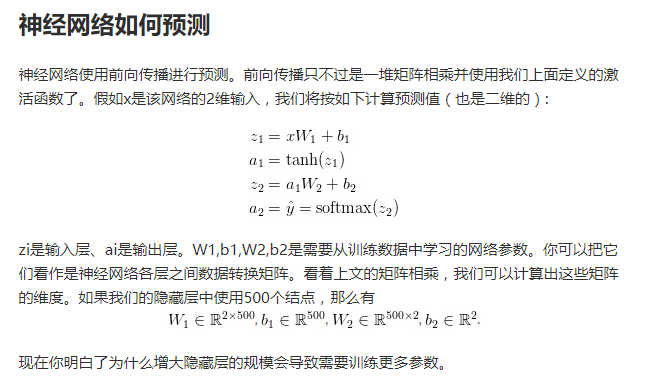
神经网络反射推到
https://www.cnblogs.com/biaoyu/archive/2015/06/20/4591304.html
交叉熵损失函数
http://blog.csdn.net/jasonzzj/article/details/52017438
三、实现思路
四、代码
  1 # %matplotlib inline   #add for display picture
  2 import numpy as np
  3 from sklearn import datasets
  4 from matplotlib import pyplot as plt
  5 # Generate a dataset and plot it
  6 np.random.seed(0)
  7 X, y = datasets.make_moons(200, noise=0.20)
  8 plt.scatter(X[:,0], X[:,1], s=40, c=y, cmap=plt.cm.Spectral)
  9 plt.show
 10 Out[24]:
 11 <function matplotlib.pyplot.show>
 12
 13 In [19]:
 14 def plot_decision_boundary(pred_func):
 15     # Set min and max values and give it some padding
 16     x_min, x_max = X[:, 0].min() - .5, X[:, 0].max() + .5
 17     y_min, y_max = X[:, 1].min() - .5, X[:, 1].max() + .5
 18     h = 0.01
 19     # Generate a grid of points with distance h between them
 20     xx, yy = np.meshgrid(np.arange(x_min, x_max, h), np.arange(y_min, y_max, h))
 21     # Predict the function value for the whole gid
 22     Z = pred_func(np.c_[xx.ravel(), yy.ravel()])
 23     Z = Z.reshape(xx.shape)
 24     # Plot the contour and training examples
 25     plt.contourf(xx, yy, Z, cmap=plt.cm.Spectral)
 26     plt.scatter(X[:, 0], X[:, 1], c=y, cmap=plt.cm.Spectral)
 27 In [20]:
 28 from sklearn import linear_model
 29 # Train the logistic rgeression classifier
 30 clf = linear_model.LogisticRegressionCV()
 31 clf.fit(X, y)
 32
 33 # Plot the decision boundary
 34 plot_decision_boundary(lambda x: clf.predict(x))
 35 plt.title("Logistic Regression")
 36 Out[20]:
 37 <matplotlib.text.Text at 0x1d21f527f98>
 38
 39 In [14]:
 40 # Helper function to evaluate the total loss on the dataset
 41 def calculate_loss(model):
 42     W1, b1, W2, b2 = model['W1'], model['b1'], model['W2'], model['b2']
 43     # Forward propagation to calculate our predictions
 44     z1 = X.dot(W1) + b1
 45     a1 = np.tanh(z1)
 46     z2 = a1.dot(W2) + b2
 47     exp_scores = np.exp(z2)
 48     probs = exp_scores / np.sum(exp_scores, axis=1, keepdims=True)
 49     # Calculating the loss
 50     corect_logprobs = -np.log(probs[range(num_examples), y])
 51     data_loss = np.sum(corect_logprobs)
 52     # Add regulatization term to loss (optional)
 53     data_loss += reg_lambda/2 * (np.sum(np.square(W1)) + np.sum(np.square(W2)))
 54     return 1./num_examples * data_loss
 55 In [15]:
 56 # Helper function to predict an output (0 or 1)
 57 def predict(model, x):
 58     W1, b1, W2, b2 = model['W1'], model['b1'], model['W2'], model['b2']
 59     # Forward propagation
 60     z1 = x.dot(W1) + b1
 61     a1 = np.tanh(z1)
 62     z2 = a1.dot(W2) + b2
 63     exp_scores = np.exp(z2)
 64     probs = exp_scores / np.sum(exp_scores, axis=1, keepdims=True)
 65     return np.argmax(probs, axis=1)
 66 In [22]:
 67 # This function learns parameters for the neural network and returns the model.
 68 # - nn_hdim: Number of nodes in the hidden layer
 69 # - num_passes: Number of passes through the training data for gradient descent
 70 # - print_loss: If True, print the loss every 1000 iterations
 71 def build_model(nn_hdim, num_passes=20000, print_loss=False):
 72
 73     # Initialize the parameters to random values. We need to learn these.
 74     np.random.seed(0)
 75     W1 = np.random.randn(nn_input_dim, nn_hdim) / np.sqrt(nn_input_dim)
 76     b1 = np.zeros((1, nn_hdim))
 77     W2 = np.random.randn(nn_hdim, nn_output_dim) / np.sqrt(nn_hdim)
 78     b2 = np.zeros((1, nn_output_dim))
 79
 80     # This is what we return at the end
 81     model = {}
 82
 83     # Gradient descent. For each batch...
 84     for i in range(0, num_passes):
 85
 86         # Forward propagation
 87         z1 = X.dot(W1) + b1
 88         a1 = np.tanh(z1)
 89         z2 = a1.dot(W2) + b2
 90         exp_scores = np.exp(z2)
 91         probs = exp_scores / np.sum(exp_scores, axis=1, keepdims=True)
 92
 93         # Backpropagation
 94         delta3 = probs
 95         delta3[range(num_examples), y] -= 1
 96         dW2 = (a1.T).dot(delta3)
 97         db2 = np.sum(delta3, axis=0, keepdims=True)
 98         delta2 = delta3.dot(W2.T) * (1 - np.power(a1, 2))
 99         dW1 = np.dot(X.T, delta2)
100         db1 = np.sum(delta2, axis=0)
101
102         # Add regularization terms (b1 and b2 don't have regularization terms)
103         dW2 += reg_lambda * W2
104         dW1 += reg_lambda * W1
105
106         # Gradient descent parameter update
107         W1 += -epsilon * dW1
108         b1 += -epsilon * db1
109         W2 += -epsilon * dW2
110         b2 += -epsilon * db2
111
112         # Assign new parameters to the model
113         model = { 'W1': W1, 'b1': b1, 'W2': W2, 'b2': b2}
114
115         # Optionally print the loss.
116         # This is expensive because it uses the whole dataset, so we don't want to do it too often.
117         if print_loss and i % 1000 == 0:
118           print ("Loss after iteration %i: %f" %(i, calculate_loss(model)))
119
120     return model
121 In [17]:
122 num_examples = len(X) # training set size
123 nn_input_dim = 2 # input layer dimensionality
124 nn_output_dim = 2 # output layer dimensionality
125
126 # Gradient descent parameters (I picked these by hand)
127 epsilon = 0.01 # learning rate for gradient descent
128 reg_lambda = 0.01 # regularization strength
129 In [23]:
130 # Build a model with a 3-dimensional hidden layer
131 model = build_model(3, print_loss=True)
132
133 # Plot the decision boundary
134 plot_decision_boundary(lambda x: predict(model, x))
135 plt.title("Decision Boundary for hidden layer size 3")
136 Loss after iteration 0: 0.432387
137 Loss after iteration 1000: 0.068947
138 Loss after iteration 2000: 0.068890
139 Loss after iteration 3000: 0.071218
140 Loss after iteration 4000: 0.071253
141 Loss after iteration 5000: 0.071278
142 Loss after iteration 6000: 0.071293
143 Loss after iteration 7000: 0.071303
144 Loss after iteration 8000: 0.071308
145 Loss after iteration 9000: 0.071312
146 Loss after iteration 10000: 0.071314
147 Loss after iteration 11000: 0.071315
148 Loss after iteration 12000: 0.071315
149 Loss after iteration 13000: 0.071316
150 Loss after iteration 14000: 0.071316
151 Loss after iteration 15000: 0.071316
152 Loss after iteration 16000: 0.071316
153 Loss after iteration 17000: 0.071316
154 Loss after iteration 18000: 0.071316
155 Loss after iteration 19000: 0.071316
156 Out[23]:
157 <matplotlib.text.Text at 0x1d21f1fd8d0>
158
159 In [ ]:
160