rgb的可以直接
- byte[]rgb = new byte[width*height*2];
ByteBuffer bufferRGB = ByteBuffer.wrap(rgb);//将 byte 数组包装到Buffer缓冲区中
Bitmap VideoBit = Bitmap.createBitmap(width, height, Bitmap.Config.RGB_565);//创建一个指定大小格式的Bitmap对象
然后再
- VideoBit.copyPixelsFromBuffer(bufferRGB);//从buffer缓冲区复制位图像素,从当前位置开始覆盖位图的像素
canvas.drawBitmap(VideoBit, 0, 0, null);
///////////////////////////////////////////////
最近在Android手机上使用相机识别条形码工作取得了比较理想的进展,自动识别功能基本完成,然而在手动识别指定条形码图片时遇到困难,由于Zxing开源Jar包识别图片的颜色编码式为YUV,而普通的图片使用RGB颜色分量来保存颜色信息。非压缩的24位的BMP图像就采用RGB空间来保存图像。一个像素24位,每8位保存一种颜色强度(0-255),例如红色保存为 0xFF0000。经过两天的探索与查阅相关YUV与RGB资料后,尝试编写了RGB转换为YUV代码,几番调试后终于转换成功。下面就作一些简单介绍,然后贴出代码。
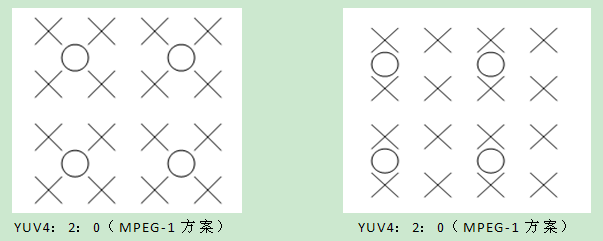
YUV是被欧洲电视系统所采用的一种颜色编码方法。其中“Y”表示明亮度(Luminance或Luma),也就是灰阶值;而“U”和“V”表示的则是色度(Chrominance或Chroma)。在彩色的广播电视中,并不是直接传送RGB三基色信号,而是把三基色经过转换成可以代表三基色信号的新的三个基本参量YUV来传输的。YUV格式通常有两大类,打包格式和平面格式。打包格式有以下几种:YUV2格式,YUYV格式, YVYU格式, UYVY格式。平面格式有IF09格式,IYUV格式,YVU9格式。Android摄像头预览的视频流色彩编码方案默认为YCbCr4:2:0,其中4:2:0表示2:1的水平下采样,2:1的垂直下采样,体现为以下分布。
详见:http://blog.csdn.net/SearchSun/article/details/2443867
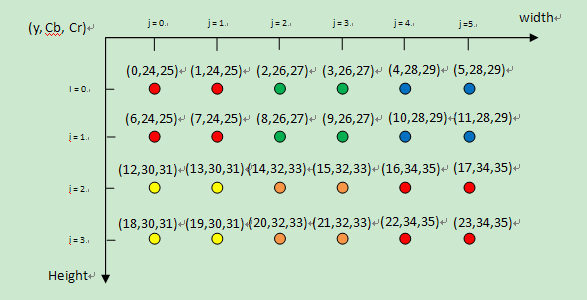
我以我理解的方式来表示来RGB与YCbCr420的对应关系,请看下图。
如上图所示为一张(宽X高)为(6 *4),即len=6×4的RGB编码位图,图中的每一个小球代表一个像素点。在便携式视频设备(MPEG-4)中,YCbCr4:2:0是最常用的格式,表示每4个像素有4个亮度分量,2个色度分量(YYYYCbCr)。从图上,可以直观地看出4个像素点共享U和V分量(颜色标志相同的小球),也即2:1的水平下采样,2:1的垂直下采样。接下来,申请一个字节数组来保存YUV数据,该YUV的数组长度为len×3/2,Y分量占len长度字节,U和V分别占len/4长度字节。
代码:
len = width * height;
byte[] yuv = new byte[len * 3 / 2];
上图中的坐标值表示该分量在在YUV数组中位置index。现在给出index计算方式:
Y_index = (i * width + j);
U_index= (len + (i >> 1) * width + (j & ~1) + 0)
V_index=(len + (i >> 1) * width + (j & ~1) + 1)
Y、U、V分量与R、G、B分量的对应关系为:
y = ((66 * r + 129 * g + 25 * b + 128) >> 8) + 16;
u = ((-38 * r - 74 * g + 112 * b + 128) >> 8) + 128;
r = 1.166f * (y - 16) + 1.596f * (v - 128);
g = 1.164f * (y - 16) - 0.813f * (v - 128)- 0.391f * (u - 128);
b = 1.164f * (y - 16) + 2.018f * (u - 128);
因此代码很容易就可写出:假定已获取到像素值,如果是一张图片,你可以通过代码先获得该图片的像素值整型数组,然后传入该数组,以及该图片的宽度和高度调用以下方法即可获取YCbCr420格式数组。
public byte[] rgb2YCbCr420(int[] pixels, int width, int height) {
int len = width * height;
//yuv格式数组大小,y亮度占len长度,u,v各占len/4长度。
byte[] yuv = new byte[len * 3 / 2];
int y, u, v;
for (int i = 0; i < height; i++) {
for (int j = 0; j < width; j++) {
//屏蔽ARGB的透明度值
int rgb = pixels[i * width + j] & 0x00FFFFFF;
//像素的颜色顺序为bgr,移位运算。
int r = rgb & 0xFF;
int g = (rgb >> 8) & 0xFF;
int b = (rgb >> 16) & 0xFF;
//套用公式
y = ((66 * r + 129 * g + 25 * b + 128) >> 8) + 16;
u = ((-38 * r - 74 * g + 112 * b + 128) >> 8) + 128;
v = ((112 * r - 94 * g - 18 * b + 128) >> 8) + 128;
//调整
y = y < 16 ? 16 : (y > 255 ? 255 : y);
u = u < 0 ? 0 : (u > 255 ? 255 : u);
v = v < 0 ? 0 : (v > 255 ? 255 : v);
//赋值
yuv[i * width + j] = (byte) y;
yuv[len + (i >> 1) * width + (j & ~1) + 0] = (byte) u;
yuv[len + +(i >> 1) * width + (j & ~1) + 1] = (byte) v;
}
}
return yuv;
}
再附上YCbCr420转换成RGB的代码,可以通过该代码还原RGB位图。
public void yCbCr2Rgb (byte[] yuv, int width, int height) {
int frameSize = width * height;
int[] rgba = new int[frameSize];
for (int i = 0; i < height; i++){
for (int j = 0; j < width; j++) {
int y = (0xff & ((int) yuv[i * width + j]));
int u = (0xff & ((int) yuv [frameSize + (i >> 1) * width
+ (j & ~1) + 0]));
int v = (0xff & ((int) yuv [frameSize + (i >> 1) * width
+ (j & ~1) + 1]));
y = y < 16 ? 16 : y;
int r = Math.round(1.166f * (y - 16) + 1.596f * (v - 128));
int g = Math.round(1.164f * (y - 16) - 0.813f * (v - 128)
- 0.391f * (u - 128));
int b = Math.round(1.164f * (y - 16) + 2.018f * (u - 128));
r = r < 0 ? 0 : (r > 255 ? 255 : r);
g = g < 0 ? 0 : (g > 255 ? 255 : g);
b = b < 0 ? 0 : (b > 255 ? 255 : b);
rgba[i * width + j] = 0xff000000 + (b << 16) + (g << 8) + r;
}
}
Bitmap bmp = Bitmap.createBitmap(width, height,
Bitmap.Config.ARGB_8888);
bmp.setPixels(rgba, 0, width, 0, 0, width, height);
String bmpName = "test.jpg";
String path = Environment.getExternalStorageDirectory()
.getAbsolutePath() + "/scan_test";
// 文件目录
File root = new File(path);
if (!root.isDirectory() || !root.exists()) {
root.mkdirs();
}
File myCaptureFile = new File(path, bmpName);
try {
myCaptureFile.createNewFile();
} catch (IOException e1) {
// TODO Auto-generated catch block
e1.printStackTrace();
}
try {
BufferedOutputStream bos = new BufferedOutputStream(
new FileOutputStream(myCaptureFile));
// 采用压缩转档方法
bmp.compress(Bitmap.CompressFormat.JPEG, 100, bos);
bos.flush();
bos.close();
} catch (Exception e) {
myCaptureFile.delete();
}
}