众所周知啊,微信小程序是可以通过微信本身授权后再登录,平台可以拿到微信用的的账号相关信息,然后保存到数据库中,那么同理在支付宝小程序开发过程中,登录功能的设计也可以如此
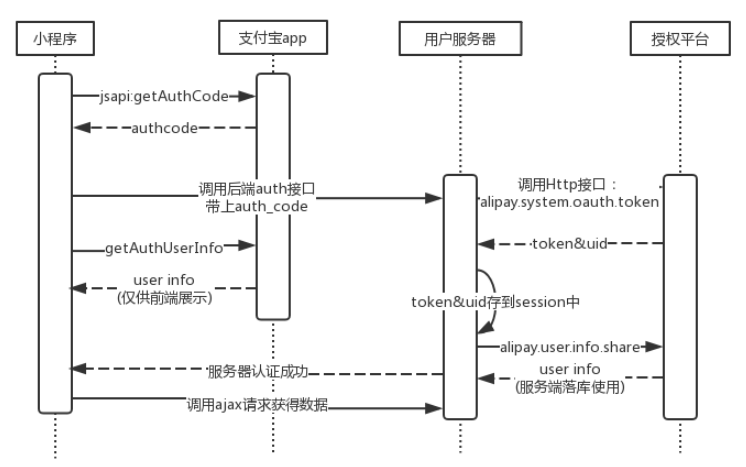
上图是官方提供的时序图,具体看一下流程:
-
在小程序端获取 auth_code,目的是获取用户授权码
-
把第一步获取的授权码 auth_code 传到咱们自己的后台,也就是说后台需要编写一个接口,方便小程序端的传入
    var me = this;
    my.getAuthCode({
      scopes: 'auth_user', // 主动授权(弹框):auth_user,静默授权(不弹框):auth_base
      success: (res) => {
        if (res.authCode) {
          // console.log(app.serverUrl + '/login/' + res.authCode);
          // 调用自己的服务端接口,让服务端进行后端的授权认证
          my.httpRequest({
            url: app.serverUrl + '/login/' + res.authCode,
            method: 'POST',
            header:{
              'content-type': 'application/json'
            },
            dataType: 'json',
            success: (res) => {
              // 授权成功并且服务器端登录成功
              console.log(res);
              me.setData({
                userInfo: res.data.data
              });
            }
          });
        }
      },
    });
-
后台拿到这个 auth_code 之后,需要调用支付宝的授权平台,从而获取用户的唯一 token 以及 支付宝的userid,都是唯一的,调用的接口为 [alipay.system.oauth.token]
-
获取到userid后,判断一下这个userid是否在我们自己的数据库中存在,如果存在,直接获取信息,并且直接返回用户对象到前台;如果不存在,则需要从支付宝授权平台再一次去获取支付宝用户的信息。
-
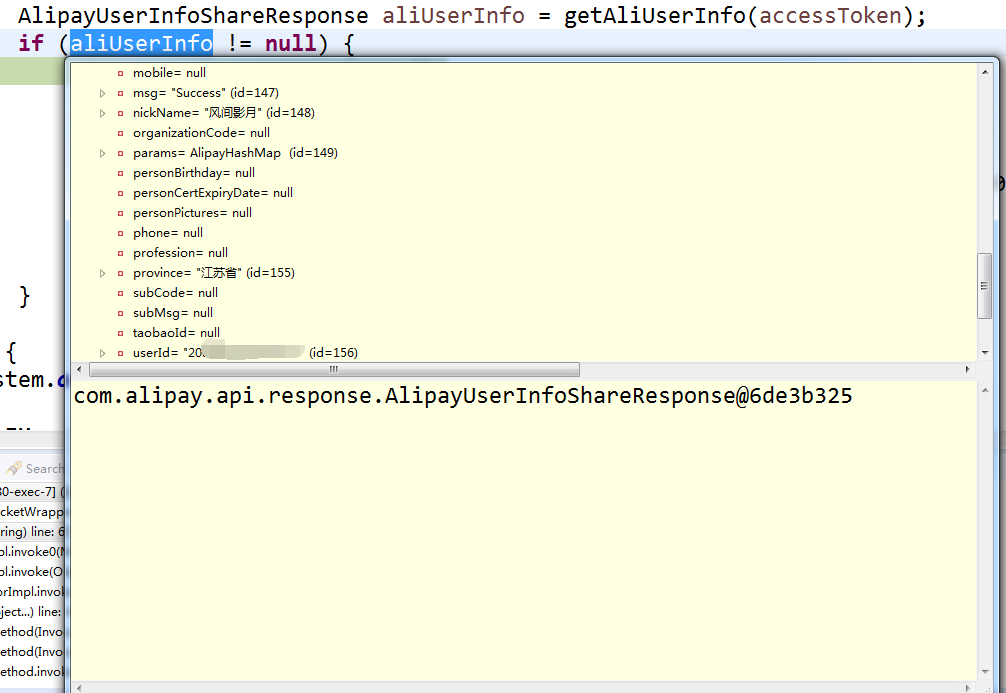
调用 [alipay.user.info.share],获取用户信息,这个用户对象里包含了大量的用户真实信息,具体参考如下
@Autowired
    private UserService userService;

    @ApiOperation(value = "统一登录接口", notes = "支付宝小程序唤起登录后调用", httpMethod = "POST")
    @PostMapping("/login/{authCode}")
    public IMoocJSONResult items(
            @ApiParam(name = "authCode",
            value = "授权码",
            required = true,
            example = "授权码") @PathVariable String authCode) throws Exception {

        // 1. 服务端获取access_token、user_id
        AlipaySystemOauthTokenResponse response = getAccessToken(authCode);
        if (response.isSuccess()) {
            System.out.println("获取access_token - 调用成功");
            /**
             *  获取到用户信息后保存到数据
             *  1. 如果数据库不存在对用的 alipayUserId, 则注册
             *  2. 如果存在,则获取数据库中的信息再返回
             */
            String accessToken = response.getAccessToken();
            String alipayUserId = response.getUserId();
            System.out.println("accessToken:" + accessToken);
            System.out.println("alipayUserId:" + alipayUserId);

            // 2. 查询该用户是否存在
            Users userInfo = userService.queryUserIsExist(alipayUserId);
            if (userInfo != null) {
                // 如果用户存在,直接返回给前端,表示登录成功
                return IMoocJSONResult.ok(userInfo);
            } else {
                // 如果用户不存在,则通过支付宝api获取用户的信息后,再注册用户到自己平台数据库
                // 获取会员信息
                AlipayUserInfoShareResponse aliUserInfo = getAliUserInfo(accessToken);
                if (aliUserInfo != null) {
                     Users newUser = new Users();
                     newUser.setAlipayUserId(alipayUserId);
                     newUser.setNickname(aliUserInfo.getNickName());
                     newUser.setRegistTime(new Date());
                     newUser.setIsCertified(aliUserInfo.getIsCertified().equals("T") ? 1 : 0);
                     newUser.setFaceImage(aliUserInfo.getAvatar());
                     userService.createUser(newUser);
                     return IMoocJSONResult.ok(newUser);
                }
            }
        } else {
            System.out.println("获取access_token - 调用失败");
        }
        return IMoocJSONResult.ok();
    }

    // 服务端获取access_token、user_id
    private AlipaySystemOauthTokenResponse getAccessToken(String authCode) throws Exception {
        AlipayClient alipayClient = new DefaultAlipayClient("https://openapi.alipay.com/gateway.do",
                APPID,                    // 1. 填入appid
                PRIVATE_KEY,            // 2. 填入私钥
                "json",
                "GBK",
                ALIPAY_PUBLIC_KEY,         // 3. 填入公钥
                "RSA2");
        AlipaySystemOauthTokenRequest request = new AlipaySystemOauthTokenRequest();
        request.setGrantType("authorization_code");
        request.setCode(authCode);        // 4. 填入前端传入的授权码authCode
        request.setRefreshToken("201208134b203fe6c11548bcabd8da5bb087a83b");    // 0. 不用管
        AlipaySystemOauthTokenResponse response = alipayClient.execute(request);

        return response;
    }

    // 获取支付宝用户信息
    private AlipayUserInfoShareResponse getAliUserInfo (String accessToken) throws Exception {
        AlipayClient alipayClient = new DefaultAlipayClient("https://openapi.alipay.com/gateway.do",
                APPID,                    // 1. 填入appid
                PRIVATE_KEY,            // 2. 填入私钥
                "json",
                "GBK",
                ALIPAY_PUBLIC_KEY,         // 3. 填入公钥
                "RSA2");
        AlipayUserInfoShareRequest request = new AlipayUserInfoShareRequest();
        AlipayUserInfoShareResponse response = alipayClient.execute(request, accessToken);
        if(response.isSuccess()){
            System.out.println("获取会员信息 - 调用成功");
            return response;
        }

        return null;
    }
拿到的支付宝用户信息如图:
最终页面的展示效果为: