1.磁盘接口:
从整体的角度上,硬盘接口分为IDE、SATA、SCSI和SAS四种,IDE接口硬盘多用于家用产品中,也部分应用于服务器,SCSI接口的硬盘则主要应用于服务器市场,而SAS只在高端服务器上。
2.分区符认识
MBR概述:全称为Master Boot Record,即硬盘的主引导记录。
硬盘的0柱面、0磁头、1扇区称为主引导扇区(也叫主引导记录MBR)。它由三个部分组成,主引导程序、硬盘分区表DPT(Disk Partition table)和分区有效标志(55AA)。在总共512字节的主引导扇区里主引导程序(boot loader)占446个字节,第二部分是Partition table区(分区表),即DPT,占64个字节,硬盘中分区有多少以及每一分区的大小都记在其中。第三部分是magic number,占2个字节,固定为55AA。
分区编号:主分区1-4 ,逻辑分区5……
LINUX规定:逻辑分区必须建立在扩展分区之上,而不是建立在主分区上
分区作用:
主分区:主要是用来启动操作系统的,它主要放的是操作系统的启动或引导程序,/boot分区最好放在主分区上
扩展分区不能使用的,它只是做为逻辑分区的容器存在的,先创建一个扩展分区,在拓展分区之上创建逻辑分区;我们真正存放数据的是主分区和逻辑分区,大量数据都放在逻辑分区中。
注意:使用分区工具fdisk对磁盘进行操作,分区,格式化(重点)
注意:
主分区+扩展分区 最多只能有4个
扩展分区可以是0个,最多是1个
扩展分区不能直接使用,扩展分区必须首先创建成逻辑分区才能使用
逻辑分区可以是0个 1个 多个
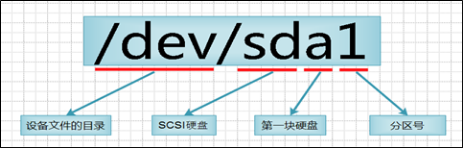
命名方式: /dev/sd[a-z]n
其中:a-z 表示设备的序号,如sda表示第一块scsi硬盘,sdb就是第二块......
n 表示每块磁盘上划分的磁盘分区编号
3.fdisk管理分区
|
参数 |
作用 |
|
m |
查看全部可用参数 |
|
n |
添加新的分区 |
|
d |
删除某个分区的信息 |
|
l |
列出所有可用分区的类型 |
|
t |
改变某个分区的类型 |
|
p |
查看分区表信息 |
|
w |
保存并退出 |
|
q |
不保存直接退出 |
PS:(这些选项是进入fdisk操作页面之后的选择项)
fdisk:磁盘分区,是Linux发行版本中最常用的分区工具
用法:fdisk [选项] device
案例:在sdb盘上建一个分区,大小为100M
在虚拟机上添加一块硬盘

第一步:查看磁盘
[root@ken ~]# ls /dev/sd*
/dev/sda  /dev/sda1  /dev/sda2  /dev/sdb

第二步:对sdb划分一个100M的空间
[root@ken ~]# fdisk /dev/sdb
Welcome to fdisk (util-linux 2.23.2).

Changes will remain in memory only, until you decide to write them.
Be careful before using the write command.

Device does not contain a recognized partition table
Building a new DOS disklabel with disk identifier 0x52997d99.

Command (m for help): n                   #创建一个新的分区
Partition type:
   p   primary (0 primary, 0 extended, 4 free)
   e   extended
Select (default p):                       #默认主分区,直接回车
Using default response p
Partition number (1-4, default 1):         #默认为第一个分区编号,直接回车
First sector (2048-41943039, default 2048):   #默认第一个扇区开始位置,直接回车
Using default value 2048
Last sector, +sectors or +size{K,M,G} (2048-41943039, default 41943039): +100M   #选择大小,前面要使用加号
Partition 1 of type Linux and of size 100 MiB is set

Command (m for help): P                   #查看已经分好的磁盘

Disk /dev/sdb: 21.5 GB, 21474836480 bytes, 41943040 sectors
Units = sectors of 1 * 512 = 512 bytes
Sector size (logical/physical): 512 bytes / 512 bytes
I/O size (minimum/optimal): 512 bytes / 512 bytes
Disk label type: dos
Disk identifier: 0x52997d99

   Device Boot      Start         End      Blocks   Id  System
/dev/sdb1            2048      206847      102400   83  Linux

Command (m for help): w                        #w退出保存,q退出不保存
The partition table has been altered!

Calling ioctl() to re-read partition table.
Syncing disks.

第三步:格式化
格式化之前,先用partprobe同步磁盘信息
新的磁盘分区使用之前必须先格式化
[root@ken ~]# mkfs.ext4 /dev/sdb1  (mkfs.文件类型  路径)
mke2fs 1.42.9 (28-Dec-2013)
Filesystem label=
OS type: Linux
Block size=1024 (log=0)
Fragment size=1024 (log=0)
Stride=0 blocks, Stripe width=0 blocks
25688 inodes, 102400 blocks
5120 blocks (5.00%) reserved for the super user
First data block=1
Maximum filesystem blocks=33685504
13 block groups
8192 blocks per group, 8192 fragments per group
1976 inodes per group
Superblock backups stored on blocks:
    8193, 24577, 40961, 57345, 73729

Allocating group tables: done
Writing inode tables: done
Creating journal (4096 blocks): done
Writing superblocks and filesystem accounting information: done

第四步:挂载使用
[root@ken ~]# mkdir /part
[root@ken ~]# mount /dev/sdb1 /part
[root@ken ~]# df -h
Filesystem               Size  Used Avail Use% Mounted on
/dev/mapper/centos-root   17G  1.2G   16G   7% /
devtmpfs                 476M     0  476M   0% /dev
tmpfs                    488M     0  488M   0% /dev/shm
tmpfs                    488M  7.7M  480M   2% /run
tmpfs                    488M     0  488M   0% /sys/fs/cgroup
/dev/sda1               1014M  130M  885M  13% /boot
tmpfs                     98M     0   98M   0% /run/user/0
/dev/sdb1                 93M  1.6M   85M   2% /part

第五步:写入到配置文件中,开机自启
[root@ken ~]# echo "/dev/sdb1 /part ext4 defaults 0 0" >> /etc/fstab
|
/dev/sdb1 |
/sdb1 |
xfs |
defaults |
0 |
0 |
|
要挂载的分区设备 |
挂载点 |
文件系统类型 |
挂载选项 |
是否备份 |
是否检测 |
4.添加交换分区
SWAP(交换)分区是一种通过在硬盘中预先划分一定的空间,然后将把内存中暂时不常用的数据临时存放到硬盘中,以便腾出物理内存空间让更活跃的程序服务来使用的技术,其设计目的是为了解决真实物理内存不足的问题。但由于交换分区毕竟是通过硬盘设备读写数据的,速度肯定要比物理内存慢,所以只有当真实的物理内存耗尽后才会调用交换分区的资源。
交换分区的创建过程与前文讲到的挂载并使用存储设备的过程非常相似。在对/dev/sdb存储设备进行分区操作前,有必要先说一下交换分区的划分建议:在生产环境中,交换分区的大小一般为真实物理内存的1.5~2倍,为了让大家更明显地感受交换分区空间的变化,这里取出一个大小为5GB的主分区作为交换分区资源。在分区创建完毕后保存并退出即可:
第一步:划分5G大小的磁盘
[root@ken ~]# fdisk /dev/sdb
Welcome to fdisk (util-linux 2.23.2).

Changes will remain in memory only, until you decide to write them.
Be careful before using the write command.


Command (m for help): n
Partition type:
   p   primary (1 primary, 0 extended, 3 free)
   e   extended
Select (default p):
Using default response p
Partition number (2-4, default 2):
First sector (206848-41943039, default 206848):
Using default value 206848
Last sector, +sectors or +size{K,M,G} (206848-41943039, default 41943039): +5G
Partition 2 of type Linux and of size 5 GiB is set

Command (m for help): P

Disk /dev/sdb: 21.5 GB, 21474836480 bytes, 41943040 sectors
Units = sectors of 1 * 512 = 512 bytes
Sector size (logical/physical): 512 bytes / 512 bytes
I/O size (minimum/optimal): 512 bytes / 512 bytes
Disk label type: dos
Disk identifier: 0x52997d99

   Device Boot      Start         End      Blocks   Id  System
/dev/sdb1            2048      206847      102400   83  Linux
/dev/sdb2          206848    10692607     5242880   83  Linux

Command (m for help): w
The partition table has been altered!

Calling ioctl() to re-read partition table.

WARNING: Re-reading the partition table failed with error 16: Device or resource busy.
The kernel still uses the old table. The new table will be used at
the next reboot or after you run partprobe(8) or kpartx(8)
Syncing disks.
[root@ken ~]# partprobe
Warning: Unable to open /dev/sr0 read-write (Read-only file system).  /dev/sr0 has been opened read-only.
[root@ken ~]# ls /dev/sd*
/dev/sda  /dev/sda1  /dev/sda2  /dev/sdb  /dev/sdb1  /dev/sdb2

第二步:格式化操作
使用SWAP分区专用的格式化命令mkswap,对新建的主分区进行格式化操作:
[root@ken ~]# mkswap /dev/sdb2
Setting up swapspace version 1, size = 5242876 KiB
no label, UUID=92dbf6b7-4635-46a4-a813-0241098766d5

第三步:
使用swapon命令把准备好的SWAP分区设备正式挂载到系统中。我们可以使用free -m命令查看交换分区的大小变化
[root@ken ~]# free -h
              total        used        free      shared  buff/cache   available
Mem:           974M         89M        755M        7.6M        129M        735M
Swap:          2.0G          0B        2.0G

[root@ken ~]# swapon /dev/sdb2
[root@ken ~]# free -h
              total        used        free      shared  buff/cache   available
Mem:           974M         93M        751M        7.6M        129M        731M
Swap:          7.0G          0B        7.0G

第四步:写入到配置文件中
[root@ken ~]# echo "/dev/sdb2 swap swap defaults 0 0" >> /etc/fstab

第五步:停止swap
使用swapoff可以停止swap
[root@ken ~]# free -h
              total        used        free      shared  buff/cache   available
Mem:           974M         93M        751M        7.6M        129M        731M
Swap:          7.0G          0B        7.0G
[root@ken ~]# swapoff

Usage:
 swapoff [options] [<spec>]

Options:
 -a, --all              disable all swaps from /proc/swaps
 -v, --verbose          verbose mode

 -h, --help     display this help and exit
 -V, --version  output version information and exit

The <spec> parameter:
 -L <label>             LABEL of device to be used
 -U <uuid>              UUID of device to be used
 LABEL=<label>          LABEL of device to be used
 UUID=<uuid>            UUID of device to be used
 <device>               name of device to be used
 <file>                 name of file to be used

For more details see swapoff(8).
[root@ken ~]# swapoff -a (由于swap会影响读写速度,一般会全部禁用)
[root@ken ~]# free -h
              total        used        free      shared  buff/cache   available
Mem:           974M         88M        758M        7.6M        127M        737M
Swap:            0B          0B          0B
5.LVM逻辑卷管理
使用LVM在线动态扩容
LVM的技术架构如图所示:

LVM常用术语:
物理存储介质(The physical media):LVM存储介质可以是磁盘分区,整个磁盘,RAID阵列或SAN磁盘,设备必须初始化为LVM物理卷,才能与LVM结合使用
物理卷PV(physical volume) :物理卷就是LVM的基本存储逻辑块,但和基本的物理存储介质(如分区、磁盘等)比较,却包含有与LVM相关的管理参数,创建物理卷它可以用硬盘分区,也可以用硬盘本身;
卷组VG(Volume Group) :一个LVM卷组由一个或多个物理卷组成ll
逻辑卷LV(logical volume) :LV建立在VG之上,可以在LV之上建立文件系统
PE(physical extents) :PV物理卷中可以分配的最小存储单元,PE的大小是可以指定的,默认为4MB
LE(logical extent) : LV逻辑卷中可以分配的最小存储单元,在同一个卷组中,LE的大小和PE是相同的,并且一一对应
部署逻辑卷
常用的LVM部署命令
|
功能/命令 |
物理卷管理 |
卷组管理 |
逻辑卷管理 |
|
扫描 |
pvscan |
vgscan |
lvscan |
|
建立 |
pvcreate |
vgcreate |
lvcreate |
|
显示 |
pvdisplay |
vgdisplay |
lvdisplay |
|
删除 |
pvremove |
vgremove |
lvremove |
|
扩展 |
|
vgextend |
lvextend |
|
缩小 |
|
vgreduce |
lvreduce |
第一步:添加两块磁盘

第二步:让两块硬盘支持LVM技术
[root@ken ~]# pvcreate /dev/sdb /dev/sdc
  Physical volume "/dev/sdb" successfully created.
  Physical volume "/dev/sdc" successfully created.

第三步:创建卷组
[root@ken ~]# vgcreate ken /dev/sdb /dev/sdc
  Volume group "ken" successfully created

第四步:创建逻辑卷
切割出一个100M的逻辑卷设备
这里需要注意切割单位的问题。在对逻辑卷进行切割时有两种计量单位。第一种是以容量为单位,所使用的参数为-L。例如,使用-L 150M生成一个大小为150MB的逻
辑卷。另外一种是以基本单元的个数为单位,所使用的参数为-l。每个基本单元的大小默认为4MB。例如,使用-l 37可以生成一个大小为37×4MB=148MB的逻辑卷。
[root@ken ~]# lvcreate -n ken1 -L 100M ken
( lvcreate -n 指定的名字  -L 指定大小 卷组名)
  Logical volume "ken1" created.

第五步:把生成好的逻辑卷进行格式化
[root@ken ~]# mkfs.ext4 /dev/ken/ken1
mke2fs 1.42.9 (28-Dec-2013)
Filesystem label=
OS type: Linux
Block size=1024 (log=0)
Fragment size=1024 (log=0)
Stride=0 blocks, Stripe width=0 blocks
25688 inodes, 102400 blocks
5120 blocks (5.00%) reserved for the super user
First data block=1
Maximum filesystem blocks=33685504
13 block groups
8192 blocks per group, 8192 fragments per group
1976 inodes per group
Superblock backups stored on blocks:
    8193, 24577, 40961, 57345, 73729

Allocating group tables: done
Writing inode tables: done
Creating journal (4096 blocks): done
Writing superblocks and filesystem accounting information: done

第六步:挂载使用
[root@ken ~]# mkdir /test1
[root@ken ~]# mount /dev/ken/ken1 /test1
[root@ken ~]# df -h
Filesystem               Size  Used Avail Use% Mounted on
/dev/mapper/centos-root   17G  1.2G   16G   7% /
devtmpfs                 476M     0  476M   0% /dev
tmpfs                    488M     0  488M   0% /dev/shm
tmpfs                    488M  7.7M  480M   2% /run
tmpfs                    488M     0  488M   0% /sys/fs/cgroup
/dev/sda1               1014M  130M  885M  13% /boot
tmpfs                     98M     0   98M   0% /run/user/0
/dev/mapper/ken-ken1      93M  1.6M   85M   2% /test1
6.Linux扩容逻辑卷ext4格式
第一步:卸载
[root@ken ~]# umount /test1

第二步:把ken1逻辑卷扩展到300M
[root@ken ~]# umount /test1
[root@ken ~]# lvextend -L 300M /dev/ken/ken1
  Size of logical volume ken/ken1 changed from 100.00 MiB (25 extents) to 300.00 MiB (75 extents).
  Logical volume ken/ken1 successfully resized.

第三步:检查磁盘完整性
[root@ken ~]# e2fsck -f /dev/ken/ken1
e2fsck 1.42.9 (28-Dec-2013)
Pass 1: Checking inodes, blocks, and sizes
Pass 2: Checking directory structure
Pass 3: Checking directory connectivity
Pass 4: Checking reference counts
Pass 5: Checking group summary information
/dev/ken/ken1: 11/25688 files (9.1% non-contiguous), 8896/102400 blocks

第四步:重置硬盘容量
[root@ken ~]# resize2fs /dev/ken/ken1
resize2fs 1.42.9 (28-Dec-2013)
Resizing the filesystem on /dev/ken/ken1 to 307200 (1k) blocks.
The filesystem on /dev/ken/ken1 is now 307200 blocks long.

第五步:重新挂载
可以发现现在已经是300M了
[root@ken ~]# mount /dev/ken/ken1 /test1
[root@ken ~]# df -h
Filesystem               Size  Used Avail Use% Mounted on
/dev/mapper/centos-root   17G  1.2G   16G   7% /
devtmpfs                 476M     0  476M   0% /dev
tmpfs                    488M     0  488M   0% /dev/shm
tmpfs                    488M  7.7M  480M   2% /run
tmpfs                    488M     0  488M   0% /sys/fs/cgroup
/dev/sda1               1014M  130M  885M  13% /boot
tmpfs                     98M     0   98M   0% /run/user/0
/dev/mapper/ken-ken1     287M  2.0M  266M   1% /test1
7.Linux扩容逻辑卷xfs格式
1. xfs格式只能扩容,不能减小!
2. xfs格式无需卸载,支持在线扩容
第一步:创建一个逻辑卷并格式化为xfs格式
[root@ken ~]# lvcreate -n lv_xfs -L 300M ken
  Logical volume "lv_xfs" created.
[root@ken ~]# mkfs.xfs /dev/ken/lv_xfs
meta-data=/dev/ken/lv_xfs        isize=512    agcount=4, agsize=19200 blks
         =                       sectsz=512   attr=2, projid32bit=1
         =                       crc=1        finobt=0, sparse=0
data     =                       bsize=4096   blocks=76800, imaxpct=25
         =                       sunit=0      swidth=0 blks
naming   =version 2              bsize=4096   ascii-ci=0 ftype=1
log      =internal log           bsize=4096   blocks=855, version=2
         =                       sectsz=512   sunit=0 blks, lazy-count=1
realtime =none                   extsz=4096   blocks=0, rtextents=0

第二步:挂载使用
[root@ken ~]# mount /dev/ken/lv_xfs /ken
[root@ken ~]# df -h
Filesystem               Size  Used Avail Use% Mounted on
/dev/mapper/centos-root   17G  1.4G   16G   8% /
devtmpfs                 476M     0  476M   0% /dev
tmpfs                    488M     0  488M   0% /dev/shm
tmpfs                    488M  7.7M  480M   2% /run
tmpfs                    488M     0  488M   0% /sys/fs/cgroup
/dev/sda1               1014M  130M  885M  13% /boot
tmpfs                     98M     0   98M   0% /run/user/0
/dev/mapper/ken-lv_xfs   297M   16M  282M   6% /ken

第三步:在线扩容至600M
[root@ken ~]# lvextend -L 600M /dev/ken/lv_xfs
  Size of logical volume ken/lv_xfs changed from 300.00 MiB (75 extents) to 600.00 MiB (150 extents).
  Logical volume ken/lv_xfs successfully resized.
[root@ken ~]# xfs_growfs /dev/ken/lv_xfs
meta-data=/dev/mapper/ken-lv_xfs isize=512    agcount=4, agsize=19200 blks
         =                       sectsz=512   attr=2, projid32bit=1
         =                       crc=1        finobt=0 spinodes=0
data     =                       bsize=4096   blocks=76800, imaxpct=25
         =                       sunit=0      swidth=0 blks
naming   =version 2              bsize=4096   ascii-ci=0 ftype=1
log      =internal               bsize=4096   blocks=855, version=2
         =                       sectsz=512   sunit=0 blks, lazy-count=1
realtime =none                   extsz=4096   blocks=0, rtextents=0
data blocks changed from 76800 to 153600

第四步:查看磁盘信息(先使用xfs_growfs /路径名 重置信息,然后查看)
发现xfs格式的逻辑卷已经扩容至600M
[root@ken ~]# df -h
Filesystem               Size  Used Avail Use% Mounted on
/dev/mapper/centos-root   17G  1.4G   16G   8% /
devtmpfs                 476M     0  476M   0% /dev
tmpfs                    488M     0  488M   0% /dev/shm
tmpfs                    488M  7.7M  480M   2% /run
tmpfs                    488M     0  488M   0% /sys/fs/cgroup
/dev/sda1               1014M  130M  885M  13% /boot
tmpfs                     98M     0   98M   0% /run/user/0
/dev/mapper/ken-lv_xfs   597M   16M  582M   3% /ken
8.Linux删除逻辑卷
第一步:取消挂载
[root@ken ~]# umount /test1/

第二步:删除逻辑卷设备
[root@ken ~]# lvremove /dev/ken/ken1
Do you really want to remove active logical volume ken/ken1? [y/n]: y
  Logical volume "ken1" successfully removed

第三步:删除卷组
[root@ken ~]# vgremove ken
  Volume group "ken" successfully removed

第四步:删除物理卷
[root@ken ~]# pvremove /dev/sdb /dev/sdc
  Labels on physical volume "/dev/sdb" successfully wiped.
  Labels on physical volume "/dev/sdc" successfully wiped.
xfs_growfs /路径 :同步信息(重置)