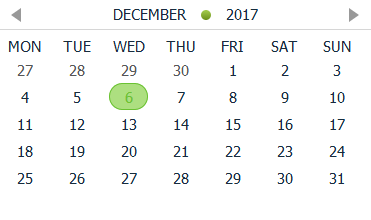
一、jquery-ui(插件)之 datepicker(日期选择器)
详见: http://www.runoob.com/jqueryui/example-datepicker.html
1.html中只有简单的一句
<div id="calendar"></div>
2.css样式
/*1.移除所有的空白、填充、边框等 */
.ui-datepicker, .ui-datepicker table, .ui-datepicker tr, .ui-datepicker td, .ui-datepicker th {
    margin: 0;
    padding: 0;
    border: none;
    border-spacing: 0;
}
/*2.添加背景颜色,圆角,阴影,字体等等 */
.ui-datepicker {
    display: none;
    cursor: default;
    text-transform: uppercase;
    font-family: Tahoma;
    font-size: 12px;
    /* background:#abcdef; */
}
/*3.更改日历头部(月份、年份)的颜色,并添加边框,和一些基本样式  */
.ui-datepicker-header {
    position: relative;
    height:20px;
    padding-top:5px;
    border-bottom: 1px solid #d6d6d6;
}
.ui-datepicker-title {
    text-align: center;
}
.ui-datepicker-month {
    position: relative;
    padding-right: 20px;
    color: #172C3D;
}
.ui-datepicker-year {
    padding-left: 8px;
    color: #172C3D;
}
/*3-1.在年份的前面添加绿色的圈圈  */
.ui-datepicker-month:before {
    display: block;
    position: absolute;
    top: 5px;
    right: 0;
     8px;
    height: 8px;
    content: '';
    background: #a5cd4e;
    background: -moz-linear-gradient(top, #a5cd4e 0%, #6b8f1a 100%);
    background: -webkit-gradient(linear, left top, left bottom, color-stop(0%,#a5cd4e), color-stop(100%,#6b8f1a));
    background: -webkit-linear-gradient(top, #a5cd4e 0%,#6b8f1a 100%);
    background: -o-linear-gradient(top, #a5cd4e 0%,#6b8f1a 100%);
    background: -ms-linear-gradient(top, #a5cd4e 0%,#6b8f1a 100%);
    background: linear-gradient(top, #a5cd4e 0%,#6b8f1a 100%);
    -webkit-border-radius: 5px;
    -moz-border-radius: 5px;
    border-radius: 5px;
}
/*4.Prev和Next按钮*/
.ui-datepicker-prev {
    position: absolute;
    top: 8px;
    left: 10px;
    display: inline-block;
     0px;
    height: 0px;
    border-left: 0px;
    border-top: 6px solid transparent;
    border-right: 8px solid #999;
    border-bottom: 6px solid transparent;
    cursor: pointer;
}
.ui-datepicker-next{
    position: absolute;
      top: 8px;
    right: 10px;
      display: inline-block;
       0px;
     height: 0px;
      border-right: 0px;
      border-top: 6px solid transparent;
      border-left: 8px solid #999;
      border-bottom: 6px solid transparent;
      cursor: pointer;
}
.ui-datepicker-prev span, .ui-datepicker-next span{
    display: block;
    text-indent: -9999px;
}
/*5.给日历添加样式  */
/*5-1.给天和周添加顶部和底部的填充并修改颜色 */
.ui-datepicker-calendar th {
    padding-top:5px;
    text-align: center;
    font-weight: normal;
    color:#172C3D;
}
/*
    5-2.给日历内容添加填充,修改颜色,并给每一个数字添加一个透明的边框。
       这是很必要的,因为我们要给选中的数字添加边框,
       为了防止页面跳动,我们预先给所有的数字都添加一个透明的边框
*/
.ui-datepicker-calendar td {
    padding: 0 5px;
    text-align: center;
    line-height: 20px;
}
.ui-datepicker-calendar .ui-state-default {
    display: block;
     30px;
    outline: none;
    text-decoration: none;
    color: #172C3D;
    border: 1px solid transparent;
}
/*5-3.对于当前选中的日期,我们要更改边框和文字的颜色为绿色。对于其他月份的日期,我们要修改为更暗的颜色 */
.ui-datepicker-calendar .ui-state-active {
    color: #6BC233;
    border: 1px solid #6BC233;
    border-radius: 20px;
    background-color:#ADDF80;
}

.ui-datepicker-other-month .ui-state-default {
    color: #565656;
}
3.js代码
$(function() {
  $('#calendar').datepicker({
    	inline: true,
    	firstDay: 1,
    	showOtherMonths: true,
    	dayNamesMin: ['Sun', 'Mon', 'Tue', 'Wed', 'Thu', 'Fri', 'Sat']
  });
});
4.最终效果

5.小结
自己的前端部分比较弱,在做毕业设计的过程中,将所遇到的一些小知识记录下来,慢慢成长!