Docker Compose 是Docker官方编排(Orchstration)项目之一,负责快速在集群中部署分布式应用。
Dockerfile可以让用户管理一个单独的应用容器;而Compose则允许用户在一个模板(YAML格式)中定义一组相关联的应用容器(被称为一个project,即项目),如一个Web服务器再加上后端的数据库服务容器等。
1、安装Docker
2、安装pip
3、安装Docker Compose
pip install docker-compose
如果报错,则使用下面的方法安装:

pip install docker-compose --ignore-installed requests
往往学习一个东西的时候,总喜欢先把原理什么的使劲的看明白再动手,其实不应该这样,先把实验模拟一遍,就大概知道这个东西是干嘛的,然后再一步一步的去深入研究。还有比如在学习Compose的时候这个实例中会用到haproxy,但是haproxy以前我又没用过,心想着要不先把这个弄懂,这个弄懂又有很懂东西得学,然后就进入一个循环模式了,与原始的目标越来越远越来越远,我们在做这个实验的时候,可以假装我已经对haproxy很熟悉了,等把compose弄明白之后,后续再去细入haproxy。
实例:一个haproxy容器,三个web容器,使用docker compose做编排

当客户端访问宿主机的80端口时,宿主机将80端口映射到haproxy容器的80端口,然后haproxy向后端的web转发请求,即转发到三台后端web容器的任意一台的80端口;
步骤:
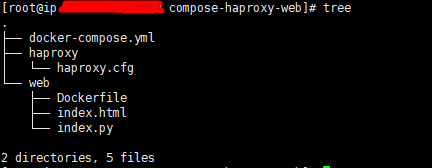
1、创建主文件夹和目录,目录结构如下

对应的文件内容如下:
1)compose-haproxy-web/web/index.py
#!/usr/bin/python #authors: yeasy.github.com #date: 2013-07-05 import sys import BaseHTTPServer from SimpleHTTPServer import SimpleHTTPRequestHandler import socket import fcntl import struct import pickle from datetime import datetime from collections import OrderedDict class HandlerClass(SimpleHTTPRequestHandler): def get_ip_address(self,ifname): s = socket.socket(socket.AF_INET, socket.SOCK_DGRAM) return socket.inet_ntoa(fcntl.ioctl( s.fileno(), 0x8915, # SIOCGIFADDR struct.pack('256s', ifname[:15]) )[20:24]) def log_message(self, format, *args): if len(args) < 3 or "200" not in args[1]: return try: request = pickle.load(open("pickle_data.txt","r")) except: request=OrderedDict() time_now = datetime.now() ts = time_now.strftime('%Y-%m-%d %H:%M:%S') server = self.get_ip_address('eth0') host=self.address_string() addr_pair = (host,server) if addr_pair not in request: request[addr_pair]=[1,ts] else: num = request[addr_pair][0]+1 del request[addr_pair] request[addr_pair]=[num,ts] file=open("index.html", "w") file.write("<!DOCTYPE html> <html> <body><center><h1><font color="blue" face="Georgia, Arial" size=8><em>HA</em></font> Webpage Visit Results</h1></center>"); for pair in request: if pair[0] == host: guest = "LOCAL: "+pair[0] else: guest = pair[0] if (time_now-datetime.strptime(request[pair][1],'%Y-%m-%d %H:%M:%S')).seconds < 3: file.write("<p style="font-size:150%" >#"+ str(request[pair][1]) +": <font color="red">"+str(request[pair][0])+ "</font> requests " + "from <<font color="blue">"+guest+"</font>> to WebServer <<font color="blue">"+pair[1]+"</font>></p>") else: file.write("<p style="font-size:150%" >#"+ str(request[pair][1]) +": <font color="maroon">"+str(request[pair][0])+ "</font> requests " + "from <<font color="navy">"+guest+"</font>> to WebServer <<font color="navy">"+pair[1]+"</font>></p>") file.write("</body> </html>"); file.close() pickle.dump(request,open("pickle_data.txt","w")) if __name__ == '__main__': try: ServerClass = BaseHTTPServer.HTTPServer Protocol = "HTTP/1.0" addr = len(sys.argv) < 2 and "0.0.0.0" or sys.argv[1] port = len(sys.argv) < 3 and 80 or int(sys.argv[2]) HandlerClass.protocol_version = Protocol httpd = ServerClass((addr, port), HandlerClass) sa = httpd.socket.getsockname() print "Serving HTTP on", sa[0], "port", sa[1], "..." httpd.serve_forever() except: exit()
2)compose-haproxy-web/web/index.html 直接touch即可
3)compose-haproxy-web/web/Dockerfile
# Description: This dockerfile uses the python image
# Version:    V1.0
# Author:     LiLe
# Contact:     836217653@qq.com

FROM python:2.7

#为后续的命令指定工作目录
WORKDIR /code

#将指定的src复制到容器的dest,其中src可以是Dockerfile所在目录的一个相对路径;也可以是一个URL,还可以是一个tar文件,会自动解压为目录;这里的.是Dockerfile所在的目录
ADD . /code

#Docker服务端暴露的端口号,在容器启动时需要使用-P指定
EXPOSE 80


CMD python index.py
4)compose-haproxy-web/haproxy/haproxy.cfg
global
    log 127.0.0.1 local0
    log 127.0.0.1 local1 notice

defaults
    log global
    mode http
    option httplog
    option dontlognull
    timeout connect 5000ms
    timeout client 50000ms
    timeout server 50000ms

listen stats
    bind 0.0.0.0:70
    stats enable
    stats uri /

frontend balancer
    bind 0.0.0.0:80
    mode http
    default_backend web_backends

backend web_backends
    mode http
    option forwardfor
    balance roundrobin
    server weba weba:80 check
    server webb webb:80 check
    server webc webc:80 check
    option httpchk GET /
    http-check expect status 200
5)compose-haproxy-web/docker-compose.yml
# Description: This yml file order maanger haproxy cluster
# Version:    V1.0
# Author:     LiLe
# Contact:     836217653@qq.com

weba:
  build: ./web
  expose:
    - 80

webb:
  build: ./web
  expose:
    - 80

webc:
  build: ./web
  expose:
    - 80

haproxy:
  image: haproxy:latest
  volumes:
    - ./haproxy:/haproxy-override
    - ./haproxy/haproxy.cfg:/usr/local/etc/haproxy/haproxy.cfg:ro

#links使得haproxy容器与其他容器相链接,使haproxy容器能直接通过内部端口访问weba、webb、webc
  links:
    - weba
    - webb
    - webc

#宿主机:容器,把容器的端口暴露给宿主局的端口
  ports:
    - "80:80"
    - "70:70"

#容器内暴露的端口
  expose:
    - "80"
    - "70"
2、启动
docker-compose up
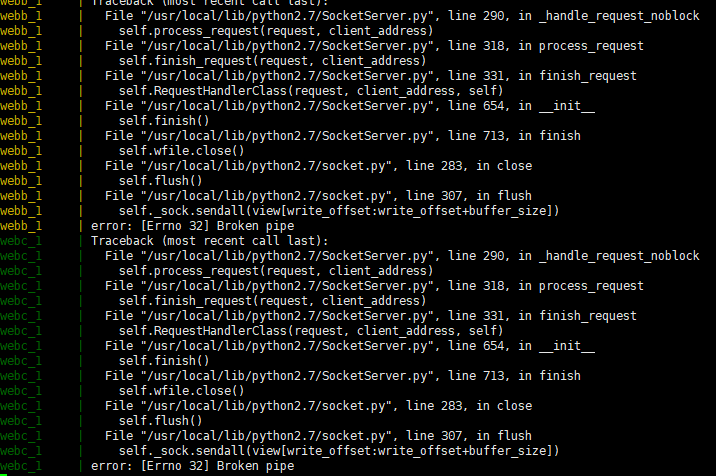
正常应该是这样:

但是事实是这样:这里不是compose的问题,应该是index.py里的问题,暂时是忽略的

3、测试
访问宿主机的80端口,可以看到HA,刷新的话会到不同的后端webserver

访问宿主机的70端口,看到统计界面
