asp.net webapi 自托管插件式服务
webapi问世已久,稀里糊涂的人哪它都当mvc来使,毕竟已mvc使用级别的经验就可以应对webapi。
webapi和mvc在asp.net5时代合体了,这告诉我们,其实 它俩还是有区别的,要不现在也不会取两个名字,但是由于本人归纳总结能力较差,各种不同也无法一一列出了。
在webapi中 HelpPage是个突出而又实用的东西,它尼玛会把我们code中的注释生成xml,然后以web页面的方式把接口文档展示出来,这尼玛无形就下岗一批文案了,以社会责任感角度来讲,ms的这个HelpPage挺不地道的,但我表示就喜欢这样的东西。。
步骤也很简单:
1、negut 搜 helppage ,认准Id是Microsoft.AspNet.WebApi.HelpPage就Install它;
2、新建一个xml文件,在项目属性-生成中 xml文档文件路径指向它 勾选;
3、引入生成的HelpPage中HelpPageConfig.cs中,此代码“config.SetDocumentationProvider(new XmlDocumentationProvider(HttpContext.Current.Server.MapPath("~/App_Data/ApiDocument.xml")));”,修改xml路径 然后解注释;
4、最后一生成就会发现你写的并没有卵用的注释被一坨一坨塞入了那个xml文件当中,当访问help/index 就会看到配图如下:
(附详细参考一份:http://www.asp.net/web-api/overview/getting-started-with-aspnet-web-api/creating-api-help-pages)

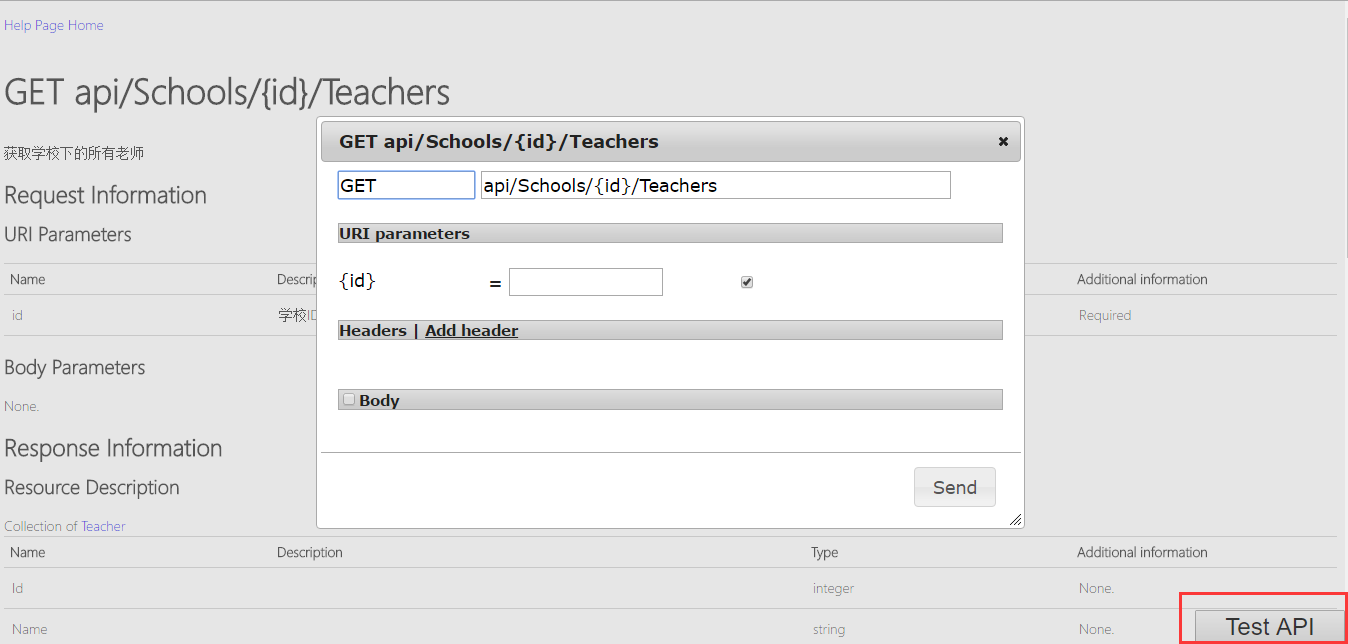
5、Negut认准Id:WebApiTestClient,Install它,你会发现多了一个js、一个cs、两个cshtml文件,都是TestClient开头的,别处用的时候不要忘了靠它。
Api.cshtml文件中加入两行代码
|
1
2
3
4
5
|
@Html.DisplayForModel("TestClientDialogs")@section Scripts{ <link href="~/Areas/HelpPage/TestClient.css" rel="stylesheet" /> @Html.DisplayForModel("TestClientReferences")} |
点入某一个接口以后,戳那个Test Api,你的项目就可以进行接口测试了。此刻你会更坚定自己身为码农的存在,我们并不是coder,我们不生产代码,我们只是代码的搬运工。
(附详细参考一份:https://blogs.msdn.microsoft.com/yaohuang1/2012/12/02/adding-a-simple-test-client-to-asp-net-web-api-help-page/)

微幅扯淡之后,言入主题,毕竟文章精髓的要藏在后面。
从文章标题来看,就可以分成两个部分,webapi可以寄宿iis、console、winform、winservice等,插件开发大家也不陌生,所以精髓的部分也言简意赅了,这也是很无奈的事情啊。
1、使用Self Host自托管方式,negut-Id:Microsoft.AspNet.WebApi.SelfHost
1.1 首先准备一个contrller和model,代码很简单
|
1
2
3
4
5
6
7
8
9
10
11
12
13
14
15
16
17
18
19
20
21
22
23
24
25
26
27
28
29
30
31
32
33
34
35
36
37
38
|
public class Product { public int Id { get; set; } public string Name { get; set; } public string Category { get; set; } public decimal Price { get; set; } }public class ProductsController : ApiController { Product[] products = new Product[] { new Product { Id = 1, Name = "Tomato Soup", Category = "Groceries", Price = 1 }, new Product { Id = 2, Name = "Yo-yo", Category = "Toys", Price = 3.75M }, new Product { Id = 3, Name = "Hammer", Category = "Hardware", Price = 16.99M } }; public IEnumerable<Product> GetAllProducts() { return products; } public Product GetProductById(int id) { var product = products.FirstOrDefault((p) => p.Id == id); if (product == null) { throw new HttpResponseException(HttpStatusCode.NotFound); } return product; } public IEnumerable<Product> GetProductsByCategory(string category) { return products.Where(p => string.Equals(p.Category, category, StringComparison.OrdinalIgnoreCase)); } } |
1.2 寄宿于console,监听port,配置route,启动service,一目了然
|
1
2
3
4
5
6
7
8
9
10
11
12
13
14
15
16
17
18
19
20
21
22
23
|
class Program { static void Main(string[] args) { Console.WriteLine("请输入监听端口"); string port = Console.ReadLine(); var config = new HttpSelfHostConfiguration(string.Format("http://localhost:{0}", port ?? "8080")); config.Routes.MapHttpRoute( "API Default", "api/{controller}/{id}", new { id = RouteParameter.Optional }); using (HttpSelfHostServer server = new HttpSelfHostServer(config)) { server.OpenAsync().Wait(); Console.WriteLine("Press ESC to quit."); while ( !Console.ReadKey().Key.Equals(ConsoleKey.Escape)) { } } } } |
1.3 用winservice来承载webapi服务
首先: Install-Package Microsoft.AspNet.WebApi.OwinSelfHost (提到Asp.Net Owin一句话可形容,Asp.Net5跨平台,此逼功不可没啊)
新建好winserver项目后就可以新建一个Owin的启动类别,在其当中构建webapi的配置
|
1
2
3
4
5
6
7
8
9
10
11
12
13
14
15
|
public class Startup { public void Configuration(IAppBuilder appBuilder) { // Configure Web API for self-host. HttpConfiguration config = new HttpConfiguration(); config.Routes.MapHttpRoute( name: "DefaultApi", routeTemplate: "api/{controller}/{id}", defaults: new { id = RouteParameter.Optional } ); //config.Services.Replace(typeof(IAssembliesResolver), new PluginsResolver()); appBuilder.UseWebApi(config); } } |
在service中启动,over。
|
1
2
3
4
5
6
7
8
9
10
11
12
13
14
15
16
17
18
19
|
private IDisposable _apiserver = null; protected override void OnStart(string[] args) { //Services URI string serveruri = string.Format("http://localhost:{0}/", System.Configuration.ConfigurationManager.AppSettings["port"]); // Start OWIN host _apiserver = WebApp.Start<Startup>(url: serveruri); base.OnStart(args); } protected override void OnStop() { if (_apiserver != null) { _apiserver.Dispose(); } base.OnStop(); } |
2、插件式服务,看似逼格很高,其实只是标题党,画龙点睛的代码到了...
重写DefaultAssembliesResolver的GetAssemblies,反射加载指定文件下的dll中的controller,在WebApiConifg添加其实现
|
1
2
3
4
5
6
7
8
9
10
11
12
13
14
15
16
17
|
public class PluginsResolver : DefaultAssembliesResolver { public override ICollection<Assembly> GetAssemblies() { //动态加载dll中的Controller,类似于插件服务,在WebApiConifg中添加配置 // config.Services.Replace(typeof(IAssembliesResolver), new PluginsResolver()); List<Assembly> assemblies = new List<Assembly>(base.GetAssemblies()); string directoryPath = Path.Combine(System.AppDomain.CurrentDomain.BaseDirectory, "dynamic_services"); string[] files = Directory.GetFiles(directoryPath); foreach (var fileName in files) { assemblies.Add(Assembly.LoadFrom(Path.Combine(directoryPath, fileName))); } return assemblies; } } |
需要什么接口服务直接写好dll仍进dynamic_services文件夹下就有了。
原文地址:https://www.cnblogs.com/NotAnEmpty/p/5667582.html