参考博客:https://www.cnblogs.com/yuanchenqi/articles/8719520.html
一、数据序列化的几种方式
在Django的视图函数中,我们从数据库中获取数据,由以下几种方式将其转化为JSON数据:
1.list强转方式
class PublishView(View):
    def get(self, request):
        publish_list = list(Publish.objects.all().values())
        return HttpResponse(json.dumps(publish_list))
通过list强转的方式。
前台接收到的数据:
[{"id": 1, "name": "u6e05u534eu5927u5b66u51fau7248u793e", "email": "qh@gmail.com"}, {"id": 2, "name":
"u5de5u4e1au51fau7248u793e", "email": "gy@gmail.com"}, {"id": 3, "name": "u90aeu7535u51fau7248u793e", "email":
"yd@gmail.com"}, {"id": 4, "name": "u56dbu5dddu6587u5b66u51fau7248u793e", "email": "scwx@gmail.com"}]
2.手动封装方式
class PublishView(View):
    def get(self, request):
        publish_list = Publish.objects.all()
        temp = []
        for obj in publish_list:
            temp.append({
                'id': obj.id,
                'name': obj.name,
                'email': obj.email
            })

        return HttpResponse(json.dumps(temp))
通过字段拼接的方式。
使用model_to_dict方法来将对象转换成字典:
class PublishView(View):
    def get(self, request):
        from django.forms.models import model_to_dict
        publish_list = Publish.objects.all()
        temp = []
        for obj in publish_list:
            temp.append(model_to_dict(obj))

        return HttpResponse(json.dumps(temp))
前台接收到的数据:
[{"id": 1, "name": "u6e05u534eu5927u5b66u51fau7248u793e", "email": "qh@gmail.com"}, {"id": 2, "name":
"u5de5u4e1au51fau7248u793e", "email": "gy@gmail.com"}, {"id": 3, "name": "u90aeu7535u51fau7248u793e", "email":
"yd@gmail.com"}, {"id": 4, "name": "u56dbu5dddu6587u5b66u51fau7248u793e", "email": "scwx@gmail.com"}]
3.Django提供的序列化
利用django中的序列化组件:·
class PublishView(View):
    def get(self, request):
        from django.core import serializers
        publish_list = Publish.objects.all()
        ret = serializers.serialize("json", publish_list)

        return HttpResponse(ret)
前台接收到的数据:
[{"model": "demo.publish", "pk": 1, "fields": {"name": "u6e05u534eu5927u5b66u51fau7248u793e", "email":
"qh@gmail.com"}}, {"model": "demo.publish", "pk": 2, "fields": {"name": "u5de5u4e1au51fau7248u793e", "email":
"gy@gmail.com"}}, {"model": "demo.publish", "pk": 3, "fields": {"name": "u90aeu7535u51fau7248u793e", "email":
"yd@gmail.com"}}, {"model": "demo.publish", "pk": 4, "fields": {"name": "u56dbu5dddu6587u5b66u51fau7248u793e",
"email": "scwx@gmail.com"}}]
4.restframework提供的序列化
利用restframework中的serializer:
from rest_framework import serializers


class PublishSerializers(serializers.Serializer):
    name = serializers.CharField()
    email = serializers.EmailField()


class PublishView(View):
    def get(self, request):
        publish_list = Publish.objects.all()
        # 如果序列化queryset,则需要参数many=True
        ps = PublishSerializers(publish_list, many=True)
        # 如果是queryset其中一个obj,则不需要many参数
        # ps = PublishSerializers(obj)
        return HttpResponse(ps.data)
这种方式的前提是安装djangorestframework。
前端接收到的数据:
OrderedDict([('name', '清华大学出版社'), ('email', 'qh@gmail.com')])OrderedDict([('name', '工业出版社'), ('email',
'gy@gmail.com')])OrderedDict([('name', '邮电出版社'), ('email', 'yd@gmail.com')])OrderedDict([('name', '四川文学出版社'), ('email',
'scwx@gmail.com')])
数据是多个有序字典组成的列表。
二、安装restframe
pip install djangorestframework
三、POST请求的Content-Type
当我们使用postman发送POST请求时,选择form-data或x-www-form-urlencoded内容类型发送:
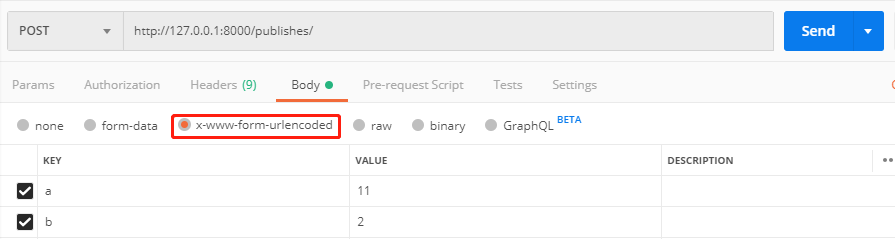
对应请求头中的Content-Type为application/x-www-form-urlencoded。
Django收到请求后,会将body中的数据a=1&b=2转化为request.POST字典。
<QueryDict: {'a': ['11'], 'b': ['2']}> # django自动帮我们将body中的数据转换为字典
但是,如果内容类型选择raw-->Json发送:

对应请求头中的Content-Type为application/json。
Django收到请求后,不会自动将其转换为request.POST。
<QueryDict: {}> # 拿到的request.POST是空的
这时,我们通过request.body可以拿到原始的body数据:
b'{"a":"1","b":"2"}'
四、restframe中的APIView
1.视图函数继承APIView
在我们写视图函数的时候,原来我们继承的事View类,而要使用restframework的话,我们需要继承APIView类:
from rest_framework.views import APIView


class PublishView(APIView):
    def get(self, request):
        pass

    def post(self, request):
        pass
2.APIView和View之间的区别
我们看以下APIView的源码:
class APIView(View):

    # The following policies may be set at either globally, or per-view.
    renderer_classes = api_settings.DEFAULT_RENDERER_CLASSES
    parser_classes = api_settings.DEFAULT_PARSER_CLASSES
    authentication_classes = api_settings.DEFAULT_AUTHENTICATION_CLASSES
    throttle_classes = api_settings.DEFAULT_THROTTLE_CLASSES
    permission_classes = api_settings.DEFAULT_PERMISSION_CLASSES
    content_negotiation_class = api_settings.DEFAULT_CONTENT_NEGOTIATION_CLASS
    metadata_class = api_settings.DEFAULT_METADATA_CLASS
    versioning_class = api_settings.DEFAULT_VERSIONING_CLASS

    # Allow dependency injection of other settings to make testing easier.
    settings = api_settings

    schema = DefaultSchema()

    @classmethod
    def as_view(cls, **initkwargs):
        """
        Store the original class on the view function.

        This allows us to discover information about the view when we do URL
        reverse lookups.  Used for breadcrumb generation.
        """
        if isinstance(getattr(cls, 'queryset', None), models.query.QuerySet):
            def force_evaluation():
                raise RuntimeError(
                    'Do not evaluate the `.queryset` attribute directly, '
                    'as the result will be cached and reused between requests. '
                    'Use `.all()` or call `.get_queryset()` instead.'
                )
            cls.queryset._fetch_all = force_evaluation

        view = super().as_view(**initkwargs)
        view.cls = cls
        view.initkwargs = initkwargs

        # Note: session based authentication is explicitly CSRF validated,
        # all other authentication is CSRF exempt.
        return csrf_exempt(view)
我们可以看到,APIView实际上是继承自View类。并且做了一些扩展。
APIView也有as_view()方法,其中做了一些判断后,然后调用了父类(View)中的as_view()方法,并且得到返回的view函数引用,最后将这个view函数引用进行了返回(并且去除了csrf)。
但是不同的是,虽然是父类的as_view()方法返回的view函数引用,但是view中调用dispatch函数就不应该是调用的父类的dispatch,而应该是APIView的dispatch()方法。
我们找到APIView类中的dispatch()方法:
def dispatch(self, request, *args, **kwargs):
    """
    `.dispatch()` is pretty much the same as Django's regular dispatch,
    but with extra hooks for startup, finalize, and exception handling.
    """
    self.args = args
    self.kwargs = kwargs
    # 首先把request使用initialize_request方法封装成了一个Request类的对象。
    request = self.initialize_request(request, *args, **kwargs)
    # 将封装后的request替换到self.request中,以后使用的都是Request类的对象,里面封装了原生的request
    # 如果要获取原生request,在这里使用request._request。
    self.request = request
    self.headers = self.default_response_headers  # deprecate?

    try:
        self.initial(request, *args, **kwargs)

        # 判断请求类型,并且返回对应的视图函数,例如get()和post(),并赋值给handler
        if request.method.lower() in self.http_method_names:
            handler = getattr(self, request.method.lower(),
                              self.http_method_not_allowed)
        else:
            handler = self.http_method_not_allowed
        # 运行请求对应的视图函数,得到response
        response = handler(request, *args, **kwargs)

    except Exception as exc:
        response = self.handle_exception(exc)
    # 在finalize_response方法中,针对response做一些处理
    self.response = self.finalize_response(request, response, *args, **kwargs)
    # 返回给客户端
    return self.response
3.使用restframework中的request
既然restframe中的APIView将request进行了封装,得到一个新的request(Request对象),那么我们如何使用:
# 使用APIView
class PublishView(APIView):
    def get(self, request):
        pass

    def post(self, request):
        # 使用新的request获取body数据
        print(request.data)
        print(type(request.data))
        return HttpResponse("OK")
使用postman发POST请求,数据类型为JSON,数据为{"a":"1","b":"2"}:

后台打印结果:
{'a': '1', 'b': '2'}
<class 'dict'>
说明restframe帮我们将JSON转换为了字典。这是Django原生View没有提供的功能。
注意:application/json数据只能使用request.data来取,而application/x-www-form-urlencoded数据可以使用request.POST和request.data来获取。
同样的,在get()中也可以通过request.data获取数据:
# 使用APIView
class PublishView(APIView):
    def get(self, request):
        print(request.data)
        print(type(request.data))
        return HttpResponse("get...")

    def post(self, request):
        pass
打印结果:
{}
<class 'dict'>
可以看到,get请求附带在url中的数据,新的request.data并没有值,也就是说restframe的request只帮我们处理了POST请求的值。
如果我们要获取GET请求的值,我们可以使用:
# 使用APIView
class PublishView(APIView):
    def get(self, request):
        print(request._request.GET)  # 通过新request中封装的原生request获取GET
        print(request.GET)  # 新的request也帮我们封装了一样的GET
        return HttpResponse("get...")

    def post(self, request):
        pass
五、通过Response返回值
1.使用Response返回值
from rest_framework import serializers
from rest_framework.views import APIView
from rest_framework.response import Response
from .models import Book, Author


class BookSerializers(serializers.Serializer):
    title = serializers.CharField()
    price = serializers.IntegerField()
    pub_date = serializers.DateTimeField()
    # publish = serializers.ForeignKey("Publish", on_delete=models.CASCADE)
    # authors = serializers.ManyToManyField("Author")


class BookView(APIView):
    def get(self, request):
        book_list = Book.objects.all()
        bs = BookSerializers(book_list, many=True)

        return Response(bs.data)

    def post(self, request):
        pass
这里返回值,我们没使用HttpResponse,而是使用的restframe提供的Response类。
Response类继承于HttpResponse类。其中扩展了一些功能。
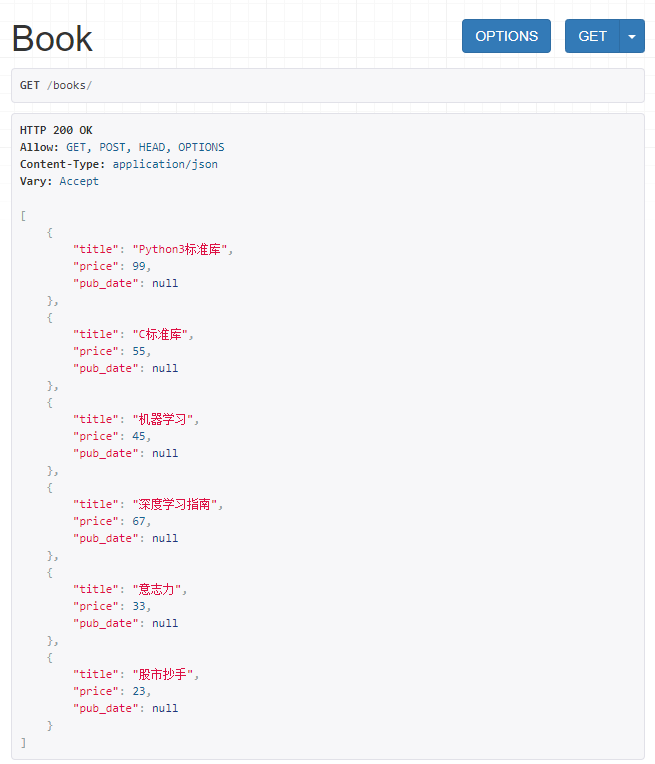
使用postman发GET请求,看返回结果:


[
    {
        "title": "Python3标准库",
        "price": 99,
        "pub_date": null
    },
    {
        "title": "C标准库",
        "price": 55,
        "pub_date": null
    },
    {
        "title": "机器学习",
        "price": 45,
        "pub_date": null
    },
    {
        "title": "深度学习指南",
        "price": 67,
        "pub_date": null
    },
    {
        "title": "意志力",
        "price": 33,
        "pub_date": null
    },
    {
        "title": "股市抄手",
        "price": 23,
        "pub_date": null
    }
]
Response帮我们将返回的JSON数据进行了格式化。
如果用浏览器请求,可以看到页面:
六、处理一对多和多对多数据
1.一对多和多对多的处理
前面小节所描述的都是表中的简单字段,而没有包含外键和多对多的字段,下面就说明一下一对多和多对多字段的处理方法。
class BookSerializers(serializers.Serializer):
    title = serializers.CharField()
    price = serializers.IntegerField()
    pub_date = serializers.DateTimeField()
    publish = serializers.CharField(source="publish.name")  # 如果想显示email,则改为source="publish.email"
    authors = serializers.SerializerMethodField()  # 多对多字段,使用这个函数配置后面定义的方法来自定义数据

    # 定义一个方法,方法名必须是get_authors,SerializerMethodField()会调用get_authors来获取返回值,并赋值给authors
    def get_authors(self, obj):
        temp = []
        for obj in obj.authors.all():
            # 将authors中该book对应的所有作者名字加入列表,并返回
            temp.append(obj.name)
        return temp


class BookView(APIView):
    def get(self, request):
        book_list = Book.objects.all()
        bs = BookSerializers(book_list, many=True)

        return Response(bs.data)

    def post(self, request):
        pass
在一对多字段(外键)中,使用source参数来指定想获取的外表字段。
在多对多字段中,使用 SerializerMethodField() 并配合自定义处理函数,来定义数据怎么组织。
Postman发GET请求,返回结果:
[
    {
        "title": "Python3标准库",
        "price": 99,
        "pub_date": null,
        "publish": "工业出版社",
        "authors": [
            "leo",
            "alex"
        ]
    },
    {
        "title": "C标准库",
        "price": 55,
        "pub_date": null,
        "publish": "清华大学出版社",
        "authors": [
            "alex",
            "Lucy"
        ]
    },
    {
        "title": "机器学习",
        "price": 45,
        "pub_date": null,
        "publish": "工业出版社",
        "authors": [
            "leo"
        ]
    },
    {
        "title": "深度学习指南",
        "price": 67,
        "pub_date": null,
        "publish": "邮电出版社",
        "authors": [
            "leo",
            "Lucy"
        ]
    },
    {
        "title": "意志力",
        "price": 33,
        "pub_date": null,
        "publish": "四川文学出版社",
        "authors": [
            "Jone",
            "Lucy"
        ]
    },
    {
        "title": "股市抄手",
        "price": 23,
        "pub_date": null,
        "publish": "邮电出版社",
        "authors": [
            "alex",
            "Jone"
        ]
    }
]
可以看到,所有的作者名都以列表的形式放在返回数据中了。
2.一对多的另外一种处理方式
既然多对多可以使用SerializerMethodField() 配合自定义处理函数来获取所有的值。那么一对多的情况,我们也可以使用这种方式来处理:
class BookSerializers(serializers.Serializer):
    title = serializers.CharField()
    price = serializers.IntegerField()
    pub_date = serializers.DateTimeField()
    publish = serializers.SerializerMethodField()

    def get_publish(self, obj):
        temp = {"name": obj.publish.name, "email": obj.publish.email}
        return temp

    authors = serializers.SerializerMethodField()  # 多对多字段,使用这个函数配置后面定义的方法来自定义数据

    # 定义一个方法,方法名必须是get_authors,SerializerMethodField()会调用get_authors来获取返回值,并赋值给authors
    def get_authors(self, obj):
        temp = []
        for obj in obj.authors.all():
            # 将authors中该book对应的所有作者名字加入列表,并返回
            temp.append(obj.name)
        return temp


class BookView(APIView):
    def get(self, request):
        book_list = Book.objects.all()
        bs = BookSerializers(book_list, many=True)

        return Response(bs.data)

    def post(self, request):
        pass
可以看到,使用这种方式,我们可以同时获取publish.name和publish.email,并将其放入一个字典中,一起返回。
获取到的数据:
[
    {
        "title": "Python3标准库",
        "price": 99,
        "pub_date": null,
        "publish": {
            "name": "工业出版社",
            "email": "gy@gmail.com"
        },
        "authors": [
            "leo",
            "alex"
        ]
    },
    {
        "title": "C标准库",
        "price": 55,
        "pub_date": null,
        "publish": {
            "name": "清华大学出版社",
            "email": "qh@gmail.com"
        },
        "authors": [
            "alex",
            "Lucy"
        ]
    },
    {
        "title": "机器学习",
        "price": 45,
        "pub_date": null,
        "publish": {
            "name": "工业出版社",
            "email": "gy@gmail.com"
        },
        "authors": [
            "leo"
        ]
    },
    {
        "title": "深度学习指南",
        "price": 67,
        "pub_date": null,
        "publish": {
            "name": "邮电出版社",
            "email": "yd@gmail.com"
        },
        "authors": [
            "leo",
            "Lucy"
        ]
    },
    {
        "title": "意志力",
        "price": 33,
        "pub_date": null,
        "publish": {
            "name": "四川文学出版社",
            "email": "scwx@gmail.com"
        },
        "authors": [
            "Jone",
            "Lucy"
        ]
    },
    {
        "title": "股市抄手",
        "price": 23,
        "pub_date": null,
        "publish": {
            "name": "邮电出版社",
            "email": "yd@gmail.com"
        },
        "authors": [
            "alex",
            "Jone"
        ]
    }
]
七、使用ModelSerializer类来处理
除了第五六节中所描述的利用serializers.Serializer来处理,还可以使用serializers.ModelSerializer类。
class BookModelSerializers(serializers.ModelSerializer):
    class Meta:
        model = Book
        fields = "__all__"


class BookView(APIView):
    def get(self, request):
        book_list = Book.objects.all()
        bs = BookModelSerializers(book_list, many=True)

        return Response(bs.data)

    def post(self, request):
        pass
得到返回数据:
[
    {
        "id": 1,
        "title": "Python3标准库",
        "price": 99,
        "pub_date": null,
        "publish": 2,
        "authors": [
            1,
            2
        ]
    },
    {
        "id": 2,
        "title": "C标准库",
        "price": 55,
        "pub_date": null,
        "publish": 1,
        "authors": [
            2,
            4
        ]
    },
    {
        "id": 3,
        "title": "机器学习",
        "price": 45,
        "pub_date": null,
        "publish": 2,
        "authors": [
            1
        ]
    },
    {
        "id": 4,
        "title": "深度学习指南",
        "price": 67,
        "pub_date": null,
        "publish": 3,
        "authors": [
            1,
            4
        ]
    },
    {
        "id": 5,
        "title": "意志力",
        "price": 33,
        "pub_date": null,
        "publish": 4,
        "authors": [
            3,
            4
        ]
    },
    {
        "id": 6,
        "title": "股市抄手",
        "price": 23,
        "pub_date": null,
        "publish": 3,
        "authors": [
            2,
            3
        ]
    }
]
可以看到,一对多和多对多字段,默认返回的是主键ID。所以我们要单独对一对多和多对多的字段做处理,和五六节中的方式一样:
class BookModelSerializers(serializers.ModelSerializer):
    class Meta:
        model = Book
        fields = "__all__"

    publish = serializers.SerializerMethodField()

    def get_publish(self, obj):
        temp = {"name": obj.publish.name, "email": obj.publish.email}
        return temp

    authors = serializers.SerializerMethodField()

    def get_authors(self, obj):
        temp = []
        for obj in obj.authors.all():
            # 将authors中该book对应的所有作者名字加入列表,并返回
            temp.append(obj.name)
        return temp


class BookView(APIView):
    def get(self, request):
        book_list = Book.objects.all()
        bs = BookModelSerializers(book_list, many=True)

        return Response(bs.data)

    def post(self, request):
        pass
我们在ModelSerializer类中将自定义处理一对多多对多字段的代码添加在后面。就会按我们自定义的方式来处理数据。
得到结果:
[
    {
        "id": 1,
        "publish": {
            "name": "工业出版社",
            "email": "gy@gmail.com"
        },
        "authors": [
            "leo",
            "alex"
        ],
        "title": "Python3标准库",
        "price": 99,
        "pub_date": null
    },
    {
        "id": 2,
        "publish": {
            "name": "清华大学出版社",
            "email": "qh@gmail.com"
        },
        "authors": [
            "alex",
            "Lucy"
        ],
        "title": "C标准库",
        "price": 55,
        "pub_date": null
    },
    {
        "id": 3,
        "publish": {
            "name": "工业出版社",
            "email": "gy@gmail.com"
        },
        "authors": [
            "leo"
        ],
        "title": "机器学习",
        "price": 45,
        "pub_date": null
    },
    {
        "id": 4,
        "publish": {
            "name": "邮电出版社",
            "email": "yd@gmail.com"
        },
        "authors": [
            "leo",
            "Lucy"
        ],
        "title": "深度学习指南",
        "price": 67,
        "pub_date": null
    },
    {
        "id": 5,
        "publish": {
            "name": "四川文学出版社",
            "email": "scwx@gmail.com"
        },
        "authors": [
            "Jone",
            "Lucy"
        ],
        "title": "意志力",
        "price": 33,
        "pub_date": null
    },
    {
        "id": 6,
        "publish": {
            "name": "邮电出版社",
            "email": "yd@gmail.com"
        },
        "authors": [
            "alex",
            "Jone"
        ],
        "title": "股市抄手",
        "price": 23,
        "pub_date": null
    }
]
八、使用POST插入数据
前面第五六七节中,我们都在讨论如果使用GET方法获取全量数据(例如Book的全部数据)。
在这节中,我们讨论,如果使用POST来向数据库中插入一条数据。
class BookModelSerializers(serializers.ModelSerializer):
    class Meta:
        model = Book
        fields = "__all__"


class BookView(APIView):
    def get(self, request):
        book_list = Book.objects.all()
        bs = BookModelSerializers(book_list, many=True)

        return Response(bs.data)

    def post(self, request):
        bs = BookModelSerializers(data=request.data)
        if bs.is_valid():
            bs.save()
            return Response(bs.data)
        else:
            return Response(bs.errors)
看post()方法,我们使用BookModelSerializers对收到的request.data数据(即POST请求传过来的JSON数据)进行反序列化,注意参数data=request.data。
bs.is_valid()会检查传过来的JSON数据的格式是否满足BookModelSerializers中定义的格式。这里我们使用的BookModelSerializers的默认格式(即未添加自定义显示字段):
{
   "id": 7,
   "title": "Python2标准库",
   "price": 99,
   "pub_date": null,
   "publish": 1,
   "authors": [
       1,
       2
   ]
}
也就是"publish"字段需要传递主键ID,而"authors"字段需要传递列表。
如果is_valid()返回值为True,则执行bs.save(),这个方法内部实际上调用了BookModelSerializers的父类ModelSerializers中的create()方法,底层就是插入数据库的操作。插入成功后,再将插入的数据返回给浏览器。
如果is_valid()返回值为False,则将错误信息返回给浏览器。
使用Postman发送数据:
{
    "title": "Python3",
    "price": 99,
    "pub_date": "2020-01-20 13:03:04",
    "publish": 1,
    "authors": [
        3,
        4
    ]
}
得到的返回结果:
{
    "id": 14,
    "title": "Python3",
    "price": 99,
    "pub_date": "2020-01-20T13:03:04Z",
    "publish": 1,
    "authors": [
        3,
        4
    ]
}
其中id是自增的。
我们查看Book表中多了一条记录:

并且在book和author的多对多表中,也添加了2条新的数据:

九、自定义插入数据格式
当我们在BookModelSerializers类定义的时候,使用了自定义显示字段:
class BookModelSerializers(serializers.ModelSerializer):
    class Meta:
        model = Book
        fields = "__all__"

    publish = serializers.CharField(source="publish.pk")
例如,publish字段,我们自定义显示其主键ID。
此时再按照第八节中的数据格式进行插入会报错:
AssertionError at /books/
The `.create()` method does not support writable dotted-source fields by default.
Write an explicit `.create()` method for serializer `demo.views.BookModelSerializers`, or set `read_only=True` on dotted-source serializer fields.
出现这个错误,是因为 ModelSerializer类中的create()方法,不支持我们自定义数据结构。
所以我们要使用自定义结构,必须自己重写create()方法:
class BookModelSerializers(serializers.ModelSerializer):
    class Meta:
        model = Book
        fields = "__all__"

    publish = serializers.CharField(source="publish.pk")

    def create(self, validated_data):
        print("validated_data:", validated_data)
        # 添加book表中的新书记录
        book = Book.objects.create(title=validated_data['title'], price=validated_data['price'],
                                   pub_date=validated_data['pub_date'], publish_id=validated_data['publish']['pk'])
        # 添加多对多表中的记录
        book.authors.add(*validated_data['authors'])

        return book
再次插入数据:
{
    "title": "JAVA",
    "price": 99,
    "pub_date": "2020-01-20 13:03:04",
    "publish": 1,
    "authors": [
        3,
        4
    ]
}
发现成功添加。
book表中记录:

多对多表中记录:

十、修改和删除单条数据
前面讨论了获取book表的全量数据,以及向表中添加一条数据,这节我们讨论如何修改一条数据,以及如何删除一条数据。
1.创建BookDetailView视图类
查看全量数据和添加数据我们都使用的是BookView视图类。而对单条数据进行操作,我们单独创建一个视图类。
class BookDetailView(APIView):
    def get(self, request, id):
        pass

    def put(self, request, id):
        pass

    def delete(self, request, id):
        pass
其中的get()方法,用来获取id对应数据。put()方法用来修改id对应数据。delete()方法用来删除id对应数据。
添加对应的路由条目:
from django.contrib import admin
from django.urls import path, re_path
from demo import views

urlpatterns = [
    path('admin/', admin.site.urls),
    re_path('^publishes/$', views.PublishView.as_view()),
    re_path('^books/$', views.BookView.as_view()),
    re_path('^books/(d+)/$', views.BookDetailView.as_view()),
]
注意,获取单条数据的路由条目中有一个参数id。
2.实现get()获取单条数据
class BookDetailView(APIView):
    def get(self, request, id):
        # 从数据库中获取id对应的数据
        book = Book.objects.filter(pk=id).first()
        # 序列化
        bs = BookModelSerializers(book)
        # 返回给浏览器
        return Response(bs.data)

    def put(self, request, id):
        pass

    def delete(self, request, id):
        pass
3.实现put()修改数据
class BookDetailView(APIView):
    def get(self, request, id):
        # 从数据库中获取id对应的数据
        book = Book.objects.filter(id=id).first()
        # 序列化
        bs = BookModelSerializers(book)
        # 返回给浏览器
        return Response(bs.data)

    def put(self, request, id):
        # 获取pk=id的条目
        book = Book.objects.filter(pk=id).first()
        # 获取bs实例,并将修改的新值作为参数data
        bs = BookModelSerializers(book, data=request.data)
        # 判断是否符合规则
        if bs.is_valid():
            # 更新,调用ModelSerializer中的update方法
            bs.save()
            # 将更新成功的数据返回给浏览器
            return Response(bs.data)
        else:
            # 将错误信息返回给浏览器
            return HttpResponse(bs.errors)

    def delete(self, request, id):
        pass
4.实现delete()删除数据
class BookDetailView(APIView):
    def get(self, request, id):
        # 从数据库中获取id对应的数据
        book = Book.objects.filter(id=id).first()
        # 序列化
        bs = BookModelSerializers(book)
        # 返回给浏览器
        return Response(bs.data)

    def put(self, request, id):
        # 获取pk=id的条目
        book = Book.objects.filter(pk=id).first()
        # 获取bs实例,并将修改的新值作为参数data
        bs = BookModelSerializers(book, data=request.data)
        # 判断是否符合规则
        if bs.is_valid():
            # 更新,调用ModelSerializer中的update方法
            bs.save()
            # 将更新成功的数据返回给浏览器
            return Response(bs.data)
        else:
            # 将错误信息返回给浏览器
            return HttpResponse(bs.errors)

    def delete(self, request, id):
        Book.objects.filter(pk=id).first().delete()
        return Response()
删除最简单,直接找到id对应的条目删除即可。
十一、超链接字段
1.场景说明
我们使用127.0.0.1:8000/books/获取到了所有书籍的信息:
[
    {
        "id": 8,
        "title": "Python2标准库3",
        "price": 99,
        "pub_date": "2012-11-20T13:03:33Z",
        "publish": 1,
        "authors": [
            1,
            2
        ]
    },
    {
        "id": 9,
        "title": "Python2标准库4",
        "price": 99,
        "pub_date": "2012-11-20T13:03:33Z",
        "publish": 1,
        "authors": [
            1,
            2
        ]
    },
    {
        "id": 10,
        "title": "Python2标准库5",
        "price": 99,
        "pub_date": "2012-11-20T13:03:33Z",
        "publish": 1,
        "authors": [
            1,
            2
        ]
    },
    {
        "id": 11,
        "title": "Python2标准库6",
        "price": 99,
        "pub_date": "2012-11-20T13:03:33Z",
        "publish": 1,
        "authors": [
            1,
            2
        ]
    },
    {
        "id": 12,
        "title": "Python2标准库7",
        "price": 99,
        "pub_date": "2012-11-20T13:03:33Z",
        "publish": 1,
        "authors": [
            1,
            2
        ]
    },
    {
        "id": 13,
        "title": "Python2标准库",
        "price": 99,
        "pub_date": "2012-11-20T13:03:33Z",
        "publish": 1,
        "authors": [
            1,
            2
        ]
    },
    {
        "id": 14,
        "title": "Python3",
        "price": 99,
        "pub_date": "2020-01-20T13:03:04Z",
        "publish": 1,
        "authors": [
            3,
            4
        ]
    },
    {
        "id": 15,
        "title": "JAVA",
        "price": 99,
        "pub_date": "2020-01-20T13:03:04Z",
        "publish": 1,
        "authors": [
            3,
            4
        ]
    },
    {
        "id": 16,
        "title": "JAVA",
        "price": 99,
        "pub_date": "2020-01-20T13:03:04Z",
        "publish": 1,
        "authors": [
            3,
            4
        ]
    },
    {
        "id": 17,
        "title": "JAVA",
        "price": 99,
        "pub_date": "2020-01-20T13:03:04Z",
        "publish": 1,
        "authors": [
            3,
            4
        ]
    },
    {
        "id": 18,
        "title": "hello",
        "price": 99,
        "pub_date": "2020-01-20T13:03:04Z",
        "publish": 1,
        "authors": [
            3,
            4
        ]
    }
]
我们可以看到,每条书籍的记录中"publish"字段都是以pk(主键ID)显示的。
如果我们想将这个字段的值换成查询相应publish的超链接,如下所示:
{
    "id": 17,
    "title": "JAVA",
    "price": 99,
    "pub_date": "2020-01-20T13:03:04Z",
    "publish": "http://127.0.0.1:8000/publishes/1/",
    "authors": [
        3,
        4
    ]
},
2.修改路由urls
要返回超链接格式的数据,url中需要使用有名分组。
from django.contrib import admin
from django.urls import path, re_path
from demo import views

urlpatterns = [
    path('admin/', admin.site.urls),
    re_path('^publishes/$', views.PublishView.as_view(), name="publish"),
    re_path('^publishes/(?P<pk>d+)/$', views.PublishDetailView.as_view(), name="publishdetail"),
    re_path('^books/$', views.BookView.as_view(), name="book"),
    re_path('^books/(?P<pk>d+)/$', views.BookDetailView.as_view(), name="bookdetail"),
]
url中要使用有名分组,分组名为pk。并且为相应url添加别名,name="publishdetail",因为在视图函数中要使用反向生成url的功能。
3.视图函数实现
由于我们要在book的全量查询和单条记录查询中都要显示publish的超链接,所以要对 BookModelSerializers类进行修改:
class BookModelSerializers(serializers.ModelSerializer):
    class Meta:
        model = Book
        fields = "__all__"

    #生成url:http://127.0.0.1:8000/publishes/1/
    publish = serializers.HyperlinkedIdentityField(
        # 指定urls中对应publish的url,即'^publishes/(?P<pk>d+)/$'
        view_name="publishdetail",
        # 从Book表中获取publish_id字段,填充到下面的lookup_url_kwarg参数指定的分组名中
        lookup_field="publish_id",
        # 将上面的publish_id填充到urls中分组pk。生成url:http://127.0.0.1:8000/publishes/1/
        lookup_url_kwarg="pk"
    )
然后,Book的全量展示或单条展示,要使用超链接的话,要在 BookModelSerializers 实例化的时候添加context参数:
class BookView(APIView):
    def get(self, request):
        book_list = Book.objects.all()
        bs = BookModelSerializers(book_list, many=True, context={'request': request})

        return Response(bs.data)

    def post(self, request):
        bs = BookModelSerializers(data=request.data)
        if bs.is_valid():
            bs.save()
            return Response(bs.data)
        else:
            return Response(bs.errors)


class BookDetailView(APIView):
    def get(self, request, pk):
        # 从数据库中获取id对应的数据
        book = Book.objects.filter(pk=pk).first()
        # 序列化
        bs = BookModelSerializers(book, context={'request': request})
        # 返回给浏览器
        return Response(bs.data)

    def put(self, request, pk):
        # 获取pk=id的条目
        book = Book.objects.filter(pk=pk).first()
        # 获取bs实例,并将修改的新值作为参数data
        bs = BookModelSerializers(book, data=request.data)
        # 判断是否符合规则
        if bs.is_valid():
            # 更新,调用ModelSerializer中的update方法
            bs.save()
            # 将更新成功的数据返回给浏览器
            return Response(bs.data)
        else:
            # 将错误信息返回给浏览器
            return HttpResponse(bs.errors)

    def delete(self, request, pk):
        Book.objects.filter(pk=pk).first().delete()
        return Response()
注意,由于urls中使用了有名分组,分组名为pk。所以BookView和BookDetailView中所有视图函数接收参数的形参必须是"pk"。
最后查看books数据的结果:(http://127.0.0.1:8000/books/)
[
    {
        "id": 8,
        "publish": "http://127.0.0.1:8000/publishes/1/",
        "title": "Python2标准库3",
        "price": 99,
        "pub_date": "2012-11-20T13:03:33Z",
        "authors": [
            1,
            2
        ]
    },
    {
        "id": 9,
        "publish": "http://127.0.0.1:8000/publishes/1/",
        "title": "Python2标准库4",
        "price": 99,
        "pub_date": "2012-11-20T13:03:33Z",
        "authors": [
            1,
            2
        ]
    },
    {
        "id": 10,
        "publish": "http://127.0.0.1:8000/publishes/1/",
        "title": "Python2标准库5",
        "price": 99,
        "pub_date": "2012-11-20T13:03:33Z",
        "authors": [
            1,
            2
        ]
    }
]
查看单条book数据的结果:(http://127.0.0.1:8000/books/8/)
{
    "id": 8,
    "publish": "http://127.0.0.1:8000/publishes/1/",
    "title": "Python2标准库3",
    "price": 99,
    "pub_date": "2012-11-20T13:03:33Z",
    "authors": [
        1,
        2
    ]
}
(•◡•) /