一、Fragment的设计哲学
Android在3.0中引入了fragments的概念,主要目的是用在大屏幕设备上——例如平板电脑上,支持更加动态和灵活的UI设计。平板电脑的屏幕比手机的大得多,有更多的空间来放更多的UI组件,并且这些组件之间会产生更多的交互。
针对屏幕尺寸的差距,很多情况下,都是先针对手机开发一套App,然后拷贝一份,修改布局以适应平板神马超级大屏的。难道无法做到一个App可以同时适应手机和平板么,当然了,必须有啊。Fragment的出现就是为了解决这样的问题。你可以把Fragment当成Activity的一个界面的一个组成部分,甚至Activity的界面可以完全有不同的Fragment组成,更帅气的是Fragment拥有自己的生命周期和接收、处理用户的事件,这样就不必在Activity写一堆控件的事件处理的代码了。更为重要的是,你可以动态的添加、替换和移除某个Fragment。
下图是文档中给出的一个Fragment分别对应手机与平板间不同情况的处理图:

PS:简单的新闻浏览页面,使用两个Fragment分别显示新闻列表与新闻内容;
Fragment在应用中应当是一个模块化和可重用的组件,因为Fragment定义了他自己的布局,以及通过使用他自己的生命周期回调方法定义了他自己的行为,可以将Fragment包含到多个Activity中。
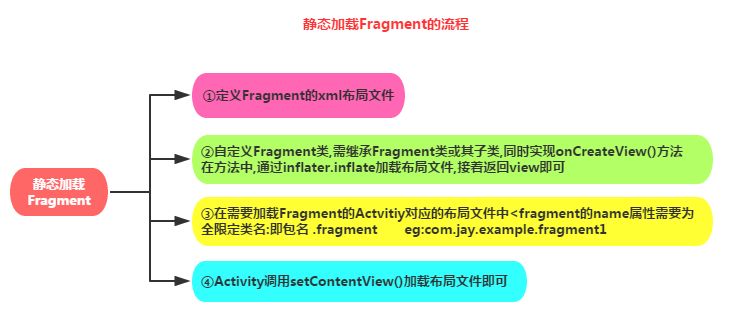
二、静态加载Fragment
Fragment知识概要:
-
- Fragment 可以作为Activity界面的一部分组成出现(不能单独使用)
- 可以在一个Activity中同时出现多个fragment,并且一个fragment也可以在多个activity中使用
- 在activity运行过程中,可以添加、一处或替换fragment
- fragment可以响应自己的输入事件,并且有自己的生命周期,他们的生命周期会受宿主activity的生命周期影响,比如Activity被destory销毁了,他也会跟着销毁
onCreateView()方法
Fragment第一次绘制它的用户界面的时候,系统会调用此方法,未来绘制Fragment的UI,此方法必须返回一个View,如果不显示UI,返回NULL即可。
在activity的layout文件中声明Fragment,需要特别注意的是<fragment>中的android: name 属性指定了在layout中实例化的Fragment类
标识Fragment的方法:
android:id 属性提供一个唯一的ID
android:tag 属性提供一个唯一字符串
1、fragment布局文件,显示fragment显示内容控件


 1 <?xml version="1.0" encoding="utf-8"?>
 2 <LinearLayout xmlns:android="http://schemas.android.com/apk/res/android"
 3     android:layout_width="match_parent"
 4     android:layout_height="match_parent"
 5     android:orientation="vertical" >
 6
 7     <TextView
 8        android:id="@+id/text"
 9         android:layout_width="wrap_content"
10         android:layout_height="wrap_content"
11         ></TextView>
12
13     <Button
14         android:id="@+id/button"
15         android:layout_width="wrap_content"
16         android:layout_height="wrap_content"
17
18         />
19 </LinearLayout>
2、自定义一个Fragment类,需要继承Fragment或者他的子类,重写onCreateView()方法 在该方法中调用:inflater.inflate()方法加载Fragment的布局文件,接着返回加载的view对象
 1 package com.example.fragment;
 2
 3 import android.app.Fragment;
 4 import android.os.Bundle;
 5 import android.view.LayoutInflater;
 6 import android.view.View;
 7 import android.view.ViewGroup;
 8 import android.widget.TextView;
 9
10 public class MyFragment extends Fragment{
11     @Override
12     public View onCreateView(LayoutInflater inflater, ViewGroup container,
13             Bundle savedInstanceState) {
14
15         //layout布局文件转换成view对象
16         /**
17          * resource:Fragment需要加载的布局文件
18          * root:加载layout的父ViewGroup
19          * attachToRoot:flase,不反回父ViewGroup
20          */
21         View view = inflater.inflate(R.layout.fragment, container, false);
22         TextView text = (TextView) view.findViewById(R.id.text);
23         text.setText("加载静态Fragment");
24         return view ;
25
26     }
27 }
3、在需要加载Fragment的Activity对应的布局文件中添加fragment的标签, 记住,name属性是全限定类名哦,就是要包含Fragment的包名
 1 <?xml version="1.0" encoding="utf-8"?>
 2 <LinearLayout xmlns:android="http://schemas.android.com/apk/res/android"
 3     android:layout_width="match_parent"
 4     android:layout_height="match_parent"
 5     android:orientation="vertical" >
 6
 7     <fragment
 8         android:id="@+id/fragment"
 9         android:layout_width="wrap_content"
10         android:layout_height="wrap_content"
11           android:name="com.example.fragment.MyFragment"
12         />
13 </LinearLayout>
4、 Activity在onCreate( )方法中调用setContentView()加载布局文件即可!(可添加事件)
 1 import android.view.View.OnClickListener;
 2 import android.widget.Button;
 3 import android.widget.TextView;
 4
 5 public class MainActivity2 extends Activity{
 6
 7     private TextView tv;
 8
 9     protected void onCreate(Bundle savedInstanceState) {
10         super.onCreate(savedInstanceState);
11
12         setContentView(R.layout.main2);
13
14         Button button = (Button) findViewById(R.id.button);
15         tv = (TextView) findViewById(R.id.text);
16         button.setText("改变");
17         button.setOnClickListener(new OnClickListener() {
18
19             @Override
20             public void onClick(View v) {
21                 tv.setText("TextView改变了");
22             }
23         });
24     }
25 }
三、动态加载
撰写代码将Fragmen添加到一个Activity layout 中
add():添加一个Fragment(指定要添加的fragment 和 要插入的View)
与此类似的还有remove() 、替换()
处理Frament事务
格局用户的交互情况,对Fragment进行添加、移除、替换,以及执行其他动作,提交给Activity的每一套变化被称作一个事务
FragmentManager fragmentManager = getFragmentManager();
FragmentTransaction beginTransaction = fragmentManager.beginTransaction();
每一个事务都是同时执行一套变化,可以在一个事务中设置所有想执行的变化,包括add()、remove()、replace()、然后提交给Activity,必须调用commit()方法
如果允许用户通过按下back按键返回到前一个Fragment状态,调用commit()之前可以加入addToBackStack()方法

MyFragment2.xml
 1 package com.example.fragment;
 2
 3 import android.app.Fragment;
 4 import android.os.Bundle;
 5 import android.view.LayoutInflater;
 6 import android.view.View;
 7 import android.view.ViewGroup;
 8 import android.widget.TextView;
 9
10 public class MyFragment2 extends Fragment{
11     @Override
12     public View onCreateView(LayoutInflater inflater, ViewGroup container,
13             Bundle savedInstanceState) {
14
15         //layout布局文件转换成view对象
16         /**
17          * resource:Fragment需要加载的布局文件
18          * root:加载layout的父ViewGroup
19          * attachToRoot:flase,不反回父ViewGroup
20          */
21         View view = inflater.inflate(R.layout.fragment, container, false);
22         TextView text = (TextView) view.findViewById(R.id.text);
23         text.setText("动态加载Fragment");
24         return view ;
25
26     }
27 }
主要代码

Fragment与activity通信
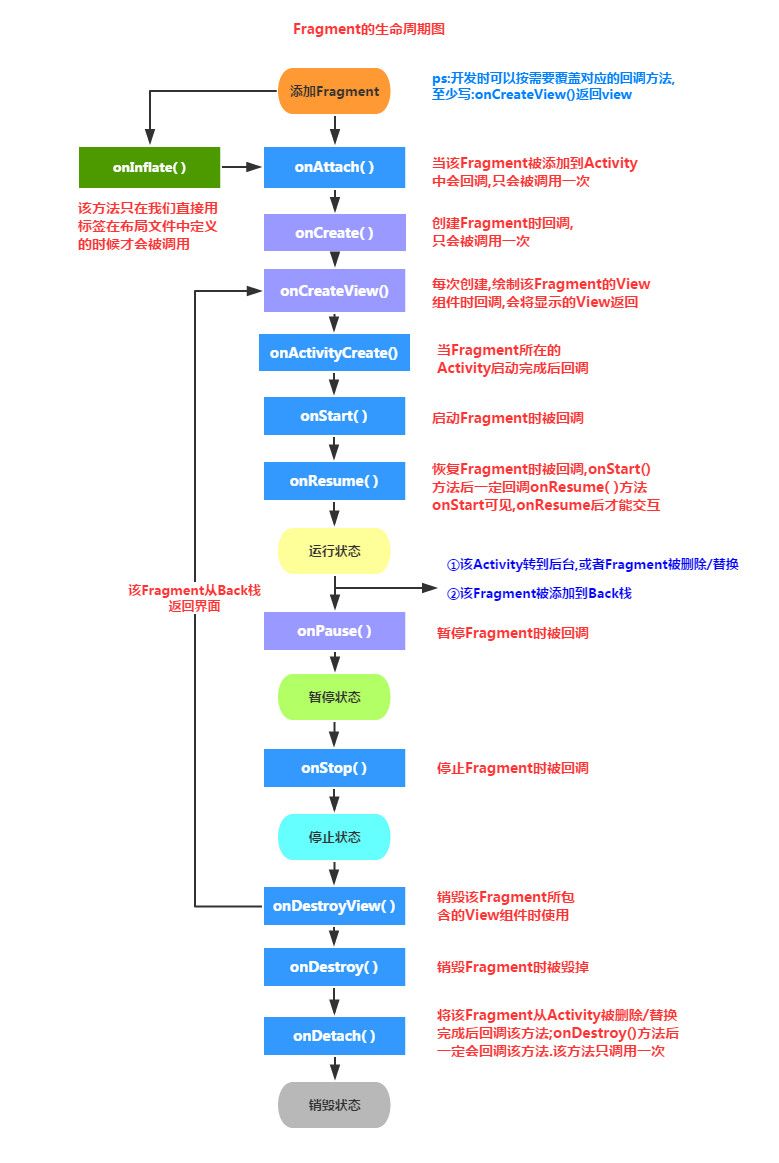
生命周期图:
探究fragment生命周期案例:
 1 package com.example.fragment;
 2
 3 import android.app.Activity;
 4 import android.app.FragmentManager;
 5 import android.app.FragmentTransaction;
 6 import android.os.Bundle;
 7 import android.view.View;
 8 import android.view.View.OnClickListener;
 9 import android.widget.Button;
10
11 public class MainActivity3 extends Activity {
12
13     private Button button;
14     private boolean flag = true;
15
16
17     @Override
18     protected void onCreate(Bundle savedInstanceState) {
19         super.onCreate(savedInstanceState);
20         setContentView(R.layout.main3);
21         init();
22         button = (Button) findViewById(R.id.button);
23         button.setOnClickListener(new OnClickListener() {
24
25             @Override
26             public void onClick(View v) {
27                 FragmentManager fragmentManager = getFragmentManager();
28                 FragmentTransaction beginTransaction = fragmentManager.beginTransaction();
29
30                 if (flag) {
31                     MyFragment4 frag4=new MyFragment4();
32                     beginTransaction.replace(R.id.layout, frag4);
33                     flag=false;
34                 } else {
35                     MyFragment3 frag3=new MyFragment3();
36                     beginTransaction.replace(R.id.layout, frag3);
37                     flag=true;
38
39                 }
40
41                beginTransaction.commit();
42             }
43         });
44
45     }
46
47     private void init() {
48         FragmentManager fragmentManager = getFragmentManager();
49         FragmentTransaction beginTransaction = fragmentManager.beginTransaction();
50         MyFragment3 frag3 = new MyFragment3();
51         beginTransaction.add(R.id.layout,frag3);
52         beginTransaction.commit();
53     }
54
55 }
 1 <?xml version="1.0" encoding="utf-8"?>
 2 <LinearLayout xmlns:android="http://schemas.android.com/apk/res/android"
 3     android:id="@+id/layout"
 4     android:layout_width="match_parent"
 5     android:layout_height="match_parent"
 6     android:orientation="vertical" >
 7
 8     <Button
 9         android:text="切换Fragment"
10         android:id="@+id/button"
11         android:layout_width="wrap_content"
12         android:layout_height="wrap_content" >
13     </Button>
14
15 </LinearLayout>
  1 package com.example.fragment;
  2
  3 import android.app.Activity;
  4 import android.app.Fragment;
  5 import android.os.Bundle;
  6 import android.util.Log;
  7 import android.view.LayoutInflater;
  8 import android.view.View;
  9 import android.view.ViewGroup;
 10 import android.widget.TextView;
 11
 12 public class MyFragment3 extends Fragment {
 13
 14     /**
 15      * 每次创建都会绘制Fragment的View组件
 16      */
 17     @Override
 18     public View onCreateView(LayoutInflater inflater, ViewGroup container,
 19             Bundle savedInstanceState) {
 20         View view = inflater.inflate(R.layout.fragment2, container, false);
 21         TextView tv = (TextView) view.findViewById(R.id.text);
 22         tv.setText("第一个ragment");
 23         Log.i("Main", "Fragment1---onCreateView()");
 24         return view;
 25     }
 26
 27     /**
 28      * 当fragment被添加Activity时候慧回调此方法,并且只调用一次
 29      */
 30     @Override
 31     public void onAttach(Activity activity) {
 32         super.onAttach(activity);
 33         Log.i("Main", "Fragment1---onAttach()");
 34
 35     }
 36
 37     /**
 38      * 创建Fragment时回调
 39      */
 40     @Override
 41     public void onCreate(Bundle savedInstanceState) {
 42         super.onCreate(savedInstanceState);
 43         Log.i("Main", "Fragment1---onCreate()");
 44
 45     }
 46
 47     /**
 48      * 当Fragment所长的activity启动完成后调用
 49      */
 50     @Override
 51     public void onActivityCreated(Bundle savedInstanceState) {
 52             super.onActivityCreated(savedInstanceState);
 53         Log.i("Main", "Fragment1---onActivityCreated()");
 54
 55     }
 56
 57     /**
 58      * 启动Fragment
 59      *
 60      */
 61     @Override
 62     public void onStart() {
 63         super.onStart();
 64         Log.i("Main", "Fragment1---onStart()");
 65
 66     }
 67
 68     /**
 69      * 恢复Fragment时会被回调,调用onStart()方法后 一定调用onResume()方法
 70      */
 71     @Override
 72     public void onResume() {
 73         super.onResume();
 74         Log.i("Main", "Fragment1---onResume()");
 75
 76     }
 77
 78     /**
 79      * 暂停Fragment
 80      */
 81     @Override
 82     public void onPause() {
 83         super.onPause();
 84         Log.i("Main", "Fragment1---onPause()");
 85
 86     }
 87
 88     /**
 89      * 停止Fragment
 90      */
 91     @Override
 92     public void onStop() {
 93         super.onStop();
 94         Log.i("Main", "Fragment1---onStop()");
 95
 96     }
 97
 98     /**
 99      *销毁 Fragment所包含的View组件
100      */
101     @Override
102     public void onDestroyView() {
103         super.onDestroyView();
104         Log.i("Main", "Fragment1---onDestroyView()");
105
106     }
107
108     /**
109      * 销毁Fragment是被回调
110      */
111     @Override
112     public void onDestroy() {
113         super.onDestroy();
114         Log.i("Main", "Fragment1---onDestroy()");
115
116     }
117
118     /**
119      * Fragment从Activity中删除时会回调该方法,只会调用一次
120      */
121     @Override
122     public void onDetach() {
123         super.onDetach();
124         Log.i("Main", "Fragment1---onDetach()");
125     }
126 }
MyFragment4.java
测试顺序:启动fragment—>回到桌面—>回到应用—>切换fragment—>退出fragment
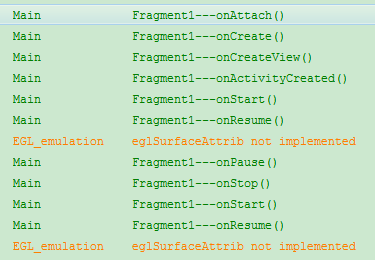
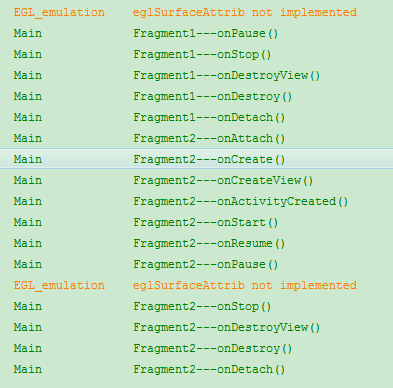
日志打印:
总结:
1)启动fragment
onAttach()—>onCreat()—>onCreateView()—>onActivityCreated()—>onStart()—>onResume()
2)锁屏
onPause()—>onStop()
3)解锁
onStart()—>onResume()
4)切换到其他的Fragment
第一个:onPause()—>onStop()—>onDestroyView()—>onDestroy()—>onDetach
第二个:onAttach()—>onCreat()—>onCreateView()—>onActivityCreated()—>onStart()—>onResume()
Fragment 与Activity通信
1)Fragment可调用getActivity()方法获取它所在的Activity
2)Activity可调用FragmentManager的findFragmentById()或findFragmentByTag()方法获取Fragment
Activity——>Fragment:在Activity中创建Bundle数据包,并调用Fragment的setArguments(Bundle bundle)方法
Fragment——>Activity:需要在Fragment中定义一个内部回调接口,再让包含该Fragment的Activity实现该回调接口。这样Fragment可调用该回调方法将数据传递给Activity