一、MHA介绍
MHA(Master High Availability)目前在MySQL高可用方面是一个相对成熟的解决方案,它由日本DeNA公司youshimaton(现就职于Facebook公司)开发,是一套优秀的作为MySQL高可用性环境下故障切换和主从提升的高可用软件。在MySQL故障切换过程中,MHA能做到在0~30秒之内自动完成数据库的故障切换操作,并且在进行故障切换的过程中,MHA能在最大程度上保证数据的一致性,以达到真正意义上的高可用。
MHA还提供在线主库切换的功能,能够安全地切换当前运行的主库到一个新的主库中(通过将从库提升为主库),大概0.5-2秒内即可完成。
- 自动故障检测和自动故障转移
MHA能够在一个已经存在的复制环境中监控MySQL,当检测到Master故障后能够实现自动故障转移,通过鉴定出最“新”的Salve的relay log,并将其应用到所有的Slave,这样MHA就能够保证各个slave之间的数据一致性,即使有些slave在主库崩溃时还没有收到最新的relay log事件。一个slave节点能否成为候选的主节点可通过在配置文件中配置它的优先级。由于master能够保证各个slave之间的数据一致性,所以所有的slave节点都有希望成为主节点。在通常的replication环境中由于复制中断而极容易产生的数据一致性问题,在MHA中将不会发生。
- 交互式(手动)故障转移
MHA可以手动地实现故障转移,而不必去理会master的状态,即不监控master状态,确认故障发生后可通过MHA手动切换
- 在线切换Master到不同的主机
MHA能够在0.5-2秒内实现切换,0.5-2秒的写阻塞通常是可接受的,所以你甚至能在非维护期间就在线切换master。诸如升级到高版本,升级到更快的服务器之类的工作,将会变得更容易。
二、MHA优势
• 自动故障转移快。
• 主库崩溃不存在数据一致性问题。
• 配置不需要对当前mysql环境做重大修改。
• 不需要添加额外的服务器(仅一台manager就可管理上百个replication)。
• 性能优秀,可工作在半同步复制和异步复制,当监控mysql状态时,仅需要每隔N秒向master发送ping包(默认3秒),所以对性能无影响。你可以理解为MHA的性能和简单的主从复制框架性能一样。
• 只要replication支持的存储引擎,MHA都支持,不会局限于innodb。
三、MHA组成
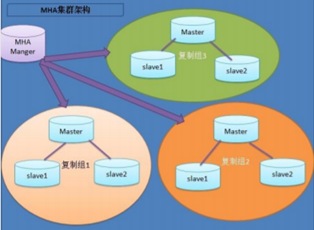
MHA由Manager节点和Node节点组成。
MHA Manager可以单独部署在一台独立的机器上管理多个master-slave集群,也可以部署在一台slave节点上。MHA Node运行在每台MySQL服务器上,MHA Manager会定时探测集群中的master节点,当master出现故障时,它可以自动将最新数据的slave 提升为新的master,然后将所有其他的slave重新指向新的master。整个故障转移过程对应用程序完全透明。
四、MHA工作原理
• 从宕机崩溃的master保存二进制日志事件(binlog events);
• 识别含有最新更新的slave;
• 应用差异的中继日志(relay log)到其他的slave;
• 应用从master保存的二进制日志事件(binlog events);
• 提升一个slave为新的master;
• 使其他的slave连接新的master进行复制;
五、MHA安装
• 准备四个节点,其中一个是管理节点,三个是一主两从的环境
Manager节点:
MySQL03 (192.168.56.13)
Node节点:
MySQL01 (192.168.56.11)
MySQL02 (192.168.56.12)
MySQL04 (192.168.56.14)
• 安装node节点
yum install -y perl-DBD-MySQL

wget https://github.com/yoshinorim/mha4mysql-node/releases/download/v0.58/mha4mysql-node-0.58-0.el7.centos.noarch.rpm

rpm -ivh mha4mysql-node-0.58-0.el7.centos.noarch.rpm
• 安装manager节点
yum install -y perl-DBD-MySQL

wget https://github.com/yoshinorim/mha4mysql-node/releases/download/v0.58/mha4mysql-node-0.58-0.el7.centos.noarch.rpm

rpm -ivh mha4mysql-node-0.58-0.el7.centos.noarch.rpm

wget https://dl.fedoraproject.org/pub/epel/epel-release-latest-7.noarch.rpm

rpm -ivh epel-release-latest-7.noarch.rpm

yum install perl-Config-Tiny perl-Log-Dispatch perl-Parallel-ForkManager -y

wget https://github.com/yoshinorim/mha4mysql-manager/releases/download/v0.58/mha4mysql-manager-0.58-0.el7.centos.noarch.rpm

rpm -ivh mha4mysql-manager-0.58-0.el7.centos.noarch.rpm
• 在四个节点的/etc/hosts中添加主机内容:
192.168.56.11 MySQL01
192.168.56.12 MySQL02
192.168.56.13 MySQL03
192.168.56.14 MySQL04
• 在manager节点创建配置文件
[root@MySQL03 ~]# cat /etc/app1.cnf
# mysql user and password
user=mha
password=456
repl_user=repl
repl_password=mysql
#linux user
ssh_user=root
# working directory on the manager
manager_workdir=/var/log/masterha/app1
# working directory on MySQL servers
remote_workdir=/var/log/masterha/app1
[server1]
hostname=MySQL01
port=3306
master_binlog_dir=/data/data
[server2]
hostname=MySQL02
port=3306
master_binlog_dir=/usr/local/mysql/data
[server3]
hostname=MySQL04
port=3306
master_binlog_dir=/usr/local/mysql/data
• 两个slave节点的my.cnf文件添加下面的参数:
log_bin=binlog
relay_log_purge=0
• 重启两个slave使配置文件生效
/etc/init.d/mysql.server restart
• 创建'mha'@'192.168.56.%'用户用于manager节点监控mysql工作状态、操作mysql实例
create user 'mha'@'192.168.56.%';

GRANT SELECT, INSERT, UPDATE, DELETE, CREATE, DROP, RELOAD, SUPER ON *.* TO `mha`@`192.168.56.%` identified by '456';
• 创建'repl'@'192.168.56.%'用户用于MySQL的主从复制。
create user 'repl'@'192.168.56.%';

GRANT REPLICATION SLAVE ON *.* TO `repl`@`192.168.56.%` identified by 'mysql';
• 建立主从复制关系
master > show master status;
............................

slave > CHANGE MASTER TO MASTER_HOST='MySQL01',
MASTER_PORT=3306,
MASTER_LOG_FILE='binlog.0xxxxxx',
MASTER_LOG_POS=xxx,
MASTER_USER='repl',
MASTER_PASSWORD='mysql';
• 在所有的节点上配置SSH无密码登陆。因为MHA manager通过SSH访问所有的node节点,各个node节点也同样需要通过SSH 来相互发送不同的relay log文件。
ssh-keygen -t rsa
cd /root/.ssh
cat id_rsa.pub >>authorized_keys  ##注意这里简略了,需要将这四台机器生成的密钥放在一起,然后将整合好的authorized文件放到所有节点服务器/root/.ssh/目录下。
如下:

[root@MySQL03 ~]# cat .ssh/authorized_keys

ssh-rsa AAAAB3NzaC1yc2EAAAADAQABAAABAQCwzWMVJCfM2u3TMDFM3NqFPQJDGT0XDrKniSgkrUGg+TX8Q3C1axATxmC+XVhSaGaR7vcsJjFwjCQQrnxhGwBfHMkIgRfhLpAf68Urth/oYPbiKHhLy8PO+PQZ1a3hE+o38BMiDjAZ1RrQwd/EQc3qIykwoVD1icycL3DSiodurp5DkHaZi/AOpsgc2jV4zgfpzlcOVqnHUNzxD9OlUWevieOib+UET4BQzElwlt+GSpFiNnWMuyqCRUx2WtMdY/c3VjXh67VHmSnWS6NDhHgLFClvvYFLnxHEce1bXWHsgX+Z30mkXm3YeV9+jqot8AG315QPtG/WrA+FjDl5Adgv root@MySQL01

ssh-rsa AAAAB3NzaC1yc2EAAAADAQABAAABAQDOBcpG6T5oaNtRWGiWLZOnqBctyf/vTO0rek6Cc5bSscHzj3z8C6wXC2Vb5GZQZ4psFU2/OVGc0yXFGgFSjqwtT5GGZXsKMD+BSpkEPS6rK5/4QjG/VvP9Y3GGVKMWKVEuG6xo0LCsZQuYvUzP4ikYiaxM+YcfjlOfd5srfW/XSEeKiDuhA5xBXkyA1bwfuz0TQk4zkWNca+cJH63rimeCIN1qyjzJ/Rb6Jzk9DO6SfuNm1mR1lDH7W3XCtAjb9OeJMk+YCRfuaBtEZllev63jqRL1DTXhXwllt8lpYkwCLAGT+prZP037OHAUnVPAVng0dK6pu7Ri8c0L7xQ+g577 root@MySQL02

ssh-rsa AAAAB3NzaC1yc2EAAAADAQABAAABAQCZ02g74+y987XECT0yKGZWIIpkIepm7MuShMq/0XDFsWkHaq4aX7ZpBMiy83+x+afwSJsxP2tdh0tLmIY3q4cqdyXQ4rXnKA9D2CXAGeCQo8Nsb3AuBuZmdhM6nmTG2krDQrZnrgf7I1/GORUxOPTKzGueNtrqtTuke7wCYp3SPJiTcqw+oZ7KCvtnqiW4orcTqj01Mebofan0fyspRL68fad/h3M7iP22M/1Zd72oX0DjM4ca0pQ3N8HpgkXtjC3e5bN87CXPdyd2cICUDO1RTMP3iL1txNQnjzyhwQ4Eh+5XtR9ct/71glPXKKsJB2dqsSdENe36L6ziiYGACUT3 root@MySQL03

ssh-rsa AAAAB3NzaC1yc2EAAAADAQABAAABAQDAEBPbamj+4MXftYoCTF30N6o+ZfRmoOop7mkTF6j0F5yN9AQcZuDPqKDGOVXKMdeI71G3XOwzRxqSKESoHkMkyc8PDSXVPNwca05SjeOQ5/amONgIgr4/IxXaafTuwyZH4rtrSHJ+sW243pS7ju15EMXI201pSuHRBgUO7XohEGagKsCD5GhFUjbizsiUJ+8zVCH3hXGt75zDTd2G7D436ytl1gsWXagC8LIt2xZ5mmVgUpzSxKnyRa9t89q6FvdGHkfB8RUwaCs4KKKkOvIMipETOJ+QWWGVXRxYMD9rdPz5i22RwrslZZ+XntJRYXJqVS5/84AsUSaYxuugCTl1 root@MySQL04
• 在所有节点创建日志目录和软连接
mkdir /var/log/masterha/app1 -p
ln -s /usr/local/mysql/bin/mysqlbinlog /usr/bin/mysqlbinlog  ##mha执行mysqlbinlog命令找的路径是/usr/bin/而我的mysqlbinlog命令是在/usr/local/mysql/bin下,需要创建一个软连接。需要根据安装的mysql的路径来决定。
ln -s /usr/local/mysql/bin/mysql /usr/bin/mysql  ##mha执行mysql命令找的路径是/usr/bin/而我的mysql命令是在/usr/local/mysql/bin下,需要创建一个软连接。需要根据安装的mysql的路径来决定。
• 在MHA manager节点通过masterha_check_ssh脚本检查SSH连接配置是否正常。
[root@MySQL03 ~]# masterha_check_ssh --conf=/etc/app1.cnf
Sat Dec 14 00:15:46 2019 - [warning] Global configuration file /etc/masterha_default.cnf not found. Skipping.
Sat Dec 14 00:15:46 2019 - [info] Reading application default configuration from /etc/app1.cnf..
..........................................................................
...........................................................................
...........................................................................
Sat Dec 14 00:15:48 2019 - [debug]  Connecting via SSH from root@MySQL04(192.168.56.14:22) to root@MySQL02(192.168.56.12:22)..
Sat Dec 14 00:15:48 2019 - [debug]   ok.
Sat Dec 14 00:15:49 2019 - [info] All SSH connection tests passed successfully.
最后出现All SSH connection tests passed successfully表示正常
• 在MHA manager节点通过masterha_check_ssh脚本检查MySQL主从复制是否正常。
[root@MySQL03 ~]# masterha_check_repl --conf=/etc/app1.cnf
Sat Dec 14 00:17:15 2019 - [warning] Global configuration file /etc/masterha_default.cnf not found. Skipping.
Sat Dec 14 00:17:15 2019 - [info] Reading application default configuration from /etc/app1.cnf..
.............................................................................................
.............................................................................................
.............................................................................................

MySQL Replication Health is OK.
最后出现MySQL Replication Health is OK.表示复制工作正常。
• 开启Manager
当正确配置完MySQL主从复制、SSH免密登陆、安装manager和node节点后,就可以通过masterha_manager命令开启MHA manager节点。
[root@MySQL03 ~]# nohup masterha_manager --conf=/etc/app1.cnf > /var/log/masterha/app1/mha_manager.log < /dev/null &
• 检查manager状态
当MHA manager启动监控以后,通过masterha_check_status命令检查manager的状态。
[root@MySQL03 ~]# masterha_check_status --conf=/etc/app1.cnf
app1 (pid:8229) is running(0:PING_OK), master:MySQL01
到这里已经搭建完成了。
六、测试master的自动故障转移
• 现在master运行正常,manager监控运行正常,下一步就是停止master,查看MHA是否会自动选择最新的slave为新的master并将另一个slave连接新的master进行复制。
[root@MySQL01 ~]# /etc/init.d/mysql.server stop
• 这时候检查manager节点的log日志,以及其中的一个slave是否成功成为新的master,并且另一个slave是否从新的master进行复制。
查看MHA切换日志
[root@MySQL03 ~]# vim /var/log/masterha/app1/mha_manager.log
----- Failover Report -----

app1: MySQL Master failover MySQL01(192.168.56.11:3306) to MySQL02(192.168.56.12:3306) succeeded

Master MySQL01(192.168.56.11:3306) is down!

Check MHA Manager logs at MySQL03 for details.

Started automated(non-interactive) failover.
The latest slave MySQL02(192.168.56.12:3306) has all relay logs for recovery.
Selected MySQL02(192.168.56.12:3306) as a new master.
MySQL02(192.168.56.12:3306): OK: Applying all logs succeeded.
MySQL04(192.168.56.14:3306): This host has the latest relay log events.
Generating relay diff files from the latest slave succeeded.
MySQL04(192.168.56.14:3306): OK: Applying all logs succeeded. Slave started, replicating from MySQL02(192.168.56.12:3306)
MySQL02(192.168.56.12:3306): Resetting slave info succeeded.
Master failover to MySQL02(192.168.56.12:3306) completed successfully.
看到Master failover to xxxxx completed successfully.表示切换成功。
查看两个Slave的主从复制情况
mysql02> show slave statusG
Empty set (0.00 sec)
mysql04> show slave statusG
*************************** 1. row ***************************
               Slave_IO_State: Waiting for master to send event
                  Master_Host: MySQL02
                  Master_User: repl
                  Master_Port: 3306
                Connect_Retry: 60
              Master_Log_File: binlog.000088
          Read_Master_Log_Pos: 1209171
               Relay_Log_File: MySQL04-relay-bin.000002
                Relay_Log_Pos: 319
        Relay_Master_Log_File: binlog.000088
             Slave_IO_Running: Yes
            Slave_SQL_Running: Yes
七、Manager节点配置文件说明
[server default]

# mysql user and password
user=mha  ##设置mysql监控用户
password=456 ##设置mysql监控用户的密码
repl_user=repl  ##设置复制环境中的复制用户名
repl_password=mysql  ##设置复制用户的密码

#linux user
ssh_user=root  ##设置ssh的登录用户

# working directory on the manager
manager_workdir=/var/log/masterha/app1  ##设置manager的工作目录
manager_log=/var/log/masterha/app1/mha_manager.log  ##设置manager的日志
#master_ip_failover_script=/usr/local/bin/master_ip_failover  ##设置自动failover时候的切换脚本。详见下一章。
#master_ip_online_change_script=/usr/local/bin/master_ip_online_change  ##设置手动切换时候的切换脚本
#ping_interval=1  ##设置监控主库manager节点向主库发送SQL语句:SELECT 1 As Value;的时间间隔,默认是3秒,尝试三次没有回应的时候自动进行failover
#failover_remote_workdir=/tmp  ##每一个MHA node生成日志文件的工作路径,这个路径是绝对路径,如果该路径目录不存在,则会自动创建,如果没有权限访问这个路径,那么MHA将终止后续过程,另外,你需要关心一下这个路径下的文件系统是否有足够的磁盘空间,默认值是/var/tmp
#report_script=/usr/local/send_report  ##设置发生切换后发送的报警的脚本
#secondary_check_script=/usr/bin/masterha_secondary_check -s MySQL02 -s MySQL04  ##MHA三次没有连通master,MHA会调用masterha_secondary_check脚本做二次检测来判断master是否是真的挂了。详见十二章。
#shutdown_script="" ##设置故障发生后关闭故障主机脚本(该脚本的主要作用是关闭主机防止发生脑裂)
# working directory on MySQL servers
[server1]
hostname=MySQL01
master_binlog_dir=/data/data/  ##设置保存binlog的位置,以便MHA可以找到mysql的日志
port=3306

[server2]
hostname=MySQL02
master_binlog_dir=/usr/local/mysql/data/  ##设置保存binlog的位置,以便MHA可以找到mysql的日志
port=3306

[server3]
hostname=MySQL04
master_binlog_dir=/usr/local/mysql/data/  ##设置保存binlog的位置,以便MHA可以找到mysql的日志
port=3306

#candidate_master=1 ##设置为候选master,如果设置该参数以后,发生主从切换以后将会将此从库提升为主库,即使这个主库不是集群中事件最新的###这个值有哪些呢?
#slave check_repl_delay=0 ##默认情况下如果一个slave落后master 100M的relay logs的话,MHA将不会选择该slave作为一个新的master,因为对于这个slave的恢复需要花费很长时间,通过设置check_repl_delay=0,MHA触发切换在选择一个新的master的时候将会忽略复制延时,这个参数对于设置了candidate_master=1的主机非常有用,因为这个候选主在切换的过程中一定是新的master
MHA在发生切换的过程中,从库的恢复过程中依赖于relay log的相关信息,所以这里要将relay log的自动清除设置为OFF,采用手动清除relay log的方式。在默认情况下,从服务器上的中继日志会在SQL线程执行完毕后被自动删除。但是在MHA环境中,这些中继日志在恢复其他从服务器时可能会被用到,因此需要禁用中继日志的自动删除功能。
八、MHA手动切换
手动failover,这种场景意味着在业务上没有启用MHA自动切换功能,当主服务器故障时,人工手动调用M H A来进行故障切换操作,具体测试命令如下:
• 先关闭mha进程,确保不会自动执行切换
[root@MySQL03 ~]# masterha_stop --conf=/etc/app1.cnf
• 再关闭maser主库
[root@MySQL01 ~]# /etc/init.d/mysql.server stop
• 执行手动切换
[root@MySQL03 app1]# masterha_master_switch --master_state=dead --conf=/etc/app1.cnf --dead_master_host=MySQL01 --dead_master_port=3306  ##注意这里的--dead_master_host=?,要使用主机名的方式,因为/etc/app.cnf写入的是主机名。
--dead_master_ip=<dead_master_ip> is not set. Using 192.168.56.11.
Thu Jun 27 21:10:34 2019 - [warning] Global configuration file /etc/masterha_default.cnf not found. Skipping.
Thu Jun 27 21:10:34 2019 - [info] Reading application default configuration from /etc/app1.cnf..
Thu Jun 27 21:10:34 2019 - [info] Reading server configuration from /etc/app1.cnf..
Thu Jun 27 21:10:34 2019 - [info] MHA::MasterFailover version 0.58.
Thu Jun 27 21:10:34 2019 - [info] Starting master failover.
Thu Jun 27 21:10:34 2019 - [info]
Thu Jun 27 21:10:34 2019 - [info] * Phase 1: Configuration Check Phase..
Thu Jun 27 21:10:34 2019 - [info]
Thu Jun 27 21:10:35 2019 - [info] GTID failover mode = 0
Thu Jun 27 21:10:35 2019 - [info] Dead Servers:
Thu Jun 27 21:10:35 2019 - [info]   MySQL01(192.168.56.11:3306)
Thu Jun 27 21:10:35 2019 - [info] Checking master reachability via MySQL(double check)...
Thu Jun 27 21:10:35 2019 - [info]  ok.
Thu Jun 27 21:10:35 2019 - [info] Alive Servers:
Thu Jun 27 21:10:35 2019 - [info]   MySQL02(192.168.56.12:3306)
Thu Jun 27 21:10:35 2019 - [info]   MySQL04(192.168.56.14:3306)
Thu Jun 27 21:10:35 2019 - [info] Alive Slaves:
Thu Jun 27 21:10:35 2019 - [info]   MySQL02(192.168.56.12:3306)  Version=8.0.13 (oldest major version between slaves) log-bin:enabled
Thu Jun 27 21:10:35 2019 - [info]     Replicating from mysql01(192.168.56.11:3306)
Thu Jun 27 21:10:35 2019 - [info]   MySQL04(192.168.56.14:3306)  Version=8.0.13 (oldest major version between slaves) log-bin:enabled
Thu Jun 27 21:10:35 2019 - [info]     Replicating from mysql01(192.168.56.11:3306)
Master MySQL01(192.168.56.11:3306) is dead. Proceed? (yes/NO): yes
Thu Jun 27 21:10:43 2019 - [info] Starting Non-GTID based failover.
Thu Jun 27 21:10:43 2019 - [info]
Thu Jun 27 21:10:43 2019 - [info] ** Phase 1: Configuration Check Phase completed.
Thu Jun 27 21:10:43 2019 - [info]
Thu Jun 27 21:10:43 2019 - [info] * Phase 2: Dead Master Shutdown Phase..
Thu Jun 27 21:10:43 2019 - [info]
Thu Jun 27 21:10:43 2019 - [info] HealthCheck: SSH to MySQL01 is reachable.
Thu Jun 27 21:10:44 2019 - [info] Forcing shutdown so that applications never connect to the current master..
Thu Jun 27 21:10:44 2019 - [warning] master_ip_failover_script is not set. Skipping invalidating dead master IP address.
Thu Jun 27 21:10:44 2019 - [warning] shutdown_script is not set. Skipping explicit shutting down of the dead master.
Thu Jun 27 21:10:44 2019 - [info] * Phase 2: Dead Master Shutdown Phase completed.
Thu Jun 27 21:10:44 2019 - [info]
Thu Jun 27 21:10:44 2019 - [info] * Phase 3: Master Recovery Phase..
Thu Jun 27 21:10:44 2019 - [info]
Thu Jun 27 21:10:44 2019 - [info] * Phase 3.1: Getting Latest Slaves Phase..
Thu Jun 27 21:10:44 2019 - [info]
Thu Jun 27 21:10:44 2019 - [info] The latest binary log file/position on all slaves is binlog.000124:155
Thu Jun 27 21:10:44 2019 - [info] Latest slaves (Slaves that received relay log files to the latest):
Thu Jun 27 21:10:44 2019 - [info]   MySQL02(192.168.56.12:3306)  Version=8.0.13 (oldest major version between slaves) log-bin:enabled
Thu Jun 27 21:10:44 2019 - [info]     Replicating from mysql01(192.168.56.11:3306)
Thu Jun 27 21:10:44 2019 - [info]   MySQL04(192.168.56.14:3306)  Version=8.0.13 (oldest major version between slaves) log-bin:enabled
Thu Jun 27 21:10:44 2019 - [info]     Replicating from mysql01(192.168.56.11:3306)
Thu Jun 27 21:10:44 2019 - [info] The oldest binary log file/position on all slaves is binlog.000124:155
Thu Jun 27 21:10:44 2019 - [info] Oldest slaves:
Thu Jun 27 21:10:44 2019 - [info]   MySQL02(192.168.56.12:3306)  Version=8.0.13 (oldest major version between slaves) log-bin:enabled
Thu Jun 27 21:10:44 2019 - [info]     Replicating from mysql01(192.168.56.11:3306)
Thu Jun 27 21:10:44 2019 - [info]   MySQL04(192.168.56.14:3306)  Version=8.0.13 (oldest major version between slaves) log-bin:enabled
Thu Jun 27 21:10:44 2019 - [info]     Replicating from mysql01(192.168.56.11:3306)
Thu Jun 27 21:10:44 2019 - [info]
Thu Jun 27 21:10:44 2019 - [info] * Phase 3.2: Saving Dead Master's Binlog Phase..
Thu Jun 27 21:10:44 2019 - [info]
Thu Jun 27 21:10:44 2019 - [info] Fetching dead master's binary logs..
Thu Jun 27 21:10:44 2019 - [info] Executing command on the dead master MySQL01(192.168.56.11:3306): save_binary_logs --command=save --start_file=binlog.000124  --start_pos=155 --binlog_dir=/data/data --output_file=/var/log/masterha/app1/saved_master_binlog_from_MySQL01_3306_20190627211034.binlog --handle_raw_binlog=1 --disable_log_bin=0 --manager_version=0.58
  Creating /var/log/masterha/app1 if not exists..    ok.
 Concat binary/relay logs from binlog.000124 pos 155 to binlog.000124 EOF into /var/log/masterha/app1/saved_master_binlog_from_MySQL01_3306_20190627211034.binlog ..
 Binlog Checksum enabled
  Dumping binlog format description event, from position 0 to 155.. ok.
  Dumping effective binlog data from /data/data/binlog.000124 position 155 to tail(178).. ok.
 Binlog Checksum enabled
 Concat succeeded.
saved_master_binlog_from_MySQL01_3306_20190627211034.binlog                                                                                               100%  178    73.5KB/s   00:00
Thu Jun 27 21:10:45 2019 - [info] scp from root@192.168.56.11:/var/log/masterha/app1/saved_master_binlog_from_MySQL01_3306_20190627211034.binlog to local:/var/log/masterha/app1/saved_master_binlog_from_MySQL01_3306_20190627211034.binlog succeeded.
Thu Jun 27 21:10:45 2019 - [info] HealthCheck: SSH to MySQL02 is reachable.
Thu Jun 27 21:10:46 2019 - [info] HealthCheck: SSH to MySQL04 is reachable.
Thu Jun 27 21:10:46 2019 - [info]
Thu Jun 27 21:10:46 2019 - [info] * Phase 3.3: Determining New Master Phase..
Thu Jun 27 21:10:46 2019 - [info]
Thu Jun 27 21:10:46 2019 - [info] Finding the latest slave that has all relay logs for recovering other slaves..
Thu Jun 27 21:10:46 2019 - [info] All slaves received relay logs to the same position. No need to resync each other.
Thu Jun 27 21:10:46 2019 - [info] Searching new master from slaves..
Thu Jun 27 21:10:46 2019 - [info]  Candidate masters from the configuration file:
Thu Jun 27 21:10:46 2019 - [info]  Non-candidate masters:
Thu Jun 27 21:10:46 2019 - [info] New master is MySQL02(192.168.56.12:3306)
Thu Jun 27 21:10:46 2019 - [info] Starting master failover..
Thu Jun 27 21:10:46 2019 - [info]
From:
MySQL01(192.168.56.11:3306) (current master)
 +--MySQL02(192.168.56.12:3306)
 +--MySQL04(192.168.56.14:3306)

To:
MySQL02(192.168.56.12:3306) (new master)
 +--MySQL04(192.168.56.14:3306)

Starting master switch from MySQL01(192.168.56.11:3306) to MySQL02(192.168.56.12:3306)? (yes/NO): yes
Thu Jun 27 21:10:50 2019 - [info] New master decided manually is MySQL02(192.168.56.12:3306)
Thu Jun 27 21:10:50 2019 - [info]
Thu Jun 27 21:10:50 2019 - [info] * Phase 3.4: New Master Diff Log Generation Phase..
Thu Jun 27 21:10:50 2019 - [info]
Thu Jun 27 21:10:50 2019 - [info]  This server has all relay logs. No need to generate diff files from the latest slave.
Thu Jun 27 21:10:50 2019 - [info] Sending binlog..
saved_master_binlog_from_MySQL01_3306_20190627211034.binlog                                                                                               100%  178    45.4KB/s   00:00
Thu Jun 27 21:10:50 2019 - [info] scp from local:/var/log/masterha/app1/saved_master_binlog_from_MySQL01_3306_20190627211034.binlog to root@MySQL02:/var/log/masterha/app1/saved_master_binlog_from_MySQL01_3306_20190627211034.binlog succeeded.
Thu Jun 27 21:10:50 2019 - [info]
Thu Jun 27 21:10:50 2019 - [info] * Phase 3.5: Master Log Apply Phase..
Thu Jun 27 21:10:50 2019 - [info]
Thu Jun 27 21:10:50 2019 - [info] *NOTICE: If any error happens from this phase, manual recovery is needed.
Thu Jun 27 21:10:50 2019 - [info] Starting recovery on MySQL02(192.168.56.12:3306)..
Thu Jun 27 21:10:50 2019 - [info]  Generating diffs succeeded.
Thu Jun 27 21:10:50 2019 - [info] Waiting until all relay logs are applied.
Thu Jun 27 21:10:50 2019 - [info]  done.
Thu Jun 27 21:10:50 2019 - [info] Getting slave status..
Thu Jun 27 21:10:50 2019 - [info] This slave(MySQL02)'s Exec_Master_Log_Pos equals to Read_Master_Log_Pos(binlog.000124:155). No need to recover from Exec_Master_Log_Pos.
Thu Jun 27 21:10:50 2019 - [info] Connecting to the target slave host MySQL02, running recover script..
Thu Jun 27 21:10:50 2019 - [info] Executing command: apply_diff_relay_logs --command=apply --slave_user='root' --slave_host=MySQL02 --slave_ip=192.168.56.12  --slave_port=3306 --apply_files=/var/log/masterha/app1/saved_master_binlog_from_MySQL01_3306_20190627211034.binlog --workdir=/var/log/masterha/app1 --target_version=8.0.13 --timestamp=20190627211034 --handle_raw_binlog=1 --disable_log_bin=0 --manager_version=0.58 --slave_pass=xxx
Thu Jun 27 21:10:51 2019 - [info]
Applying differential binary/relay log files /var/log/masterha/app1/saved_master_binlog_from_MySQL01_3306_20190627211034.binlog on MySQL02:3306. This may take long time...
Applying log files succeeded.
Thu Jun 27 21:10:51 2019 - [info]  All relay logs were successfully applied.
Thu Jun 27 21:10:51 2019 - [info] Getting new master's binlog name and position..
Thu Jun 27 21:10:51 2019 - [info]  binlog.000089:872643
Thu Jun 27 21:10:51 2019 - [info]  All other slaves should start replication from here. Statement should be: CHANGE MASTER TO MASTER_HOST='MySQL02 or 192.168.56.12', MASTER_PORT=3306, MASTER_LOG_FILE='binlog.000089', MASTER_LOG_POS=872643, MASTER_USER='repl', MASTER_PASSWORD='xxx';
Thu Jun 27 21:10:51 2019 - [warning] master_ip_failover_script is not set. Skipping taking over new master IP address.
Thu Jun 27 21:10:51 2019 - [info] ** Finished master recovery successfully.
Thu Jun 27 21:10:51 2019 - [info] * Phase 3: Master Recovery Phase completed.
Thu Jun 27 21:10:51 2019 - [info]
Thu Jun 27 21:10:51 2019 - [info] * Phase 4: Slaves Recovery Phase..
Thu Jun 27 21:10:51 2019 - [info]
Thu Jun 27 21:10:51 2019 - [info] * Phase 4.1: Starting Parallel Slave Diff Log Generation Phase..
Thu Jun 27 21:10:51 2019 - [info]
Thu Jun 27 21:10:51 2019 - [info] -- Slave diff file generation on host MySQL04(192.168.56.14:3306) started, pid: 8021. Check tmp log /var/log/masterha/app1/MySQL04_3306_20190627211034.log if it takes time..
Thu Jun 27 21:10:52 2019 - [info]
Thu Jun 27 21:10:52 2019 - [info] Log messages from MySQL04 ...
Thu Jun 27 21:10:52 2019 - [info]
Thu Jun 27 21:10:51 2019 - [info]  This server has all relay logs. No need to generate diff files from the latest slave.
Thu Jun 27 21:10:52 2019 - [info] End of log messages from MySQL04.
Thu Jun 27 21:10:52 2019 - [info] -- MySQL04(192.168.56.14:3306) has the latest relay log events.
Thu Jun 27 21:10:52 2019 - [info] Generating relay diff files from the latest slave succeeded.
Thu Jun 27 21:10:52 2019 - [info]
Thu Jun 27 21:10:52 2019 - [info] * Phase 4.2: Starting Parallel Slave Log Apply Phase..
Thu Jun 27 21:10:52 2019 - [info]
Thu Jun 27 21:10:52 2019 - [info] -- Slave recovery on host MySQL04(192.168.56.14:3306) started, pid: 8023. Check tmp log /var/log/masterha/app1/MySQL04_3306_20190627211034.log if it takes time..
saved_master_binlog_from_MySQL01_3306_20190627211034.binlog                                                                                               100%  178    34.2KB/s   00:00
Thu Jun 27 21:10:54 2019 - [info]
Thu Jun 27 21:10:54 2019 - [info] Log messages from MySQL04 ...
Thu Jun 27 21:10:54 2019 - [info]
Thu Jun 27 21:10:52 2019 - [info] Sending binlog..
Thu Jun 27 21:10:52 2019 - [info] scp from local:/var/log/masterha/app1/saved_master_binlog_from_MySQL01_3306_20190627211034.binlog to root@MySQL04:/var/log/masterha/app1/saved_master_binlog_from_MySQL01_3306_20190627211034.binlog succeeded.
Thu Jun 27 21:10:52 2019 - [info] Starting recovery on MySQL04(192.168.56.14:3306)..
Thu Jun 27 21:10:52 2019 - [info]  Generating diffs succeeded.
Thu Jun 27 21:10:52 2019 - [info] Waiting until all relay logs are applied.
Thu Jun 27 21:10:52 2019 - [info]  done.
Thu Jun 27 21:10:53 2019 - [info] Getting slave status..
Thu Jun 27 21:10:53 2019 - [info] This slave(MySQL04)'s Exec_Master_Log_Pos equals to Read_Master_Log_Pos(binlog.000124:155). No need to recover from Exec_Master_Log_Pos.
Thu Jun 27 21:10:53 2019 - [info] Connecting to the target slave host MySQL04, running recover script..
Thu Jun 27 21:10:53 2019 - [info] Executing command: apply_diff_relay_logs --command=apply --slave_user='root' --slave_host=MySQL04 --slave_ip=192.168.56.14  --slave_port=3306 --apply_files=/var/log/masterha/app1/saved_master_binlog_from_MySQL01_3306_20190627211034.binlog --workdir=/var/log/masterha/app1 --target_version=8.0.13 --timestamp=20190627211034 --handle_raw_binlog=1 --disable_log_bin=0 --manager_version=0.58 --slave_pass=xxx
Thu Jun 27 21:10:53 2019 - [info]
Applying differential binary/relay log files /var/log/masterha/app1/saved_master_binlog_from_MySQL01_3306_20190627211034.binlog on MySQL04:3306. This may take long time...
Applying log files succeeded.
Thu Jun 27 21:10:53 2019 - [info]  All relay logs were successfully applied.
Thu Jun 27 21:10:53 2019 - [info]  Resetting slave MySQL04(192.168.56.14:3306) and starting replication from the new master MySQL02(192.168.56.12:3306)..
Thu Jun 27 21:10:53 2019 - [info]  Executed CHANGE MASTER.
Thu Jun 27 21:10:53 2019 - [info]  Slave started.
Thu Jun 27 21:10:54 2019 - [info] End of log messages from MySQL04.
Thu Jun 27 21:10:54 2019 - [info] -- Slave recovery on host MySQL04(192.168.56.14:3306) succeeded.
Thu Jun 27 21:10:54 2019 - [info] All new slave servers recovered successfully.
Thu Jun 27 21:10:54 2019 - [info]
Thu Jun 27 21:10:54 2019 - [info] * Phase 5: New master cleanup phase..
Thu Jun 27 21:10:54 2019 - [info]
Thu Jun 27 21:10:54 2019 - [info] Resetting slave info on the new master..
Thu Jun 27 21:10:54 2019 - [info]  MySQL02: Resetting slave info succeeded.
Thu Jun 27 21:10:54 2019 - [info] Master failover to MySQL02(192.168.56.12:3306) completed successfully.
Thu Jun 27 21:10:54 2019 - [info]

----- Failover Report -----

app1: MySQL Master failover MySQL01(192.168.56.11:3306) to MySQL02(192.168.56.12:3306) succeeded

Master MySQL01(192.168.56.11:3306) is down!

Check MHA Manager logs at MySQL03 for details.

Started manual(interactive) failover.
The latest slave MySQL02(192.168.56.12:3306) has all relay logs for recovery.
Selected MySQL02(192.168.56.12:3306) as a new master.
MySQL02(192.168.56.12:3306): OK: Applying all logs succeeded.
MySQL04(192.168.56.14:3306): This host has the latest relay log events.
Generating relay diff files from the latest slave succeeded.
MySQL04(192.168.56.14:3306): OK: Applying all logs succeeded. Slave started, replicating from MySQL02(192.168.56.12:3306)
MySQL02(192.168.56.12:3306): Resetting slave info succeeded.
Master failover to MySQL02(192.168.56.12:3306) completed successfully.
九、MHA在线切换
在线切换一般是在维护数据库,需要将主库变为从库,从库变为主库时使用的。
为了保证数据完全一致性,在最快的时间内完成切换,MHA的在线切换必须满足以下条件才会切换成功,否则会切换失败。
1.所有slave的IO线程都在运行
2.所有slave的SQL线程都在运行
3.所有的show slave status的输出中Seconds_Behind_Master参数小于或者等于running_updates_limit秒,如果在切换过程中不指定running_updates_limit,那么默认情况下running_updates_limit为1秒。
4.在master端,通过show processlist;输出,没有一个更新花费的时间大于running_updates_limit秒。
在线切换步骤如下:
• 首先,停掉MHA监控:
[root@MySQL03 ~]# masterha_stop --conf=/etc/app1.cnf
• 其次,进行在线切换操作(模拟在线切换主库操作,原主库192.168.56.11变为slave,192.168.56.14提升为新的主库)
[root@MySQL03 app1]# masterha_master_switch --conf=/etc/app1.cnf --master_state=alive --new_master_host=MySQL04 --new_master_port=3306 --orig_master_is_new_slave --running_updates_limit=10000
Mon Jul  1 18:07:00 2019 - [info] MHA::MasterRotate version 0.58.
Mon Jul  1 18:07:00 2019 - [info] Starting online master switch..
Mon Jul  1 18:07:00 2019 - [info]
Mon Jul  1 18:07:00 2019 - [info] * Phase 1: Configuration Check Phase..
Mon Jul  1 18:07:00 2019 - [info]
Mon Jul  1 18:07:00 2019 - [warning] Global configuration file /etc/masterha_default.cnf not found. Skipping.
Mon Jul  1 18:07:00 2019 - [info] Reading application default configuration from /etc/app1.cnf..
Mon Jul  1 18:07:00 2019 - [info] Reading server configuration from /etc/app1.cnf..
Mon Jul  1 18:07:01 2019 - [info] GTID failover mode = 0
Mon Jul  1 18:07:01 2019 - [info] Current Alive Master: MySQL01(192.168.56.11:3306)
Mon Jul  1 18:07:01 2019 - [info] Alive Slaves:
Mon Jul  1 18:07:01 2019 - [info]   MySQL02(192.168.56.12:3306)  Version=8.0.13 (oldest major version between slaves) log-bin:enabled
Mon Jul  1 18:07:01 2019 - [info]     Replicating from mysql01(192.168.56.11:3306)
Mon Jul  1 18:07:01 2019 - [info]   MySQL04(192.168.56.14:3306)  Version=8.0.13 (oldest major version between slaves) log-bin:enabled
Mon Jul  1 18:07:01 2019 - [info]     Replicating from mysql01(192.168.56.11:3306)

It is better to execute FLUSH NO_WRITE_TO_BINLOG TABLES on the master before switching. Is it ok to execute on MySQL01(192.168.56.11:3306)? (YES/no): YES
Mon Jul  1 18:07:09 2019 - [info] Executing FLUSH NO_WRITE_TO_BINLOG TABLES. This may take long time..
Mon Jul  1 18:07:09 2019 - [info]  ok.
Mon Jul  1 18:07:09 2019 - [info] Checking MHA is not monitoring or doing failover..
Mon Jul  1 18:07:09 2019 - [info] Checking replication health on MySQL02..
Mon Jul  1 18:07:09 2019 - [info]  ok.
Mon Jul  1 18:07:09 2019 - [info] Checking replication health on MySQL04..
Mon Jul  1 18:07:09 2019 - [info]  ok.
Mon Jul  1 18:07:09 2019 - [info] MySQL04 can be new master.
Mon Jul  1 18:07:09 2019 - [info]
From:
MySQL01(192.168.56.11:3306) (current master)
 +--MySQL02(192.168.56.12:3306)
 +--MySQL04(192.168.56.14:3306)

To:
MySQL04(192.168.56.14:3306) (new master)
 +--MySQL02(192.168.56.12:3306)
 +--MySQL01(192.168.56.11:3306)

Starting master switch from MySQL01(192.168.56.11:3306) to MySQL04(192.168.56.14:3306)? (yes/NO): YES
Mon Jul  1 18:07:23 2019 - [info] Checking whether MySQL04(192.168.56.14:3306) is ok for the new master..
Mon Jul  1 18:07:23 2019 - [info]  ok.
Mon Jul  1 18:07:23 2019 - [info] MySQL01(192.168.56.11:3306): SHOW SLAVE STATUS returned empty result. To check replication filtering rules, temporarily executing CHANGE MASTER to a dummy host.
Mon Jul  1 18:07:23 2019 - [info] MySQL01(192.168.56.11:3306): Resetting slave pointing to the dummy host.
Mon Jul  1 18:07:23 2019 - [info] ** Phase 1: Configuration Check Phase completed.
Mon Jul  1 18:07:23 2019 - [info]
Mon Jul  1 18:07:23 2019 - [info] * Phase 2: Rejecting updates Phase..
Mon Jul  1 18:07:23 2019 - [info]
master_ip_online_change_script is not defined. If you do not disable writes on the current master manually, applications keep writing on the current master. Is it ok to proceed? (yes/NO): yes
Mon Jul  1 18:08:10 2019 - [info] Locking all tables on the orig master to reject updates from everybody (including root):
Mon Jul  1 18:08:10 2019 - [info] Executing FLUSH TABLES WITH READ LOCK..
Mon Jul  1 18:08:10 2019 - [info]  ok.
Mon Jul  1 18:08:10 2019 - [info] Orig master binlog:pos is binlog.000001:155.
Mon Jul  1 18:08:10 2019 - [info]  Waiting to execute all relay logs on MySQL04(192.168.56.14:3306)..
Mon Jul  1 18:08:10 2019 - [info]  master_pos_wait(binlog.000001:155) completed on MySQL04(192.168.56.14:3306). Executed 0 events.
Mon Jul  1 18:08:10 2019 - [info]   done.
Mon Jul  1 18:08:10 2019 - [info] Getting new master's binlog name and position..
Mon Jul  1 18:08:10 2019 - [info]  binlog.000003:1170
Mon Jul  1 18:08:10 2019 - [info]  All other slaves should start replication from here. Statement should be: CHANGE MASTER TO MASTER_HOST='MySQL04 or 192.168.56.14', MASTER_PORT=3306, MASTER_LOG_FILE='binlog.000003', MASTER_LOG_POS=1170, MASTER_USER='repl', MASTER_PASSWORD='xxx';
Mon Jul  1 18:08:10 2019 - [info]
Mon Jul  1 18:08:10 2019 - [info] * Switching slaves in parallel..
Mon Jul  1 18:08:10 2019 - [info]
Mon Jul  1 18:08:10 2019 - [info] -- Slave switch on host MySQL02(192.168.56.12:3306) started, pid: 7231
Mon Jul  1 18:08:10 2019 - [info]
Mon Jul  1 18:08:11 2019 - [info] Log messages from MySQL02 ...
Mon Jul  1 18:08:11 2019 - [info]
Mon Jul  1 18:08:10 2019 - [info]  Waiting to execute all relay logs on MySQL02(192.168.56.12:3306)..
Mon Jul  1 18:08:10 2019 - [info]  master_pos_wait(binlog.000001:155) completed on MySQL02(192.168.56.12:3306). Executed 0 events.
Mon Jul  1 18:08:10 2019 - [info]   done.
Mon Jul  1 18:08:10 2019 - [info]  Resetting slave MySQL02(192.168.56.12:3306) and starting replication from the new master MySQL04(192.168.56.14:3306)..
Mon Jul  1 18:08:10 2019 - [info]  Executed CHANGE MASTER.
Mon Jul  1 18:08:10 2019 - [info]  Slave started.
Mon Jul  1 18:08:11 2019 - [info] End of log messages from MySQL02 ...
Mon Jul  1 18:08:11 2019 - [info]
Mon Jul  1 18:08:11 2019 - [info] -- Slave switch on host MySQL02(192.168.56.12:3306) succeeded.
Mon Jul  1 18:08:11 2019 - [info] Unlocking all tables on the orig master:
Mon Jul  1 18:08:11 2019 - [info] Executing UNLOCK TABLES..
Mon Jul  1 18:08:11 2019 - [info]  ok.
Mon Jul  1 18:08:11 2019 - [info] Starting orig master as a new slave..
Mon Jul  1 18:08:11 2019 - [info]  Resetting slave MySQL01(192.168.56.11:3306) and starting replication from the new master MySQL04(192.168.56.14:3306)..
Mon Jul  1 18:08:11 2019 - [info]  Executed CHANGE MASTER.
Mon Jul  1 18:08:11 2019 - [info]  Slave started.
Mon Jul  1 18:08:11 2019 - [info] All new slave servers switched successfully.
Mon Jul  1 18:08:11 2019 - [info]
Mon Jul  1 18:08:11 2019 - [info] * Phase 5: New master cleanup phase..
Mon Jul  1 18:08:11 2019 - [info]
Mon Jul  1 18:08:11 2019 - [info]  MySQL04: Resetting slave info succeeded.
Mon Jul  1 18:08:11 2019 - [info] Switching master to MySQL04(192.168.56.14:3306) completed successfully.
--orig_master_is_new_slave切换时加上此参数是将原master变为slave节点,如果不加此参数,原来的master将不启动。
--running_updates_limit=10000故障切换时候选master如果有延迟的话,mha切换不能成功,加上此参数表示延迟在此时间范围内都可切换(单位为s),但是切换的时间长短是由recover时relay日志的大小决定。
检查原master的状态:
mysql01> show slave statusG
*************************** 1. row ***************************
               Slave_IO_State: Waiting for master to send event
                  Master_Host: MySQL04
                  Master_User: repl
                  Master_Port: 3306
                Connect_Retry: 60
              Master_Log_File: binlog.000003
          Read_Master_Log_Pos: 1170
               Relay_Log_File: MySQL01-relay-bin.000002
                Relay_Log_Pos: 319
        Relay_Master_Log_File: binlog.000003
             Slave_IO_Running: Yes
            Slave_SQL_Running: Yes
检查slave1的状态:
mysql02> show slave statusG
*************************** 1. row ***************************
               Slave_IO_State: Waiting for master to send event
                  Master_Host: MySQL04
                  Master_User: repl
                  Master_Port: 3306
                Connect_Retry: 60
              Master_Log_File: binlog.000003
          Read_Master_Log_Pos: 1170
               Relay_Log_File: MySQL02-relay-bin.000002
                Relay_Log_Pos: 319
        Relay_Master_Log_File: binlog.000003
             Slave_IO_Running: Yes
            Slave_SQL_Running: Yes
检查slave2的状态:
mysql04> show slave statusG
Empty set (0.00 sec)
十、MHA vip漂移
要知道当Master突然宕机后虽然MHA能实现秒级切换,即在复制集群中迅速选择一个新的master,建立新的复制集群。但是前端的客户端所连接的ip还是maste的ip,我们去一个一个客户端上修改所连接的ip,显然不太现实。这时候我们需要用到第七章讲到的master_ip_failover_script参数,以及虚拟网卡。
• 在master节点上添加虚拟网卡
[root@MySQL01 ~]# ifconfig eth0:2 192.168.56.20/24  ##需要注意,虚拟网卡在机器重启后将丢失。
[root@MySQL01 ~]# ifconfig
eth0: flags=4163<UP,BROADCAST,RUNNING,MULTICAST>  mtu 1500
        inet 192.168.56.11  netmask 255.255.255.0  broadcast 192.168.56.255
        ether 00:0c:29:ac:e3:17  txqueuelen 1000  (Ethernet)
        RX packets 7635  bytes 729595 (712.4 KiB)
        RX errors 0  dropped 0  overruns 0  frame 0
        TX packets 6190  bytes 748870 (731.3 KiB)
        TX errors 0  dropped 0 overruns 0  carrier 0  collisions 0

eth0:2: flags=4163<UP,BROADCAST,RUNNING,MULTICAST>  mtu 1500
        inet 192.168.56.20  netmask 255.255.255.0  broadcast 192.168.56.255
        ether 00:0c:29:ac:e3:17  txqueuelen 1000  (Ethernet)
• 在监控节点上配置虚拟ip自动切换脚本
[root@MySQL03 ~]# cd /usr/local/bin/
[root@MySQL03 bin]# rz  ##上传脚本
[root@MySQL03 bin]# chmod +x master_ip_failover
[root@MySQL03 bin]# ll
total 4
-rwxr-xr-x 1 root root 2201 Jul  2 10:21 master_ip_failover
[root@MySQL03 bin]#vim master_ip_failover  ##修改脚本的第13-16行
  1 #!/usr/bin/env perl
  2 ##这个是虚拟ip漂移脚本
  3 use strict;
  4 use warnings FATAL => 'all';
  5
  6 use Getopt::Long;
  7
  8 my (
  9     $command,          $ssh_user,        $orig_master_host, $orig_master_ip,
 10     $orig_master_port, $new_master_host, $new_master_ip,    $new_master_port
 11 );
 12
 13 my $vip = '192.168.56.20/24';  ##这个是虚拟ip地址
 14 my $key = '2';  ##网卡号,这里是eth0:2,所以填写2
 15 my $ssh_start_vip = "/sbin/ifconfig eth0:$key $vip";  ##网卡名称,有的网卡名称不是ehh0所以这有时也需要修改。注意参与切换的主机的网卡名称必须要一样。
 16 my $ssh_stop_vip = "/sbin/ifconfig eth0:$key down";  ##网卡名称,有的网卡名称不是ehh0所以这有时也需要修改。注意参与切换的主机的网卡名称必须要一样。
 17
 18 GetOptions(
 19     'command=s'          => $command,
 20     'ssh_user=s'         => $ssh_user,
 21     'orig_master_host=s' => $orig_master_host,
 22     'orig_master_ip=s'   => $orig_master_ip,
 23     'orig_master_port=i' => $orig_master_port,
 24     'new_master_host=s'  => $new_master_host,
 25     'new_master_ip=s'    => $new_master_ip,
 26     'new_master_port=i'  => $new_master_port,
 27 );
 28
 29 exit &main();
 30
 31 sub main {
 32
 33     print "

IN SCRIPT TEST====$ssh_stop_vip==$ssh_start_vip===

";
 34
 35     if ( $command eq "stop" || $command eq "stopssh" ) {
 36
 37         my $exit_code = 1;
 38         eval {
 39             print "Disabling the VIP on old master: $orig_master_host
";
 40             &stop_vip();
 41             $exit_code = 0;
 42         };
 43         if ($@) {
 44             warn "Got Error: $@
";
 45             exit $exit_code;
 46         }
 47         exit $exit_code;
 48     }
 49     elsif ( $command eq "start" ) {
 50
 51         my $exit_code = 10;
 52         eval {
 53             print "Enabling the VIP - $vip on the new master - $new_master_host
";
 54             &start_vip();
 55             $exit_code = 0;
 56         };
 57         if ($@) {
 58             warn $@;
 59             exit $exit_code;
 60         }
 61         exit $exit_code;
 62     }
 63     elsif ( $command eq "status" ) {
 64         print "Checking the Status of the script.. OK
";
 65         exit 0;
 66     }
 67     else {
 68         &usage();
 69         exit 1;
 70     }
 71 }
 72
 73 sub start_vip() {
 74     `ssh $ssh_user@$new_master_host " $ssh_start_vip "`;
 75 }
 76 sub stop_vip() {
 77      return 0  unless  ($ssh_user);
 78     `ssh $ssh_user@$orig_master_host " $ssh_stop_vip "`;
 79 }
 80
 81 sub usage {
 82     print
 83     "Usage: master_ip_failover --command=start|stop|stopssh|status --orig_master_host=host --orig_master_ip=ip --orig_master_port=port --new_master_host=host --new_master_ip=ip --new_m    aster_port=port
";
 84 }
• 在监控节点的/etc/app1.cnf配置文件的[server default]模块下引入此文件
[server default]
........................................................
........................................................
master_ip_failover_script=/usr/local/bin/master_ip_failover
• 检查复制是否正常
[root@MySQL03 ~]# masterha_check_repl --conf=/etc/app1.cnf
• 开启manager监控
[root@MySQL03 ~]# nohup masterha_manager --conf=/etc/app1.cnf > /var/log/masterha/app1/mha_manager.log < /dev/null &
• 检查manager状态
[root@MySQL03 ~]# masterha_check_status --conf=/etc/app1.cnf
app1 (pid:7860) is running(0:PING_OK), master:MySQL01
• 测试当把master的mysql关闭之后,VIP漂移到了新的主节点上
[root@MySQL01 ~]# /etc/init.d/mysql.server stop
Shutting down MySQL............ SUCCESS!
###################
测试结果
###################
在切换过程中应用通过虚拟ip连接数据库没有影响,如下只有在切换中有一个ping稍微有些延迟的结果,然后下一秒立刻恢复正常延迟。
64 bytes from 192.168.56.20: icmp_seq=21 ttl=64 time=0.444 ms
64 bytes from 192.168.56.20: icmp_seq=22 ttl=64 time=0.428 ms
64 bytes from 192.168.56.20: icmp_seq=23 ttl=64 time=0.647 ms
64 bytes from 192.168.56.20: icmp_seq=33 ttl=64 time=1.25 ms
64 bytes from 192.168.56.20: icmp_seq=34 ttl=64 time=0.456 ms
64 bytes from 192.168.56.20: icmp_seq=35 ttl=64 time=0.522 ms
64 bytes from 192.168.56.20: icmp_seq=36 ttl=64 time=0.744 ms
十一、MHA在GTID复制环境下自动切换
MHA在0.56版本开始支持GTID复制。
• 首先在所有的Node节点的my.cnf中添加配置
gtid_mode=on
enforce_gtid_consistency=on
• 修改完成后重启mysql服务。
• 配置VIP
配置VIP的操作请按照第十章的前三步操作进行配置。
• 重置复制状态
stop slave;
reset slave all;
• 建立基于GTID的复制进程
CHANGE MASTER TO
MASTER_HOST='mysql01',
MASTER_PORT=3306,
MASTER_USER='repl',
MASTER_PASSWORD='mysql',
MASTER_AUTO_POSITION=1;
• 启动和检查slave进程
start slave;
show slave statusG
• 在管理节点检查复制是否正常
[root@MySQL03 ~]# masterha_check_repl --conf=/etc/app1.cnf
• 开启manager监控
[root@MySQL03 ~]# nohup masterha_manager --conf=/etc/app1.cnf > /var/log/masterha/app1/mha_manager.log < /dev/null &
• 检查manager状态
[root@MySQL03 ~]# masterha_check_status --conf=/etc/app1.cnf
app1 (pid:7860) is running(0:PING_OK), master:MySQL01
十二、对secondary_check_script参数实验
  根据第七章得知secondary_chech_script参数表示MHA三次没有连通master,MHA会调用masterha_secondary_check脚本做二次检测来判断master是否是真的挂了。

第一步:建立一主两从复制集群。

第二步:在master添加虚拟网卡。

第三步:在MHA的manager节点/etc/app.cnf中添加。
secondary_check_script=/usr/bin/masterha_secondary_check -s MySQL02
第四步:检查ssh连通性和复制工作后开启manager节点。

第五步:使用iptables禁止manager节点连接master节点上的mysql
[root@MySQL01 ~]# iptables -I INPUT -p tcp -s 192.168.56.13 --dport 3306 -j DROP
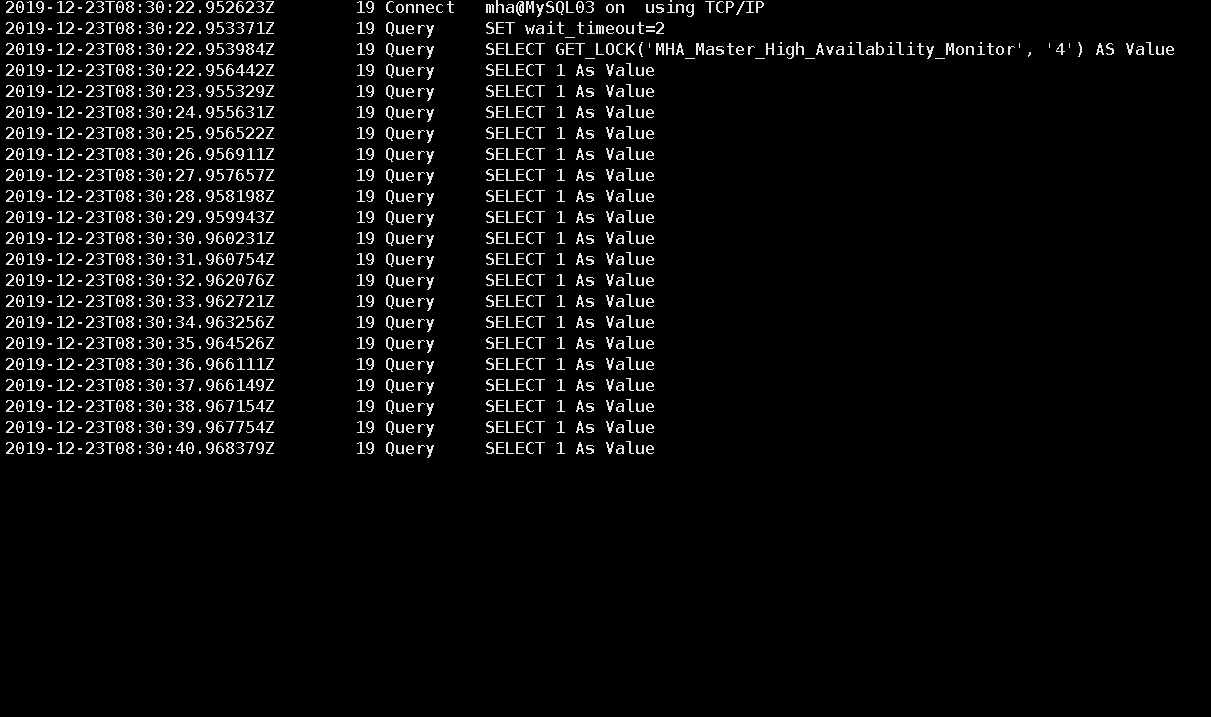
第六步:通过查看master节点上的general_log.log查询日志得知manager无法检查master上的mysql的存活状态,如图。
第七步:查看manager上的监控日志得知检查到MySQL02可以访问到master所以没有进行切换

第八步:使用iptables禁止 mysql02 节点连接master节点上的mysql[root@MySQL01 ~]# iptables -I INPUT -p tcp -s 192.168.56.12 --dport 3306 -j DROP
第九步:查看manager节点的监控日志报告“无法从MySQL02访问主服务器,应启动故障转移”

第十步:查看manager节点的监控日志,已经切换完成。新的复制结构如图:

根据上图是MySQL04从MySQL02上进行复制。

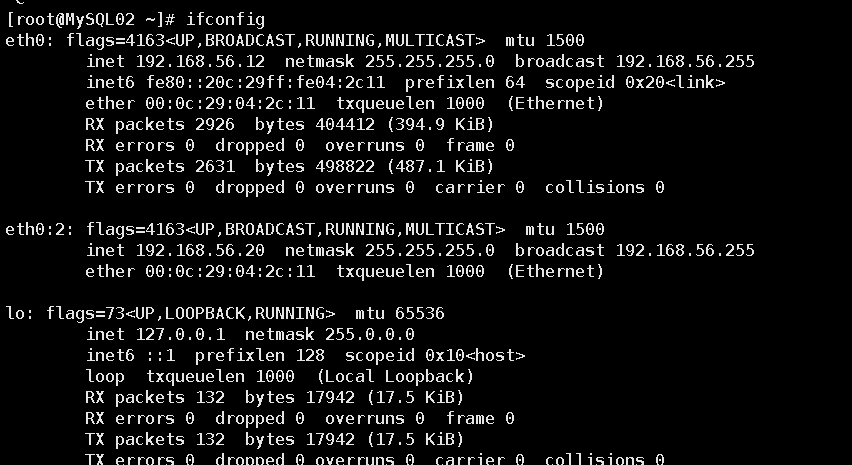
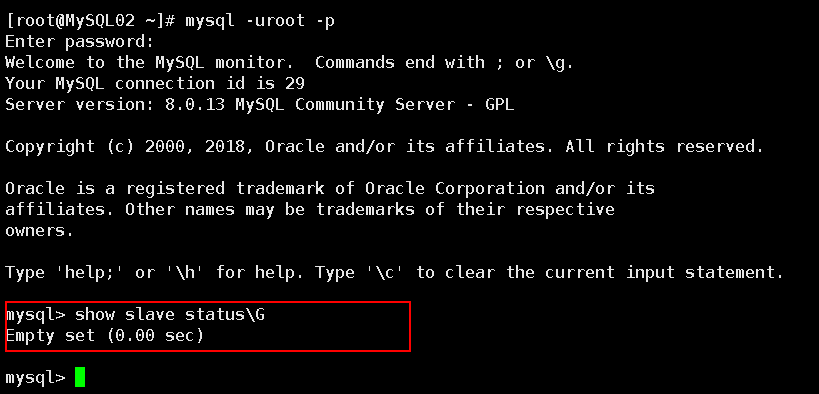
第十一步:验证VIP是否切换到MySQL02主机上了,MySQL02是否关闭slave线程
第十二步:此时应用的读写是通过连接VIP,操作MySQL02上的资源。查看MySQL04的复制状态
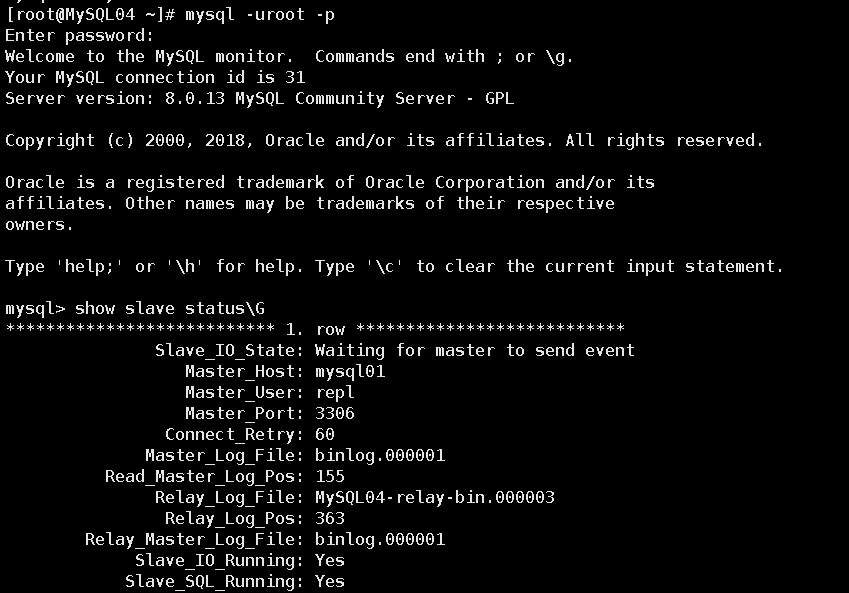
发现MySQL04还是从MySQL01上复制数据,显然是不正确的,因为此时的数据写入到了MySQL02上,所以如果使用secondary_check_script参数应当写上全部的Slave,如:
secondary_check_script=/usr/bin/masterha_secondary_check -s MySQL02 MySQL04
到这里MHA已经讲完了。
PDM