什么是MariaDB服务器?
MariaDB是一个免费的开源RDBMS(关系数据库管理系统)。MariaDB是MySQL数据库的一个分支,由MySQL项目的某些原始开发人员维护。就像其前身一样,MariaDB主要用作[基于PHP的服务器]的后端数据库。许多FOSS(自由和开源软件)实用程序还将MariaDB用作其数据存储库。
MariaDB服务器具有高度的可扩展性,可以用作[基于Standalone]或[Galera的MariaDB集群]环境。
MariaDB Server 10.5.3于2020年5月12日发布,具有许多新功能和一些重大更改。这是撰写本文时的最新版本。
MariaDB Server 10.5中的新功能:
MariaDB Server 10.5中的一些更改和功能包括:
- 所有以前以mysql开头的二进制文件现在都以mariadb开头,并带有对应的mysql命令的 符号链接
- S3存储引擎-用于将MariaDB表归档在Amazon S3或实现S3 API的任何第三方公共或私有云中
- S3表和分区S3表都是可发现的。这意味着,如果您创建分区的S3表,则该分区表及其分区都可以由另一台有权访问S3存储的服务器直接使用。
- 通过分割SUPER特权来添加新特权,以便可以对每个用户可以执行的操作进行更精细的调整
- 加快二进制行记录代码的速度
- 提高连接速度(最高25%)
您可以在MariaDB官方网站上查看MariaDB 10.5.3中新功能的完整列表。
环境规格:
- CPU:3.4 GHz(2核)
- 内存:2 GB
- 储存空间:20 GB
- 作业系统:CentOS 8.2
- 主机名:mariadb.lianglab.cn
- IP地址:192.168.6.200/24
第一步:更新CentOS 8软件包
使用ssh工具以root用户身份连接到mariadb.lianglab.cn。
最佳实践使用最新Linux软件包
[root@couchdb ~]# hostnamectl set-hostname mariadb.lianglab.cn

[root@mariadb ~]# dnf update -y
Dependencies resolved.
Nothing to do.
Complete!
第二步:CentOS 8中安装MariaDB Yum存储库
MariaDB Server 10.5.3是最新版本,因此在CentOS 8 yum存储库中不可用。
MariaDB提供了一个正式的yum存储库,我们可以使用它在CentOS 8上安装MariaDB Server 10.5 。
【1】创建yum存储库文件,如下所示。
[root@mariadb-01 ~]# vi /etc/yum.repos.d/MariaDB.repo
在此文件中添加以下指令。
# MariaDB 10.5 CentOS repository list - lianglab created 2020-12-26
# https://www.cnblogs.com/lianglab/
# http://downloads.mariadb.org/mariadb/repositories/
[mariadb]
name = MariaDB
baseurl = http://yum.mariadb.org/10.5/centos8-amd64
module_hotfixes=1
gpgkey=https://yum.mariadb.org/RPM-GPG-KEY-MariaDB
gpgcheck=1
【2】MariaDB yum存储库构建缓存。
[root@mariadb ~]# dnf clean all
44 files removed
[root@mariadb ~]# dnf makecache
CentOS-8 - Base - mirrors.tongdun.cn                                         1.2 MB/s | 3.9 kB     00:00
CentOS-8 - Extras - mirrors.tongdun.cn                                       817 kB/s | 1.5 kB     00:00
CentOS-8 - AppStream - mirrors.tongdun.cn                                    2.7 MB/s | 4.3 kB     00:00
MariaDB                                                                      1.7 kB/s | 2.9 kB     00:01
bintray--apache-couchdb-rpm                                                  2.1 kB/s | 1.3 kB     00:00
Extra Packages for Enterprise Linux 8 - x86_64                               2.7 MB/s | 4.7 kB     00:00
Extra Packages for Enterprise Linux 8 - x86_64 - Debug                       1.6 MB/s | 3.0 kB     00:00
Extra Packages for Enterprise Linux 8 - x86_64 - Source                      2.1 MB/s | 3.5 kB     00:00
Metadata cache created.

第三步:CentOS 8上安装MariaDB Server 10.5
【1】我们已经添加了MariaDB yum存储库,现在我们可以使用dnf命令轻松安装MariaDB Server 。
[root@mariadb ~]# dnf install -y MariaDB-server
Last metadata expiration check: 0:00:26 ago on Sat 26 Dec 2020 09:55:49 PM CST.
Dependencies resolved.
=============================================================================================================
 Package                      Architecture         Version                     Repository               Size
=============================================================================================================
Installing:
 MariaDB-server               x86_64               10.5.8-1.el8                mariadb                  27 M
Installing dependencies:
 MariaDB-client               x86_64               10.5.8-1.el8                mariadb                  13 M
 MariaDB-common               x86_64               10.5.8-1.el8                mariadb                  87 k
 MariaDB-shared               x86_64               10.5.8-1.el8                mariadb                 115 k
 galera-4                     x86_64               26.4.6-1.el8                mariadb                  13 M
 socat                        x86_64               1.7.3.3-2.el8               AppStream               302 k
===========================================省略=====================================================
Downloading Packages:
(1/6): socat-1.7.3.3-2.el8.x86_64.rpm                                        6.2 MB/s | 302 kB     00:00
(2/6): MariaDB-common-10.5.8-1.el8.x86_64.rpm                                6.8 kB/s |  87 kB     00:12
(3/6): MariaDB-shared-10.5.8-1.el8.x86_64.rpm                                 27 kB/s | 115 kB     00:04
[MIRROR] MariaDB-server-10.5.8-1.el8.x86_64.rpm: Curl error (28): Timeout was reached for http://yum.mariadb.org/10.5/centos8-amd64/rpms/MariaDB-server-10.5.8-1.el8.x86_64.rpm [Operation too slow. Less than 1000 bytes/sec transferred the last 30 seconds]
[MIRROR] galera-4-26.4.6-1.el8.x86_64.rpm: Curl error (28): Timeout was reached for http://yum.mariadb.org/10.5/centos8-amd64/rpms/galera-4-26.4.6-1.el8.x86_64.rpm [Operation too slow. Less than 1000 bytes/sec transferred the last 30 seconds]

===========================================省略=====================================================

[root@mariadb tdops]# dnf -y install galera-4-26.4.6-1.el8.x86_64.rpm  MariaDB-server-10.5.8-1.el8.x86_64.rpm  MariaDB-client-10.5.8-1.el8.x86_64.rpm

Installed:
  MariaDB-client-10.5.8-1.el8.x86_64       MariaDB-common-10.5.8-1.el8.x86_64       MariaDB-server-10.5.8-1.el8.x86_64       MariaDB-shared-10.5.8-1.el8.x86_64
  galera-4-26.4.6-1.el8.x86_64
Complete!

[root@mariadb tdops]# dnf install -y MariaDB-server
Last metadata expiration check: 0:21:18 ago on Sat 26 Dec 2020 09:55:49 PM CST.
Package MariaDB-server-10.5.8-1.el8.x86_64 is already installed.
Dependencies resolved.
Nothing to do.
Complete!
【2】启动MariaDB服务。
[root@mariadb-01 ~]# systemctl enable --now mariadb.service
Created symlink /etc/systemd/s[root@mariadb tdops]# systemctl enable --now mariadb.service
Created symlink /etc/systemd/system/multi-user.target.wants/mariadb.service → /usr/lib/systemd/system/mariadb.service.
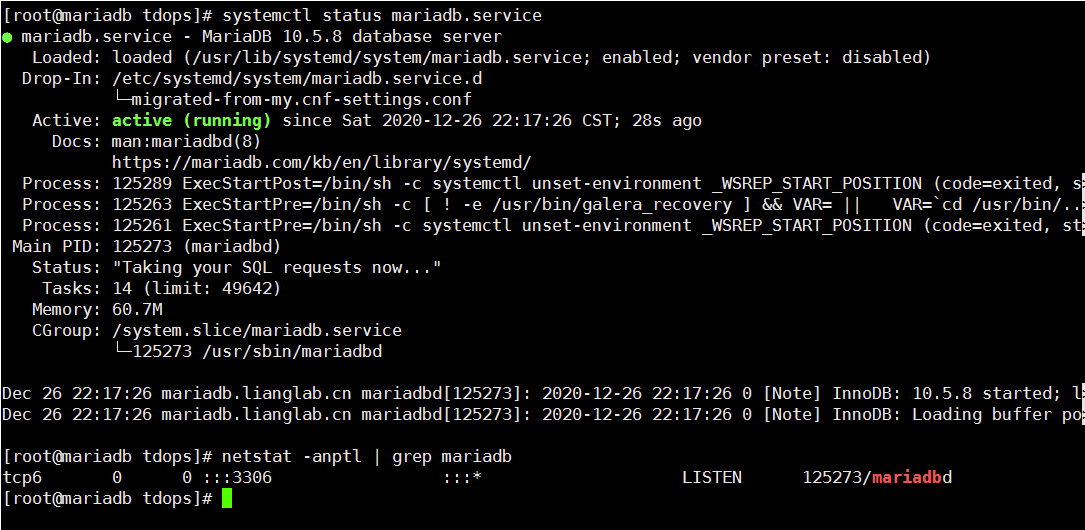
【3】验证MariaDB服务的状态和监听的端口
[root@mariadb-01 ~]# systemctl status mariadb.service
â mariadb.service - MariaDB 10.5.3 database server
   Loaded: loaded (/usr/lib/systemd/system/mariadb.service; enabled; vendor pre>
  Drop-In: /etc/systemd/system/mariadb.service.d
           ââmigrated-from-my.cnf-settings.conf
   Active: active (running) since Fri 2020-05-29 13:59:04 PKT; 12s ago
     Docs: man:mysqld(8)
           https://mariadb.com/kb/en/library/systemd/
  Process: 12496 ExecStartPost=/bin/sh -c systemctl unset-environment _WSREP_ST>
  Process: 12475 ExecStartPre=/bin/sh -c [ ! -e /usr/bin/galera_recovery ] && V>
  Process: 12473 ExecStartPre=/bin/sh -c systemctl unset-environment _WSREP_STA>
 Main PID: 12485 (mysqld)
   Status: "Taking your SQL requests now..."
    Tasks: 11 (limit: 5916)
   Memory: 75.8M
   CGroup: /system.slice/mariadb.service
           ââ12485 /usr/sbin/mysqld

May 29 13:59:04 mariadb-01.centlinux.com mysqld[12485]: 2020-05-29 13:59:04 0 [>
May 29 13:59:04 mariadb-01.centlinux.com mysqld[12485]: 2020-05-29 13:59:04 0 [>
May 29 13:59:04 mariadb-01.centlinux.com mysqld[12485]: 2020-05-29 13:59:04 0 [>
May 29 13:59:04 mariadb-01.centlinux.com mysqld[12485]: 2020-05-29 13:59:04 0 [>
May 29 13:59:04 mariadb-01.centlinux.com mysqld[12485]: 2020-05-29 13:59:04 0 [>
May 29 13:59:04 mariadb-01.centlinux.com mysqld[12485]: 2020-05-29 13:59:04 0 [>

[root@mariadb tdops]# netstat -anptl | grep mariadb
tcp6       0      0 :::3306                 :::*                    LISTEN      125273/mariadbd
[root@mariadb tdops]#

第四步:MariaDB 数据库用户密码设置
- Linux的根用户可以连接到MariaDB的服务器MariaDB的根用户无需任何密码
- Linux mysql用户可以无需任何密码即可作为MariaDB mysql用户连接到MariaDB服务器
为了允许其他Linux用户以root或mysql用户身份登录,我们需要为这些数据库用户设置密码。
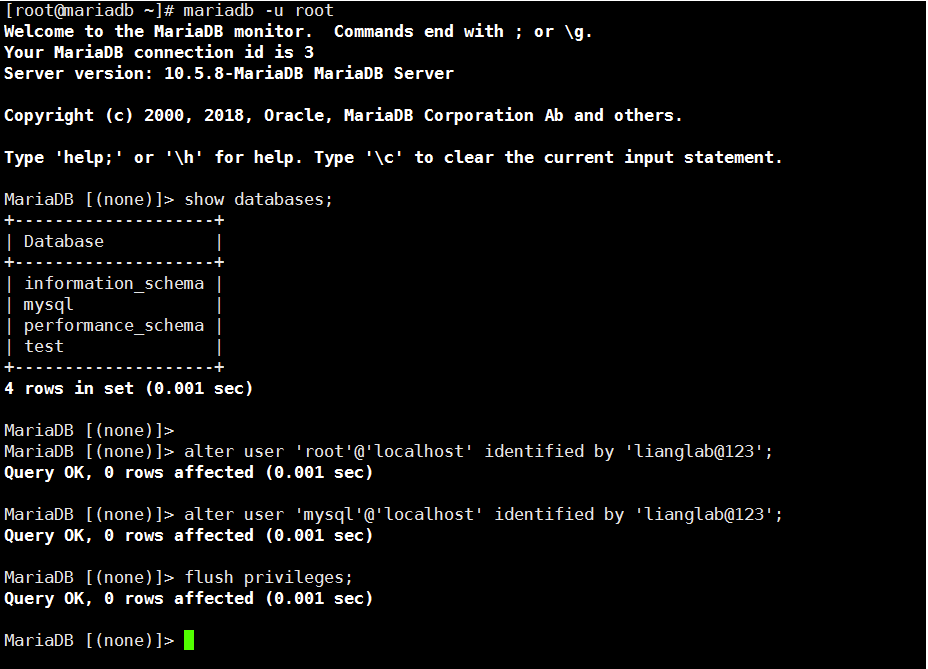
【1】使用新的mariadb命令连接MariaDB服务器。
[root@mariadb ~]# mariadb -u root
Welcome to the MariaDB monitor.  Commands end with ; or g.
Your MariaDB connection id is 3
Server version: 10.5.8-MariaDB MariaDB Server

Copyright (c) 2000, 2018, Oracle, MariaDB Corporation Ab and others.

Type 'help;' or 'h' for help. Type 'c' to clear the current input statement.

MariaDB [(none)]> show databases;
+--------------------+
| Database           |
+--------------------+
| information_schema |
| mysql              |
| performance_schema |
| test               |
+--------------------+
4 rows in set (0.001 sec)

MariaDB [(none)]>
【2】为root和mysql用户设置强密码为lianglab@123
MariaDB [(none)]> alter user 'root'@'localhost' identified by 'lianglab@123';
Query OK, 0 rows affected (0.001 sec)

MariaDB [(none)]> alter user 'mysql'@'localhost' identified by 'lianglab@123';
Query OK, 0 rows affected (0.001 sec)
【3】重新加载特权表。
MariaDB [(none)]> flush privileges;
Query OK, 0 rows affected (0.001 sec)
【4】列出MariaDB服务器中的可用数据库。
MariaDB [(none)]> show databases;
+--------------------+
| Database           |
+--------------------+
| information_schema |
| mysql              |
| performance_schema |
| test               |
+--------------------+
4 rows in set (0.001 sec)
【5】从MariaDB shell退出。
MariaDB [(none)]> exit
Bye
【6】我们的MariaDB Server 10.5已成功安装。

博主站点:https://www.cnblogs.com/lianglab/
第五步:MariaDB服务器配置数据库安全性
我们可以选择删除测试数据库并限制root用户的远程登录。
我们可以使用新的mariadb-secure-installation命令。
[root@mariadb ~]# mariadb-secure-installation

NOTE: RUNNING ALL PARTS OF THIS SCRIPT IS RECOMMENDED FOR ALL MariaDB
      SERVERS IN PRODUCTION USE!  PLEASE READ EACH STEP CAREFULLY!

In order to log into MariaDB to secure it, we'll need the current
password for the root user. If you've just installed MariaDB, and
haven't set the root password yet, you should just press enter here.

Enter current password for root (enter for none): ##输入我们创建的密码lianglab@123
OK, successfully used password, moving on...

Setting the root password or using the unix_socket ensures that nobody
can log into the MariaDB root user without the proper authorisation.

You already have your root account protected, so you can safely answer 'n'.

Switch to unix_socket authentication [Y/n] n
 ... skipping.

You already have your root account protected, so you can safely answer 'n'.

Change the root password? [Y/n] n
 ... skipping.

By default, a MariaDB installation has an anonymous user, allowing anyone
to log into MariaDB without having to have a user account created for
them.  This is intended only for testing, and to make the installation
go a bit smoother.  You should remove them before moving into a
production environment.

Remove anonymous users? [Y/n] y
 ... Success!

Normally, root should only be allowed to connect from 'localhost'.  This
ensures that someone cannot guess at the root password from the network.

Disallow root login remotely? [Y/n] y
 ... Success!

By default, MariaDB comes with a database named 'test' that anyone can
access.  This is also intended only for testing, and should be removed
before moving into a production environment.

Remove test database and access to it? [Y/n] y
 - Dropping test database...
 ... Success!
 - Removing privileges on test database...
 ... Success!

Reloading the privilege tables will ensure that all changes made so far
will take effect immediately.

Reload privilege tables now? [Y/n] y
 ... Success!

Cleaning up...

All done!  If you've completed all of the above steps, your MariaDB
installation should now be secure.

Thanks for using MariaDB!
[root@mariadb ~]#

我们已经在CentOS 8.2上成功安装MariaDB Server 10.5并配置管理员用户和数据库安全性。