preface
在上上家公司,曾维护过公司的MFS文件系统,主要用来存储系统日志文件,单纯的把日志当作文件存储,在当时的架构下,MFS就像一个中间站一样,这边程序生成的日志放入MFS,那边日志分析程序从里面取出日志文件来。
翻开尘封多年的笔记,借助下相关的文档资料,特意写下MFS的一丁点知识。
MFS概论与读写过程
MFS的官方网站是http://www.moosefs.org,我们可以从这里获取权威的帮助信息,官方MFS网络组成以及原理如下所示:
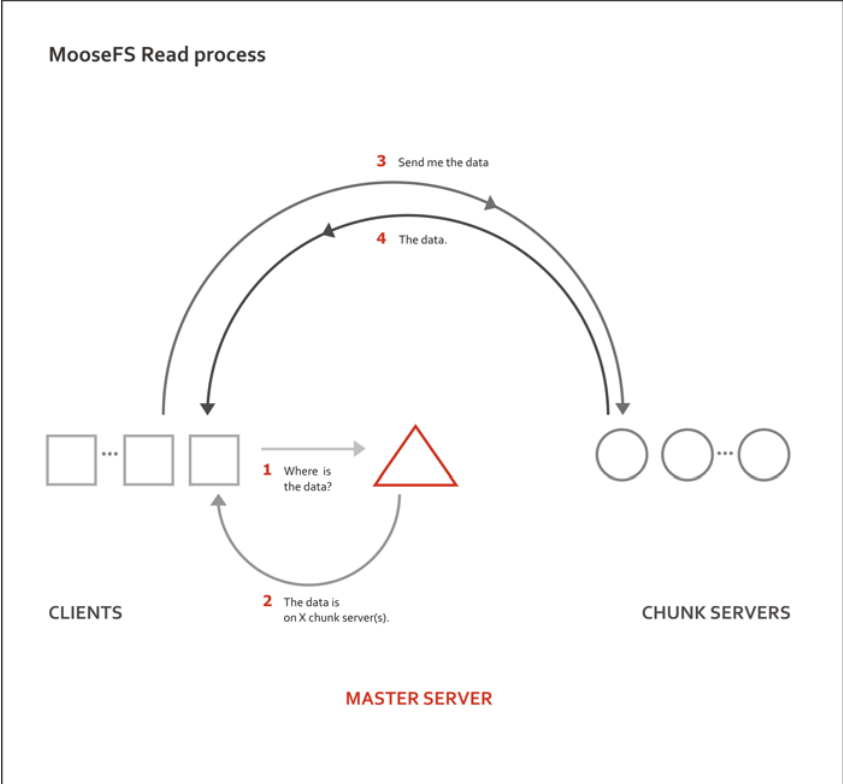
MFS Read Process:
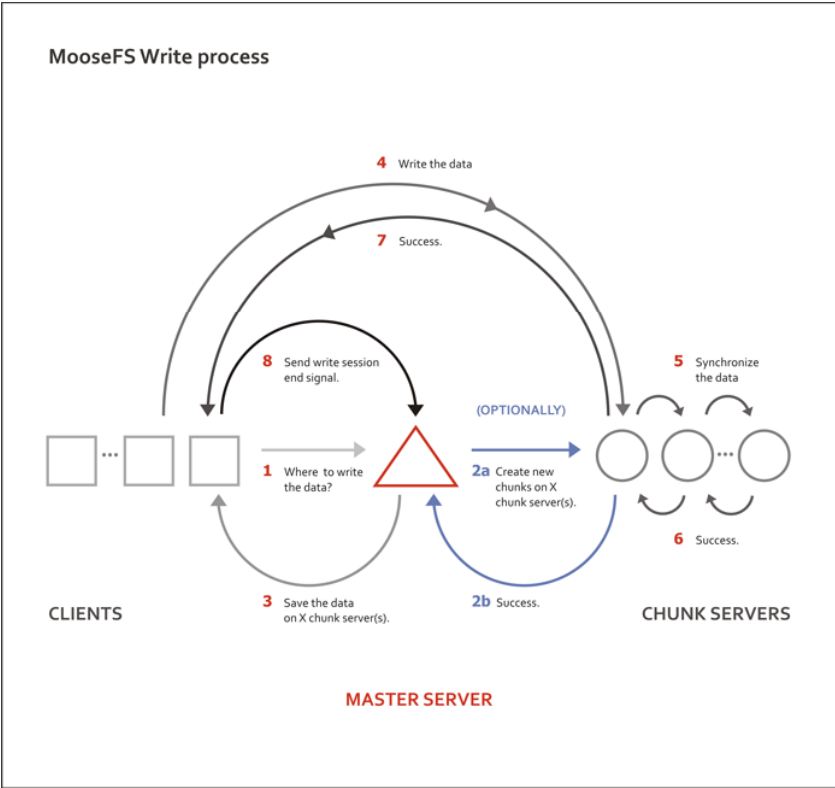
MFS Write Process:

how the system works:
All file operations on a client computer that has mounted MooseFS are exactly the same as they would be with other file systems. The operating system kernel transfers all file operations to the FUSE module, which communicates with the mfsmount process. The mfsmount process communicates through the network subsequently with the managing server and data servers (chunk servers). This entire process is fully transparent to the user.
mfsmount communicates with the managing server every time an operation on file metadata is required:
- creating files
- deleting files
- reading directories
- reading and changing attributes
- changing file sizes
- at the start of reading or writing data
- on any access to special files on MFSMETA
mfsmount uses a direct connection to the data server (chunk server) that stores the relevant chunk of a file. When writing a file, after finishing the write process the managing server receives information from mfsmount to update a file's length and the last modification time.
Furthermore, data servers (chunk servers) communicate with each other to replicate data in order to achieve the appropriate number of copies of a file on different machines.
通过上面官网的解释,我相信大家应该指定MFS一个工作流程了。
文件系统
如上图所示,MFS文件系统共有4个角色,分别是
- 管理服务器 --- Master Server
- 元数据日志服务器 --- Metalogger
- 数据存储服务器 --- Chunk Server
- 客户端 --- Client
4种角色作用如下:
-
管理服务器--mfsmaster
有时也称为元数据服务器,负责管理各个数据存储服务器,调度文件读写,回收文件空间以及恢复多节点拷贝。 -
元数据服务器-mfsmetalogger
负责备份管理服务器的变化日志,文件类型为changelog_ml.*.mfs,以便于在管理服务器出现问题时接替期进行工作。这类服务器是在mfs1.6版本后新增的服务,可以把元数据日志保留在管理服务器中,也可以单独存在一台服务器中。为保证数据的安全性和可靠性,建议单独使用一台服务器来存放元数据日志,需要注意的是,元数据日志守护进程跟管理服务器在同一个服务器,备份元数据日志服务器作为它的客户端,从管理服务器取得日志文件进行备份。 -
数据存储服务器-mfschunkserver
这类是真正存储用户数据的服务器。在存储文件时,首先把文件分成块,然后把这些块在数据存储服务器之间互相复制,同事,数据存储服务器还负责连接管理服务器,听从管理服务器调度,并为客户提供数据传输。数据存储服务器可以有多个,并且数量越多,可靠性越高。MFS可用的磁盘空间也越大。 -
客户端-mfsclient
客户端通过fuse内核接口挂载远程服务器上所管理的数据存储服务器,使共享的文件系统和使用本地linux文件系统的效果看起来一样的。
MFS的安装
我在这里拿一套实验环境来进行部署,机器信息如下:
| IP | 角色 |
|---|---|
| 172.16.22.142 | MfsChunkServer |
| 172.16.160.191 | MfsMaster |
| 172.16.160.192 | Mfsmetadata |
| 172.16.22.81 | MfsClient |
yum安装过程
想采用yum安装,那么就按照官网资料操作吧:
yum安装参考官方资料:https://moosefs.com/download/centosfedorarhel.html
Important!
If you already upgraded your Chunkservers to v. 3.0.83 or higher, please DO NOT downgrade them!
In MooseFS Chunkserver v. 3.0.83 we changed Chunk header from 5k to 8k (see changelog) - it means, that Chunkserver older than 3.0.83 cannot "understand" new Chunk header, which may lead to potential data loss!
源码包安装
下面开始源码 ,我们安装3.0这个版本的包,安装过程可以参考官网, 或者下面的PDF:
PDF地址:https://moosefs.com/Content/Downloads/moosefs-3-0-users-manual.pdf
地址是:https://moosefs.com/download/sources.html
源码包下载地址是:http://ppa.moosefs.com/src/moosefs-3.0.84-1.tar.gz
Notice
- 安装之前/etc/hosts文件做好解析,在这我们将使用mfsmaster,所以一定要在/etc/hosts里面加入这条记录。
- 所有服务器时间同步。
172.16.160.191安装master server-管理服务器
[root@localhost tmp]# tar zxf moosefs-3.0.84-1.tar.gz
[root@localhost tmp]# cd moosefs-3.0.84
[root@localhost moosefs-3.0.84]# useradd mfs -s /sbin/nologin
[root@localhost moosefs-3.0.84]# ./configure --prefix=/usr/local/mfs --with-default-user=mfs --with-default-group=mfs
[root@localhost moosefs-3.0.84]# make && make install
编译没有问题,那么就安装成功了,我们在/usr/local/mfs/下找到配置文件,更改配置文件:
mfsmaster.cfg
[root@localhost moosefs-3.0.84]# cd /usr/local/mfs/etc/mfs
[root@localhost mfs]# cp sbin/mfs* /usr/sbin/    #复制命令到系统下面
[root@localhost mfs]# cp -a mfsmaster.cfg.sample  mfsmaster.cfg
[root@localhost mfs]# grep ^[a-Z] mfsmaster.cfg
WORKING_USER = mfs
WORKING_GROUP = mfs
SYSLOG_IDENT = mfsmaster  #在syslog中的表示,说明这是mfsmaster产生的
LOCK_MEMORY = 0    # 是否执行mlockall()以避免mfsmaster内存溢出(默认为0)
NICE_LEVEL = -19     # 运行的优先级(默认-19,注意,这进程必须是root启动 )
DATA_PATH = /usr/local/mfs/var/mfs      #数据存放路径,该目录下有三大类文件,changelog,sessions,stats
EXPORTS_FILENAME = /usr/local/mfs/etc/mfs/mfsexports.cfg     #被挂载目录以及其权限控制文件的存放位置
BACK_LOGS = 50     #元数据的改变日志文件数量(默认是50)
MATOML_LISTEN_HOST = *     # 元数据日志服务器监听的IP地址(默认是*,代表任何IP)
MATOML_LISTEN_PORT = 9419   # 元数据日志服务器监听的端口地址,默认是9419
MATOCS_LISTEN_HOST = *       # 用于存储服务器(Chunk Server)连接的IP地址
MATOCS_LISTEN_PORT = 9420    # 是存储服务器(Chunk server)连接的端口地址
REPLICATIONS_DELAY_INIT = 300   # 延迟复制的时间(默认是300)
CHUNKS_LOOP_MIN_TIME = 300  #  chunks 的回环率
CHUNKS_SOFT_DEL_LIMIT = 10
CHUNKS_WRITE_REP_LIMIT = 2,1,1,4   在一个循环里复制到一个CHUNK Server的最大chunks数目
CHUNKS_READ_REP_LIMIT = 10,5,2,5
MATOCL_LISTEN_HOST = *
MATOCL_LISTEN_PORT = 9421
以上配置不需要修改,直接把配置文件copy之后就可以了。
mfsexports.cfg
[root@localhost mfs]# cp mfsexports.cfg.sample mfsexports.cfg
[root@localhost mfs]# tail mfsexports.cfg
172.16.160.0/24    .         rw,alldirs,maproot=0
参数解释:
- 第一部分 172.16.160.0/24表示客户端的IP地址,可以有以下几种表现形式:
-
- 表示所有的IP
- n.n.n.n 单个IP
- n.n.n.n/b IP网络地址/位数掩码
- n.n.n.n/m.m.m.m IP网络地址/子网掩码
- f.f.f.f-t.t.t.t ip段
- 第二部分 / 表示被挂接的目录
- /表示MooseFS的根
- .表示MFSMETA文件系统
- 第三部分 rw.alldirs,maproot=0 表示客户端拥有的权限。
权限部分选项如下:
- ro 只读模式共享
- rw 读写方式共享
- alldirs 允许挂载任何指定的子目录
- maproot 映射为root用户还是指定的用户
- password 指定客户端密码
metadata.mfs
默认的元数据文件为metadata.mfs.empty,启动master server,需要重命名下
[root@localhost mfs]# cp /usr/local/mfs/var/mfs/metadata.mfs.empty /usr/local/mfs/var/mfs/metadata.mfs
启动master server
启动master server的命令为mfsmaster,其参数如下所示。
-v : print version number and exit
-f : run in foreground
-u : log undefined config variables
-n : do not attempt to increase limit of core dump size
-t locktimeout : how long wait for lockfile  等待lockfile的时长
-c cfgfile : use given config file
-i : ignore some metadata structure errors (attach orphans to root, ignore names without inode, etc.)
-a : automatically restore metadata from change logs
-x : produce more verbose output
-xx : even more verbose output
master server可以单独启动,即使没有任何数据存储服务器(chunk server)也能够正常工作。启动master server的命令如下:
[root@localhost mfs]# mfsmaster start
[root@localhost mfs]# netstat -lnpt  #查看监听端口,确保启动成功
Active Internet connections (only servers)
Proto Recv-Q Send-Q Local Address               Foreign Address             State       PID/Program name
'''
tcp        0      0 0.0.0.0:9419                0.0.0.0:*                   LISTEN      5944/mfsmaster
tcp        0      0 0.0.0.0:9420                0.0.0.0:*                   LISTEN      5944/mfsmaster
tcp        0      0 0.0.0.0:9421                0.0.0.0:*                   LISTEN      5944/mfsmaster
'''
停止master server
安全停止master server是非常必要的,千万不要kill,而是利用自带的命令mfsmaster来安全停止master server。
[root@localhost mfs]# mfsmaster stop
我们安装后采用默认的配置,没有做任何更改,所以默认的日志是写入/var/log/messages。
172.16.160.192安装元数据日志服务器
下载代码包后,解压后开始编译。
[root@localhost moosefs-3.0.84]# useradd mfs -s /sbin/nologin
[root@localhost moosefs-3.0.84]# ./configure --prefix=/usr/local/mfs --with-default-user=mfs --with-default-group=mfs
[root@localhost moosefs-3.0.84]# make && make install
mfsmetalogger.cfg
更改配置文件
[root@localhost mfs]# cp mfsmetalogger.cfg.sample mfsmetalogger.cfg
[root@localhost mfs]# vim mfsmetalogger.cfg
[root@localhost mfs]# grep ^[a-Z] mfsmetalogger.cfg
META_DOWNLOAD_FREQ = 2         # 元数据备份文件下载请求频率,默认是24小时,即每2小时从master server上下载一个metadata.mfs文件,当元数据服务器关闭或者故障的时候,metadata.mfs.back文件将消失,此时需要从元数据日志服务器中取得这个文件。注意,这个文件和日志文件共同使用才能恢复整个已损坏的分布式文件系统
...只需要更改上面2行就行了,其他保持默认即可如果没有特殊要求。
MASTER_HOST = 172.16.160.191  # master server的地址
启动元数据服务器
启动,停止命令是mfsmetalogger :
root@localhost mfs]# cp /usr/local/mfs/sbin/mfsmetalogger /usr/sbin/
[root@localhost mfs]# mfsmetalogger start   # 启动命令
[root@localhost mfs]# ps -ef |grep mfs
mfs       7446     1  0 01:43 ?        00:00:00 mfsmetalogger start
root      7449  1583  0 01:43 pts/0    00:00:00 grep mfs
[root@localhost mfs]# lsof -i :9419                   # 确保端口在使用中
COMMAND    PID USER   FD   TYPE DEVICE SIZE/OFF NODE NAME
mfsmetalo 7446  mfs    8u  IPv4  19768      0t0  TCP 172.16.160.192:48103->172.16.160.191:9419 (ESTABLISHED)

[root@localhost mfs]# cd /usr/local/mfs/var/mfs/      # 查看工作目录下是否有元数据文件生成
[root@localhost mfs]# ls
changelog_ml_back.0.mfs  changelog_ml_back.1.mfs  metadata.mfs.empty  metadata_ml.mfs.back


[root@localhost mfs]# mfsmetalogger stop     # 停止服务
172.16.22.142安装数据存储服务器(Chunk Server)
下载代码包后,解压后开始编译。
[root@salt moosefs-3.0.84]# useradd mfs -s /sbin/nologin
[root@salt moosefs-3.0.84]# ./configure --prefix=/usr/local/mfs --with-default-user=mfs --with-default-group=mfs   && make && make install
mfschunkserver
[root@salt moosefs-3.0.84]# cd /usr/local/mfs/etc/mfs/
[root@salt mfs]# cp mfschunkserver.cfg.sample mfschunkserver.cfg
[root@salt mfs]# vim mfschunkserver.cfg
[root@salt mfs]# grep ^[a-Z] mfschunkserver.cfg
MASTER_HOST = mfsmaster        # 指明master server服务器地址
MASTER_PORT = 9420             #指明master server 端口
HDD_CONF_FILENAME = /usr/local/mfs/etc/mfs/mfshdd.cfg     # 这个指明哪个配置文件来配置共享磁盘的
mfshdd
[root@salt etc]# mkdir /mnt/sdb1
[root@salt mfs]# grep ^/ mfshdd.cfg
/mnt/sdb1    # 必须把磁盘挂载在某个目录下,直接使用硬盘或者分区是不行的。
[root@salt etc]# mkfs.ext4 /dev/sdb1
[root@salt etc]# mount /dev/sdb1 /mnt/sdb1/
[root@salt etc]# chown -R  mfs.mfs /mnt/sdb1/
启动服务
[root@salt etc]# mfschunkserver start
[root@salt etc]# ps -ef |grep mfs
mfs       40568      1  0 02:14 ?        00:00:00 mfschunkserver start
root      40625  17565  0 02:15 pts/0    00:00:00 grep mfs
要停止服务,请使用mfschunkserver stop来停止。
172.16.22.72 安装客户端
安装fuse
[root@localhost libfuse-master]# yum -y install fuse fuse-devel fuse-libs
我的yum源是CentOs6.6 安装好后自带的。
需要注意的是,如果采用源码安装fuse,那么出现 configure error,mfsmount build was forced,but the fuse development package is not installed ..
这样的错误不能正确安装MFS客户端,是因为没有设置环境变量,通过下面两种方法可以解决:
第一 编辑/etc/profile ,在此文件中加入下面的内容:
export PKG_CONFIG_PATH=/usr/local/lib/pkgconfig:$PKG_CONFIG_PATH

第二 直接在命令行执行
export PKG_CONFIG_PATH=/usr/local/lib/pkgconfig:$PKG_CONFIG_PATH
挂载磁盘并且使用
注意,如果使用mfsmount挂载磁盘后,df出现不了挂载MFS的记录,那么请检查/etc/hosts有没有添加mfsmaster这条记录。因为我踩的坑就是没有添加这条记录导致虽然提示挂载上去 了,但是无法使用mfs的盘,df也显示不了新挂载的盘。
[root@localhost ~]# mfsmount /mnt/mfsclient/ -H mfsmaster   # mfsmaster是在/etc/hosts有记录。
mfsmaster accepted connection with parameters: read-write,restricted_ip,admin ; root mapped to root:root
[root@localhost ~]# df -hT
Filesystem     Type      Size  Used Avail Use% Mounted on
/dev/sda2      ext4       28G  2.5G   24G  10% /
tmpfs          tmpfs     238M     0  238M   0% /dev/shm
/dev/sda1      ext4      283M   28M  240M  11% /boot
mfsmaster:9421 fuse.mfs  8.5G  278M  8.2G   4% /mnt/mfsclient   # 新增挂载的记录

[root@localhost mfsclient]# mount
/dev/sda2 on / type ext4 (rw)
proc on /proc type proc (rw)
sysfs on /sys type sysfs (rw)
devpts on /dev/pts type devpts (rw,gid=5,mode=620)
tmpfs on /dev/shm type tmpfs (rw)
/dev/sda1 on /boot type ext4 (rw)
none on /proc/sys/fs/binfmt_misc type binfmt_misc (rw)
vmware-vmblock on /var/run/vmblock-fuse type fuse.vmware-vmblock (rw,nosuid,nodev,default_permissions,allow_other)
mfsmaster:9421 on /mnt/mfsclient type fuse.mfs (rw,nosuid,nodev,allow_other)
卸载磁盘
老规矩,umount卸载即可。
[root@localhost mfsclient]# umount /mnt/mfsclient/
测试
至此,MFS已经搭建完成,我们可以来个简单的文件写入。
[root@localhost mfsclient]# dd if=/dev/zero of=/mnt/mfsclient/haha.iso count=100 bs=20M
100+0 records in
100+0 records out
2097152000 bytes (2.1 GB) copied, 7.14513 s, 294 MB/s
如有疑问请与本人联系,18500777133@sina.cn