1. 创建Maven的普通java项目(所有的原型(DarchetypeArtifactId指的什么类型的项目比如jar或者war项目)参考 http://maven.apache.org/guides/introduction/introduction-to-archetypes.html):
mvn archetype:generate
-DgroupId=packageName
-DartifactId=projectName
2. 创建Maven的Web项目:
mvn archetype:generate
-DgroupId=packageName
-DartifactId=webappName
-DarchetypeArtifactId=maven-archetype-webapp
3. 编译源代码: mvn compile
4. 编译测试代码:mvn test-compile
5. 运行测试:mvn test
6. 产生site(在target/site目录下生成该文档的一个帮助api网页):mvn site
7. 打包:mvn package
8. 在本地Repository中安装jar:mvn install
9. 清除产生的项目:mvn clean
10. 生成eclipse项目:mvn eclipse:eclipse
11. 生成intellij idea:mvn idea:idea
12. 组合使用goal命令,如只打包不测试:mvn -Dtest package
13. 编译测试的内容:mvn test-compile
14. 只打jar包: mvn jar:jar
15. 只测试而不编译,也不测试编译:mvn test -skipping compile -skipping test-compile
( -skipping 的灵活运用,当然也可以用于其他组合命令)
16. 清除eclipse的一些系统设置:mvn eclipse:clean
二 常用单词解释及pom.xnl
SNAPSHOT表示项目正在一个开发版本 对应的RELEASE 一般开发版本定义是 x.y-SNAPSHOT 比如 1.0-SNAPSHOT 开发一个新版本后y++
1》pom.xml讲解
》》属性定义
 <properties>
		<project.build.sourceEncoding>UTF-8</project.build.sourceEncoding>
		<project.reporting.outputEncoding>UTF-8</project.reporting.outputEncoding>
		<java.version>1.7</java.version>
		<spring-cloud.version>Dalston.SR3</spring-cloud.version>
</properties>》》依赖控制
<dependency>
			<groupId>org.springframework.boot</groupId>
			<artifactId>spring-boot-starter-test</artifactId>
                        <version>${属性名}</version>
			<scope>test</scope>
</dependency>
添加依赖后 自动寻找本地仓库jar包 如果无法找到 查找远程仓库
介绍 scope各个值的参考
compile:默认的scope。任何定义在compile scope下的依赖将会在所有的class paths下可用。maven工程会将其打包到最终的arifact中。如果你构建一个WAR类型的artefact,那么在compile scope下引用的JAR文件将会被集成到WAR文件内。

provided:这个scope假定对应的依赖会由运行这个应用的JDK或者容器来提供。最好的例子就是servlet API。任何在provided scope下定义的依赖在构建时的类路径里是可用的,但是不会被打包到最终的artifact中。如果是一个WAR的文件,servlet API在构建时的类路径里是可用的,但是并不会被打包到WAR文件中。

runtime:在runtime scope下定义的依赖只会在运行期可用,而在构建期的类路径下不可用。这些依赖将会被打包到最终的artifact中。比如你有一个基于web的应用需要在运行时访问MySQL数据库。你的代码没有任何MySQL数据库驱动的硬依赖。你的代码仅仅是基于JDBC API来编写,在构建期并不需要MySQL数据库驱动。然而,在运行期,就需要相应的驱动来操作MySQL数据库了。因此,这个驱动应该被打包到最终的artifact中。

test:只用于测试变异的依赖(比如JUnit),execution必须定义在test scope下。这些依赖不会被打包到最终的artefact中。

system:于provided scope很像。唯一的区别在于,在system scope中,你需要告诉Mave如何去找到这个依赖。如果你要引用的依赖在Maven仓库中不存在时,就可以用这个scope。不推荐使用system依赖。

import:从其它的pom文件中导入依赖设置。
三 mvn插件列表
如果需要自己构建maven项目 你需要在pom.xml中配置参见 插件就是mvn 后的命令名称 参考(http://maven.apache.org/plugins/)
四 开发自己的插件(开发插件参考官网http://maven.apache.org/guides/plugin/guide-java-plugin-development.html)
1>生成插件项目
命令行: 使用 mvn archetype:generate 生成插件
Choose archetype:
   1: internal -> org.apache.maven.archetypes:maven-archetype-archetype (An archety
    pe which contains a sample archetype.)
   2: internal -> org.apache.maven.archetypes:maven-archetype-j2ee-simple (An arche
    type which contains a simplifed sample J2EE application.)
   3: internal -> org.apache.maven.archetypes:maven-archetype-plugin (An archetype
    which contains a sample Maven plugin.)
   4: internal -> org.apache.maven.archetypes:maven-archetype-plugin-site (An arche
    type which contains a sample Maven plugin site.
输入数字3 即可输入groupid和项目ip 生成插件项目
eclipse生成插件项目(新建maven项目选择第三项)

使用eclipse项目时 会出现两个编译异常 mojo-descriptor和helpmojo 这里可以忽略检查这个异常 不影响插件的编译和安装

点击 Permanebtly mark goal helpmojo in pom.xml 即可忽略
maven希望你将插件项目名称命名为 插件名称-maven-plugin 最终 就可以通过插件别名来运行该插件 比如我生成的插件pom。xml如下
  <groupId>cn.et.plugin</groupId>
  <artifactId>gen-maven-plugin</artifactId>
  <version>0.0.1-SNAPSHOT</version>
  <packaging>maven-plugin</packaging>
实现插件的代码 必须添加类 实现AbstractMojo该抽象类 实现execute方法 该方法就是插件运行时执行的方法
这个插件用于统计当前项目中各类型文件的个数
package cn.et.plugin.gen_maven_plugin;


import java.io.File;
import java.util.HashMap;
import java.util.Map;


/*
 * Copyright 2001-2005 The Apache Software Foundation.
 *
 * Licensed under the Apache License, Version 2.0 (the "License");
 * you may not use this file except in compliance with the License.
 * You may obtain a copy of the License at
 *
 *      http://www.apache.org/licenses/LICENSE-2.0
 *
 * Unless required by applicable law or agreed to in writing, software
 * distributed under the License is distributed on an "AS IS" BASIS,
 * WITHOUT WARRANTIES OR CONDITIONS OF ANY KIND, either express or implied.
 * See the License for the specific language governing permissions and
 * limitations under the License.
 */


import org.apache.maven.plugin.AbstractMojo;
import org.apache.maven.plugin.MojoExecutionException;
import org.apache.maven.plugins.annotations.LifecyclePhase;
import org.apache.maven.plugins.annotations.Mojo;
import org.apache.maven.plugins.annotations.Parameter;

/**
 * 统计总共拥有的文件分类总个数
 *   txt 5个
 *   java 6个
 *   jpg  10个
 @Mojo 注解中的name表示插件运行时的类
  如果一个插件项目中存在两个类都是继承AbstractMojo 每个类需要一个mojo name
  运行时  mvn 插件名称:mojoname 就可以运行到具体的类
 * @author jiaozi
 *
 */
@Mojo( name = "filecount", defaultPhase = LifecyclePhase.PROCESS_SOURCES )
public class MyMojo
    extends AbstractMojo
{
    /**
       @Parameter表示引用该插件时可以传递参数
     * defaultValue可以是el表达式  使用javabean的特性
     * 注解中给定了 api路径 指定可以使用的表达式内容
     * <a href="/ref/current/maven-core/apidocs/org/apache/maven/plugin/PluginParameterExpressionEvaluator.html">

     */
    @Parameter( defaultValue = "${project.build.directory}", property = "outputDir", required = true )
    private File outputDirectory;
    /**
     * 获取执行该插件的当前项目的根目录
     */
    @Parameter(defaultValue="${basedir}",property="filecount.baseDir")
    private String baseDir;
    /**
     * 键 后缀名
     * 值 该文件的个数
     */
    private Map<String,Integer> fileCount=new HashMap<String,Integer>();
    /**
     * 递归统计每个目录下的不同后缀文件个数
     * @param curFile 当前目录
     */
    public void calc(File curFile){
    File[] listFile=curFile.listFiles();
    for(File myFile:listFile){
    if(myFile.isDirectory()){
    calc(myFile);
    }else{
    String fileName=myFile.getName();
    String fileKey="no_suffix";
    if(fileName.indexOf(".")>0){
    fileKey=fileName.split("\.")[1];
    }
    int count=1;
if(fileCount.containsKey(fileKey)){
count=fileCount.get(fileName)+1;
}
fileCount.put(fileName,count);
    }
    }
    }
    /**
     * 必须实现execute方法表示插件入口
     */
    public void execute()
        throws MojoExecutionException
    {
        File baseFile=new File(baseDir);
        calc(baseFile);
        for(Map.Entry<String,Integer> me:fileCount.entrySet()){
        System.out.println("文件"+me.getKey()+" 个数:"+me.getValue());
        }
    }
}
开发完成后 mvn clean install 自动打包 安装到本地的maven库
创建一个maven jar项目 测试该插件是否能正常运行
执行 mvn groupid:artifactId:version:mojoname 就可以运行当前插件 版本号可以省略(这里aaa必须是个maven项目)
   C:Usersjiaoziaaa>mvn cn.et.plugin:gen-maven-plugin:0.0.1-SNAPSHOT:filecount
[INFO] Scanning for projects...
[INFO]
[INFO] ------------------------------------------------------------------------
[INFO] Building aaa 1.0-SNAPSHOT
[INFO] ------------------------------------------------------------------------
[INFO]
[INFO] --- gen-maven-plugin:0.0.1-SNAPSHOT:filecount (default-cli) @ aaa ---
文件App.java 个数:1
文件AppTest.java 个数:1
文件pom.xml 个数:1
将当前groupid添加到maven的settings.xml中可以通过简写运行
配置如下 添加
 <pluginGroups>
<pluginGroup>cn.et.plugin</pluginGroup>
  </pluginGroups>
这里gen是插件 gen-maven-plugin的第一个单词 满足maven规范 所以可以直接简写了
 C:Usersjiaoziaaa>mvn gen:filecount
[INFO] Scanning for projects...
[INFO]
[INFO] ------------------------------------------------------------------------
[INFO] Building aaa 1.0-SNAPSHOT
[INFO] ------------------------------------------------------------------------
[INFO]
[INFO] --- gen-maven-plugin:0.0.1-SNAPSHOT:filecount (default-cli) @ aaa ---
文件App.java 个数:1
文件AppTest.java 个数:1
文件pom.xml 个数:1
其他的maven项目中引用该插件 在pom。xml中配置如下
<build>
    <plugins>
      <plugin>
        <groupId>cn.et.plugin</groupId>
  <artifactId>gen-maven-plugin</artifactId>
  <version>0.0.1-SNAPSHOT</version>
        <configuration>
          <baseDir>C:/app/jiaozi/oradata/orcl</baseDir>  <!--这里配置的参数就是前面mojo类中的属性 带有@Parameter注解的参数-->
        </configuration>
      </plugin>
    </plugins>
</build>
如果希望maven插件在maven执行的生命周期里自动执行 比如编译的时候自动执行
<build>
		<plugins>
			<plugin>
				<groupId>cn.et.plugin</groupId>
				 <artifactId>gen-maven-plugin</artifactId>
				 <version>0.0.1-SNAPSHOT</version>
				 <executions>
				 	<execution>
				 		<phase>compile</phase> #在哪个周期执行
				 		<goals>
				 			<goal>filecount</goal> #执行插件的pojoname
				 		</goals>
				 	</execution>
				 </executions>
			</plugin>

		</plugins>
</build>插件的生命周期 :
default生命周期是最核心的,它包含了构建项目时真正需要执行的所有步骤。
validate
initialize
generate-sources
process-sources
generate-resources
process-resources    :复制和处理资源文件到target目录,准备打包;
compile    :编译项目的源代码;
process-classes
generate-test-sources
process-test-sources
generate-test-resources
process-test-resources
test-compile    :编译测试源代码;
process-test-classes
test    :运行测试代码;
prepare-package
package    :打包成jar或者war或者其他格式的分发包;
pre-integration-test
integration-test
post-integration-test
verify
install    :将打好的包安装到本地仓库,供其他项目使用;
deploy    :将打好的包安装到远程仓库,供其他项目使用;
这里插件参数的el表达式用法可以查看http://maven.apache.org/ref/3.5.0/apidocs/index.html

五 上传插件到私服
这里参考了http://www.cnblogs.com/luotaoyeah/p/3817465.html
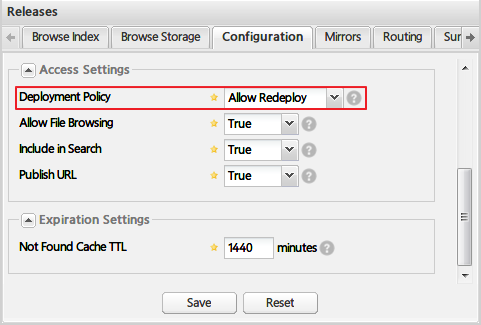
1 . 修改私服中仓库的部署策略
Release版本的项目应该发布到Releases仓库中,对应的,Snapshot版本应该发布到Snapshots仓库中。Maven根据pom.xml文件中版本号<version>节点的属性是否包含-SNAPSHOT,来判断该项目是否是snapshot版本。如果是snapshot版本,在执行mvn deploy部署命令时,maven会自动将项目发布到Snapshots仓库。要发布项目,首先需要将Releases仓库和Snapshots仓库的“Deployment Policy”设置为“Allow Redeploy”:
2 . 配置项目的部署仓库
在pom.xml中分别对Release版本和Snapshot版本配置部署仓库,其中id唯一,url分别对应私服中Releases和Snapshots仓库的Repository Path:

<uniqueVersion>表示是否为Snapshot版本分配一个包含时间戳的构建号,效果如下:

    <distributionManagement>
        <snapshotRepository>
            <id>user-snapshot</id>
            <name>User Porject Snapshot</name>
            <url>http://localhost:8081/nexus/content/repositories/snapshots/</url>
            <uniqueVersion>true</uniqueVersion>
        </snapshotRepository>
        <repository>
            <id>user-release</id>
            <name>User Porject Release</name>
            <url>http://localhost:8081/nexus/content/repositories/releases/</url>
        </repository>
    </distributionManagement>
3 . 启用Deployment用户
Nexus默认有三个用户,其中Deployment用户用于部署项目:
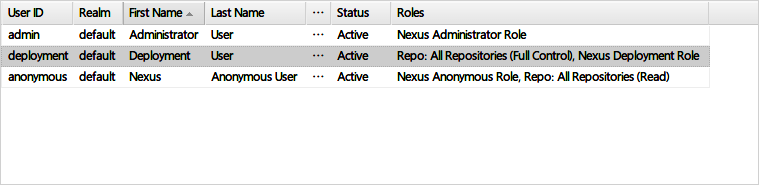
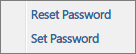
Deployment用户默认密码为deployment123,右键菜单可修改或重置密码:
在settings.xml中分别为上面配置的部署仓库配置server,其中id需要分别对应上面的部署仓库id:
    <servers>
        <server>
            <id>user-release</id>
            <username>deployment</username>
            <password>deployment123</password>
        </server>
        <server>
            <id>user-snapshot</id>
            <username>deployment</username>
            <password>deployment123</password>
        </server>
        …
    </servers>
4 . 发布项目
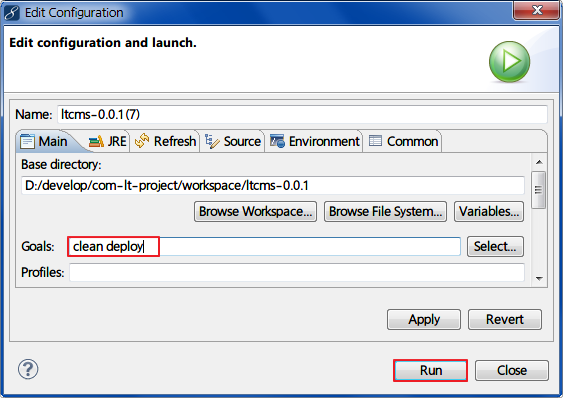
右键pom.xml - Run As - 2 Maven build...
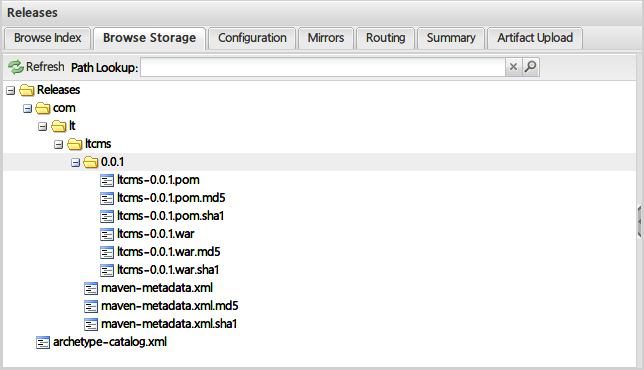
发布成功后,在私服的仓库中就能看到了:
5 . 在Nexus中手动上传项目构件
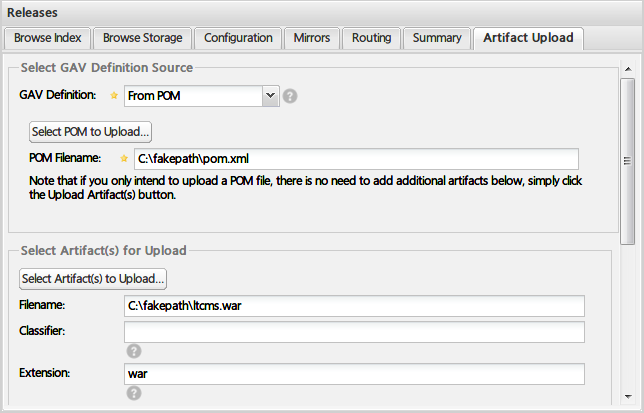
在Nexus仓库的Artifact Upload选项卡中,填写相关信息,可以手动的方式上传项目构件:
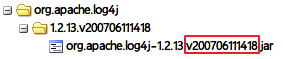
我这里通过私服 查看 开发版本库的结果 正常上传
Index of /repositories/snapshots/cn/et/plugin
| Name | Last Modified | Size | Description |
|---|---|---|---|
| Parent Directory | |||
| gen-maven-plugin/ | Wed May 10 01:42:19 CST 2017 | ||
| maven-metadata.xml | Wed May 10 01:42:19 CST 2017 | 251 | |
| maven-metadata.xml.md5 | Wed May 10 01:42:19 CST 2017 | 32 | |
| maven-metadata.xml.sha1 | Wed May 10 01:42:19 CST 2017 | 40 |
maven项目多之间存在两种关系 继承和聚合
继承关系一般用于定义统一的项目版本号 以及依赖的jar
<project xmlns="http://maven.apache.org/POM/4.0.0" xmlns:xsi="http://www.w3.org/2001/XMLSchema-instance" xsi:schemaLocation="http://maven.apache.org/POM/4.0.0 http://maven.apache.org/xsd/maven-4.0.0.xsd">
  <modelVersion>4.0.0</modelVersion>
  <groupId>cn.et</groupId>
  <artifactId>myshop-parent</artifactId>
  <version>0.0.1-SNAPSHOT</version>
  <packaging>pom</packaging>
  <!-- 开发项目时 所有用到的项目框架版本号 尽量 统一使用 父项目管理版本号-->
  <properties>
  	<spring-webmvc-version>4.3.10.RELEASE</spring-webmvc-version>
  	<mybatis-spring-version>1.3.1</mybatis-spring-version>
  	<mybatis-version>3.4.5</mybatis-version>
  </properties>
  <!-- 在父项目中 使用了 dependencyManagement 添加的依赖 所有子项目都不需要在添加版本号-->
  <dependencyManagement>
  	<dependencies>
  		<dependency>
		  <groupId>org.springframework</groupId>
		  <artifactId>spring-webmvc</artifactId>
		  <version>${spring-webmvc-version}</version>
		</dependency>

		<dependency>
		  <groupId>org.mybatis</groupId>
		  <artifactId>mybatis</artifactId>
		  <version>${mybatis-version}</version>
		</dependency>

		<dependency>
		  <groupId>org.mybatis</groupId>
		  <artifactId>mybatis-spring</artifactId>
		  <version>${mybatis-spring-version}</version>
		</dependency>

  	</dependencies>

  </dependencyManagement>
  <build>
  	<pluginManagement>


  	</pluginManagement>
  </build>


</project>
聚合关系一般是将 不同的模块聚合成一个项目
1 通过maven项目创建pom的父项目
2 通过maven module创建jar项目 父项目选择pom项目
3 实际的web项目 选择war项目 项目之间互相依赖 添加对方的dependencies
比如:
