# encoding=utf-8
import tensorflow as tf
import numpy as np
from tensorflow.examples.tutorials.mnist import input_data

mnist = input_data.read_data_sets('MNIST_data', one_hot=True)


def weight_variable(shape):
    initial = tf.truncated_normal(shape, stddev=0.1)  # 定义Weights的函数  使用tf.trunncated_normal  标准值为0.1
    return tf.Variable(initial)


def bias_variable(shape):                             #定义biase函数,tf.constant
    initial = tf.constant(0.1, shape=shape)
    return tf.Variable(initial)


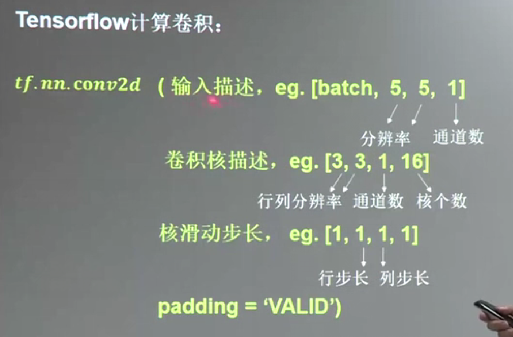
def conv2d(x, W):                                       #定义卷积层
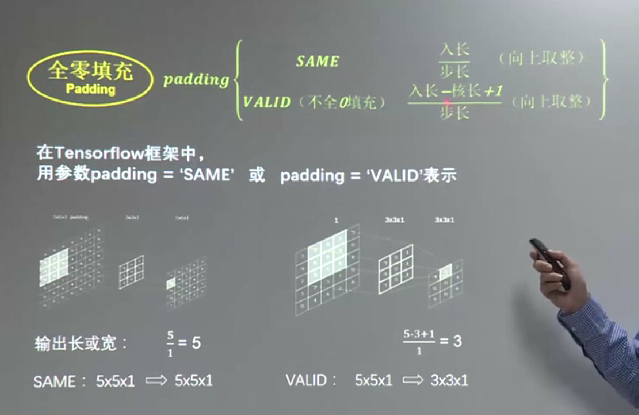
    return tf.nn.conv2d(x, W, strides=[1, 1, 1, 1], padding='SAME')  # strides第0位和第3为一定为1,剩下的是卷积的横向和纵向步长


def max_pool_2x2(x):                       #定义最大化池化层pooling
    return tf.nn.max_pool(x, ksize=[1, 2, 2, 1], strides=[1, 2, 2, 1], padding='SAME')  # 参数同上,ksize是池化块的大小


x = tf.placeholder(tf.float32,[None,784])
y_ = tf.placeholder(tf.float32, [None, 10])

# 图像转化为一个四维张量,第一个参数代表样本数量,-1表示不定,第二三参数代表图像尺寸,最后一个参数代表图像通道数
#x_image = tf.reshape(x, [-1, 28, 28, 1])

# 第一层卷积加池化
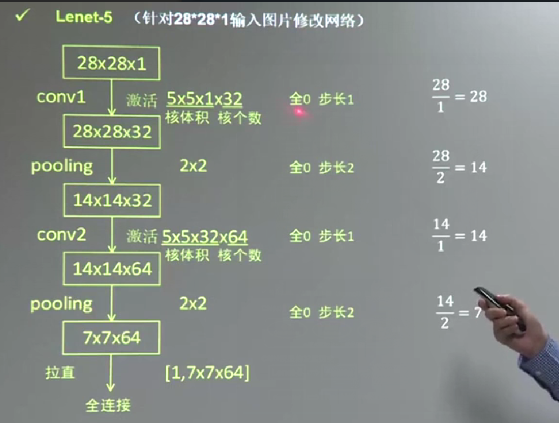
w_conv1 = weight_variable([5, 5, 1, 32])  # 第一二参数值得卷积核尺寸大小,即patch,第三个参数是图像通道数,第四个参数是卷积核的数目,代表会出现多少个卷积特征 其实就是输出的尺寸
b_conv1 = bias_variable([32])

h_conv1 = tf.nn.relu(conv2d(x, w_conv1) + b_conv1)
h_pool1 = max_pool_2x2(h_conv1)

# 第二层卷积加池化
w_conv2 = weight_variable([5, 5, 32, 64])  # 多通道卷积,卷积出64个特征
b_conv2 = bias_variable([64])

h_conv2 = tf.nn.relu(conv2d(h_pool1, w_conv2) + b_conv2)
h_pool2 = max_pool_2x2(h_conv2)

# 原图像尺寸28*28,第一轮图像缩小为14*14,共有32张,第二轮后图像缩小为7*7,共有64张

w_fc1 = weight_variable([7 * 7 * 64, 1024])
b_fc1 = bias_variable([1024])

h_pool2_flat = tf.reshape(h_pool2, [-1, 7 * 7 * 64])  # 展开,第一个参数为样本数量,-1未知
f_fc1 = tf.nn.relu(tf.matmul(h_pool2_flat, w_fc1) + b_fc1)

# dropout操作,减少过拟合
keep_prob = tf.placeholder(tf.float32)
h_fc1_drop = tf.nn.dropout(f_fc1, keep_prob)

w_fc2 = weight_variable([1024, 10])
b_fc2 = bias_variable([10])
y_conv = tf.nn.softmax(tf.matmul(h_fc1_drop, w_fc2) + b_fc2)

cross_entropy = -tf.reduce_sum(y_ * tf.log(y_conv))  # 定义交叉熵为loss函数
train_step = tf.train.AdamOptimizer(1e-4).minimize(cross_entropy)  # 调用优化器优化

def compute_accuracy(v_xs,v_ys):

    correct_prediction=tf.equal(tf.argmax(y_conv,1),tf.argmax(v_ys,1))#比较你预测的y和真实y那个1所在的位置。是一个布尔型量
    print(sess.run(correct_prediction))

    accuracy=tf.reduce_mean(tf.cast(correct_prediction,tf.float32))#转化为float32格式然后求其正确率  tf.cast转换格式
    result=sess.run(accuracy,feed_dict={x:v_xs,y_:v_ys})
    return result


sess = tf.InteractiveSession()
sess.run(tf.initialize_all_variables())
for i in range(2000):
    batch = mnist.train.next_batch(50)
    if i % 100 == 0:
        train_accuracy = compute_accuracy(batch[0], batch[1])
        print(sess.run(train_accuracy))
   # train_step.run(feed_dict={x: batch[0], y_: batch[1], keep_prob: 0.5})
print(sess.run(compute_accuracy(mnist.test.images[0:50], mnist.test.labels[0:50])))

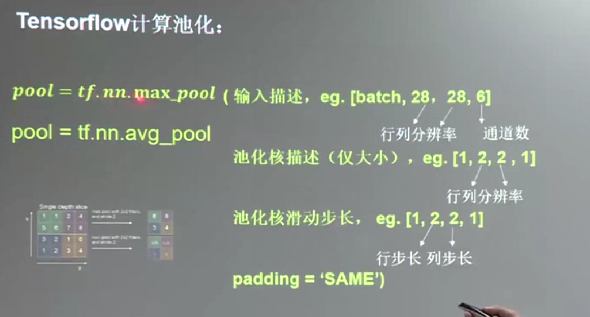
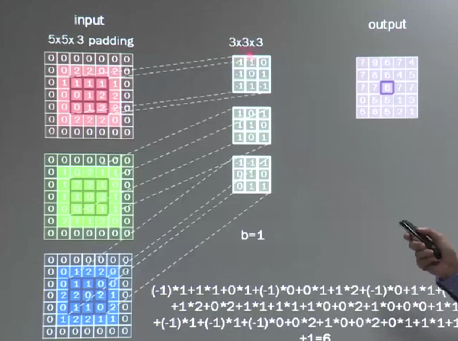
计算输出特征通道数,针对polling方式
