框架可以简化操作,提高代码利用率,jdbc方式还有很多欠缺,因此不是框架所需要的,于是springjpa挺身而出,它不仅有springjdbc的集成性,而且具有简化sql,实现分页等等比较常用的功能。
其实现类似于spring jdbc,下面粘出其配置文件
<?xml version="1.0" encoding="UTF-8"?>

<beans xmlns="http://www.springframework.org/schema/beans"
       xmlns:xsi="http://www.w3.org/2001/XMLSchema-instance"
       xmlns:context="http://www.springframework.org/schema/context"
       xmlns:tx="http://www.springframework.org/schema/tx"
       xmlns:jpa="http://www.springframework.org/schema/data/jpa"
       xsi:schemaLocation="http://www.springframework.org/schema/beans http://www.springframework.org/schema/beans/spring-beans.xsd
		http://www.springframework.org/schema/data/jpa http://www.springframework.org/schema/data/jpa/spring-jpa-1.3.xsd
		http://www.springframework.org/schema/tx http://www.springframework.org/schema/tx/spring-tx-4.0.xsd
		http://www.springframework.org/schema/context http://www.springframework.org/schema/context/spring-context-4.0.xsd">

    <!--1 配置数据源-->
    <bean id="dataSource" class="org.springframework.jdbc.datasource.DriverManagerDataSource">
        <property name="driverClassName" value="com.mysql.jdbc.Driver"/>
        <property name="username" value="root"/>
        <property name="password" value=""/>
        <property name="url" value="jdbc:mysql:///db_name"/>
    </bean>

    <!--2 配置EntityManagerFactory-->
    <bean id="entityManagerFactory" class="org.springframework.orm.jpa.LocalContainerEntityManagerFactoryBean">
        <property name="dataSource" ref="dataSource"/>
        <property name="jpaVendorAdapter">
            <bean class="org.springframework.orm.jpa.vendor.HibernateJpaVendorAdapter"/>
        </property>
        <property name="packagesToScan" value="com.imooc"/>

        <property name="jpaProperties">
            <props>
                <prop key="hibernate.ejb.naming_strategy">org.hibernate.cfg.ImprovedNamingStrategy</prop>
                <prop key="hibernate.dialect">org.hibernate.dialect.MySQL5InnoDBDialect</prop>
                <prop key="hibernate.show_sql">true</prop>
                <prop key="hibernate.format_sql">true</prop>
                <prop key="hibernate.hbm2ddl.auto">update</prop>
            </props>
        </property>

    </bean>

    <!--3 配置事务管理器-->
    <bean id="transactionManager" class="org.springframework.orm.jpa.JpaTransactionManager">
        <property name="entityManagerFactory" ref="entityManagerFactory"/>
    </bean>

    <!--4 配置支持注解的事务-->
    <tx:annotation-driven transaction-manager="transactionManager"/>

    <!--5 配置spring data-->
    <jpa:repositories base-package="com.repository" entity-manager-factory-ref="entityManagerFactory"/>

    <context:component-scan base-package="com.beans"/>

</beans>
此时需要特殊注意的是注释1以及注释5: 自动扫描找到repositories;扫描bean类
会自动扫描到@Entity(doamin)和@RepositoryDefinition()注解
描到@Entity: 这个实体类会对应数据库一个表(此表没有回自动创建,spring jpa的独特功能),作为bean使用
@Entity
public class Student{

    private Integer id;

    private String name;

    private Integer age;

    @GeneratedValue
    @Id
    public Integer getId() {
        return id;
    }

    public void setId(Integer id) {
        this.id = id;
    }

    @Column(length = 20)
    public String getName() {
        return name;
    }

    public void setName(String name) {
        this.name = name;
    }

    public Integer getAge() {
        return age;
    }

    public void setAge(Integer age) {
        this.age = age;
    }
}
描到@RepositoryDefinition(如果不用RepositoryDefinition直接继承Repository类也可以实现),使用这个注解可以实现StudentRepositor接口(接口名自己定义,一般取bean的名字),使用时只有继承这个接口就可以。而且这个类还可以实现sql的封装下面列出我写的几个实现
@RepositoryDefinition(domainClass = Student.class, idClass = Integer.class)
public interface StudentRepository {

    public Student findByName(String name);

    // where name like ?% and age <?
    public List<Student> findByNameStartingWithAndAgeLessThan(String name, Integer age);

    // where name like %? and age <?
    public List<Student> findByNameEndingWithAndAgeLessThan(String name, Integer age);

    // where name in (?,?....) or age <?
    public List<Student> findByNameInOrAgeLessThan(List<String> names, Integer age);

    // where name in (?,?....) and age <?
    public List<Student> findByNameInAndAgeLessThan(List<String> names, Integer age);

    @Query("select o from Student o where id=(select max(id) from Student t1)")
    public Student getEmployeeByMaxId();

    @Query("select o from Student o where o.name=?1 and o.age=?2")
    public List<Student> queryParams1(String name, Integer age);

    @Query("select o from Student o where o.name=:name and o.age=:age")
    public List<Student> queryParams2(@Param("name")String name, @Param("age")Integer age);

    @Query("select o from Student o where o.name like %?1%")
    public List<Student> queryLike1(String name);

    @Query("select o from Student o where o.name like %:name%")
    public List<Student> queryLike2(@Param("name")String name);

    @Query(nativeQuery = true, value = "select count(1) from Student")
    public long getCount();
  //Modifying实现了事物
    @Modifying
    @Query("update Student o set o.age = :age where o.id = :id")
    public void update(@Param("id")Integer id, @Param("age")Integer age);

}
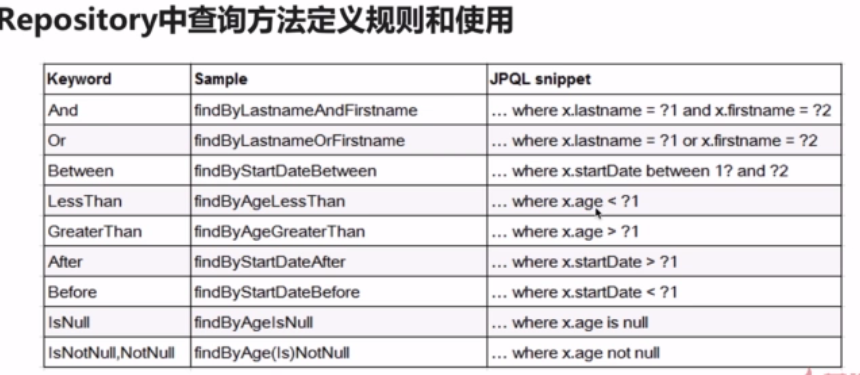
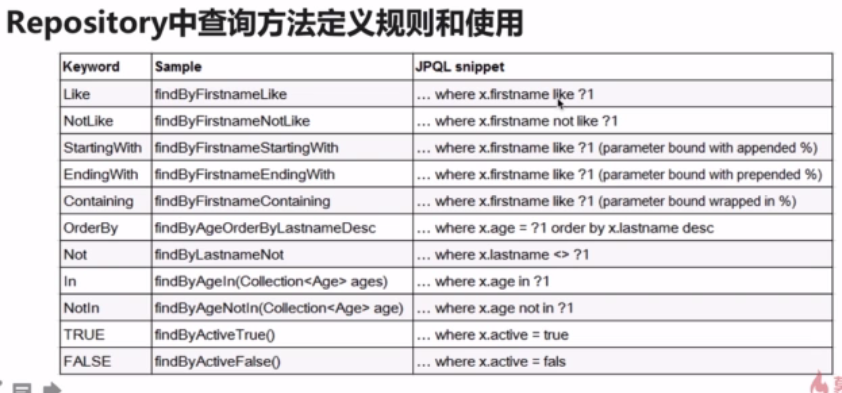
repository查询方法定义规则和使用
接下来只要实现EmployeeRepository接口就可以愉快的curd了。
//根据上下文获取
ctx = new ClassPathXmlApplicationContext("beans-new.xml");
studentRepository = ctx.getBean(StudentRepository.class);

Student Student = studentRepository.findByName("zhangsan");
System.out.println("id:" + Student.getId()
		+ " , name:" + Student.getName()
		+ " ,age:" + Student.getAge());
}
那么如何实现分页呢?很简单,只要StudentRepository类继承PagingAndSorting接口就行了
public interface StudentRepository extends PagingAndSortingRepository{}
操作注意Pageable类需要引入jpa包中的Pageable类
//根据上下文获取
ctx = new ClassPathXmlApplicationContext("beans-new.xml");
studentRepository = ctx.getBean(StudentRepository.class);
Pageable pageable = new PageRequest( 0,5 );
Student Student = studentRepository.findAll(pageable );