昨天一个同事问我DataGridView单元格合并的问题,一开始按照我的设想是算出两个单元格的Rectangle,
然后直接使用e.Graphics.FillRectangle(backColorBrush, rectangle)从新填充下背景色,然后在绘制显示的字符,当然这种想法是行不通的。
下面是我写的一个单元格合并的方法,其实这种方法并不好,只是看上去是把单元格合并了,其实实际DataGridView的列结构是没有发生变化,而且这种重绘的方法并不能编辑,所以我还是建议如果遇到合并单元格的问题,最好还是不要用DataGridView
如有不懂得可以加(源码分享群 81582487)一起交流
代码部分:
using System;
using System.Collections.Generic;
using System.ComponentModel;
using System.Data;
using System.Drawing;
using System.Linq;
using System.Text;
using System.Windows.Forms;
namespace WindowsDemo
{
public partial class DataGridViewMergeCell : Form
{
public DataGridViewMergeCell()
{
InitializeComponent();
Init();
}
private void DataGridViewMergeCell_Load(object sender, EventArgs e)
{
int rowIndex = view.Rows.Add();
DataGridViewRow row = view.Rows[rowIndex];
row.Cells["value"].Value = "bbb";
row.Cells["name"].Value = "aaa";
row.Cells["price"].Value = "bbb";
row.Cells["num"].Value = "aaa";
rowIndex = view.Rows.Add();
row = view.Rows[rowIndex];
row.Cells["value"].Value = "bbb";
row.Cells["name"].Value = "aaa";
row.Cells["price"].Value = "bbb";
row.Cells["num"].Value = "aaa";
rowIndex = view.Rows.Add();
row = view.Rows[rowIndex];
row.Cells["value"].Value = "bbb";
row.Cells["name"].Value = "aaa";
row.Cells["price"].Value = "bbb";
row.Cells["num"].Value = "aaa";
rowIndex = view.Rows.Add();
row = view.Rows[rowIndex];
row.Cells["value"].Value = "bbb";
row.Cells["name"].Value = "aaa";
row.Cells["price"].Value = "bbb";
row.Cells["num"].Value = "aaa";
rowIndex = view.Rows.Add();
row = view.Rows[rowIndex];
row.Cells["value"].Value = "bbb";
row.Cells["name"].Value = "aaa";
row.Cells["price"].Value = "bbb";
row.Cells["num"].Value = "aaa";
}
private void Init() {
view.AllowUserToAddRows = false;
// view.ColumnHeadersVisible = false;
view.AutoGenerateColumns = false;
view.AutoSize = false;
//view.RowHeadersVisible = false;
//view.GridColor = System.Drawing.ColorTranslator.FromHtml("#F8F8FF");
view.ColumnHeadersHeight = 60;
view.AutoSizeColumnsMode = DataGridViewAutoSizeColumnsMode.None;
view.ColumnHeadersBorderStyle = DataGridViewHeaderBorderStyle.Single;
view.Columns.Add(new DataGridViewTextBoxColumn() { Name = "name", HeaderText = "主体", Width = 90, ReadOnly = true,Visible = true, AutoSizeMode = DataGridViewAutoSizeColumnMode.None });
view.Columns.Add(new DataGridViewTextBoxColumn() { Name = "value", HeaderText = "", Width = 80, ReadOnly = true, Visible = true, AutoSizeMode = DataGridViewAutoSizeColumnMode.None });
view.Columns.Add(new DataGridViewTextBoxColumn() { Name = "price", HeaderText = "主体", Width = 90, ReadOnly = true, Visible = true, AutoSizeMode = DataGridViewAutoSizeColumnMode.None });
view.Columns.Add(new DataGridViewTextBoxColumn() { Name = "num", HeaderText = "", Width = 80, ReadOnly = true, Visible = true, AutoSizeMode = DataGridViewAutoSizeColumnMode.Fill });
view.CellPainting -= new DataGridViewCellPaintingEventHandler(view_CellPainting);
view.CellPainting += new DataGridViewCellPaintingEventHandler(view_CellPainting);
}
void view_CellPainting(object sender, DataGridViewCellPaintingEventArgs e)
{
if (e.RowIndex == 1 && e.ColumnIndex == 1)
{
Brush backColorBrush = new SolidBrush(e.CellStyle.BackColor);
e.Paint(e.CellBounds, DataGridViewPaintParts.All);
e.Graphics.FillRectangle(backColorBrush, e.CellBounds);
//绘制背景色(被选中状态下)
if (e.State == (DataGridViewElementStates.Displayed | DataGridViewElementStates.Selected | DataGridViewElementStates.Visible))
e.PaintBackground(e.CellBounds, false);
//分别绘制原文本和现在改变颜色的文本
Brush fontColor = new SolidBrush(e.CellStyle.ForeColor);
// e.Graphics.DrawString("", this.Font, fontColor, e.CellBounds, StringFormat.GenericDefault);
//绘制下边框线
Brush gridBrush = new SolidBrush(this.view.GridColor);
Pen pen = new Pen(gridBrush);
e.Graphics.DrawLine(pen, e.CellBounds.Left, e.CellBounds.Bottom - 1,
e.CellBounds.Right - 1, e.CellBounds.Bottom - 1);
DataGridViewCell cell = this.view.Rows[e.RowIndex].Cells[e.ColumnIndex];
cell.Value = "";
e.Handled = true;
}
if (e.RowIndex == 1 && e.ColumnIndex == 2)
{
Brush backColorBrush = new SolidBrush(e.CellStyle.BackColor);
e.Paint(e.CellBounds, DataGridViewPaintParts.All);
e.Graphics.FillRectangle(backColorBrush, e.CellBounds);
//绘制背景色(被选中状态下)
if (e.State == (DataGridViewElementStates.Displayed | DataGridViewElementStates.Selected | DataGridViewElementStates.Visible))
e.PaintBackground(e.CellBounds, true);
//分别绘制原文本和现在改变颜色的文本
Brush fontColor = new SolidBrush(e.CellStyle.ForeColor);
// e.Graphics.DrawString("", this.Font, fontColor, e.CellBounds, StringFormat.GenericDefault);
//绘制下边框线
Brush gridBrush = new SolidBrush(this.view.GridColor);
Pen pen = new Pen(gridBrush);
e.Graphics.DrawLine(pen, e.CellBounds.Left, e.CellBounds.Bottom - 1,
e.CellBounds.Right - 1, e.CellBounds.Bottom - 1);
//绘制右边框线
e.Graphics.DrawLine(pen, e.CellBounds.Right - 1,
e.CellBounds.Top, e.CellBounds.Right - 1,
e.CellBounds.Bottom - 1);
DataGridViewCell cell = this.view.Rows[e.RowIndex].Cells[e.ColumnIndex];
cell.Value = "";
cell.Tag = "ccccc";
Rectangle rectanle = e.CellBounds;
rectanle.X = rectanle.X -15;
rectanle.Y = rectanle.Y + 5;
//这里需要注意的是我没有用 e.Graphics 原因是这个只能在当前单元格绘制
//而我是在DataGridView上面建一个绘图Graphics对象这样就可以看上去在两个单元格里面绘制了
//这里你们也可以自己试一试
Graphics graphics = this.view.CreateGraphics();
//分别绘制原文本和现在改变颜色的文本
graphics.DrawString("cccc", this.Font, new SolidBrush(e.CellStyle.ForeColor), rectanle, StringFormat.GenericDefault);
e.Handled = true;
}
}
}
}
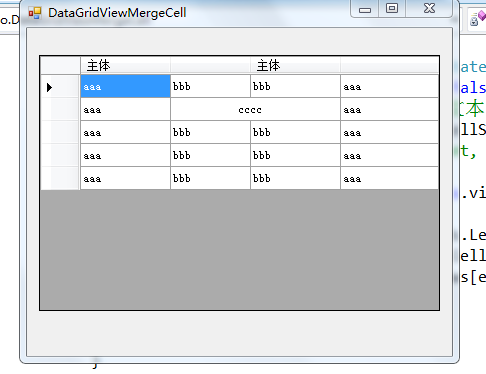
以下是我的建议,这种虽然看上去是把问题解决了,其实这样有很多缺点,一个是不能编辑,而且这个还有个bug就是点击左边的边框的时候会把左边的文字隐藏起来,我试了很多方法都没解决,这个应该是编辑的时候背景颜色给遮住了。
一下推荐一个可以合并单元格的第三方控件(DevExpress.XtraGrid.v7.3.dll),这个现在我也没有研究,不过后续我会研究的,也会在写篇文章的
