spring-boot是一个快速构建环境的一套框架,其设计理念是尽可能的减少xml的配置,用来简化新Spring应用的初始搭建以及开发过程。该框架使用了特定的方式来进行配置,从而使开发人员不再需要定义样板化的配置。
废话不多说,关于spring-boot是什么具体请百度。
官网:http://projects.spring.io/spring-boot
1. spring-boot是一个mavan项目,所以其使用的jar包全部是通过maven管理,当然,使用maven也是非常方便的。
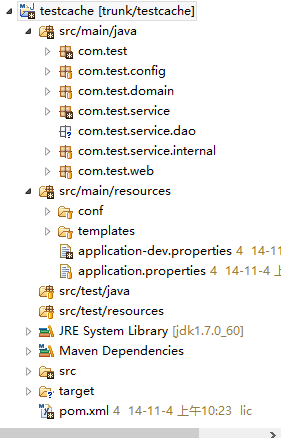
首先上我的项目目录结构:
spring-boot打出来的包是一个可执行jar包的状态,使用的是内置的tomcat服务器,所以不需要将项目转成EJB项目。
2.设置pom.xml文件
使用过maven的朋友都知道,maven通过pom文件的依赖来进行管理jar包,所以核心也是这个pom.xml文件


<?xml version="1.0" encoding="UTF-8"?>
<project xmlns="http://maven.apache.org/POM/4.0.0" xmlns:xsi="http://www.w3.org/2001/XMLSchema-instance"
    xsi:schemaLocation="http://maven.apache.org/POM/4.0.0 http://maven.apache.org/xsd/maven-4.0.0.xsd">
    <modelVersion>4.0.0</modelVersion>
    <groupId>com.lclc.boot</groupId>
    <artifactId>boot-cache</artifactId>
    <version>0.0.1-SNAPSHOT</version>
    <!-- Inherit defaults from Spring Boot -->
    <parent>
        <!--Spring Boot基础父类,其中包含了很多必要的jar包,如果不使用父类,则需要自己去依赖这些jars -->
        <groupId>org.springframework.boot</groupId>
        <artifactId>spring-boot-starter-parent</artifactId>
        <version>1.1.3.RELEASE</version>
    </parent>
    <dependencies>
        <!-- web程序的启动项依赖,通过此依赖可引入内嵌的tomcat等web必须的jars -->
        <dependency>
            <groupId>org.springframework.boot</groupId>
            <artifactId>spring-boot-starter-web</artifactId>
        </dependency>
        <!-- spring-data-jpa程序的启动项依赖,底层为hibernate实现,若不使用此框架则可以依赖其他的orm框架 -->
        <dependency>
            <groupId>org.springframework.boot</groupId>
            <artifactId>spring-boot-starter-data-jpa</artifactId>
        </dependency>
        <!-- thymeleaf程序的启动项依赖,spring-boot对thymeleaf模板引擎支持最好,建议模板引擎使用此框架 -->
        <dependency>
            <groupId>org.springframework.boot</groupId>
            <artifactId>spring-boot-starter-thymeleaf</artifactId>
        </dependency>
        <!-- mysql依赖,使用spring-data-jpa需要指定一个数据库方言,用于连接数据库,即mysql驱动 -->
        <dependency>
            <groupId>mysql</groupId>
            <artifactId>mysql-connector-java</artifactId>
        </dependency>
    </dependencies>

    <dependencyManagement>
        <dependencies>
        </dependencies>
    </dependencyManagement>

    <build>
        <plugins>
            <!-- 通过maven构建的插件  -->
            <plugin>
                <groupId>org.springframework.boot</groupId>
                <artifactId>spring-boot-maven-plugin</artifactId>
            </plugin>
        </plugins>
    </build>
    <!-- 仓库,使用spring-boot RELEASE版本需要这些 -->
    <repositories>
        <repository>
            <id>spring-snapshots</id>
            <url>http://repo.spring.io/snapshot</url>
            <snapshots>
                <enabled>true</enabled>
            </snapshots>
        </repository>
        <repository>
            <id>spring-milestones</id>
            <url>http://repo.spring.io/milestone</url>
        </repository>
    </repositories>
    <pluginRepositories>
        <pluginRepository>
            <id>spring-snapshots</id>
            <url>http://repo.spring.io/snapshot</url>
        </pluginRepository>
        <pluginRepository>
            <id>spring-milestones</id>
            <url>http://repo.spring.io/milestone</url>
        </pluginRepository>
    </pluginRepositories>

</project>
3.使用maven update 下载jar包
4.由于我们使用了thymeleaf引擎,此引擎需要一个templates文件夹来存放静态页面,以便进行跳转前台。
所以在resources下添加此文件夹并加入一个默认的页面index.html(注:此文件夹下必须有一个html页面,否则thymeleaf启动项会抛异常)
5.编写application.properties
这个配置文件是对spring-boot的一些配置,spring-boot通过此文件对集成在其中的一些框架进行配置。由我的项目结构可以看出,我有两个application.properties文件:
application.properties:主配置文件,spring-boot直接读取这个文件。注:配置文件必须放在resources下,即放在项目根目录下。
application-dev.properties:开发环境配置文件,这个是我的开发环境的配置文件,为了简化一些开发,所以需要一些与部署环境不同的配置,比如页面缓存之类的。此文件通过application.properties的spring.profiles.active属性进行配置读取。
上两个文件的代码:
首先是application.properties:
# PROFILES
## dev | prod | test
spring.profiles.active=dev

# EMBEDDED SERVER CONFIGURATION (ServerProperties)
server.port=8080
server.session-timeout=30
server.context-path=
server.tomcat.max-threads=0
server.tomcat.uri-encoding=UTF-8

# THYMELEAF (ThymeleafAutoConfiguration)
spring.thymeleaf.encoding=UTF-8

# DataSource
spring.datasource.initialize=false
spring.datasource.test-on-borrow=false
spring.datasource.test-on-return=false
spring.datasource.test-while-idle=true
spring.datasource.max-wait-millis=30000
spring.datasource.validation-query=SELECT 1
spring.datasource.time-between-eviction-runs-millis=20000
spring.datasource.min-evictable-idle-time-millis=28700
然后是application-dev.properties:
#page cache
spring.thymeleaf.cache=false

# DATASOURCE
spring.datasource.platform=mysql
spring.datasource.url=jdbc:mysql://localhost/test_development?useUnicode=true&characterEncoding=utf-8&zeroDateTimeBehavior=convertToNull&transformedBitIsBoolean=true
spring.datasource.username=root
spring.datasource.password=123456
spring.datasource.driverClassName=com.mysql.jdbc.Driver
spring.datasource.max-active=5
spring.datasource.max-idle=2
spring.datasource.min-idle=1
spring.datasource.initial-size=1
spring.datasource.initialize=false

# JPA
spring.jpa.hibernate.ddl-auto=update
spring.jpa.show-sql=true
spring.jpa.properties.hibernate.format_sql=false
spring.jpa.properties.hibernate.use_sql_comments=true
6.于是配置便完成了,现在看怎么使用spring-boot进行启动一个web程序
spring-boot打的包是一个可执行的jar包,当然也可以打成可执行的war包,启动服务器就完全不需要像以前一样弄一个tomcat进行启动了,完全是java application进行启动
通过一个启动文件的main方法
@Configuration
@EnableAutoConfiguration
@ComponentScan
public class Application {
    public static void main(String[] args){
        SpringApplication springApplication = new SpringApplication (Application.class);
        springApplication.run (args);
    }
}
先来解释下这个文件中的代码。
@Configuration:标注此文件为一个配置项
@EnableAutoConfiguration:使用自动配置
@ComponentScan:可扫描的
SpringApplication:启动管理器。
注意,由于是使用注解的方式,所以需要配置扫描路径,spring-boot使用的是启动管理器所在的包为根扫描路径。会扫描其所在的包和子包,所以需要将Application.java放在跟路径下,即com.test这个包里。
7.然后执行一下就好了。