Virtual Networking Computing (VNC) is a Kind of remote sharing system that makes it possible to take control of any other computer connected to internet. Keyboard and mouse clicks can easily transmit from one computer to another. It helps administrator and technical staff to manage their servers and desktops without being to the same location physically.
VNC is an open source application created in late 1990′s. It is independent and is compatible with Windows and Unix/Linux. Means a normal Windows based user can interact with Linux based system without any hazel.
To use VNC you must have TCP/IP connection and VNC viewer client to connect to a computer running VNC server component. The server transmits a duplicate display of a remote computer to the viewer.
This artilce demonstrates how to install VNC Server using TightVNC a much enhanced version of a older VNC program, with GNOME Desktop remote access on RHEL, CentOS andFedora systems.
Step 1: Installing GNOME Desktop
If you’ve installed a minimal version of Operating System, which gives only a command-line interface not GUI. Then you need to install a GUI (Graphical User Interface) withGNOME Desktop. The GNOME desktop provides a lightweight desktop environment that works very well on remote VNC desktops.
[root@tecmint ~]# yum groupinstall "X Window System" "Desktop"
Step 2: Installing TightVNC Server
TightVNC a remote desktop control software that enables us to connect to remote desktops. To install, use the following yum command as shown below.
[root@tecmint ~]# yum -y install tigervnc-server xorg-x11-fonts-Type1
Step 3: Create a Normal VNC User
Create a normal user, that will be used to connect to remote desktop. For example, I’ve used “tecmint” as a user, you can choose your own username.
[root@tecmint ~]# useradd tecmint
[root@tecmint ~]# passwd tecmint
Changing password for user tecmint.
New password:
Retype new password:
passwd: all authentication tokens updated successfully.
Step 4: Set VNC Password for User
Create a new password for newly created user. Login to the user (su – tecmint) and run ‘vncpasswd‘ to set the VNC password for the user.
Note : This password is for accessing VNC remote desktop, and the password we created instep 3 is for accessing SSH.
[root@tecmint ~]# su - tecmint
[tecmint@tecmint ~]$ vncpasswd
Password:
Verify:
The above command ask you to supply password twice and creates “.vnc” directory under user’s home directory with passwd file inside it. You can check the password file is created, by using following command.
# ls -l /home/tecmint/.vnc
-rw------- 1 tecmint tecmint 8 Jul 14 21:33 passwd
Now exit from user login and return to root user login.
[tecmint@tecmint ~]$ exit
exit
Step 5: Create VNC Xstartup Script
Create the xstartup script as root user. This can be created by starting the VNC server.
[root@tecmint ~]# /etc/init.d/vncserver start

Starting VNC server: 1:tecmint
New 'tecmint.com:1 (tecmint)' desktop is tecmint.com:1

Starting applications specified in /home/tecmint/.vnc/xstartup
Log file is /home/tecmint/.vnc/tecmint.com:1.log
						 [  OK  ]
Next, check whether xstartup script is created under (tecmint) user’s home directory, do “ls -l” command.
[root@tecmint ~]# ls -l /home/tecmint/.vnc/
-rw-------. 1 tecmint tecmint    8 Jul 15 12:27 passwd
-rwxr-xr-x. 1 tecmint tecmint  654 Oct 11  2012 xstartup
Once, it created, set a desktop resolution in xstartup file. For this, you must stop running VNC service.
[root@tecmint ~]# /etc/init.d/vncserver stop

Shutting down VNC server: 1:tecmint              [  OK  ]
Step 6: Setting Xstarup Resolution
Open file “/etc/sysconfig/vncservers” file your choice of editor. Here I’m using “nano” editor. Create new VNC Session for “tecmint” with below command. where “-geomerty” is used define desktop resolution.
[root@tecmint ~]# nano /etc/sysconfig/vncservers
And add following lines to it at the bottom of file. Save and close it.
## Single User ##
VNCSERVERS="1:tecmint"
VNCSERVERARGS[1]="-geometry 1280x1024"
If you’re dealing with multiple users, first create a vncpasswd for all user’s as described above in step 4, and then add those user’s to the VNCSERVERS line and add aVNCSERVERARGS[x] entry as shown below. Where ‘x‘ is the ID number.
## Multiple Users ##
VNCSERVERS="2:ravi 3:navin 4:avishek"
VNCSERVERARGS[2]="-geometry 1280x1024"
VNCSERVERARGS[3]="-geometry 1280x1024"
VNCSERVERARGS[4]="-geometry 1280x1024"
Step 7: Starting TightVNC Server
After making all changes, run the following command to start again the VNC server. Before starting VNC session to “tecmint” user, let me give you a small intro about Port Numbers and ID‘s. By Default VNC runs on Port 5900 and ID:0 (which is for root user). In our scenario I’ve created tecmint, ravi, navin and avishek. So, the ports andid’s are used by these users as follows
User's		Port's		ID's
5900		root		:0
5901		tecmint		:1
5902		ravi		:2
5903		navin		:3
5904		avishek		:4
So, here user “tecmint” will get port 5901 and id as :1 and so on. If you’ve created another user say (user5) then he will get port 5905 and id:5 and so on for each user you creates.
[root@tecmint ~]# /etc/init.d/vncserver start

Starting VNC server: 1:tecmint
New 'tecmint.com:1 (tecmint)' desktop is tecmint.com:1

Starting applications specified in /home/tecmint/.vnc/xstartup
Log file is /home/tecmint/.vnc/tecmint.com:1.log

2:ravi
New 'tecmint.com:2 (ravi)' desktop is tecmint.com:2

Starting applications specified in /home/ravi/.vnc/xstartup
Log file is /home/ravi/.vnc/tecmint.com:2.log

3:navin
New 'tecmint.com:3 (navin)' desktop is tecmint.com:3

Starting applications specified in /home/navin/.vnc/xstartup
Log file is /home/navin/.vnc/tecmint.com:3.log

4:avishek
New 'tecmint.com:4 (avishek)' desktop is tecmint.com:4

Starting applications specified in /home/avishek/.vnc/xstartup
Log file is /home/avishek/.vnc/tecmint.com:4.log

                                                           [  OK  ]
Step 8: Open VNC Ports on Firewall
Open port on iptables, say for user (tecmint) at 5901.
[root@tecmint ~]# iptables -A INPUT -m state --state NEW -m tcp -p tcp --dport 5901 -j ACCEPT
For multiple users, ravi, navin and avishek. I open ports 5902, 5903 and 5904respectively.
[root@tecmint ~]# iptables -I INPUT 5 -m state --state NEW -m tcp -p tcp -m multiport --dports 5902:5904 -j ACCEPT
Restart Iptables service.
[root@tecmint ~]# service iptables save
[root@tecmint ~]# service iptables restart
Step 9: Download VNC Client
Now go to your Windows or Linux machine and download VNC Viewer client and install in your system to access the desktop.
Step 10: Connect to Remote Desktop Using Client
After you installed the VNC Viewer client, open it you’ll get similar to below screen. Enter VNC Server IP address along with VNC ID (i.e 1) for user tecmint.
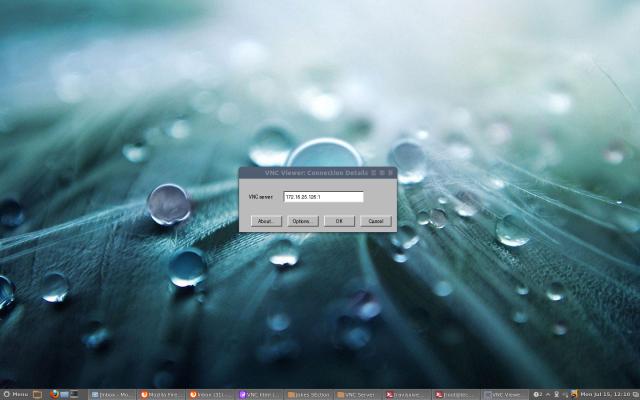
Enter VNC Server IP Address
Enter password that we created with “vncpasswd” command.
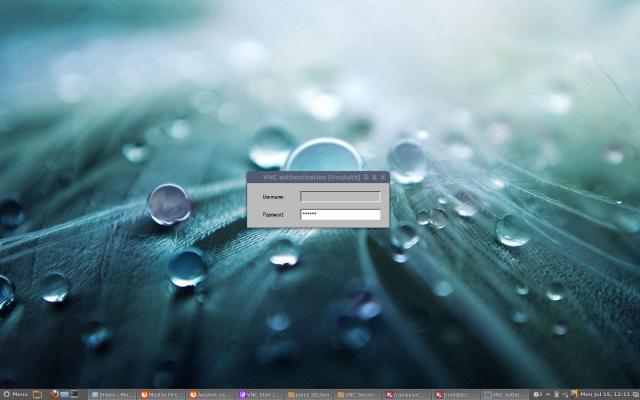
Enter VNC User Password
That’s it, you connected to your Remote Desktop.
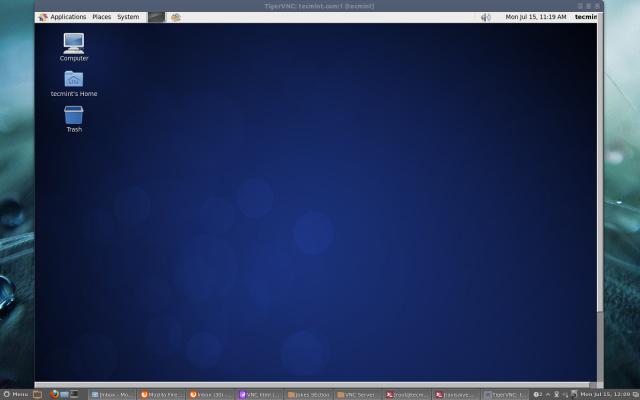
VNC Remote Desktop
Read Also : Access VNC Desktop from Web Browser
from:http://www.tecmint.com/install-tightvnc-remote-desktop/