接上一篇,这里使用 sequelize 来连接 postgresql 数据库
1、安装 sequelize,数据库驱动 pg
yarn add sequelize sequelize-typescript pg reflect-metadata
2、新建配置文件夹 conf 及 配置文件 db.conf.ts
/**
 * @name: 数据库配置
 * @param : undefined
 * @return : undefined
 */
export const dbConfig = {
  host: 'localhost',
  database: 'demo',
  dialect: 'postgres',
  username: 'postgres',
  password: '123456'
}
3、连接数据库,新建文件夹 db 及 配置文件 db.ts
 1 /*
 2  * @Description: 数据库连接类
 3  */
 4
 5 import * as path from 'path'
 6 import { Sequelize } from 'sequelize-typescript'
 7 import { dbConfig } from '../conf/db.conf'
 8
 9 class DbContext {
10   private sequelize: Sequelize
11   constructor() {
12     const { host, database, dialect, username, password } = dbConfig
13     this.sequelize = new Sequelize({
14       host: host,
15       database: database,
16       dialect: dialect,
17       username: username,
18       password: password,
19       define: {
20         timestamps: true,  //开启时间戳 create_at delete_at update_at
21         paranoid: true,    //开启假删除
22         underscored: true, //下划线
23         charset: 'utf8',
24         freezeTableName: true //固定表名为单数  默认表名是xxxs
25       },
26       pool: {
27         max: 10,
28         min: 0,
29         acquire: 30000,
30         idle: 10000
31       },
32       timezone: '+08:00',
33       modelPaths: [path.resolve(__dirname, `./models`)]
34     })
35     this.sequelize.sync()
36   }
37   init(): Boolean {
38     return !!this.sequelize
39   }
40   getInstance(): Sequelize {
41     return this.sequelize
42   }
43   isInit(): Boolean {
44     return !!this.sequelize
45   }
46 }
47 export const dbContext = new DbContext()
4、数据库实体类,新建文件夹 models 及文件 user.ts
 1 /*
 2  * @Description: 数据库实体类
 3  */
 4
 5 import { Table, Column, Model } from 'sequelize-typescript'
 6
 7 @Table({
 8   tableName: 'user'
 9 })
10 export default class User extends Model<User> {
11   @Column({
12     comment: '自增ID',
13     primaryKey: true,
14     autoIncrement: true,
15   })
16   id: number
17
18   @Column
19   username: string
20
21   @Column
22   password: string
23 }
5、编写业务逻辑接口,在 src 目录下新建文件夹 dao、service,在 dao 目录下新建 UserDao.ts 及子目录 impl,在 service 目录下新建 UserService.ts 及子目录 impl
 1 /*
 2  * @Description: 数据库表操作基础接口 UserDao.ts
 3  */
 4 export interface UserDao {
 5   /**
 6    * @name: 查询
 7    * @param :
 8    * @return : Array<User>
 9    */
10   findAll();
11   /**
12    * @name: 查询
13    * @param :
14    * @return : Array<User>
15    */
16   findByName(username:string);
17   /**
18    * @name: 新增
19    * @param : undefined
20    * @return : undefined
21    */
22   create(entity:UserInfo);
23
24   /**
25    * @name: 删除
26    * @param : undefined
27    * @return : undefined
28    */
29   delete(id:number);
30 }
31 export interface UserInfo {
32   username:string;
33   password:string;
34 }
 1 /*
 2  * @Description: service接口  UserService.ts
 3  * @version:
 4  */
 5
 6 export interface UserService{
 7   /**
 8    * @name: 查询
 9    * @param : undefined
10    * @return : undefined
11    */
12   findAll();
13
14   /**
15    * @name: 查询
16    * @param : undefined
17    * @return : undefined
18    */
19   findByName(username:string);
20
21   /**
22    * @name: 新增
23    * @param : undefined
24    * @return : undefined
25    */
26   create(username:string,password:string);
27
28   /**
29    * @name: 删除
30    * @param : undefined
31    * @return : undefined
32    */
33   delete(id:String);
34 }
6、编写业务逻辑实现类 UserDaoImpl.ts、UserServiceImpl.ts
 1 /*
 2  * @Description: 数据库表操作基础实现类 UserDaoImpl.ts
 3  */
 4
 5 import { dbContext } from '../../db/db'
 6 import { UserDao, UserInfo } from '../UserDao';
 7 import User from '../../db/models/user';
 8
 9 export class UserDaoImpl implements UserDao{
10   constructor(){
11     dbContext.init();
12   }
13   /**
14    * @name: 查询
15    * @param : undefined
16    * @return : undefined
17    */
18   public async findAll(){
19     const results = await User.findAll({
20       raw: true
21     })
22     return results;
23   }
24
25    /**
26    * @name: 查询
27    * @param : undefined
28    * @return : undefined
29    */
30   public async findByName(username:string){
31     const results = await User.findOne({
32       where:{
33         username:username
34       }
35     })
36     return results;
37   }
38
39   /**
40    * @name: 新增
41    * @param : entity
42    * @return : undefined
43    */
44   public async create(entity:UserInfo) {
45     const results = await User.create(entity)
46     return results;
47   }
48
49    /**
50    * @name: 删除
51    * @param : undefined
52    * @return : undefined
53    */
54   public async delete(id: number) {
55     const results = await User.destroy({
56       where:{
57           id:{
58             $eq:id
59           }
60       }
61     });
62     return results;
63   }
64 }
 1 import { UserService } from "../UserService";
 2 import { UserDao } from "../../dao/UserDao";
 3 import { UserDaoImpl } from "../../dao/impl/UserDaoImpl";
 4
 5 /*
 6  * @Description: service实现类 UserServiceImpl.ts
 7  */
 8
 9
10 export class UserServiceImpl implements UserService{
11   private userDao:UserDao;
12
13   constructor(){
14     this.userDao = new UserDaoImpl();
15   }
16
17   /**
18    * @name: 查询
19    * @param : undefined
20    * @return : undefined
21    */
22   public findAll() {
23     return this.userDao.findAll();
24   }
25   /**
26    * @name: 查询
27    * @param : undefined
28    * @return : undefined
29    */
30   public findByName(username:string) {
31     return this.userDao.findByName(username);
32   }
33   /**
34    * @name: 新增
35    * @param : entity
36    * @return : undefined
37    */
38   public create(username: string, password: string) {
39     return this.userDao.create({username,password});
40   }
41
42   /**
43    * @name: 删除
44    * @param : undefined
45    * @return : undefined
46    */
47   public delete(id: String) {
48     return this.userDao.delete(~~id);
49   }
50
51 }
7、查看成果,修改 router/index.ts
 1 /*
 2  * @Description: 后台路由组件
 3  * @version: 0.1.0
 4  */
 5 import * as Router from 'koa-router';
 6 import { UserInfo } from '../dao/UserDao';
 7 import { UserService } from '../service/UserService';
 8 import { UserServiceImpl } from '../service/impl/UserServiceImpl';
 9
10 const router = new Router();
11 const userService:UserService =new UserServiceImpl();
12
13 router.get('/*', async (ctx) => {
14   ctx.body = await userService.findAll();
15 })
16
17 export { router }
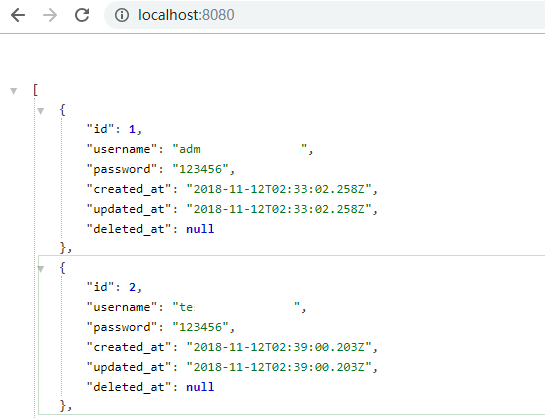
8、浏览器输入 http://localhost:8080

至此连接数据库完成
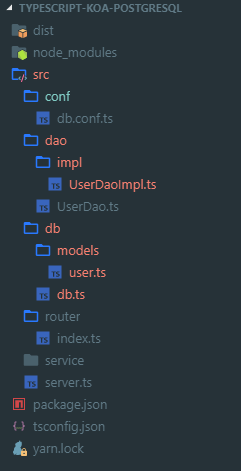
目录结构:
