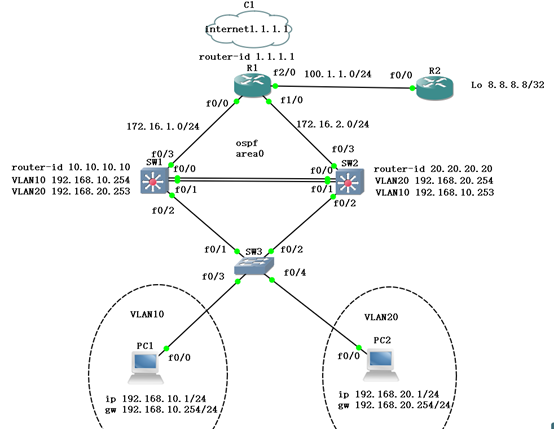
实验要求:
一、设备管理
1、依据图中拓扑,为不同设备定义主机名。
SW#conf t
SW(config)#hostname SW1
SW1(config)#
2、全局关闭域名解析。
SW1(config)#no ip domain lookup
3、Console 和 VTY 线路下关闭线路超时并开启输出同步。
SW1(config)#line console 0
SW1(config-line)#logging synchronous 关闭输出同步
SW1(config-line)#exec-timeout 0 0 关闭发呆超时
4、为实现安全登录,要求创建本地用户名 PingingLab,密码 CCIE,并将其调用到 console 和 vty 线路下;要求设置特权密码 CISCO,并要求加密存储。
SW1(config)#username PingingLab secret CCIE
SW1(config)#line console 0
SW1(config-line)#login local
SW1(config-line)#exit
SW1(config)#line vty 0 15
SW1(config-line)#login local
SW1(config-line)#exit
SW1(config)#enable secret CISCO
5、所有交换机管理 vlan 为 vlan1,所在网段为 192.168.1.0/24,其中 SW1 的管理 IP 为 192.168.1.1/24,SW2 为 192.168.1.2/24,SW3 为 192.168.1.3/24,要求能够实现远程管理。
SW1#conf t
SW1(config)#int vlan 1
SW1(config-if)#no shutdown
SW1(config-if)#ip address 192.168.1.1 255.255.255.0
SW1(config-if)#end
SW1#show ip int brief

SW2#conf t
SW2(config)#int vlan 1
SW2(config-if)#no shutdown
SW2(config-if)#ip address 192.168.1.2 255.255.255.0
SW2(config-if)#end
SW3#conf t
SW3(config)#int vlan 1
SW3(config-if)#no shutdown
SW3(config-if)#ip address 192.168.1.3 255.255.255.0
SW3(config-if)#end
SW3#ping 192.168.1.1

SW3#ping 192.168.1.2

二、交换技术
1、Trunk 技术
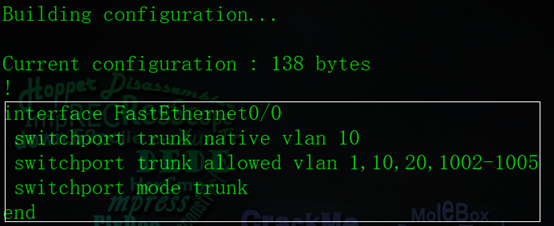
①所有交换机之间强制启用 Trunk,并采用 802.1Q 进行封装。
②全局 native vlan 定义为 vlan 10。
③要求 Trunk 上只允许 VLAN1、10、20 的数据通过。
SW1#conf t
SW1(config)#interface range f0/0 - 2
SW1(config-if-range)#switchport mode trunk
SW1(config-if-range)#switchport trunk encapsulation dot1q
SW1(config-if-range)#switchport trunk native vlan 10
SW1(config-if-range)#switchport trunk allowed vlan 1,1002-1005,10,20
SW1(config-if-range)#end
SW1#show interfaces trunk查看trunk信息

SW1#show run int f0/0 窃配置
SW2#conf t
SW2(config)#int range f0/0 - 2
SW2(config-if-range)#switchport trunk native vlan 10
SW2(config-if-range)# switchport trunk allowed vlan 1,10,20,1002-1005
SW2(config-if-range)# switchport mode trunk
SW2(config-if-range)#end
SW2#show run int f0/0

SW3#conf t
SW3(config)#int range f0/1 ,f0/2
SW3(config-if-range)# switchport trunk native vlan 10
SW3(config-if-range)# switchport trunk allowed vlan 1,10,20,1002-1005
SW3(config-if-range)# switchport mode trunk
SW3(config-if-range)#end
SW3#show run int f0/1

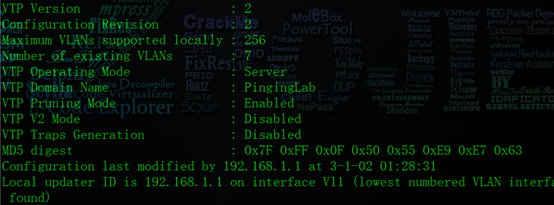
2、VTP 技术
①SW1 为 Server,其他交换机为 Client。
②VTP 管理域为 PingingLab,密码为 cisco。
③全局开启 VTP 修剪。
④在 SW1 上创建 VLAN10/20,并要求全局同步。
⑤将不同用户接口放入相应的 VLAN 中。
定义vtp服务器与客户端
SW1#vlan database
SW1(vlan)#vtp domain PingingLab
SW1(vlan)#vtp password cisco
SW1(vlan)#vtp server
SW1(vlan)#vtp pruning
SW1(vlan)#exit
SW2#vlan database
SW2(vlan)#vtp domain PingingLab
SW2(vlan)#vtp password cisco
SW2(vlan)#vtp client
SW2(vlan)#exit
SW3#vlan database
SW3(vlan)#vtp domain PingingLab
SW3(vlan)#vtp password cisco
SW3(vlan)#vtp client
SW3(vlan)#exit
SW1#show vtp status查看vtp信息
创建VLAN
SW1#vlan database
SW1(vlan)#vlan 10

SW1(vlan)#vlan 20
SW1(vlan)#exit
SW2#show vlan-switch brief查看VLAN信息
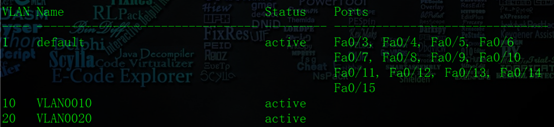
SW3#show vlan-switch brief
SW3#conf t
SW3(config)#int f0/3
SW3(config-if)#switchport mode access
SW3(config-if)#switchport access vlan 10
SW3(config-if)#exit
SW3(config)#int f0/4
SW3(config-if)#switchport mode access
SW3(config-if)#switchport access vlan 20
SW3(config-if)#end
SW3#show vlan-switch br

3、STP 技术
①部署 PVST,要求 SW1 为 VLAN10 的 Root,VLAN20 的 Secondary,SW2为 VLAN20 的 Root,VLAN10 的 Secondary,实现负载均衡。
②开启 Portfast,加速用户接入网络接口。
③开启 Uplinkfast,加速直连链路收敛。
④开启 Backbonefast,加速骨干链路收敛。
SW1#conf t
SW1(config)#spanning-tree vlan 10 root primary
SW1(config)#spanning-tree vlan 20 root secondary
SW2#conf t
SW2(config)#spanning-tree vlan 10 root secondary
SW2(config)#spanning-tree vlan 20 root primary
SW3#show spanning-tree vlan 10 bri

SW3#show spanning-tree vlan 20 bri

SW3#conf t
SW3(config)#int range f0/3 - 4
SW3(config-if-range)#spanning-tree portfast用于access口
SW3(config-if-range)#exit
SW3(config)#spanning-tree uplinkfast
SW3(config)#spanning-tree backbonefast
4、L3 Swithing 技术
①SW1 作为 VLAN10 的主网关,VLAN20 的备网关,其中 VLAN10 地址为192.168.10.254/24,VLAN20 地址为 192.168.20.253/24;SW2 作为 VLAN20的主网关,VLAN10 的备网关,其中 VLAN10 地址为 192.168.10.253/24,VLAN20 地址为 192.168.20.254/24。
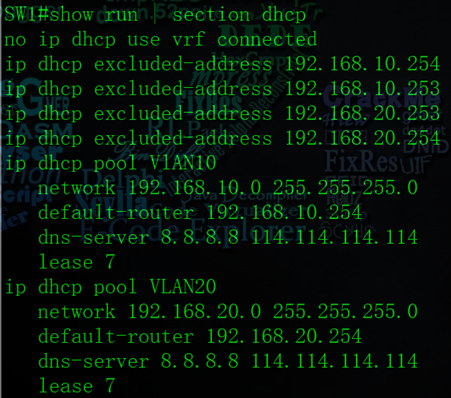
②在 SW1 和 SW2 上同时部署 DHCP 服务,方便不同 VLAN 的主机接入网络,其中主 DNS 为 8.8.8.8,备用 DNS 为 114.114.114.114。
③在三层交换机上开启三层路由功能,并要求 VLAN 间主机能够相互通信。
SW1#conf t
SW1(config)#interface vlan 10
SW1(config-if)#ip address 192.168.10.254 255.255.255.0
SW1(config-if)#exit
SW1(config)#interface vlan 20
SW1(config-if)#ip address 192.168.20.253 255.255.255.0
SW1#show ip int br

SW2(config)#int vlan 10
SW2(config-if)#ip address 192.168.10.253 255.255.255.0
SW2(config-if)#exit
SW2(config)#int vlan 20
SW2(config-if)#ip address 192.168.20.254 255.255.255.0
SW2(config-if)#exit
SW2#show ip int br

SW1# conf t
SW1(config)#ip dhcp pool VlAN10
SW1(dhcp-config)#network 192.168.10.0 /24
SW1(dhcp-config)#default-router 192.168.10.254
SW1(dhcp-config)#dns-server 8.8.8.8 114.114.114.114
SW1(dhcp-config)#lease 7
SW1(dhcp-config)#exit
SW1(config)#ip dhcp pool VLAN20
SW1(dhcp-config)#network 192.168.20.0 /24
SW1(dhcp-config)#default-router 192.168.20.254
SW1(dhcp-config)#dns-server 8.8.8.8 114.114.114.114
SW1(dhcp-config)#lease 7
SW1(dhcp-config)#exit
SW1(config)#ip dhcp excluded-address 192.168.10.254
SW1(config)#ip dhcp excluded-address 192.168.10.253
SW1(config)#ip dhcp excluded-address 192.168.20.253
SW1(config)#ip dhcp excluded-address 192.168.20.254
SW1(config)#exit
SW1#show run | section dhcp看配置后贴配置用
SW2#conf t
SW2(config)#ip dhcp excluded-address 192.168.10.254
SW2(config)#ip dhcp excluded-address 192.168.10.253
SW2(config)#ip dhcp excluded-address 192.168.20.253
SW2(config)#ip dhcp excluded-address 192.168.20.254
SW2(config)#ip dhcp pool VlAN10
SW2(dhcp-config)# network 192.168.10.0 255.255.255.0
SW2(dhcp-config)# default-router 192.168.10.254
SW2(dhcp-config)# dns-server 8.8.8.8 114.114.114.114
SW2(dhcp-config)# lease 7
SW2(dhcp-config)#ip dhcp pool VLAN20
SW2(dhcp-config)# network 192.168.20.0 255.255.255.0
SW2(dhcp-config)# default-router 192.168.20.254
SW2(dhcp-config)# dns-server 8.8.8.8 114.114.114.114
SW2(dhcp-config)# lease 7
SW2(dhcp-config)#end
SW2#show run | section dhcp

SW1#conf t
SW1(config)#ip routing
SW2#conf t
SW2(config)#ip routing
PC1#conf t
PC1(config)#int f0/0
PC1(config-if)#no shut
PC1(config-if)#ip address dhcp

PC1(config-if)#end
PC2#conf t
PC2(config)#int f0/0
PC2(config-if)#no shut
PC2(config-if)#ip address dhcp

PC2(config-if)#end
PC1#ping 192.168.10.254

PC1#ping 192.168.20.254

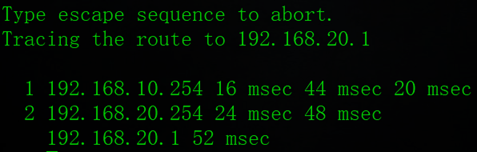
PC1#traceroute 192.168.20.1
5、Etherchannel 技术
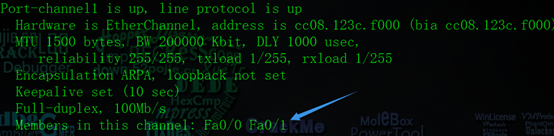
①为实现链路冗余并提供网络带宽,要求在汇聚层交换机之间部署 L2Etherchannel 技术。
SW1(config)#int range f0/0 , f0/1
SW1(config-if-range)#channel-group 1 mode on
SW1(config-if-range)#end
SW2(config)#int range f0/0 ,f0/1
SW2(config-if-range)#channel-group 1 mode on
SW2(config-if-range)#end
SW2#show interfaces trunk

SW2#show ip int br

SW2#show interfaces port-channel 1
6、Port-Security 技术
①为实现用户接入安全,要求在所有用户接入接口启用端口安全技术。
②开启地址学习,并定义最大 MAC 数为 1。
③定义用户违反规则为 shutdown 模式,并要求在 30s 后自动恢复。
三、路由技术
1、在三层交换机 SW1、SW2 和 R1 上部署动态路由协议 OSPF,并通告到骨干
区域中。
2、在边缘路由器 R1 上部署默认路由,用于访问互联网。
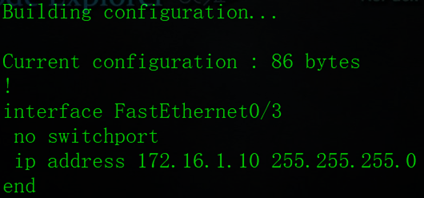
SW1#conf t
SW1(config)#int f0/3
SW1(config-if)#no switchport
SW1(config-if)#no shutdown
SW1(config-if)#ip address 172.16.1.10 255.255.255.0
SW1(config-if)#end
SW1#show run int f0/3 brief
R1#conf t
R1(config)#int f0/0
R1(config-if)#no shut
R1(config-if)#ip add 172.16.1.1 255.255.255.0
R1(config-if)#int f1/0
R1(config-if)#no shut
R1(config-if)#ip add 172.16.2.1 255.255.255.0
R1(config-if)#end
SW2#conf t
SW2(config)#int f0/3
SW2(config-if)#no switchport
SW2(config-if)#no shut
SW2(config-if)#ip address 172.16.2.20 255.255.255.0
SW2(config-if)#do ping 172.16.2.1加do可以不用返回特权直接ping

R1#ping 172.16.1.10

R1#conf t
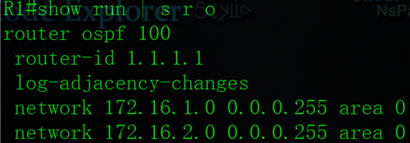
R1(config)#router ospf 100
R1(config-router)#router-id 1.1.1.1
R1(config-router)#network 172.16.1.0 0.0.0.255 area 0
R1(config-router)#network 172.16.2.0 0.0.0.255 area 0
R1(config-router)#end
R1#show run | s r o
SW1#conf t
SW1(config)#router ospf 100
SW1(config-router)#router-id 10.10.10.10
SW1(config-router)#network 172.16.1.0 0.0.0.255 area 0
SW1(config-router)#network 192.168.10.0 0.0.0.255 area 0
SW1(config-router)#network 192.168.20.0 0.0.0.255 area 0
SW1(config-router)#end
SW1#show run | s r o
SW2#conf t
SW2(config)#router ospf 100
SW2(config-router)#router-id 20.20.20.20
SW2(config-router)#network 172.16.2.0 0.0.0.255 area 0
SW2(config-router)#network 192.168.10.0 0.0.0.255 area 0
SW2(config-router)#network 192.168.20.0 0.0.0.255 area 0
R1#show ip ospf neighbor

R1#show ip route ospf

R1#ping 192.168.10.1

R1#ping 192.168.20.1
PC1#ping 172.16.1.1

PC1#ping 172.16.2.1
R1#conf t
R1(config)#int lo1
R1(config-if)#ip address 1.1.1.1 255.255.255.255
R1(config-if)#exit
R1(config)#router ospf 100
R1(config-router)#network 1.1.1.1 0.0.0.0 area 0
R1(config-router)#end
PC1#ping 1.1.1.1
PC1对二层交换机进行网管
SW3#conf t
SW3(config)#enable secret cisco
SW3(config)#no ip routing
SW3(config)#ip default-gateway 192.168.1.1
PC1#ping 192.168.1.1
PC1#ping 192.168.1.3
SW3(config)#username PingingLab password cisco
SW3(config)#line vty 0 15
SW3(config-line)#login local
SW3(config-line)#end
PC1#telnet 192.168.1.3

SW3>enable
SW3#show ip int bri查看接口是否down掉,进行排错
R1对二层交换机进行网管
SW1#conf t
SW1(config)#router ospf 100
SW1(config-router)#network 192.168.1.0 0.0.0.255 area 0
SW1(config-router)#end
SW2#conf t
SW2(config)#router ospf 100
SW2(config-router)#network 192.168.1.0 0.0.0.255 area 0
SW2(config-router)#end
四、安全策略
1、要求只允许管理员地址 192.168.10.1/24 能够远程访问边缘路由器 R1。
2、为实现内网主机访问互联网,要求部署 PAT 技术。