1.前言
第三节介绍了Netty的一些基本概念,此节介绍Netty的第一个概念Bootstrap——启动类。Netty中服务端和客户端的启动类是不一样的,这个不要搞错了,类都在bootstrap包下。之后的所有章节都是基于目前最新版本的Netty 4.1.24.Final版本。
2.结构详解
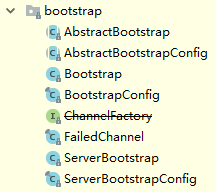
bootstrap中主要就两个内容:bootstrap和config。channelFactory被移动到其他地方了,这个接口已经废弃。乱入了一个FailedChannel,这里暂且不管。
config给人带来歧义,让人误以为是我们去设置这个config,bootstrap读取这个设置进行初始化。实际上相反,这个类的作用是暴露我们对bootstrap的设置,仅仅起到展示配置的作用,并不是对其设置。设置相关内容还是需要直接操作bootstrap。所以config也不进行介绍,只剩下AbstractBootstrap、Bootstrap和ServerBootstrap了,本章主要介绍这三个内容。
2.1 AbstractBootstrap
这个是所有启动类的抽象父类,包含了一系列的基础内容。
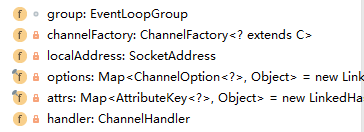
这是该类的基础字段:
group:线程池
channelFactory: 创建channel的工厂类
localAddress:本地地址
options: socket及其它的一些属性设置
attrs:附加属性设置
handler:channel处理类
其中options和attrs在例子中暂时没有表现出来,使用起来也不复杂,看具体方法即可。下面介绍一些需要关注的方法。
    public B channel(Class<? extends C> channelClass) {
        if (channelClass == null) {
            throw new NullPointerException("channelClass");
        }
        return channelFactory(new ReflectiveChannelFactory<C>(channelClass));
    }
这个方法可以看出,放入Channel.class之后,其实际上是通过一个工厂类生成的channel对象,ReflectiveChannelFactory的做法也十分的简单,就是通过反射的方式newInstance()了该类的一个对象。另外bootstrap还直接提供了一个channelFactory方法,从字段也可以看出我们需要的是一个channelFactory。
localAddress(..)该方法就是设置bind的方法监听的本地地址端口了,和bind()配合使用,bind(..)就是直接使用传入的地址,而不会管之前设置的localAddress。
最后介绍一下最重要的bind(address)方法,这个就是针对服务端的监听端口环节,看看这步究竟做了些什么事情:
    public ChannelFuture bind(SocketAddress localAddress) {
        validate();
        if (localAddress == null) {
            throw new NullPointerException("localAddress");
        }
        return doBind(localAddress);
    }

    private ChannelFuture doBind(final SocketAddress localAddress) {
        final ChannelFuture regFuture = initAndRegister();
        final Channel channel = regFuture.channel();
        if (regFuture.cause() != null) {
            return regFuture;
        }

        if (regFuture.isDone()) {
            // At this point we know that the registration was complete and successful.
            ChannelPromise promise = channel.newPromise();
            doBind0(regFuture, channel, localAddress, promise);
            return promise;
        } else {
            // Registration future is almost always fulfilled already, but just in case it's not.
            final PendingRegistrationPromise promise = new PendingRegistrationPromise(channel);
            regFuture.addListener(new ChannelFutureListener() {
                @Override
                public void operationComplete(ChannelFuture future) throws Exception {
                    Throwable cause = future.cause();
                    if (cause != null) {
                        // Registration on the EventLoop failed so fail the ChannelPromise directly to not cause an
                        // IllegalStateException once we try to access the EventLoop of the Channel.
                        promise.setFailure(cause);
                    } else {
                        // Registration was successful, so set the correct executor to use.
                        // See https://github.com/netty/netty/issues/2586
                        promise.registered();

                        doBind0(regFuture, channel, localAddress, promise);
                    }
                }
            });
            return promise;
        }
    }
1、先检验基础配置是否完成,主要关心两个内容:线程池和channelFactory。
2、通过channelFactory生成一个channel对象,并初始化(init(Channel),方法该方法是个抽象方法,子类完成初始化动作),失败关闭相关资源,之后将channel注册到线程池中(即线程池提供了注册channel的方法),失败一样清除相关资源。
3、如果前面成功,开始绑定端口地址,绑定失败自动关闭,这个就是由channel自身完成,channel.bind(address, promise)。
上面整个bind方法就完成了,主要注意的有以下几个内容:
1.启动类可以自己决定channel初始化的一些操作;
2.channel必须注册到线程池中,即线程池提供channel接入的入口;
3.具体的监听端口方法由channel自身实现;
其它的方法就无关紧要了,抽象父类需要关注的内容就这么点。
2.2 ServerBootstrap
该类是服务端的启动类,根据第三节所说的,为了区别处理服务端本身的监听端口channel和客户端的channel都使用了连接线程池。实际上不只是线程池,其继承抽象父类的都是服务端的相关内容,客户端的内容用另一组字段设置了,所以我们可以看到我们设置的handler是childHandler,服务端本身是不需要设置handler的。具体客户端相关设置如下:
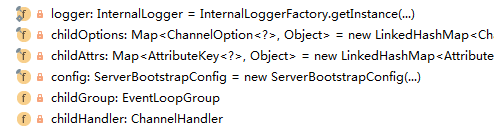
大部分都是针对child设置的内容,不需要一一解释,应该都能明白。
该类需要关注的方法只有一个,就是抽象父类交给子类实现的init方法,如何初始化channel?
    void init(Channel channel) throws Exception {
        final Map<ChannelOption<?>, Object> options = options0();
        synchronized (options) {
            setChannelOptions(channel, options, logger);
        }

        final Map<AttributeKey<?>, Object> attrs = attrs0();
        synchronized (attrs) {
            for (Entry<AttributeKey<?>, Object> e: attrs.entrySet()) {
                @SuppressWarnings("unchecked")
                AttributeKey<Object> key = (AttributeKey<Object>) e.getKey();
                channel.attr(key).set(e.getValue());
            }
        }

        ChannelPipeline p = channel.pipeline();

        final EventLoopGroup currentChildGroup = childGroup;
        final ChannelHandler currentChildHandler = childHandler;
        final Entry<ChannelOption<?>, Object>[] currentChildOptions;
        final Entry<AttributeKey<?>, Object>[] currentChildAttrs;
        synchronized (childOptions) {
            currentChildOptions = childOptions.entrySet().toArray(newOptionArray(childOptions.size()));
        }
        synchronized (childAttrs) {
            currentChildAttrs = childAttrs.entrySet().toArray(newAttrArray(childAttrs.size()));
        }

        p.addLast(new ChannelInitializer<Channel>() {
            @Override
            public void initChannel(final Channel ch) throws Exception {
                final ChannelPipeline pipeline = ch.pipeline();
                ChannelHandler handler = config.handler();
                if (handler != null) {
                    pipeline.addLast(handler);
                }

                ch.eventLoop().execute(new Runnable() {
                    @Override
                    public void run() {
                        pipeline.addLast(new ServerBootstrapAcceptor(
                                ch, currentChildGroup, currentChildHandler, currentChildOptions, currentChildAttrs));
                    }
                });
            }
        });
    }
1、首先就是设置channel的socket参数了,这个就是我们之前设置的option参数了。
2、就是设置属性了,这个属性就是与channel绑定的,也是之前设置的attr参数。
3、最后是关键的一步,获取了这个channel的pipeline,pipeline的概念channel那章再介绍,这里只需要了解对channel的管理都是通过pipeline完成的。之前我说过服务端不需要设置handler,并不意味着完全可以不要,这里就为服务端的channel设置了handler。我们可以想一下,如果不处理,如何对客户端的channel进行设置属性等内容呢。这里就在channel初始化的时候设置了ServerBootstrapAcceptor。
    public void channelRead(ChannelHandlerContext ctx, Object msg) {
            final Channel child = (Channel) msg;

            child.pipeline().addLast(childHandler);

            setChannelOptions(child, childOptions, logger);

            for (Entry<AttributeKey<?>, Object> e: childAttrs) {
                child.attr((AttributeKey<Object>) e.getKey()).set(e.getValue());
            }

            try {
                childGroup.register(child).addListener(new ChannelFutureListener() {
                    @Override
                    public void operationComplete(ChannelFuture future) throws Exception {
                        if (!future.isSuccess()) {
                            forceClose(child, future.cause());
                        }
                    }
                });
            } catch (Throwable t) {
                forceClose(child, t);
            }
     }
上述就是ServerBootstrapAcceptor的read方法,其做了如下操作:
1、设置handler
2、设置socket属性
3、设置attr
4、将channel注册到childGroup,客户端的线程池中。
这里可以推测一下相关逻辑了,因为read方法不是数据读取的时候才触发吗?根据JAVA NIO例子,这步应该出现在accept事件阶段,所以可以推测是该阶段调用了handler的read方法,传递了accept的客户端channel,在此对该channel进行处理,至于对不对,要后续解读代码进行验证(这个没错,简单说下,以NIO为例,主要逻辑在NioEventLoop调用的unsafe.read(),对于Server端而言是NioMessageUnsafe的read()方法,其调用了NioServerSocketChannel的doReadMessages方法,在buf中放入了accept的NioSocketChannel对象,再回到read()方法,通过pipeline调用fireChannelRead(buf[i]),这个会最终传导到handler,该handler接收到的不是byte而是一个客户端的channel对象,所以扩展连接方法的时候这段逻辑要非常注意)。但是通过上述说明,也就能明白服务端为什么不用设置handler了,因为能做的事情也就这些,除非你还有其他的事情要做,也许是统计多久有一个连接进来?这个没实验过,不过根据原理,应该可行,除非做了其他限制。
2.3 Bootstrap
最后一个我们客户端的设置。客户端与服务端最大的不同在于,其是connect而不是bind,而且其需要知道远程服务端的地址。所以客户端的字段多了如下内容:

远程地址,和翻译远程地址的resolver。由于客户端关注的是connect方法,而不是bind方法,我们重新对connect方法进行说明:
    private ChannelFuture doResolveAndConnect(final SocketAddress remoteAddress, final SocketAddress localAddress) {
        final ChannelFuture regFuture = initAndRegister();
        final Channel channel = regFuture.channel();

        if (regFuture.isDone()) {
            if (!regFuture.isSuccess()) {
                return regFuture;
            }
            return doResolveAndConnect0(channel, remoteAddress, localAddress, channel.newPromise());
        } else {
            // Registration future is almost always fulfilled already, but just in case it's not.
            final PendingRegistrationPromise promise = new PendingRegistrationPromise(channel);
            regFuture.addListener(new ChannelFutureListener() {
                @Override
                public void operationComplete(ChannelFuture future) throws Exception {
                    // Directly obtain the cause and do a null check so we only need one volatile read in case of a
                    // failure.
                    Throwable cause = future.cause();
                    if (cause != null) {
                        // Registration on the EventLoop failed so fail the ChannelPromise directly to not cause an
                        // IllegalStateException once we try to access the EventLoop of the Channel.
                        promise.setFailure(cause);
                    } else {
                        // Registration was successful, so set the correct executor to use.
                        // See https://github.com/netty/netty/issues/2586
                        promise.registered();
                        doResolveAndConnect0(channel, remoteAddress, localAddress, promise);
                    }
                }
            });
            return promise;
        }
    }
1、第一步和bind操作一样,创建一个channel,初始化这个channel(操作差不多,注册handler,设置socket参数,设置attr)注册到线程池中,失败就清除资源。
2、根据线程池获取resolver,对不同的连接,翻译不同的地址。
3、进行连接,调用channel提供的connect方法。
大体内容和server端差不多,这里不需要再增加额外的内容了,只需要使用抽象父类的字段就可以完成了。
3.后记
本节主要介绍了bootstrap包中的一些内容,即Netty启动的一些操作。主要内容如下:
1.客户端和服务端执行的逻辑不同,一个是connect一个是bind,但是最终都是通过channel来完成该操作的,即channel决定了连接的方式。
2.服务端不需要设置服务端的handler,其内置了一个ServerBoostrapAcceptor,主要设置了客户端的channel属性,这段逻辑最终也是由服务端的channel的read相关方法控制的,即服务端的channel,read方法接收的是一个channel而不是一个byte。
3.所有的channel都需要注册到EventLoop中。
以上几点内容都是与channel,EventLoop相关联了,所以特此提出,方便后续概念的相互验证,其具体做了哪些工作。