一、Client Credentials实例
①准备
安装模板,请打开控制台窗口,然后键入以下命令:
dotnet new -i IdentityServer4.Templates
安装后,会出现这么几个identityserver模板
查看模板
dotnet new
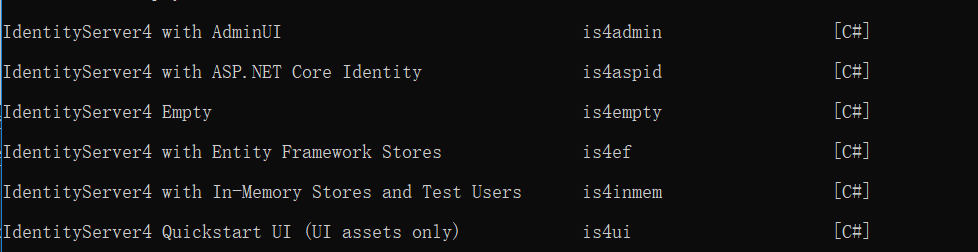
我们这里选择将信息放在内存里面的In-Memory Stores and Test Users模板
②创建In-Memory Stores and Test Users模板项目
dotnet new is4inmem --name myService
在config文件中会生成几个Client类别,本案例就试用
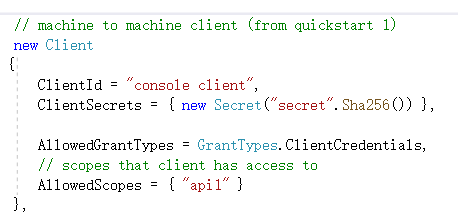
然后我们将服务的启动项端口设为5000
③创建客户端
编写一个请求访问令牌的客户端,创建一个控制台应用设置启动端口为5002
添加IdentityModel包
从元数据中读取实际的端点地址
// discover endpoints from metadata
var client = new HttpClient();
var disco = await client.GetDiscoveryDocumentAsync("http://localhost:5000");
if (disco.IsError)
{
    Console.WriteLine(disco.Error);
    return;
}
接下来,您可以使用发现文档中的信息向IdentityServer请求令牌以访问api1
// request token
var tokenResponse = await client.RequestClientCredentialsTokenAsync(new ClientCredentialsTokenRequest
{
    Address = disco.TokenEndpoint,

    ClientId = "client",
    ClientSecret = "secret",
    Scope = "api1"
});

if (tokenResponse.IsError)
{
    Console.WriteLine(tokenResponse.Error);
    return;
}

Console.WriteLine(tokenResponse.Json);
将访问令牌发送到API,访问api
// call api
var apiClient = new HttpClient();
apiClient.SetBearerToken(tokenResponse.AccessToken);

var response = await apiClient.GetAsync("http://localhost:5001/identity");
if (!response.IsSuccessStatusCode)
{
    Console.WriteLine(response.StatusCode);
}
else
{
    var content = await response.Content.ReadAsStringAsync();
    Console.WriteLine(JArray.Parse(content));
}
④定义API资源
创建一个api项目,设置启动端口为5001
添加一个名为的新类IdentityController
[Route("identity")]
[Authorize]
public class IdentityController : ControllerBase
{
    [HttpGet]
    public IActionResult Get()
    {
        return new JsonResult(from c in User.Claims select new { c.Type, c.Value });
    }
}
然后再控制器上面加上权限访问[Authorize]
最后一步是将身份验证服务添加到DI(依赖注入),并将身份验证中间件添加到管道。这些将:
- 验证传入令牌以确保它来自受信任的发行者
- 验证令牌是否可以与此API一起使用(也称为受众群体)
public class Startup
{
    public void ConfigureServices(IServiceCollection services)
    {
        services.AddControllers();

        services.AddAuthentication("Bearer")
            .AddJwtBearer("Bearer", options =>
            {
                options.Authority = "http://localhost:5000";
                options.RequireHttpsMetadata = false;

                options.Audience = "api1";
            });
    }

    public void Configure(IApplicationBuilder app)
    {
        app.UseRouting();

        app.UseAuthentication();
        app.UseAuthorization();

        app.UseEndpoints(endpoints =>
        {
            endpoints.MapControllers();
        });
    }
}
AddAuthentication将身份验证服务添加到DI并配置Bearer为默认方案。UseAuthentication将身份验证中间件添加到管道中,以便对主机的每次调用都将自动执行身份验证。UseAuthorization添加了授权中间件,以确保匿名客户端无法访问我们的API端点。
http://localhost:5001/identity在浏览器上导航至控制器应返回401状态代码。这意味着您的API需要凭据,并且现在受IdentityServer保护。
二、Authorization Code Flow保护MVC客户端实例
①创建mvc项目
修改startup文件,注册身份认证中间件
services.AddAuthentication(options =>
            {
                options.DefaultScheme = CookieAuthenticationDefaults.AuthenticationScheme;
                options.DefaultChallengeScheme = OpenIdConnectDefaults.AuthenticationScheme;
            })
                .AddCookie(CookieAuthenticationDefaults.AuthenticationScheme)
                .AddOpenIdConnect(OpenIdConnectDefaults.AuthenticationScheme, options =>
                {
                    options.SignInScheme = CookieAuthenticationDefaults.AuthenticationScheme;
                    //授权服务器地址
                    options.Authority = "http://localhost:5000";
                    //去掉https
                    options.RequireHttpsMetadata = false;
                    options.ClientId = "mvc client";
                    options.ClientSecret = "mvc secret";
                    options.SaveTokens = true;
                    options.ResponseType = "code";

                    options.Scope.Clear();
                    options.Scope.Add("api1");
                    options.Scope.Add(OidcConstants.StandardScopes.OpenId);
                    options.Scope.Add(OidcConstants.StandardScopes.Profile);
                    //options.Scope.Add(OidcConstants.StandardScopes.Email);
                    //options.Scope.Add(OidcConstants.StandardScopes.Phone);
                    //options.Scope.Add(OidcConstants.StandardScopes.Address);
                    options.Scope.Add(OidcConstants.StandardScopes.OfflineAccess);
                });
在Configure方法中调用
app.UseAuthentication();
放在mvc之前就行
然后对控制中的资源进行保护
在控制器前面加上验证[Authorize]
②在授权服务中添加Client
 // mvc client using code flow + pkce
                new Client
                {
                    ClientId = "mvc client",
                    ClientName = "MVC Client",
                    ClientSecrets = { new Secret("mvc secret".Sha256()) },
                    AllowedGrantTypes = GrantTypes.CodeAndClientCredentials,
                    //指定使用基于授权代码的授权类型的客户端是否必须发送校验密钥
                   // RequirePkce = true,
                    //RequireConsent = false, //禁用 确认授权那个consent 页面确认
                    //指定允许的URI以返回令牌或授权码
                    RedirectUris = { "http://localhost:5003/signin-oidc" },
                    //指定客户端的注销URI,以用于基于HTTP的前端通道注销
                    FrontChannelLogoutUri = "http://localhost:5003/signout-oidc",
                    //指定在注销后重定向到的允许URI
                    PostLogoutRedirectUris = { "http://localhost:5003/signout-callback-oidc" },
                    AllowOfflineAccess = true, // offline_access
                    AllowedScopes = {"api1",
                        IdentityServerConstants.StandardScopes.OpenId,
                        IdentityServerConstants.StandardScopes.Profile,
                        //IdentityServerConstants.StandardScopes.Email,
                        //IdentityServerConstants.StandardScopes.Phone,
                        //IdentityServerConstants.StandardScopes.Address,
                        IdentityServerConstants.StandardScopes.OfflineAccess
                    }

                },
github代码地址:https://github.com/LGXQWER/identityServerDEMO
参考文献:https://identityserver4.readthedocs.io/en/latest/quickstarts/1_client_credentials.html