声明:这篇文章是记录读书过程中的知识点,并加以归纳总结,成文。文中图片、代码出自《Netty in action》。
1. 为什么用Netty?
每个框架的流行,都一定有它出众的地方。Netty就是为了网络编程使用,它封装了大量的通讯的底层内容,简化开发者的工作量,让开发者的精力全都放于业务上,而且它能高效的处理网络通讯的东西。很多大的公司都使用Netty作为通讯框架,因此,使这个框架更加完善。
2. OIO(阻塞I/O)与NIO(非阻塞I/O)与AIO(异步I/O)
2.1 阻塞I/O
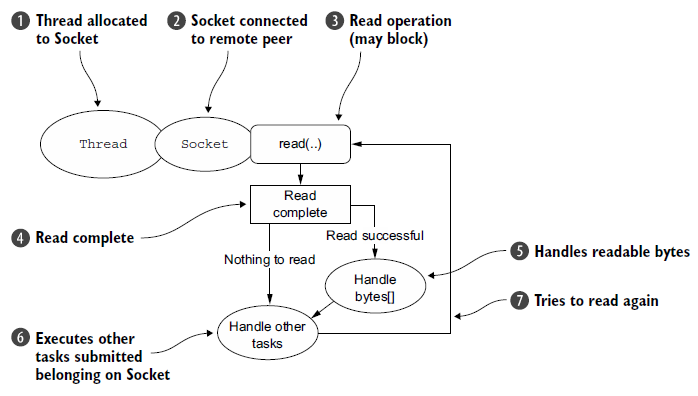
为什么叫阻塞I/O呢?因为每个线程对应一个连接,连接的建立、数据读取、写入,都会进行阻塞,所以叫阻塞I/O。
性能瓶颈:一个线程对应一个连接,当连接数量巨大时,线程数量过多,每个线程都需要内存,内存会被迅速耗尽,以及线程间切换的开销也十分巨大。另外,阻塞也是一个问题。accept()、read()、write()都会进行阻塞。
OIO线程模型:

处理逻辑:
2.2 非阻塞I/O
NIO三大组件:Buffer、Channel(数据来源或数据写入的目的地)、Selector(多路复用器)
开启Selector方式:Selector selector = Selector.open();
注册的四种事件:SelectionKey.OP_READ(可读)、SelectionKey.OP_WRITE(可写)、SelectionKey.OP_CONNECT(建立起连接)、SelectionKey.OP_ACCEPT(接收连接)
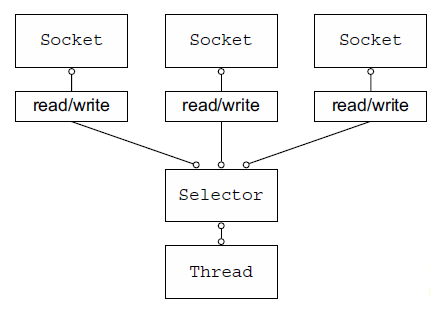
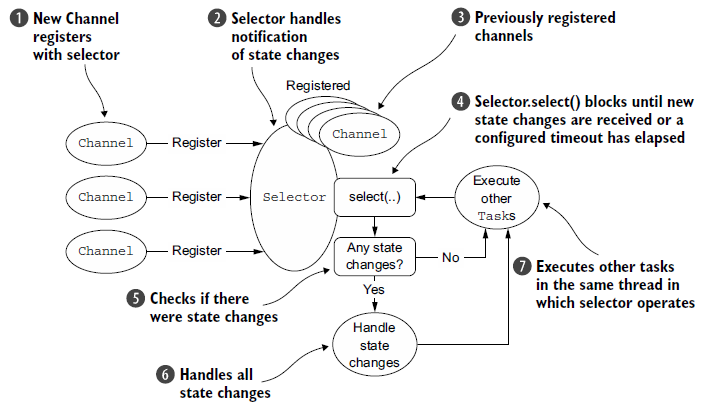
为什么叫非阻塞I/O呢?它不阻塞了吗?不是的。是因为,使用Selector对多个并发的连接进行轮询(也就是用更少的线程监视更多的连接),通过事件驱动来查明哪些可以进行I/O,不必等待到操作的结束。
NIO线程模型:
处理逻辑:
2.3 异步I/O
在NIO的基础上,AIO可以让效率有更多的提高。AIO是基于回调和事件驱动,当异步方法提交任务后可以立即返回,由线程池负责来执行任务,当任务完成后可以立即通知给任务的提交者。异步I/O的目的,主要为了控制线程数量,减少过多的线程带来的内存消耗和CPU在线程调度上的开销。
异步I/O的使用方式有两种,一种是Future,另一种是回调函数。
2.3.1 Future
它代表异步计算的结果。
 1 interface ArchiveSearcher { String search(String target); }
 2  class App {
 3    ExecutorService executor = ...
 4    ArchiveSearcher searcher = ...
 5    void showSearch(final String target)
 6        throws InterruptedException {
 7      Future<String> future
 8        = executor.submit(new Callable<String>() {
 9          public String call() {
10              return searcher.search(target);
11          }});
12      displayOtherThings(); // do other things while searching
13      try {
14        displayText(future.get()); // use future  这里会进行阻塞,一直到计算的完成
15      } catch (ExecutionException ex) { cleanup(); return; }
16    }
17  }
在Future这里,还要提到FutreTask这个类,它可以包装Callable和Runnable的对象,此外,因为它继承Runnable接口,所以它可以被提交给Executor来执行。
2.3.2 回调函数 CompletionHandler
CompletionHandler它是一个处理器,用于异步计算结果。有两个方法,completed(V result, A attachment)(执行成功时调用)和failed(Throwable exc, A attachment)(执行失败时调用)。在下列地方,都有使用CompletionHandler作为回调函数的方法:
AsynchronousFileChannel 类的 read(ByteBuffer dst, long position, A attachment, CompletionHandler<Integer,? super A> handler)
AsynchronousServerSocketChannel类的 accept(A attachment, CompletionHandler<AsynchronousSocketChannel,? super A> handler)
AsynchronousSocketChannel 类的 read(ByteBuffer dst, A attachment, CompletionHandler<Integer,? super A> handler)
3. ByteBuf
Java NIO中提供ByteBuffer作为byte的容器,在Netty中,使用ByteBuf来替代ByteBuffer。ByteBuf功能更强大,更加灵活。Netty对于数据的处理主要是通过两个组件,抽象类ByteBuf和接口ByteBufHolder。
3.1 ByteBuf使用方式
HEAP BUFFERS 存储JVM的堆数据
1 ByteBuf heapBuf = ...;
2 if (heapBuf.hasArray()) {
3 byte[] array = heapBuf.array();
4 int offset = heapBuf.arrayOffset() + heapBuf.readerIndex();
5 int length = heapBuf.readableBytes();
6 handleArray(array, offset, length);
7 }
DIRECT BUFFERS
这里的Direct该如何理解呢?它是ByteBuf的一种形式,在使用JNI的时候,它避免了将buffer的内容复制到中间媒介buffer上,可以直接使用。这就是DIrect的说明。
在JavaDoc中,关于ByteBuffer有明确的说明:direct buffers会处于正常的垃圾回收之外,因此,它非常适用于网络传输方面。如果你的数据保留在heap-buffer上面,那么socket传输前,要将buffer复制到direct buffer上。至于,它的不足之处,在于使用direct buffer的时候,必须先复制一份。代码如下:
1 ByteBuf directBuf = ...;
2 if (!directBuf.hasArray()) {
3 int length = directBuf.readableBytes();
4 byte[] array = new byte[length];
5 directBuf.getBytes(directBuf.readerIndex(), array);
6 handleArray(array, 0, length);
7 }
COMPOSITE BUFFERS 就是前面两种的结合
3.2 接口ByteBufHolder
在保存实际数值的时候,常需要保存一些附加的值。比如:Http返回的例子,除了返回的实际内容外,还有status code,cookies等等。
Netty用ByteBufholder来提供一些共通的方法使用,它有几个常用的方法:content()、copy()、duplicate()
如果你要实现一个在ByteBuf中存储实际负载的对象的话,那么ByteBufHolder是个好的选择。
3.3 ByteBuf allocation
这里讨论的是ByteBuf实例的管理。
3.3.1 On-demand: interface ByteBufAllocator
ByteBufAllocator 常见方法(部分记录):buffer()、heapBuffer()、directBuffer()、compositeBuffer()、ioBuffer()
Netty用ByteBufAllocator实现了缓存池。我们可以通过Channel或是绑定在ChannelHandler上的ChannelHandlerContext,来获得ByteBufAllocator的引用。示例如下:
1 Channel channel = ...;
2 ByteBufAllocator allocator = channel.alloc();
3 ....
4 ChannelHandlerContext ctx = ...;
5 ByteBufAllocator allocator2 = ctx.alloc();
ByteBufAllocator有两种实现:PooledByteBufAllocator 和 UnpooledByteBufAllocator 前者会进行缓存;后者,不会缓存ByteBuf的实例,每次调用都会返回新的。
3.3.2 Unpooled buffers
Netty有一个Unpooled的类,来提供静态方法,用于创建未被缓存ByteBuf实例。
常用的方法:buffer()、directBuffer()、wrappedBuffer()、copiedBuffer()
3.4 Reference counting
Reference counting被用来优化内存的使用,通过释放不再使用的资源。Netty中的Reference counting 和 ByteBufHolder 都实现了ReferenceCounted接口。ReferenceCounted的实现的实例,它们的活跃的实例的计数都是从1进行的,只要大于0,对象就一定不会被释放。当数字减为0时,资源就会被释放。下面给出两个例子:
Reference counting:
1 Channel channel = ...;
2 ByteBufAllocator allocator = channel.alloc();
3 ....
4 ByteBuf buffer = allocator.directBuffer();
5 assert buffer.refCnt() == 1;
Release reference-counted object
1 ByteBuf buffer = ...;
2 boolean released = buffer.release();   // 活跃的引用,变成0,对象被释放,方法返回true
4. ChannelHandler 和 ChannelPipline
4.1 The ChannelHandler family
4.1.1 Channel 生命周期
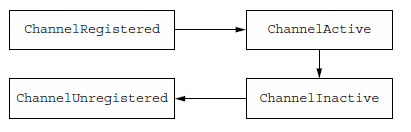
ChannelRegistered:Channel被注册到EventLoop
ChannelActive: Channel活跃,可以发送、接收数据
ChannelInactive:Channel没有连接到remote peer
ChannelUnregistered:Channel被创建了,但没被注册到EventLoop
4.1.2 ChannelHandler
先看看它的接口层次图:
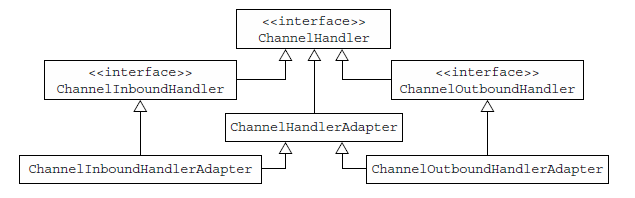
ChannelHandler 生命周期的方法:handlerAdded(ChannelHandler被加入到ChannelPipeline时调用)、handlerRemoved(被移除时)、exceptionCaught(ChannelPipeline的处理过程中发生exception时调用)
ChannelInboundHandler
处理inbound数据和Channel状态的改变
常用方法:channelRegistered、channelActive、channelReadComplete、channelRead 等等
看一段代码:
1 @Sharable       //这里的注解的意思是,这个handler可以被加到多个ChannelPipelines中
2 public class DiscardHandler extends ChannelInboundHandlerAdapter {
// 当继承ChannelInboundHandler,覆盖channelRead时,需要明确地释放缓存的实例
3 @Override
4 public void channelRead(ChannelHandlerContext ctx, Object msg) {
5 ReferenceCountUtil.release(msg);
6  }
7 }
看另一个例子:
1 @Sharable
2 public class SimpleDiscardHandler       // SimpleDiscardHandler 会自动释放资源
3 extends SimpleChannelInboundHandler<Object> {
4 @Override
5 public void channelRead0(ChannelHandlerContext ctx,
6 Object msg) {
7 // 不需要任何明确地释放资源的操作,这里只需做业务处理就可以
8 }
9 }
注意:如果一个message被使用或是丢弃,并且没有被传给管道中下一个ChannelOutboundHandler时,就一定要调用ReferenceCountUtil.release() 释放资源。如果消息到达实际传输层,那么,write或是Channel关闭时,会自动释放资源。
ChannelOutboundHandler:处理outbound数据,并允许所有操作的拦截
常见方法:bind、connect、disconnect、close 等
ChannelHandlerAdapter有一个isSharable()方法,判断是否有注解@Sharable
4.1.3 Resource management
无论是ChannelInboundHandler.channelRead()还是ChannelOutboundHandler.write(),都需要确保没有资源泄露。当你使用ByteBuf之后,需要调整引用的计数reference count。为了帮助诊断潜在的问题,Netty提供了一个ResourceLeakDetector,检测到泄漏时,会打印log。
使用方法:java -Dio.netty.leakDetectionLevel=ADVANCED
参数有四种:DISABLED、SIMPLE(default)、ADVANCED、PARANOID
4.2 ChannelPipeline接口
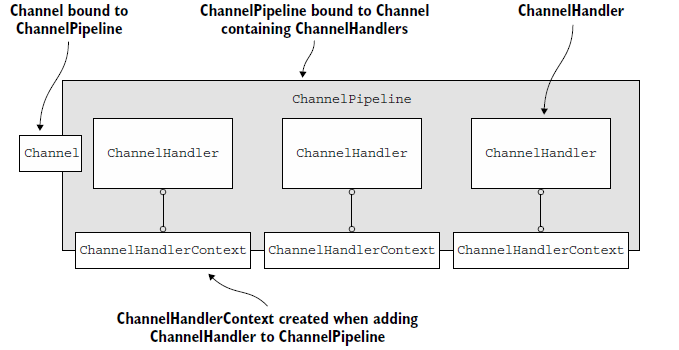
每个新Channel创建时,都会被指定一个新的ChannelPipeline,这种对应关系是永久的,不会改变。
ChannelPipeline 和 ChannelHandlers 关系图:

ChannelPipeline一些常用方法:
addLast、addFirst、remove、replace、get、context(获得绑定在ChannelHandler上的ChannelHandlerContext)、names(获得ChannelPipeline上的所有ChannelHandler名字)
4.3 ChannelHandlerContext接口
4.3.1 ChannelHandlerContext的使用
它的主要作用就是管理handlers之间的交互。
常见API:bind、channel、close、connect、deregister、fireChannelActive、fireChannelRead、handler、pipeline、read、write 等等
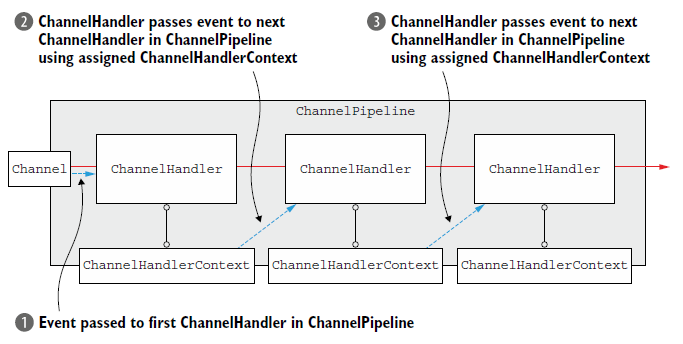
ChannelHandlerContext的使用,如下图:
每个ChannelHandler都是和一个ChannelHandlerContext相互关联,关联关系一直不会改变,因此,缓存一个它的引用很安全。
下面看2个代码片段:
 1 ChannelHandlerContext ctx = ..;
 2 Channel channel = ctx.channel();   // 从ChannelHandlerContext关联到Channel
 3 channel.write(Unpooled.copiedBuffer("Netty in Action",
 4 CharsetUtil.UTF_8));
 5
 。。。
 9 ChannelHandlerContext ctx = ..;
10 ChannelPipeline pipeline = ctx.pipeline();  // 从ChannelHandlerContext 关联到 ChannelPipeline
11 pipeline.write(Unpooled.copiedBuffer("Netty in Action", 12 CharsetUtil.UTF_8));
上面代码中,虽然Channel 或是 ChannelPipeline 调用的write()方法,代理了pipline中事件的传递,实际上,ChannelHandler之间的传递是ChannelHandlerContext来做的。
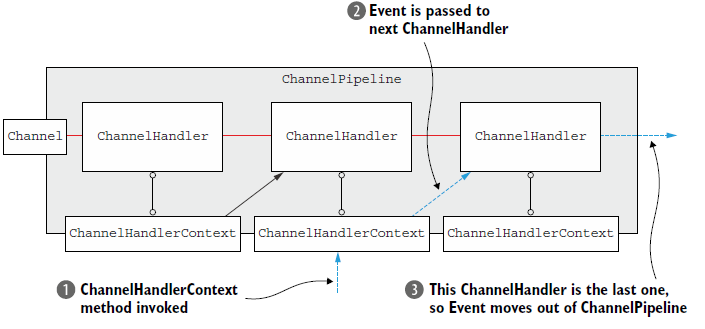
如果你想从某个handler开始(不是从第一个开始),那么就可以利用ChannelHandlerContext。
1 ChannelHandlerContext ctx = ..;       // 获取ChannelHandlerContext的引用
2 ctx.write(Unpooled.copiedBuffer("Netty in Action", CharsetUtil.UTF_8));   //write() sends the buffer to the next ChannelHandler
4.3.2 ChannelHandler 和ChannelHandlerContext 的高级用法
6.3.2。。。
5 EventLoop 和 threading model
5.1 EventLoop接口
首先看一下EventLoop的层次结构:
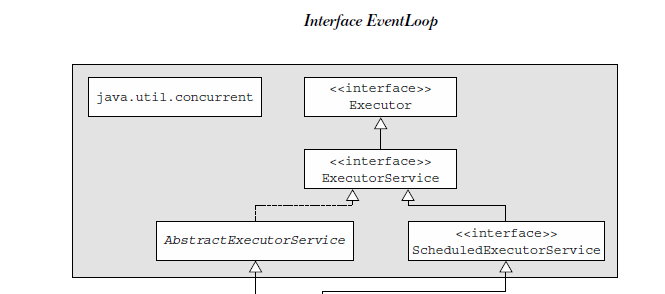

注意,EventLoop继承了ScheduledExecutorService,定义了唯一的接口parent()。
1 public interface EventLoop extends EventExecutor, EventLoopGroup {
2 @Override
3 EventLoopGroup parent();  // 作用是返回当前EventLoop实现的实例所属的EventLoopGroup的引用
4 }
5.1.1 I/O and event handling in Netty 4
在Netty 4 中,所有的I/O和Event都是交由指定给EventLoop的thread来处理的。
5.1.2 I/O operations in Netty 3
这部分原文没看懂。。


 1 The threading model used in previous releases guaranteed only that inbound (previously
 2 called upstream) events would be executed in the so-called I/O thread (corresponding
 3 to Netty 4’s EventLoop). All outbound (downstream) events were handled
 4 by the calling thread, which might be the I/O thread or any other. This seemed a good
 5 idea at first but was found to be problematical because of the need for careful synchronization
 6 of outbound events in ChannelHandlers. In short, it wasn’t possible to
 7 guarantee that multiple threads wouldn’t try to access an outbound event at the same
 8 time. This could happen, for example, if you fired simultaneous downstream events
 9 for the same Channel by calling Channel.write() in different threads.
10 Another negative side effect occurred when an inbound event was fired as a result
11 of an outbound event. When Channel.write() causes an exception, you need to
12 generate and fire an exceptionCaught event. But in the Netty 3 model, because this
13 is an inbound event, you wound up executing code in the calling thread, then handing
14 the event over to the I/O thread for execution, with a consequent additional context
15 switch.
16 The threading model adopted in Netty 4 resolves these problems by handling
17 everything that occurs in a given EventLoop in the same thread. This provides a simpler
18 execution architecture and eliminates the need for synchronization in the Channel-
19 Handlers (except for any that might be shared among multiple Channels).
20 Now that you understand the role of the EventLoop, let’s see how tasks are scheduled
21 for execution.
5.2 Task scheduling
5.2.1 JDK scheduling API
用ScheduledExecutorService来定时执行任务
 1 ScheduledExecutorService executor =
 2 Executors.newScheduledThreadPool(10);
 3 ScheduledFuture<?> future = executor.schedule(    // 这个方法是延迟执行,仅执行一次
 4 new Runnable() {
 5 @Override
 6 public void run() {
 7 System.out.println("60 seconds later");
 8 }
 9 }, 60, TimeUnit.SECONDS);
10 ...
11 executor.shutdown();
书中记载ScheduledExecutorService的使用,比较直接,但是在高负载下,性能较低,没有Netty的好。那么,关于这一点,Netty好在哪里?有待确认。
5.2.2 Scheduling tasks using EventLoop
定期执行一次
1 Channel ch = ...
2 ScheduledFuture<?> future = ch.eventLoop().schedule(
3 new Runnable() {
4 @Override
5 public void run() {
6 System.out.println("60 seconds later");
7 }
8 }, 60, TimeUnit.SECONDS);
定期重复执行多次
1 Channel ch = ...
2 ScheduledFuture<?> future = ch.eventLoop().scheduleAtFixedRate(
3 new Runnable() {
4 @Override
5 public void run() {
6 System.out.println("Run every 60 seconds");
7 }
8 }, 60, 60, TimeUnit.Seconds);
5.3 Implementation details
5.3.1 线程的管理:
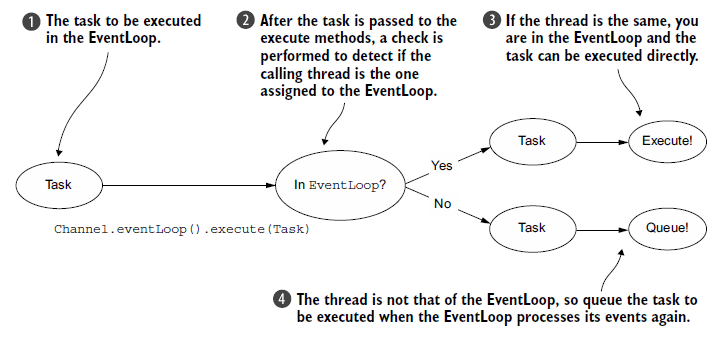
EventLoop的执行逻辑
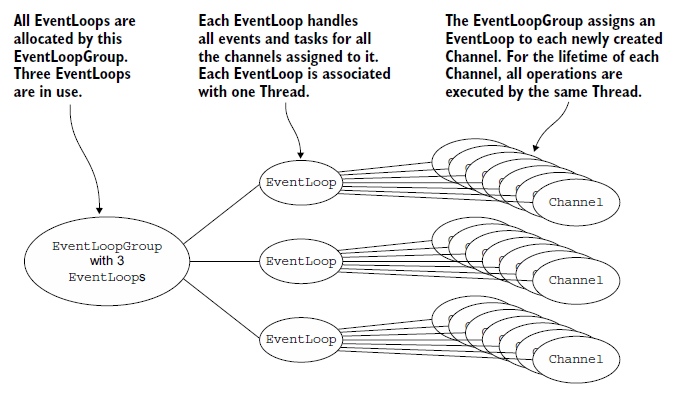
5.3.2 EventLoop/thread allocation
对于非阻塞传输时,EventLoop的分配:
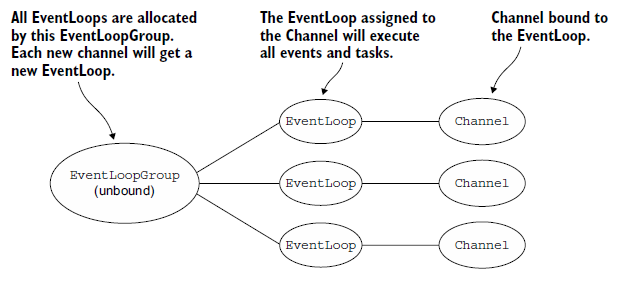
阻塞传输时,EventLoop的分配:
8 BootStrapping
To be continued!!!