基于JWT实现SSO
在淘宝( https://www.taobao.com )上点击登录,已经跳到了 https://login.taobao.com,这是又一个服务器。只要在淘宝登录了,就能直接访问天猫(https://www.tmall.com)了,这就是单点登录了。
淘宝、天猫都是一家的公司,所以呢希望用户在访问淘宝时如果在淘宝上做了登录,当在访问或者从淘宝跳转到天猫时,直接就处于登录状态而不用再次登录,用户体验大大的好。
结合OAuth协议,相比就是如下的流程图,应用A就相当于淘宝,应用B就相当于天猫,【认证服务器】就是淘宝天猫的 登录服务器。我们想要实现的效果就是:
在应用A上,如果用户访问了需要登录的服务,引导用户到认证服务器上做登录,登录后返回要访问的服务,如果此时再访问应用B,在应用B也处于登录状态,这样当访问应用B上受保护的服务时,就可以不用再登录了,这就是sso。
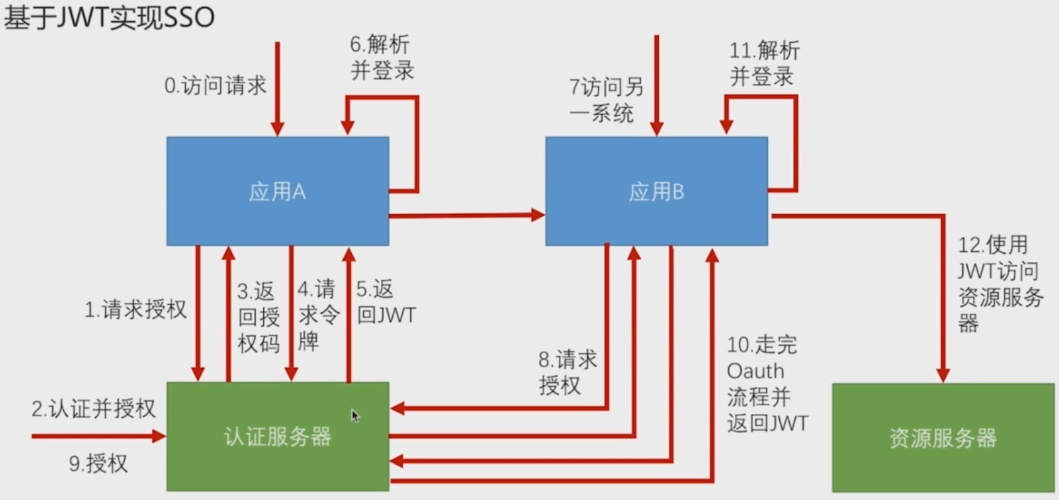
1,当在应用A上访问需要登录才能访问的服务时,会引导用户到认证服务器
2,用户在认证服务器上做认证并授权
3,认证成功并授权后,认证服务器返回授权码给应用A
4,应用A带着授权码请求令牌
5,认证服务器返回JWT
6,应用A解析JWT,用用户信息构建Authentication放在SecurityContext,做登录
7,此时访问应用B ,仍是未授权的状态
8,应用B请求认证服务器授权
9,认证服务器此时已经知道当前用户是谁的,要求用户去授权可以用登录信息去访问应用B
10,发给应用B 一个新的JWT,和应用A得到的JWT字符串是不一样的,但是解析出来的用户信息是一样的
11,然后用用户信息构建Authentication放在SecurityContext,完成在应用B的登录
最终的效果就是,用户在认证服务器上只做了一次登录,应用A和应用B分别使用两个JWT解析出用户信息,构建Authentication,放在SecurityContext,都做了登录,应用A、B的session里都有了用户信息,用户既可以访问应用A,也可以访问应用B,用的身份是一样的。
12,如果是前后端分离的,配置成资源服务器,拿着JWT去访问你的服务。
具体实现
初步项目结构:
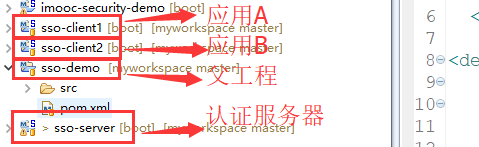
1,配置认证服务器sso-server:
AuthorizationServerConfig:这里就先写死了,可以自定义成配置文件
/**
 * 认证服务器
 * ClassName: AuthorizationServerConfig
 * @Description: TODO
 * @author lihaoyang
 * @date 2018年3月16日
 */
@Configuration
@EnableAuthorizationServer
public class AuthorizationServerConfig extends AuthorizationServerConfigurerAdapter{

    @Override
    public void configure(ClientDetailsServiceConfigurer clients) throws Exception {
        clients.inMemory()
            .withClient("imooc1")
            .secret("imoocsecrect1")
            .authorizedGrantTypes("authorization_code", "refresh_token")
            .scopes("all")
            .and()
            .withClient("imooc2")
            .secret("imoocsecrect2")
            .authorizedGrantTypes("authorization_code", "refresh_token")
            .scopes("all");
    }


    @Bean
    public TokenStore jwtTokenStore() {
        return new JwtTokenStore(jwtAccessTokenConverter());
    }

    /**
     * 给JWT加签名
     * @Description: 给JWT加签名
     * @param @return
     * @return JwtAccessTokenConverter
     * @throws
     * @author lihaoyang
     * @date 2018年3月16日
     */
    @Bean
    public JwtAccessTokenConverter jwtAccessTokenConverter(){
        JwtAccessTokenConverter converter = new JwtAccessTokenConverter();
        converter.setSigningKey("imooc");
        return converter;
    }


    @Override
    public void configure(AuthorizationServerEndpointsConfigurer endpoints) throws Exception {
        endpoints.tokenStore(jwtTokenStore()).accessTokenConverter(jwtAccessTokenConverter());
    }

    @Override
    public void configure(AuthorizationServerSecurityConfigurer security) throws Exception {
        //其他应用要访问认证服务器的tokenKey(就是下边jwt签名的imooc)的时候需要经过身份认证,获取到秘钥才能解析jwt
        security.tokenKeyAccess("isAuthenticated()");
    }


}
application.properties:默认用户名user,配置密码为123456
server.port = 9999
server.context-path = /server
security.user.password =123456  #密码
2,client1:@EnableOAuth2Sso 注解开启sso ,一个注解全搞定
/**
 *
 * ClassName: SsoCient1Application
 * @Description: TODO
 * @author lihaoyang
 * @date 2018年3月16日
 */
@SpringBootApplication
@RestController
@EnableOAuth2Sso
public class SsoClient1Application {

    @GetMapping("/user")
    public Authentication  user(Authentication  user){
        return user;
    }

    public static void main(String[] args) {
        SpringApplication.run(SsoClient1Application.class, args);
    }
}
配置:
security.oauth2.client.clientId = imooc1
security.oauth2.client.clientSecret = imoocsecrect1
#认证地址
security.oauth2.client.user-authorization-uri = http://127.0.0.1:9999/server/oauth/authorize
#获取token地址
security.oauth2.client.access-token-uri = http://127.0.0.1:9999/server/oauth/token
#拿认证服务器密钥解析jwt
security.oauth2.resource.jwt.key-uri = http://127.0.0.1:9999/server/oauth/token_key

server.port = 8080
server.context-path =/client1
client2:
/**
 *
 * ClassName: SsoCient1Application
 * @Description: TODO
 * @author lihaoyang
 * @date 2018年3月16日
 */
@SpringBootApplication
@RestController
@EnableOAuth2Sso
public class SsoClient2Application {

    @GetMapping("/user")
    public Authentication  user(Authentication  user){
        return user;
    }

    public static void main(String[] args) {
        SpringApplication.run(SsoClient2Application.class, args);
    }
}
配置
security.oauth2.client.clientId = imooc2
security.oauth2.client.clientSecret = imoocsecrect2
security.oauth2.client.user-authorization-uri = http://127.0.0.1:9999/server/oauth/authorize
security.oauth2.client.access-token-uri = http://127.0.0.1:9999/server/oauth/token
security.oauth2.resource.jwt.key-uri = http://127.0.0.1:9999/server/oauth/token_key

server.port = 8060
server.context-path =/client2
页面:
在client1和client2的resource目录下,新建static目录,新建index页,作为client1和client2之间,可以相互跳转的页面
client1:
<!DOCTYPE html>
<html>
<head>
<meta charset="UTF-8">
<title>SSO Client1</title>
</head>
<body>
    <h1>SSO Demo Client1</h1>
    <a href="http://127.0.0.1:8060/client2/index.html">访问Client2</a>
</body>
</html>
client2:
<!DOCTYPE html>
<html>
<head>
<meta charset="UTF-8">
<title>SSO Client2</title>
</head>
<body>
    <h1>SSO Demo Client2</h1>
    <a href="http://127.0.0.1:8080/client1/index.html">访问Client1</a>
</body>
</htm
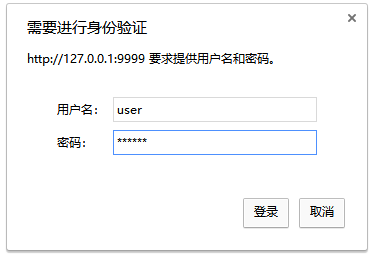
启动sso-server、sso-client1、 sso-client2,访问client1 :
localhost:8080/client1,直接跳转到了配置的认证服务器认证地址,可以看到,url里携带了一些client1配置的参数
client_id=imooc1 客户端id,response_type=code 授权码模式,

提示spring security默认的登录页,输入默认用户名user,密码123456
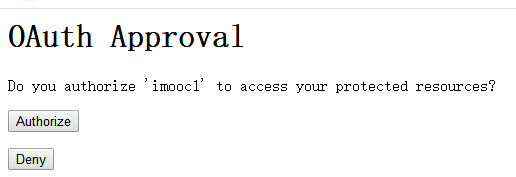
提示是否同意给client1授权,这个是默认配置,后续版本需要去除这一步。点击同意授权
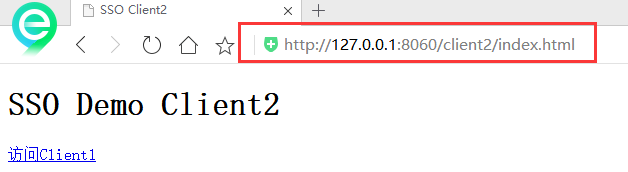
访问到client1的index页:

点击跳转到client2连接,可以看到直接跳转到了认证服务器,提示是否同意给client2授权,此时 redirect_uri=http://127.0.0.1:8060/client2/login ,是client2

同意授权
再访问client1时,也会提示是否授权,再同意之后,就可以相互访问了。
访问 http://127.0.0.1:8080/client1/user 查看当前用户信息:
{
  "authorities":[
    {
      "authority":"ROLE_USER"
    }
  ],
  "details":{
    "remoteAddress":"127.0.0.1",
    "sessionId":"318DF6369A3279AB037C2528F79A42A5",
    "tokenValue":"eyJhbGciOiJIUzI1NiIsInR5cCI6IkpXVCJ9.eyJleHAiOjE1MjE0OTQ0ODUsInVzZXJfbmFtZSI6InVzZXIiLCJhdXRob3JpdGllcyI6WyJST0xFX1VTRVIiXSwianRpIjoiMzlkODIxZTUtMTA5Yy00MjNlLWJlZDQtNmY5YTIwMTQ2MzQ3IiwiY2xpZW50X2lkIjoiaW1vb2MxIiwic2NvcGUiOlsiYWxsIl19.zlimgyRCvwShZBcbKGcEfsUY0RlgPRqqeDLx8zRIDoQ",
    "tokenType":"bearer",
    "decodedDetails":null
  },
  "authenticated":true,
  "userAuthentication":{
    "authorities":[
      {
        "authority":"ROLE_USER"
      }
    ],
    "details":null,
    "authenticated":true,
    "principal":"user",
    "credentials":"N/A",
    "name":"user"
  },
  "principal":"user",
  "credentials":"",
  "oauth2Request":{
    "clientId":"imooc1",
    "scope":[
      "all"
    ],
    "requestParameters":{
      "client_id":"imooc1"
    },
    "resourceIds":[

    ],
    "authorities":[

    ],
    "approved":true,
    "refresh":false,
    "redirectUri":null,
    "responseTypes":[

    ],
    "extensions":{

    },
    "grantType":null,
    "refreshTokenRequest":null
  },
  "clientOnly":false,
  "name":"user"
}
访问 http://127.0.0.1:8060/client2/user 查看 client2的登录用户信息:
{
  "authorities":[
    {
      "authority":"ROLE_USER"
    }
  ],
  "details":{
    "remoteAddress":"127.0.0.1",
    "sessionId":"EC7AD91E31A22B5B1806B86868C0F912",
    "tokenValue":"eyJhbGciOiJIUzI1NiIsInR5cCI6IkpXVCJ9.eyJleHAiOjE1MjE0OTQ0ODMsInVzZXJfbmFtZSI6InVzZXIiLCJhdXRob3JpdGllcyI6WyJST0xFX1VTRVIiXSwianRpIjoiMWFkMWI5N2QtNzAwZS00MzEwLWI4MmYtNmRiZmI1NWViNjIzIiwiY2xpZW50X2lkIjoiaW1vb2MyIiwic2NvcGUiOlsiYWxsIl19.YNCaXP8lOdDa_GeOjnGsc9oIGqm1VJbEas5_g8x3m7o",
    "tokenType":"bearer",
    "decodedDetails":null
  },
  "authenticated":true,
  "userAuthentication":{
    "authorities":[
      {
        "authority":"ROLE_USER"
      }
    ],
    "details":null,
    "authenticated":true,
    "principal":"user",
    "credentials":"N/A",
    "name":"user"
  },
  "credentials":"",
  "principal":"user",
  "clientOnly":false,
  "oauth2Request":{
    "clientId":"imooc2",
    "scope":[
      "all"
    ],
    "requestParameters":{
      "client_id":"imooc2"
    },
    "resourceIds":[

    ],
    "authorities":[

    ],
    "approved":true,
    "refresh":false,
    "redirectUri":null,
    "responseTypes":[

    ],
    "extensions":{

    },
    "grantType":null,
    "refreshTokenRequest":null
  },
  "name":"user"
}

©2014 JSON.cn All right reserved. 京I
可以看到。认证服务器给 client1和client2 返回的jwt 是不一样的,但是解析出来的都是 user 用户。说明这两个jwt 包含的信息是一样的。
上边的流程还存在问题。
1,sso-server 认证服务器的登录页是Spring Security 默认的弹框
2,在sso-server上登录后,当跳转到client1的服务时,还会弹出授权页面
3,在第一次访问 client1 和 client2 时,也会弹出授权页面
这些是不友好的,下边开始改造。
1,配置为表单登录
配置ss-server
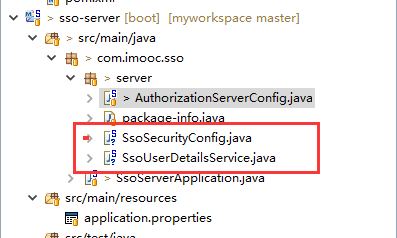
SsoUserDetailsService :是覆盖spring默认的登录方式,使用自定义的 loadUserByUsername 来登录
/**
 * 配置自己的登录,findByUsername而不是spring默认的user
 * ClassName: SsoUserDetailsService
 * @Description: TODO
 * @author lihaoyang
 * @date 2018年3月20日
 */
@Component
public class SsoUserDetailsService implements UserDetailsService{

    @Autowired
    private PasswordEncoder passwordEncoder;


    @Override
    public UserDetails loadUserByUsername(String username) throws UsernameNotFoundException {

        return new User(username,  // 用户名
                        passwordEncoder.encode("123456") , //密码
                        AuthorityUtils.commaSeparatedStringToAuthorityList("ROLE_USER"));//权限集合

    }

}
SsoSecurityConfig:告诉spring使用自己的登录方式,配置密码加密器,配置那些服务需要认证等
@Configuration
public class SsoSecurityConfig extends WebSecurityConfigurerAdapter{

    @Autowired
    private UserDetailsService userDetailsService;

    //密码加密解密
    @Bean
    public PasswordEncoder passwordEncoder(){
        return new BCryptPasswordEncoder();
    }

    /**
     * 配置登录方式等
     */
    @Override
    protected void configure(HttpSecurity http) throws Exception {

        http.formLogin() //表单登录
            .and()
            .authorizeRequests() //所有请求都需要认证
            .anyRequest()
            .authenticated();
    }

    /**
     * 告诉AuthenticationManager ,使用自己的方式登录时 【查询用户】和密码加密器
     */
    @Override
    protected void configure(AuthenticationManagerBuilder auth) throws Exception {
        auth.userDetailsService(userDetailsService).passwordEncoder(passwordEncoder());
    }
}
此时启动应用,登录页就变了,就成了想要表单登录,如果想自定义表单请看以前的文章

2,去掉点击授权按钮步骤
授权是Oauth协议的一部分,不能够去掉,Spring默认的授权是一个表单,让用户点击授权按钮,想要去除这个过程,思路就是在代码里找到这个表单,写一段js代码让表单自动提交,就不需要用户点击了。
实际上这段代码是在WhitelabelApprovalEndpoint 类里的:
红色部分就是授权的表单,使用css让表单隐藏,写个js自动提交表单
/**
 * Controller for displaying the approval page for the authorization server.
 *
 * @author Dave Syer
 */
@FrameworkEndpoint
@SessionAttributes("authorizationRequest")
public class WhitelabelApprovalEndpoint {

    @RequestMapping("/oauth/confirm_access")
    public ModelAndView getAccessConfirmation(Map<String, Object> model, HttpServletRequest request) throws Exception {
        String template = createTemplate(model, request);
        if (request.getAttribute("_csrf") != null) {
            model.put("_csrf", request.getAttribute("_csrf"));
        }
        return new ModelAndView(new SpelView(template), model);
    }

    protected String createTemplate(Map<String, Object> model, HttpServletRequest request) {
        String template = TEMPLATE;
        if (model.containsKey("scopes") || request.getAttribute("scopes") != null) {
            template = template.replace("%scopes%", createScopes(model, request)).replace("%denial%", "");
        }
        else {
            template = template.replace("%scopes%", "").replace("%denial%", DENIAL);
        }
        if (model.containsKey("_csrf") || request.getAttribute("_csrf") != null) {
            template = template.replace("%csrf%", CSRF);
        }
        else {
            template = template.replace("%csrf%", "");
        }
        return template;
    }

    private CharSequence createScopes(Map<String, Object> model, HttpServletRequest request) {
        StringBuilder builder = new StringBuilder("<ul>");
        @SuppressWarnings("unchecked")
        Map<String, String> scopes = (Map<String, String>) (model.containsKey("scopes") ? model.get("scopes") : request
                .getAttribute("scopes"));
        for (String scope : scopes.keySet()) {
            String approved = "true".equals(scopes.get(scope)) ? " checked" : "";
            String denied = !"true".equals(scopes.get(scope)) ? " checked" : "";
            String value = SCOPE.replace("%scope%", scope).replace("%key%", scope).replace("%approved%", approved)
                    .replace("%denied%", denied);
            builder.append(value);
        }
        builder.append("</ul>");
        return builder.toString();
    }

    private static String CSRF = "<input type='hidden' name='${_csrf.parameterName}' value='${_csrf.token}' />";

    private static String DENIAL = "<form id='denialForm' name='denialForm' action='${path}/oauth/authorize' method='post'><input name='user_oauth_approval' value='false' type='hidden'/>%csrf%<label><input name='deny' value='Deny' type='submit'/></label></form>";

    private static String TEMPLATE = "<html><body><h1>OAuth Approval</h1>"
            + "<p>Do you authorize '${authorizationRequest.clientId}' to access your protected resources?</p>"
            + "<form id='confirmationForm' name='confirmationForm' action='${path}/oauth/authorize' method='post'><input name='user_oauth_approval' value='true' type='hidden'/>%csrf%%scopes%<label><input name='authorize' value='Authorize' type='submit'/></label></form>"
            + "%denial%</body></html>";

    private static String SCOPE = "<li><div class='form-group'>%scope%: <input type='radio' name='%key%'"
            + " value='true'%approved%>Approve</input> <input type='radio' name='%key%' value='false'%denied%>Deny</input></div></li>";

}
@FrameworkEndpoint 注解和RestController的功能类似,里边可以写@RequestMapping 来处理某个请求,
但是RestController 的优先级比@FrameworkEndpoint 高,如果有两个@RequestMapping 的映射路径一样,Spring会优先执行RestController 的。
所以想要覆盖这个类的功能,要做的就是复制一份,把@FrameworkEndpoint 换成@RestController ,然后改造。
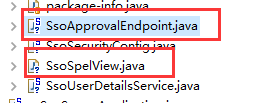
copy一份 WhitelabelApprovalEndpoint,命名为SsoApprovalEndpoint,将 @FrameworkEndpoint 换为 RestController ,里边 用到一个类SpelView,这个类不是public的,默认别的包用不了,所以这个也需要整一份,命名为SsoSpelView
表单部分代码:
<html>
    <body>
        <div style='display:none'>
            <h1>OAuth Approval</h1>"
            + "<p>Do you authorize '${authorizationRequest.clientId}' to access your protected resources?</p>"
            + "<form id='confirmationForm' name='confirmationForm' action='${path}/oauth/authorize' method='post'>
                <input name='user_oauth_approval' value='true' type='hidden'/>%csrf%%scopes%
                <label><input name='authorize' value='Authorize' type='submit'/></label>
            </form>"
+ "%denial%</div></body><script>document.getElementById('confirmationForm').submit();</script></html>
这样有点简单粗暴,效果就是授权页一闪而过,可以优化优化。
具体代码在github:https://github.com/lhy1234/spring-security