一、RESTful介绍
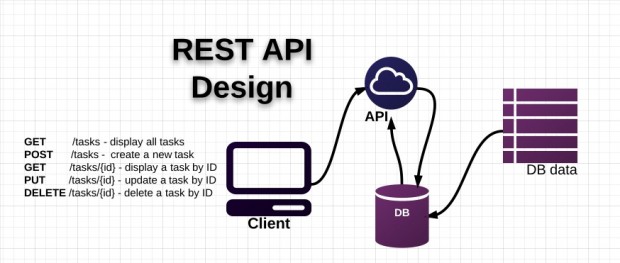
REST(表征性状态传输,Representational State Transfer)是Roy Fielding博士在2000年他的博士论文中提出来的一种软件架构风格。RESTful风格的设计不仅具有更好的可读性(Human Readable),而且易于做缓存以及服务器扩展(scalability)。REST风格体现在URL设计上:
- 每个URL对应一个资源
- 对资源的不同操作对应于HTTP的不同方法
- 资源表现形式(representation)通过Accept和Content-Type指定
符合REST设计风格的Web API称为RESTful API。它从以下三个方面资源进行定义:
- 直观简短的资源地址:URI,比如:http://example.com/resources/。
- 传输的资源:Web服务接受与返回的互联网媒体类型,比如:JSON,XML,YAML等。
- 对资源的操作:Web服务在该资源上所支持的一系列请求方法(比如:POST,GET,PUT或DELETE)。
二、$resource介绍和使用
A factory which creates a resource object that lets you interact with RESTful server-side data sources.
$resource服务主要用来处理使用RESTful编写后台的接口进行数据交互。
- high level: $resource service
- low level:$http service
语法格式:
$resource(url, [paramDefaults], [actions], options);
$resource()根据actions对象的不同,默认一共有提供一下5个方法,开发者可以进行重名覆盖:
{
    "get": {
        "method": "GET"
    }, //一般用于获取某个资源
    "query": {
        "method": "GET",
        "isArray": true
    }, //一般用于获取资源列表,以数组形式返回
    "save": {
        "method": "POST"
    }, //一般用于保存某个资源,有可能是新建的资源,也有可能是更新现有的资源
    "remove": {
        "method": "DELETE"
    } //一般用于删除某个资源delete: {"method": 'DELETE'}一般用于删除某个资源
}
demo:
为资源建立一个Factory:
var blogModule = angular.module('blogModule', ['ngResource']);

blogModule.factory('BlogResource', ['$resource',
    function ($resource) {
        return $resource(serverUrl + "/api/blog/:id", {}, {
            get: { method: 'GET', cache: false, isArray: false },
            save: { method: 'POST', cache: false, isArray: false },
            update: { method: 'PUT', cache: false, isArray: false },
            delete: { method: 'DELETE', cache: false, isArray: false }
        });
    }]);
CRUD操作
blogModule.controller('BlogListCtrl', ['$scope', 'BlogResource',
    function($scope, BlogResource) {

        BlogResource.get({}, function (response) {
            $scope.blogList = response;
        }, function (error) {
            console.log("Error:" + JSON.stringify(error));
        });
        //返回数据

        // $scope.blogList = [
        //     {
        //         "id": 1,
        //         "date": 1400623623107,
        //         "introText": "This is a blog post about AngularJS. We will cover how to build",
        //         "blogText": "This is a blog post about AngularJS. We will cover how to build a blog and how to add comments to the blog post."
        //     },
        //     {
        //         "id": 2,
        //         "date": 1400267723107,
        //         "introText": "In this blog post we will learn how to build applications based on REST",
        //         "blogText": "In this blog post we will learn how to build applications based on REST web services that contain most of the business logic needed for the application."
        //     }
        // ];
    }]);
blogModule.controller('BlogDetailCtrl', ['$scope', '$routeParams', 'BlogResource',
    function($scope, $routeParams, BlogResource) {


        var blogId = $routeParams.id;

        BlogResource.get({ id: blogId }, function (response) {
            $scope.blogEntry = response;
        }, function (error) {
            console.log("Error:" + JSON.stringify(error));
        });

    }]);
新建博客
//新建博客控制器
blogModule.controller('NewBlogPostCtrl', ['$scope', '$routeParams', 'BlogResource', function ($scope, $routeParams, BlogResource) {
    $scope.submit=function(){

        var postData={
            "introText":$scope.introText,
            "blogText":$scope.blogText,
            "languageId":1
        };
        var blogId=Date.now();

        BlogResource.save({ id: blogId },postData,function(response){
            console.log("Success:"+JSON.stringify(response));
        },function(errorResponse){
            console.log("Error:"+JSON.stringify(errorResponse));
        });
    }
}]);
ps:前后端代码都写好之后,上传到Github上。http://angularjsblog.duapp.com/ 后端是Node.js编写。