http://blog.ipodmp.com/archives/php-write-a-mini-smarty-template-engine/
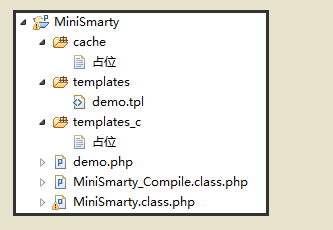
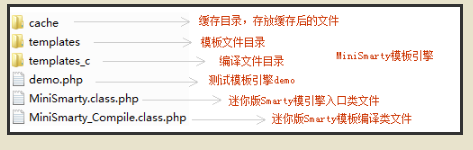
迷你版Smarty模板引擎目录结构如下:
① 要开发一个模板引擎,最主要的有两个类,分别是模板引擎入口类和模板解析类。
A.首先创建MiniSmarty目录,然后新建一个文件名为MiniSmarty.class.php
其代码如下:
<?php
//MiniSmarty模板引擎
class MiniSmarty {
//模板文件
public $template_dir = 'templates';
//编译文件
public $compile_dir = 'templates_c';
// 缓存文件
public $cache_dir = 'cache';
// 模板变量
public $_tpl_var = array();
// 是否开启缓存
public $caching = false;
public function __construct() {
$this->checkDir();
}
//检查目录是否建好
private function checkDir() {
if(!is_dir($this->template_dir)) {
exit('模板文件目录 templates 不存在!请手动创建');
}
if(!is_dir($this->compile_dir)) {
exit('编译模板 templates_c不存在!请手动创建');
}
if(!is_dir($this->cache_dir)) {
exit('缓存文件目录 cache 不存在!请手动创建' );
}
}
//模板变量注入方法
public function assign($tpl_var, $var = null) {
if(isset($tpl_var) && !empty($tpl_var)) {
$this->_tpl_var[$tpl_var] = $var;
}else {
exit('模板变量没有设好!');
}
}
//文件编译
public function display($file) {
//模板文件
$tpl_file = $this->template_dir . '/' . $file;
if(!file_exists($tpl_file)) {
exit('Error: 模板文件不存在!');
}
//编译文件
$parse_file = $this->compile_dir . '/' . md5($file) . $file . '.php';
//只有当编译文件不存在或者是模板文件被修改过了
//才重新编译文件
if(!file_exists($parse_file) || filemtime($parse_file) < filemtime($tpl_file)) {
include_once('MiniSmarty_Compile.class.php');
$compile = new MiniSmarty_Compile($tpl_file);
$compile->parse($parse_file);
}
//开启了缓存才加载缓存文件,否则直接加载编译文件
if($this->caching) {
//缓存文件
$cache_file = $this->cache_dir . '/' . md5($file) . $file . '.html';
//只有当缓存文件不存在,或者编译文件已被修改过
//重新生成缓存文件
if(!file_exists($cache_file) || filemtime($cache_file) < filemtime($parse_file)) {
//引入缓存文件
include_once($parse_file);
//缓存内容
$content = ob_get_clean();
//生成缓存文件
if(!file_put_contents($cache_file, $content)) {
exit('缓存文件生成出错!');
}
}
//载入缓存文件
include_once($cache_file);
}else {
//载入编译文件
include_once($parse_file);
}
}
}
B.然后再新建一个MiniSmarty模板引擎解析器类文件:MiniSmarty_Compile.class.php
其代码如下:
<?php
// MiniSmarty模板引擎
class MiniSmarty_Compile {
//模板内容
private $content = '';
public function __construct($tpl_file) {
$this->content = file_get_contents($tpl_file);
}
//解析普通变量,如把{$name}解析成$this->_tpl_var['name']
public function parseVar() {
$pattern = '/{$([wd]+)}/i';
if(preg_match($pattern, $this->content)) {
$this->content = preg_replace($pattern, '<?php echo $this->_tpl_var["$1"]?>', $this->content);
}
}
//这里可以自定义其他解析器...
//模板编译
public function parse($parse_file) {
//调用普通变量解析器
$this->parseVar();
//这里可以调用其他解析器...
//编译完成后,生成编译文件
if(!file_put_contents($parse_file, $this->content)) {
exit('编译出错!');
}
}
}
C.最后,还必须新建几个目录,分别是模板文件目录templates、编译文件目录 template_c、缓存文件目录cache。
D.编写demo.php,测试一下自定义的迷你版MiniSmarty模板引擎吧!
demo.php代码如下:
<?php
//引入模板引擎
require_once('MiniSmarty.class.php');
//实例化模板类
$minismarty = new MiniSmarty();
//缓存开关
//$minismarty->caching = true;
$webname = 'Smarty测试';
$author = 'lin3615';
$title = '这是测试标题';
$content = '这是测试内容';
$minismarty->assign('webname', $webname);
$minismarty->assign('author', $author);
$minismarty->assign('title', $title);
$minismarty->assign('content', $content);
//启动编译模板文件
$minismarty->display('demo.tpl');
demo.tpl 中示例如下:
{$webname}
<h3>{$title} </h3>
<span>作者:{$author}</span>
<p>内容:{$content}</p>
运行测试:可以修改上面的示例变量和是否开启缓存:
运行后,图如下: