调用钉钉API发消息
一、自动获取access_token
#!/usr/bin/env python
# -*- coding: utf-8 -*-
# 2017-8-20 钉钉API发送消息

import urllib, urllib2
import requests
import json
import os
import sys

'''
钉钉管理后台 : http://open-dev.dingtalk.com
CorpId       : 企业应用ID
secrect      : corpSecret管理列表下面 企业应用的凭证密钥
'''
corpid = ''
secrect = ''

#获取access_token
def getToken():
    url          = 'https://oapi.dingtalk.com/gettoken?corpid=%s&corpsecret=%s' % (corpid, secrect)
    req          = urllib2.Request(url)
    result       = urllib2.urlopen(req)
    access_token = json.loads(result.read())
    return access_token['access_token']

#默认情况下第一次创建群组 并获取群组id chatid并写入文件里
def getChatid(access_token):
    file_name = "/tmp/.chatid"
    #判断群组id文件是否存在
    if not os.path.exists(file_name):
        url = 'https://oapi.dingtalk.com/chat/create?access_token=%s' % access_token
        '''
        name : 群组名字
        owner: 群主userid
        useridlist: 群成员userId列表 也可以写群主userid
        '''
        data = {
                "name": "test1",
                "owner": "manager302",
                "useridlist": ["manager302"]
        }
        data   = json.dumps(data)
        req    = requests.post(url, data)
        chatid = json.loads(req.text)['chatid']
        with open(file_name,'w') as fd:
            fd.write(chatid)
    else:
        with open(file_name) as fd:
            chatid = fd.read()
    return chatid

#access_token 访问令牌 chatid 群组id content 发送的内容
def tonews(access_token, chatid, content):
    '''
    chatid  : 群组id
    msgtype : 类型
    content : 内容
    '''
    url    = "https://oapi.dingtalk.com/chat/send?access_token=%s" % access_token
    msgtype = 'text'
    values  = {
               "chatid": chatid,
               "msgtype": msgtype,
               msgtype: {
                   "content": content
               }
    }
    values = json.dumps(values)
    data   = requests.post(url, values)
    errmsg = json.loads(data.text)['errmsg']
    if errmsg == 'ok':
        return "ok"
    return "fail: %s" % data.text

if __name__ == '__main__':
    access_token = getToken()
    chatid = getChatid(access_token)
    content = '\\\\n'.join(sys.argv[1:])
    if not content:
        content = '测试'
    print tonews(access_token, chatid, content)
二、手动配置access_token
1、创建群聊
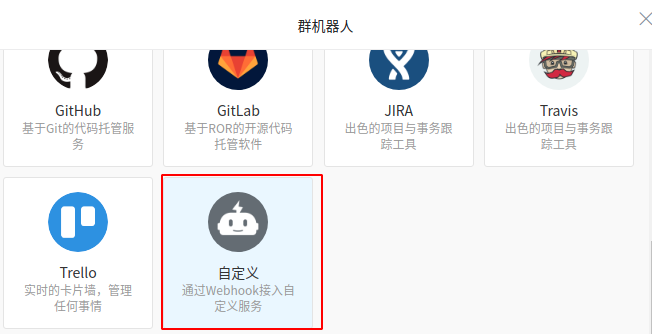
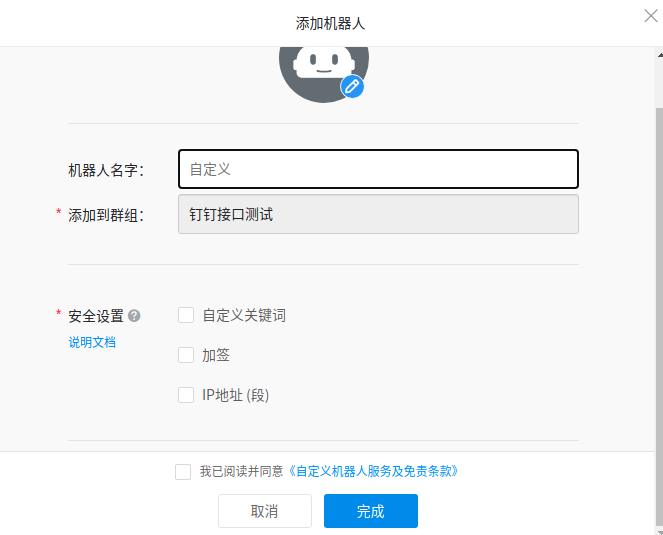
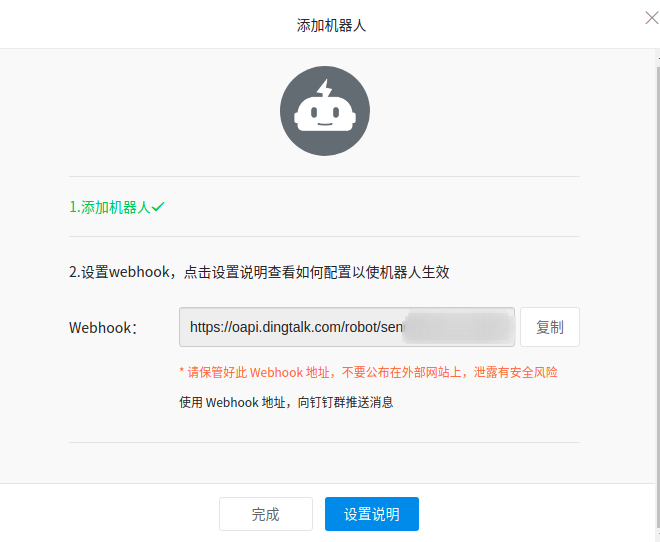
2、添加群机器人

# !/usr/bin/env python3
# -*coding:utf-8 -*-

import datetime
import json
import urllib.request

# 你的钉钉机器人url(Webhook对应的url)
my_url = "https://oapi.dingtalk.com/robot/send?access_token=123asefasdrqwer12341241sadfaserfaer12312341234"


def send_request(url, datas):
    # 传入url和内容发送请求
    # 构建一下请求头部
    header = {
        "Content-Type": "application/json",
        "Charset": "UTF-8"
    }
    sendData = json.dumps(datas)  # 将字典类型数据转化为json格式
    sendDatas = sendData.encode("utf-8")  # python3的Request要求data为byte类型
    # 发送请求
    request = urllib.request.Request(url=url, data=sendDatas, headers=header)
    # 将请求发回的数据构建成为文件格式
    opener = urllib.request.urlopen(request)
    # 打印返回的结果
    print(opener.read())


def main():
    my_data = {
        "msgtype": "markdown",
        "markdown": {"title": "123",
                     "text": " "
                     },
        "at": {
            "isAtAll": True
        }
    }

    my_Copywriting = '## 123
 %s' % '12312312312'

    # 把消息内容写入请求数据中
    my_data["markdown"]["text"] = my_Copywriting

    # 发送消息
    send_request(my_url, my_data)


if __name__ == "__main__":
    main()